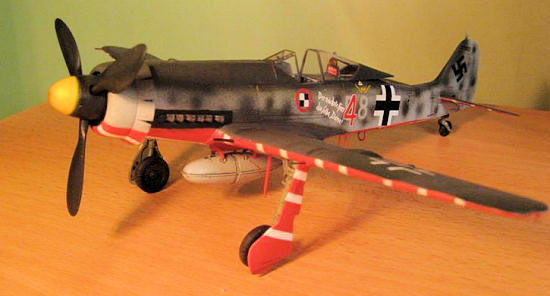
ProModeler 1/48 FW-190D-11
| KIT #: | 5969 |
| PRICE: | $ |
| DECALS: | Two Options |
| REVIEWER: | Lee Fogel |
| NOTES: | A good but incomplete step forward for a D-11. Dragon molds |
| HISTORY |
The Fw 190 series of aircraft is regarded by many as one of the finest piston-engine fighters of World War II. For some modelers the definitive version of this aircraft is the D series. The amazing variety of markings and variants makes for both passionate building and a unique looking model every time you build one. The aircraft of JV 44 hold a special interest for many modelers especially the Me 262 Protection Focke Wulfs.
| THE KIT |
Awhile back I traded for the Monogram
Pro Modeler Fw 190D-11 release.
Based on the Trimaster molds I had read a few reviews
about the kit and they were generally favorable.
But it does have a few faults that keep it from being a
100% correct representation of this fighter.
 -Initial
Assessment-
-Initial
Assessment-
Opening up the box we find the old Trimaster kit and a few new additions. These molds have seen quite a bit of use and they reflect this. There is plenty of flash and scarring on the plastic. The plug for the new D-11 tail section has been grafted onto the Trimaster fuselage molds. This area needs a bit of sanding to streamline it to the fuselage halves. The lower wing panel has had the Mk 108 cannon cover molded into the wing. However there is a mold line from the insert and this requires a bit of sanding to make it flush with the wing panels. Monogram also molded a new gun cover/upper cowling to reflect the lack of cowling guns. Perhaps the biggest change is the lack of any PE fret. Monogram replicated the PE parts in plastic and most of these parts, in my opinion, lack the finesse of the PE versions. The instructions are borderline adequate and have some odd color call outs for the camouflage. The decal sheet looks very nice with excellent print quality and choices for two aircraft.
| CONSTRUCTION |
 The following day I mated the fuselage and wing
assemblies.
The starboard side wing root had a pretty decent sized gap that I
filled with super glue.
The rest of the fit is pretty good with few gaps
elsewhere.
There is a small step on the port side of the wing where the
lower and upper halves join.
I think that the alignment pins on that side may have
gotten worn down due to the heavy use of these molds over time.
This area will require some clean up and rescribing.
I also added the horizontal stabs at this juncture of
the build.
They went on fine and fit very well.
The following day I mated the fuselage and wing
assemblies.
The starboard side wing root had a pretty decent sized gap that I
filled with super glue.
The rest of the fit is pretty good with few gaps
elsewhere.
There is a small step on the port side of the wing where the
lower and upper halves join.
I think that the alignment pins on that side may have
gotten worn down due to the heavy use of these molds over time.
This area will require some clean up and rescribing.
I also added the horizontal stabs at this juncture of
the build.
They went on fine and fit very well.
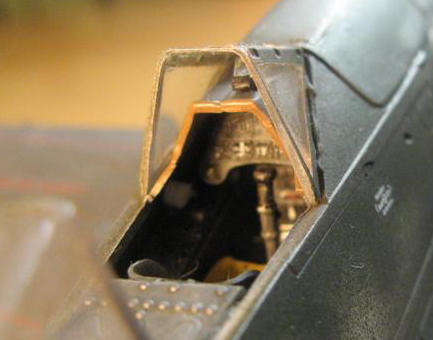
The remaining parts were added in preparation for painting. These included the drop tank/bomb rack, antenna, pitot tube, main landing gear and boarding step. The landing gear was painted RLM 02 and the main wheel hubs flat black and dry brushed lightly with RLM 66. I assembled the canopy slide and headrest and painted this and the inside of the canopy Model Master RLM 66. The assembly procedure for this is another area in the directions that are vague. I assembled this in the canopy as it helped to line things up easiest with them in place. Make sure to pay close attention so that everything lines up inside of the canopy.
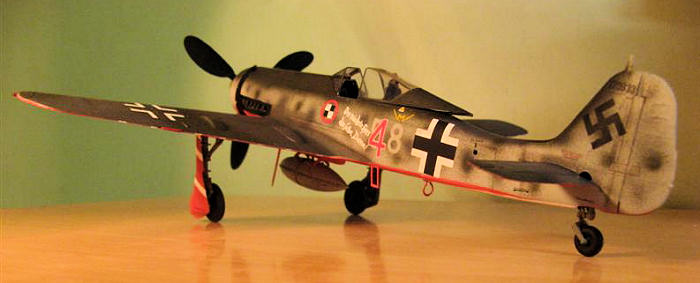
| COLORS & MARKINGS |
The canopy was masked off with Bare
Metal Foil and attached to the airframe.
After much debate I decided to use the kit supplied
white stripes instead of painting them.
I then put down a base coat of MM flat white.
I did this to get a proper base coat for the
 RLM 23
“Rote” paint.
The MM RLM 23 looks a bit too “pink” in my opinion so I made a
mixture using 2/3rd
MM RLM 23 and
1/3rd
Testors Flat Red.
I like the results and it went on with no issue.
I then very carefully masked off the red areas in
preparation for the RLM 74/75/76 scheme.
I used Floquil enamels for the remaining colors.
Avoid the instruction sheet callouts for the camouflage
colors as they seem suspect.
(Note:
I found all kinds of information on the colors of the
Papagei Staffel Ds and to be honest I’m not sure that my model is 100% accurate.
I found enough variations and interpretations that I am
just living with what I applied).
Also, something to keep in mind when building a Papagei
Staffel 190D is that the stripes were not 100% uniform.
So, whether you paint them or use decals don’t fret if
one of more of the white stripes are not 100% uniform with the rest.
The plane was then set aside and was given a coat of
gloss in preparation for decals.
RLM 23
“Rote” paint.
The MM RLM 23 looks a bit too “pink” in my opinion so I made a
mixture using 2/3rd
MM RLM 23 and
1/3rd
Testors Flat Red.
I like the results and it went on with no issue.
I then very carefully masked off the red areas in
preparation for the RLM 74/75/76 scheme.
I used Floquil enamels for the remaining colors.
Avoid the instruction sheet callouts for the camouflage
colors as they seem suspect.
(Note:
I found all kinds of information on the colors of the
Papagei Staffel Ds and to be honest I’m not sure that my model is 100% accurate.
I found enough variations and interpretations that I am
just living with what I applied).
Also, something to keep in mind when building a Papagei
Staffel 190D is that the stripes were not 100% uniform.
So, whether you paint them or use decals don’t fret if
one of more of the white stripes are not 100% uniform with the rest.
The plane was then set aside and was given a coat of
gloss in preparation for decals.
The decals are very cleanly printed.
The colors are very good, on register and the white is
opaque enough to use the ID stripes over the red paint.
However, the decal instructions are pretty shoddy.
There are eight decals (mostly
stencils) that are not accounted for and there is a pair of
stripes (#69) that are not shown at all.
It’s best to use what references that you may have and
use the decal sheet as an addendum and for stripe placement.
A few of the stripes are short and need to be touched
up.
I used MM Flat White for this and it matched perfectly.
The decals respond very well to Solvaset and will take
plenty of poking and prodding in getting them in place.
The wing walk stripes do need to be trimmed as they are
all too long.
Included are the cuts I made for each stripe:
#42 (and
#57)-remove three red blocks
#59-Remove three
red blocks
#58-Cut in half
and use one half for each wing placement
#56-Remove eight
red blocks
Overall this is a terrific decal sheet.
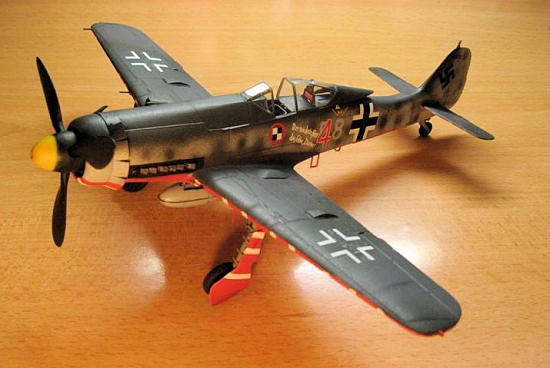
The prop blades were painted with
Floquil RLM 70 and the hub detailed with black and silver paints.
The spinner was painted Floquil RLM 70 with the front of
it 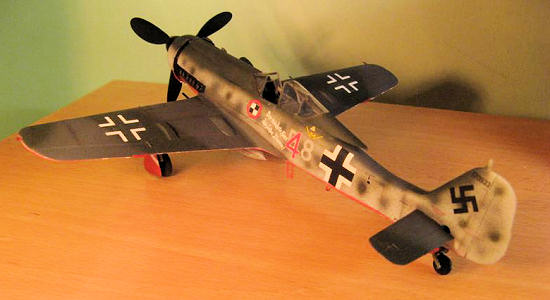 being
painted Floquil RLM 04.
This appears to be a bit sloppy in the pictures I have
seen of this airframe.
Therefore I did not paint it “perfect” and it’s slightly
off-center on purpose.
You have to guess a bit at the proper blade pitch as
there are no positive location pins on the blades.
The drop tank was attached to give a bit of contrast to
the RLM 23 underside.
The last additions were the gun barrels and these were
painted MM flat black and the dry-brushed with Testors steel.
The canopy was attached in the open position by sliding
it into place.
being
painted Floquil RLM 04.
This appears to be a bit sloppy in the pictures I have
seen of this airframe.
Therefore I did not paint it “perfect” and it’s slightly
off-center on purpose.
You have to guess a bit at the proper blade pitch as
there are no positive location pins on the blades.
The drop tank was attached to give a bit of contrast to
the RLM 23 underside.
The last additions were the gun barrels and these were
painted MM flat black and the dry-brushed with Testors steel.
The canopy was attached in the open position by sliding
it into place.
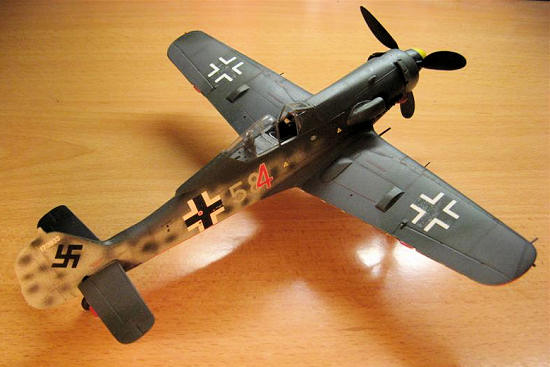
Weathering consisted of using Formula P3 Armor Wash for an oily wash on the drop tank and main gear. For panel lines, exhaust, gear bays, wheels and gun residue I used my trusty set of chalk pastels and a .07 Pentel mechanical pencil. The landing lights were painted using Tamiya clear red and green. I specifically left the underside very clean due to the limited time that this airframe saw day to day action. The topside was also lightly weathered but a bit more so than the underside.
| CONCLUSIONS |
 Well, if
you are familiar with the old Trimaster/DML/Dragon molds then this kit is like
seeing an old friend.
However the small PE fret is sorely missed.
I’ve put too many of these kits together over the years
and just am biased a bit on this point.
The fit is still pretty decent especially for the
mileage these molds have seen.
Well, if
you are familiar with the old Trimaster/DML/Dragon molds then this kit is like
seeing an old friend.
However the small PE fret is sorely missed.
I’ve put too many of these kits together over the years
and just am biased a bit on this point.
The fit is still pretty decent especially for the
mileage these molds have seen.
Is this a definitive D-11? Unfortunately it is not. Can the problems listed above be corrected by the builder? Absolutely, especially if you choose to go aftermarket to replace the incorrect cowling cover and intake scoop. This is not a completely accurate D-11 out of the box but it is a good start and with a bit of work can be made into a very presentable replica. I recommend this kit but do stress that it needs the accuracy issues to be addressed. And, if possible, I would compliment the instructions/stencil placement with a copy from a Trimaster/DML/Dragon kit.
| REFERENCES |
German Aircraft Cockpits 1911-1970,
Cohausz, Peter W., Schiffer Publishing, 2003. ISBN: 0-7643-1873-X, pp 176-177
The Great Book of World War II Airplanes,
Grinsell, Robert, Zokeisha Publications, 1984.
ISBN: 0-517-459930, pp 501-502.
Osprey Modeling Manuals 20: Focke-Wulf
Fw 190, Sommerville,
Donald (series editor), Osprey Publishing, 2002.
ISBN: 1 84176 268 7, pp 33-43, 48-51.
Osprey Masterclass: World War 2
Luftwaffe Fighter Modeling,
Coughlin, Geoff, Osprey Publishing, 2000.
ISBN: 1-84176-060-9
Experten Decals: History, Camouflage,
and Markings of JV 44 and JG 6 Fock-Wulf 190D-9s No.48-1,
Brown, David E. and Wadman, David, Halifax printing, 1993.
ISBN: 0-9696819-0-9-1495
 Experten
Decals: History, Camouflage, and Markings of JV 44 and JG 6 Fock-Wulf 190D-9s
No.48-1 Addendum,
Brown, David E. and Wadman, David, Halifax printing, 2003.
*Note: addendum sheet found on
www.stormbirds.com
Experten
Decals: History, Camouflage, and Markings of JV 44 and JG 6 Fock-Wulf 190D-9s
No.48-1 Addendum,
Brown, David E. and Wadman, David, Halifax printing, 2003.
*Note: addendum sheet found on
www.stormbirds.com
Experten
Decals: History, Camouflage, and Markings of JV 44, JG 6 and JG 1 Fock-Wulf
190Ds No.48-3, Brown, David E. and Wadman, David, Halifax
printing, 1995.
ISBN: 0-9696819-0-11-1595
Experten Decals: History, Camouflage,
and Markings of JV 44, JG 6 and JG 1 Fock-Wulf 190Ds No.48-3,
Brown, David E. and Wadman, David, Halifax printing, 2003.
*Note: addendum sheet found on
www.stormbirds.com
http://www.ipmsstockholm.org/magazine/2002/10/stuff_eng_dacoba_fw190d.htm
November 2009
If you would like your product reviewed fairly and quickly, please contact me or see other details in the Note to Contributors.