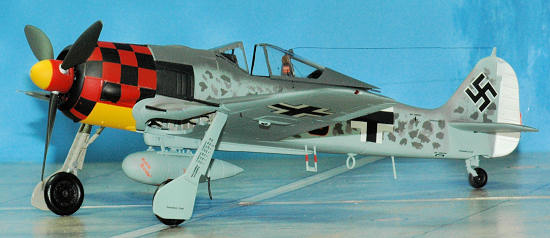
Hasegawa 1/48 FW-190A-6 'Checker Nose'
| KIT #: | 09812 |
| PRICE: | $41.99 MSRP |
| DECALS: | Three Options |
| REVIEWER: | Andrew Garcia |
| NOTES: | Eduard FE398 Fw 190A-5 Color Zoom & FE370 Fw 190 Color Placards |
| HISTORY |
There have been many fine builds and histories of the Fw-190A appearing on Modeling Madness so I will point you to a good explanation of the “-6” series provided by Tom Cleaver.
http://modelingmadness.com/reviews/axis/cleaver/tmca6.htm
| THE KIT |
When Hasegawa first released the Fw-190A-3 I was actually disappointed, not because it was a poor rendition but because the Fw-190A had been released by Tamiya and later by Eduard in addition to a fine effort by Trimaster and DML years ago – so why release a new mould Fw-190 when so many other aircraft await the Hasegawa touch?
 I did not
buy or build any at that time since I had built quite a few Trimaster and DML
releases, followed by adding to the kit stash numerous Tamiya Fw-190 releases
thereby fulfilling my need to enjoy building one of my favorite aircraft. Then
recently a retailer put them on sale at an attractive price and I thought I
would purchase some because Hasegawa always makes a quality product. Once I had
Hasegawa’s kit in hand and looked at the plastic I found it to be an excellent
reproduction of the Fw-190. With plastic in hand I thought I would give it a go.
I did not
buy or build any at that time since I had built quite a few Trimaster and DML
releases, followed by adding to the kit stash numerous Tamiya Fw-190 releases
thereby fulfilling my need to enjoy building one of my favorite aircraft. Then
recently a retailer put them on sale at an attractive price and I thought I
would purchase some because Hasegawa always makes a quality product. Once I had
Hasegawa’s kit in hand and looked at the plastic I found it to be an excellent
reproduction of the Fw-190. With plastic in hand I thought I would give it a go.
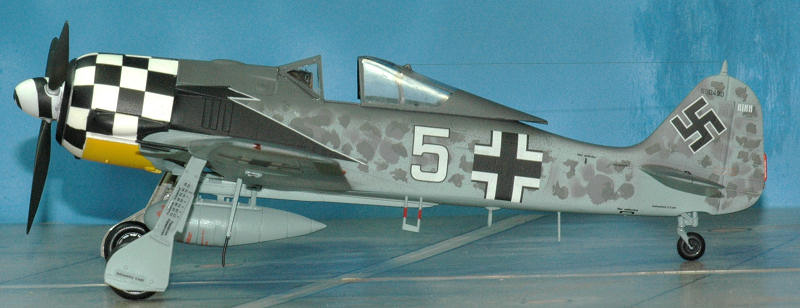
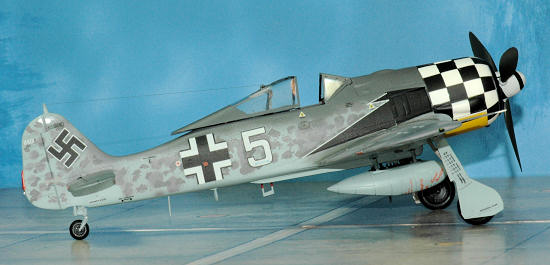
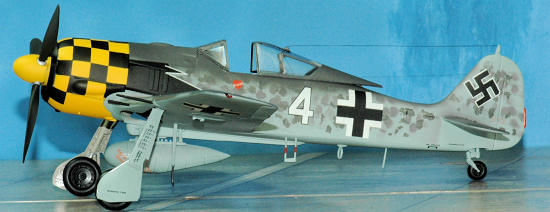
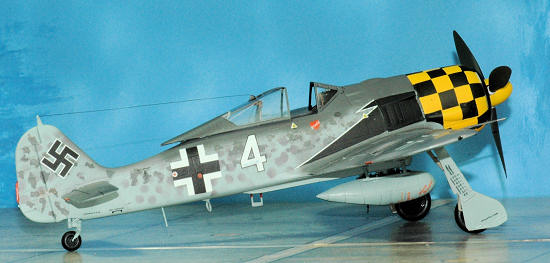
Hasegawa’s Fw-190A features finely engraved panel lines, excellent overall shape and detail, a highly detailed cockpit, nice wheel wells and landing gear, a canopy with separate parts and an optional centerline drop tank. There are decals for 3 aircraft – three versions of checkered cowl Fw-190A-6’s! Over the years I had set aside numerous aftermarket decal sheets representing checkered cowl Fw-190A’s from JG1. I committed myself to building some of the JG1 checker cowl aircraft next time I built some
Fw-190A’s.
Hasegawa‘s release featured three of them with different cowl and spinner color combinations. They hit the sweet spot of my checkered cowl interest and prompted a purchase. I found the kit decals to be as good as or better than some aftermarket decals since they are printed by Cartograph. Now the problem was which one of the three versions in the Hasegawa kit would I build? The solution – build all three.
I prefer the Hasegawa kit releases with decals which
are printed by Cartograph. They are so thin, well printed and compliant that
when applied they add a lot of value to a kit. I
also used the instrument panel portion of the decal and achieved great results.
Once applied using Testors clear gloss as a base coat and Testors dullcote as a
finishing coat they look painted on. The artwork has superb details, somewhat
more accurate than some of the aftermarket versions. But, be careful of what you
ask for. They are so thin that care must be taken when applying them. They will
fold together and can easily be a disaster to apply if you let them
 soak too
long or need a lot of movement to position them one they are applied – se be
careful!
soak too
long or need a lot of movement to position them one they are applied – se be
careful!
There are no photo-etch parts with the kit but you can build a nice OOB build without them. The kit comes with an excellent stencil decal sheet. For an OOB build you will be very pleased with Hasegawa’s release.
At the current Hasegawa (MSRP) retail price or even when purchased for less from discounters’, it is a bit higher in price than I prefer given the alternatives from Tamiya, Eduard and DML. This is where the Eduard kit offers a very competitive alternative and at a much better price in the weekend edition.
I did not see any need for an aftermarket resin cockpit and just some Eduard color etch seatbelts filled the need for extra detailing with the Hasegawa kit. In my Trimaster/DML builds I used every resin aftermarket cockpit piece I could only to have them disappear into the narrow and closed up Fw-190 interior. With that memory in mind I opted for no resin in the cockpit area with this build.
If cost or budget is your concern then I would suggest getting the Eduard or Tamiya kits – unless you can find Hasegawa on sale. After building this kit I enjoyed it so much that I now keep an eye out for Hasegawa Fw-190’s when they go on sale because it is a beautiful kit to build. If you don’t want to open up a lot of the interior and have an interest in a fast and smooth build I recommend you look at this kit.
| CONSTRUCTION |
This model is very easy to construct. The instructions are typical Hasegawa quality including the colors and markings section. I did find one notable mistake. The kit instructions would have you, in step # 12 use part C-17 as the pitot. This is incorrect. It may be a leftover instruction from the Fw-190A-8 release. You should use part # E-41 and position it past the outboard starboard wing cannon as seen in the colors and markings painting guide. Parts C-12 and C-13, the wing edge ports for the MG/151 20 cannons were a bit fiddly to use and the instructions do not adequately explain the need to cut and modify the area for a good fit.
 The
instruction booklet is what every modeler has come to expect from Hasegawa.
Printed on non-gloss paper the details are reasonably clear and well
illustrated. I did not find any other problems with the assembly sequence. I
used the kit decals for the cockpit instrument panel and side panels but did not
follow Hasegawa’s instructions stating “level surface before applying decal”.
Instead, I retained the plastic surface contours and applied Microset solution,
positioned the decal and used Microsol on the top once the decal was positioned.
They conformed perfectly to the raised plastic detail and in my opinion appear
much better than the flat color etched parts or if Hasegawa’s instructions are
followed the decal would look similar to flat etched part. By maintaining the
plastic contours with the kit decals a better end result can be obtained.
The
instruction booklet is what every modeler has come to expect from Hasegawa.
Printed on non-gloss paper the details are reasonably clear and well
illustrated. I did not find any other problems with the assembly sequence. I
used the kit decals for the cockpit instrument panel and side panels but did not
follow Hasegawa’s instructions stating “level surface before applying decal”.
Instead, I retained the plastic surface contours and applied Microset solution,
positioned the decal and used Microsol on the top once the decal was positioned.
They conformed perfectly to the raised plastic detail and in my opinion appear
much better than the flat color etched parts or if Hasegawa’s instructions are
followed the decal would look similar to flat etched part. By maintaining the
plastic contours with the kit decals a better end result can be obtained.
I also used the clear plastic parts for the wing tips green and red formation lights. They were painted with clear Tamiya colors. After the overall kit dull coat was dry I attached the clear lights and pitot.
I like the Hasegawa kit plastic in the cockpit area. There is no dry fitting or other problems to deal with unlike that posed by some resin cockpits. Hasegawa’s plastic kit cockpit detailing in their recent kits is very nice. By adding some of the Eduard color etched bits to the Hasegawa plastic cockpit parts a very nice build can be had without getting into an AMS build.
Although you can paint the kit plastic instrument dials and dry brush
the details be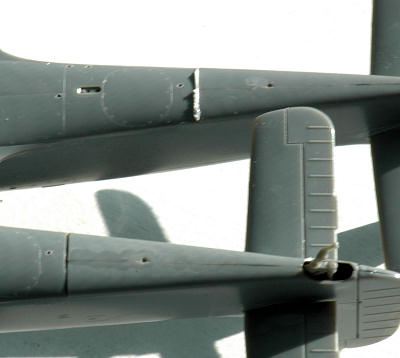 cause
it would look “OK”, I prefer to use the kit supplied instrument dial decal
instead. I did this with all three versions and used the Eduard zoom etched
mainly for its seatbelts.
cause
it would look “OK”, I prefer to use the kit supplied instrument dial decal
instead. I did this with all three versions and used the Eduard zoom etched
mainly for its seatbelts.
With careful placement the decal conformed perfectly to the excellent kit plastic instrument moulding using Microsol and Microset. The benefit of this is you can drill into the decal once it is dry and place small rods made from thin guitar wire that allow for the attachment of the very small Eduard etched throttle and “T” handles for your instrument panel. Once attached and dry a dab of thin red paint on the “T” handles makes them look great.
I find attaching the “T” handles and small levers directly to Eduard’s etched metal to be too difficult or prone to installation accidents. If your skills are better than mine or you have mastered this step and can get the potential results from a direct attachment also adding all the levers to the Eduard painted parts without affecting them – go for it! I found the use of glued in metal guitar wire as backing posts to make the job easier.
I did have a small fit problem with the underside wing to fuselage join. Since I was building three of them seeing the same problem with all three leads to the conclusion it is a fundamental mould error. When I experienced the same exact gap with all three kits I knew it was the same famous spot where many Hasegawa kits have a small problem – in the wing to fuselage join area. See the photo of the problem. I fixed it by using some thin plastic sheet as a shim and gluing it with MEK solvent which is the same as Testors liquid glue. Once dry and sanded it disappeared.
I compared some photos to the Hasegawa upper wing to fuselage join and feel this area could be better. It looks good to a casual view and the seam cleans up nicely but when compared to the way the Fw-190 wing is attached it is not accurate. The join is a curved segment and the kit has a shallow almost 90 degree join.
Another problem area was the attachment and fit of the landing gear covers. I had to cut some just to get the right look after a few dried and I realized it was not accurate.
| COLORS & MARKINGS |
I used Gunze acrylic paint for the upper surfaces and for undersurfaces. Testors dullcoat was used to create the final finish. I added some weathering and Tamiya smoke around the exhaust area. I also used Testors chrome silver for chipped paint and wear on the port entry-side wing area and wing walk.
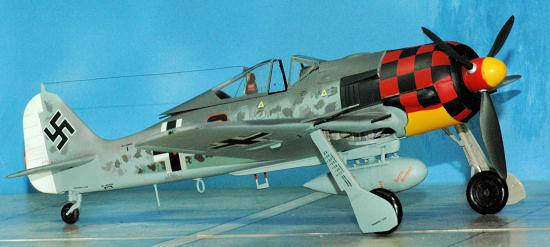 Attaching
the decals because of the checkered cowls was the most significant finishing
touch. The decals themselves were flawless but their thinness meant extra care
in applying them and limiting their movement once positioned was mandatory. The
Hasegawa decal instructions for the checkers were not as good as the thought
that went into the decals themselves. Due to the compound curves and bulges on
the cowl Hasegawa divided up the checkers into wonderful components that fit
like a glove. If you take your time and review the decals for placement before
committing them to water and application this is a very easy step. You will be
rewarded with an excellent checkered cowl!
Attaching
the decals because of the checkered cowls was the most significant finishing
touch. The decals themselves were flawless but their thinness meant extra care
in applying them and limiting their movement once positioned was mandatory. The
Hasegawa decal instructions for the checkers were not as good as the thought
that went into the decals themselves. Due to the compound curves and bulges on
the cowl Hasegawa divided up the checkers into wonderful components that fit
like a glove. If you take your time and review the decals for placement before
committing them to water and application this is a very easy step. You will be
rewarded with an excellent checkered cowl!
Decal national markings came from the kit decals. The kit decals are so well printed and thin I was really pleased with them.
| CONCLUSIONS |
It was a very enjoyable project. I was not at all
interested in building any Hasegawa Fw-190’s when they were initially released.
But the “master of reboxing”, as Scott has appropriately called Hasegawa, has
put out some very interesting Fw-190 releases
 during
the last four years since the initial Fw-190A-3 was released.
during
the last four years since the initial Fw-190A-3 was released.
Hasegawa’s Fw-190’s are a big improvement over DML in terms of “buildability”. The wing to cowl area is especially well done. The plastic connects and the compound curves click into place. I started to build a DML Fw-190A-5 with the white and black striped cowl at the same time as this build for a comparison and set it aside when it came time to work through the wing to cowl join. I was greatly disappointed with the experience this time and do not recall the Trimaster release to have been such a poor fit as the current DML “A-5” release which has a new wing and landing gear wheel wells.
I will build a few more of the Hasegawa Fw-190’s since I have found many of the releases have gone on sale recently from a variety of internet sources in the $20.00 to $ 25.00 range. Given the yen is around 85 per dollar this won’t last for long or permit new releases to go for that price range so get them while you can. You will enjoy the building experience and be pleased with the finished kit.
| REFERENCES |
Fw-190 In Action, Squadron Signal Publications # 1019 by Jerry L. Campbell 1975
February 2010
Copyright ModelingMadness.com. All rights reserved. No reproduction in part or in whole without express permission.
If you would like your product reviewed fairly and quickly, please contact me or see other details in the Note to Contributors.