
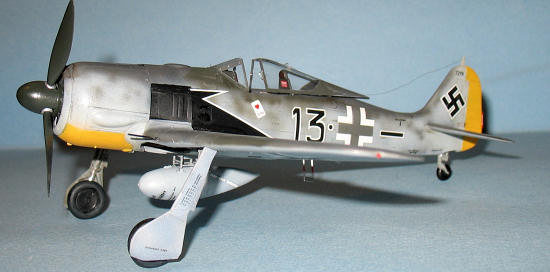
Hasegawa 1/48 FW-190A-5 'Priller Special'
| KIT #: | 09755 |
| PRICE: | $55.95 MSRP |
| DECALS: | One Option |
| REVIEWER: | Dan Lee |
| NOTES: | Kit includes figure and car which is not covered in this review |
| HISTORY |
Josef “Pips” Priller was born on
By 1940, he
was Squadron Commander of 6/JG51 and as the war went on he eventually rose to
become wing commander of JG26 aka the “Abbeville Boys” despite his
confrontational style with his commanding officers.
By the end of the war, he was Inspector of Day Fighters
(Eastern Front.)
Famous for his attack on 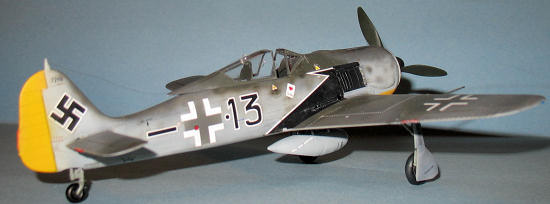 ts,
Pips was also a very good commander of JG26 who used his limited resources to
keep the British
on the defensive and kept his men’s morale up.
ts,
Pips was also a very good commander of JG26 who used his limited resources to
keep the British
on the defensive and kept his men’s morale up.
Post war, Josef became a brewery manager who died of a heart attack in
1961.
FW-190A-5
The
FW-190A-5 was an update to the amazing A-3 which included a 6 inch extension to
the frame due to a more powerful engine and a change in the center of gravity.
It was built from 1942 to June 1943 when it was replaced
by the A-6.
The A-5 was
armed with a pair of 7.92mm machine guns in the fuselage and a pair of 20mm
cannon in the wings.
This was armament was fine when dealing with fighters,
but proved inadequate when attacking US bombers.
Brief summaries based on information from Wikipedia and TC’s earlier review of the Hasegawa 1/32 FW-190A-8.
| THE KIT |
Please visit the preview to see what comes in the box. For a look at the BMW car article, visit this link.
| CONSTRUCTION |
The parts
were washed and dried and then I removed the pieces from the parts gates,
cleaned up the attachment points/flash/sanded them and organized them into what
colors I needed to paint them.
The cockpit parts and cockpit area of the fuselage were
painted German Black Grey, the remaining interior bits were done with Tamiya
RLM02 that was lightened with Flat
 White (it
is darker than it should be), the prop done in RLM70 Black Green, the wheels
done in Gloss Black and the engine parts in steel.
White (it
is darker than it should be), the prop done in RLM70 Black Green, the wheels
done in Gloss Black and the engine parts in steel.
Hasegawa’s
cockpit looks fine right out of the box so the only extra details I added to the
FW-190 cockpit were seat belts.
To be blunt, the FW-190 cockpit doesn’t really need many
extras other than seat belts due to it’s relative small size.
It’s not all that satisfying when you spend several
hours adding all these tiny detailed bits which disappear when one glues the
fuselage together.
It really needs the PE seat belts.
I did
detail paint the control panel and consoles using red, blue, yellow, white and
gloss black which was the extent of which I detailed the interior.
I dry brushed silver along areas where the pilot’s boots
would go and to bring out what little detail one can see.
Overall,
the plane itself only took an hour to assemble.
I have to give Hasegawa plaudits for making this kit so
easy to build especially when compared to my own experiences with the Tamiya and
Eduard FW-190s.
Only seam that one has to be really
careful about are those at the junction at the lower
forward fuselage where the lower wing, fuselage and cowling meet.
It is recommended that you sand/fill/polish those seams
before gluing on the cowling unless one enjoys making life difficult for
oneself.
 To ensure
a snug fit between the cowling and the fuselage, I lightly sanded down the areas
where the cowling attaches to the wing.
Only area of the engine/cowling assembly where I really
had to work it was to make sure the engine did not go out of alignment.
To ensure
a snug fit between the cowling and the fuselage, I lightly sanded down the areas
where the cowling attaches to the wing.
Only area of the engine/cowling assembly where I really
had to work it was to make sure the engine did not go out of alignment.
Hasegawa
does a nice job of doing some detailing the engine including the pushrods, but I
think it is really unnecessary due to the fact that the forward fan blocks most
of the light.
A simple one piece engine face would have sufficed unless you’re
the type to open it up (but that’s just my opinion.)
Unfortunately, I ended up breaking half the pushrods
because I didn’t trim them enough for the engine face to slide into the cowling
(not that anyone would really notice.)
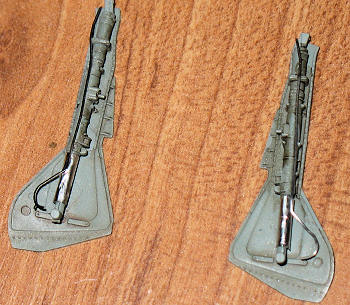
I did a little bit of detailing on the landing gear. Instead of painting the chrome parts of the struts, I used tin foil and Micro Metal Foil Adhesive. Once dry, I glued with CA glue a pair of PE brake lines that were salvaged from the wreckage of a ruined D-9 build.
| COLORS & MARKINGS |
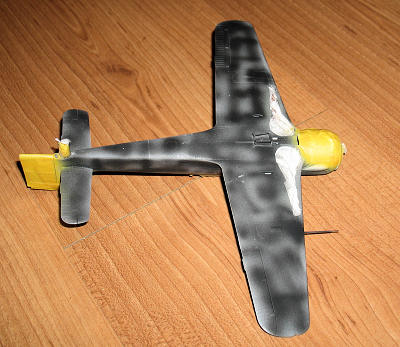
Painting
Priller’s A-5 is based on the RLM 74/75/76 scheme with mottling while
the underside of the cowling and rudder are painted in RLM 04.
Unfortunately, I don’t have all the colors from the same paint supplier
and the paints I have don’t react well together (Gunze and Poly Scale) so it
took longer to paint than it should.
I attached
the already masked canopy parts on with white glue then sprayed on German Grey.
Next I preshaded the plane with flat black, focusing on
the areas where there was going to be a lot of extra stains like the guns and
exhausts.
I then sprayed flat white on the rudder and underside of the
engine cowling where RLM 04 (Yellow) was supposed to go.
Once the paint was cured,
 I sprayed
on a close approximation of RLM 04 based on a mix of Tamiya Paints (16 drops
Yellow, 2 drops of red and 4 drops of white.)
I do have pre-mixed RLM, but I find it be too yellow/not
enough orange and the paint coverage is horrible (multiple coats) which is why I
made my own this time.
I only needed two light coats to get decent paint
coverage.
I sprayed
on a close approximation of RLM 04 based on a mix of Tamiya Paints (16 drops
Yellow, 2 drops of red and 4 drops of white.)
I do have pre-mixed RLM, but I find it be too yellow/not
enough orange and the paint coverage is horrible (multiple coats) which is why I
made my own this time.
I only needed two light coats to get decent paint
coverage.
I let the
RLM04 cure for a couple of hours, then I masked off those areas and sprayed on
Poly Scale RLM76 in two light coats which was just thin enough to allow the pre
shading to show.
One thing to watch about for about Acryl and Poly Scale paints is
that they don’t really grab on to the plastic like Japanese paints and I do
recommend that you prime before using them.
This can be a pain when there is a lot of masking
involved.
A day
later, I masked off various sections of the plane and sprayed on Gunze RLM74.
Once it was dry, I cut some soft masks from painters
tape and paper in the RLM 74 pattern based on the instructions, attached them to
the model and then sprayed on the RLM 75.
Despite the fact that in the photos the color
demarcation is relatively sharp.
There might
be one or two of you wondering why I didn’t just use the Poly Scale RLM74/75
instead of Gunze. The reason is simple, the mottling.
I’ve used Poly Scale to do German mottling and it’s
never really worked out.
I’ve had the paint clog due to the low
I make mottles the way I learned it from Floyd Werner through his
excellent
 Despite
repeated maskings with low tack tape, the fragile Acryl RLM76 stayed for the
most part on the model.
I did have to do some touch ups on areas that I
discovered needed to be sanded again (CA glue remainders and poorly done seams.)
Despite
repeated maskings with low tack tape, the fragile Acryl RLM76 stayed for the
most part on the model.
I did have to do some touch ups on areas that I
discovered needed to be sanded again (CA glue remainders and poorly done seams.)
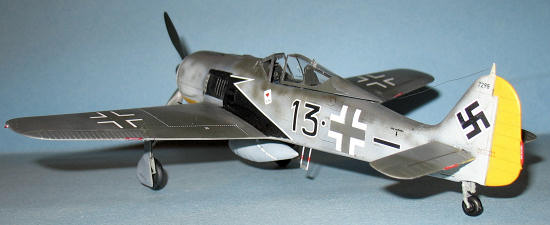
Markings
I used the
decals supplied with the kit for Josef “Pips” Prillier’s A-5.
These are the newer Hasegawa decals with a white that is
closer to white than ivory.
I used Microset and a bit of Solvaset to deal with them.
At this point I realized that I did not spray RLM74 in
to fill in the crosses.
I ended up having to carefully tape and mask the area,
spray RLM74, let it dry and then add the remaining decals.
Once the decals were dry, the excess decal solution was
wiped away.
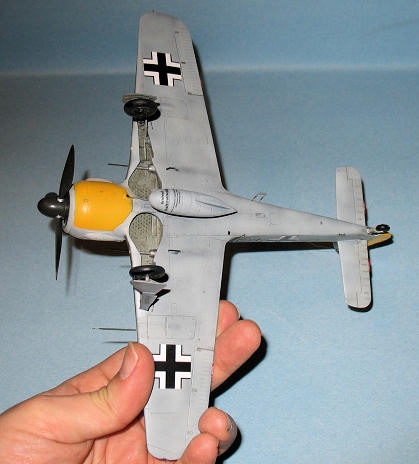
Weathering
The Prillier’s plane was from May-June 1943, a time when the Luftwaffe wasn’t worn out from the Allied bombing campaign and its supply chain wasn’t wrecked by the Allied invasion and advance so I kept weathering down to a minimum. The cannon ejection ports and exhausts were lightly stained with charcoal and the plane was lightly weathered with a watercolor wash. Most of the paint variance was represented using pre and post shading. Once the decals were dry and the excess decal solution removed, I sprayed on Vallejo Flat Coat to seal everything in.
| FINAL BITS |
The FW-190A-5 tiny bits were added according to instructions except the
following modifications:
1)
Replaced
the cannon barrels with Mini-mecha tubing
2)
Made the
canopy handles using 30 gauge wire and glued them (with white glue) to the
canopy
3)
Added a
radio aerial (for the FW-190A-5, being sloppy with the radio wire is actually
more accurate as the aerial is “relaxed” when the canopy is pulled back) using
aluminum wire attached with white glue.
| CONCLUSIONS |
The
Hasegawa FW-190A-5 was a joy to build.
This kit fell together so nicely without any real
headaches at all.
On a personal note, this kit was a welcome change from
the string of more difficult kits that I was building at the time.
 In terms
of ease of construction, the Hasegawa radial engined FW-190 wins hands down
based on my own experience with the previous Anton Series kits (Eduard and
Tamiya) and it is accurate enough that one doesn’t need a lot of correction
sets.
The Eduard kit has much finer detail, but is rather difficult to build
because of all that detail while the Tamiya (the A3 version only as they don’t
have an A-5) is almost as easy to build as this version, but has incorrect
details mainly issues with the landing gear and wheels that some modelers with
an eye for detail would want to correct.
In terms
of ease of construction, the Hasegawa radial engined FW-190 wins hands down
based on my own experience with the previous Anton Series kits (Eduard and
Tamiya) and it is accurate enough that one doesn’t need a lot of correction
sets.
The Eduard kit has much finer detail, but is rather difficult to build
because of all that detail while the Tamiya (the A3 version only as they don’t
have an A-5) is almost as easy to build as this version, but has incorrect
details mainly issues with the landing gear and wheels that some modelers with
an eye for detail would want to correct.
I recommend this kit for folks of all skill levels who want to build a
reasonably accurate A-5 without dealing with a lot of extra detail or someone
who just wants a quick simple build.
Copyright ModelingMadness.com. All rights reserved. No reproduction in part or in whole without express permission.
If you would like your product reviewed fairly and quickly , please contact me or see other details in the Note to Contributors.
Back to the Review Index Page 2022