| KIT #: | ? |
| PRICE: | $ |
| DECALS: | One option |
| REVIEWER: | John Miller |
| NOTES: |
| HISTORY |
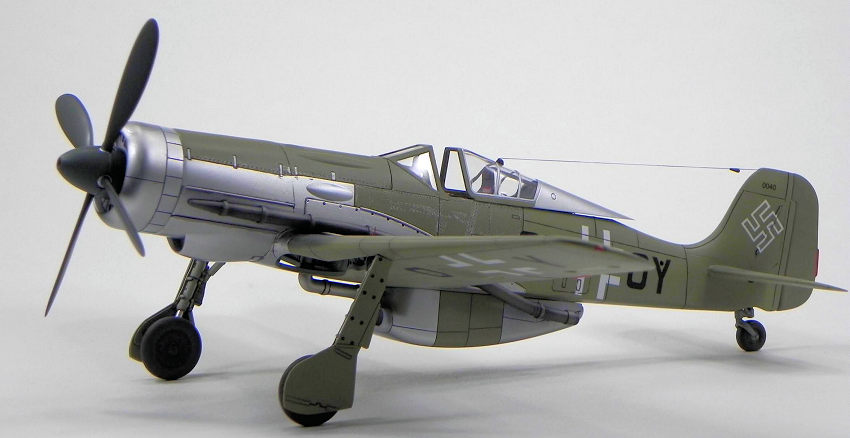
Kurt Tanks’ masterpiece, the Fw-190 Würger was a mainstay of the Luftwaffe fighter force till the end of WWII. Its BMW 801 radial had sufficient performance at low and medium altitudes for the 190 to be an able adversary for most allied aircraft. High altitude performance was greatly hampered however, by the lack of a turbo supercharger. Multiple engineering difficulties prevented the addition of a supercharger to a BMW-powered Fw-190. To solve the problem, Focke Wulf proposed to install 12-cylinder, in-line Daimler-Benz or Jumo engines into 190A series airframes as part of the company’s response to the Höhenjäger (High-altitude fighter) development program instituted by the RLM in 1942.
The airframes
dedicated to the program ultimately received various combinations of newly
developed aluminum-zinc alloy fuselage components, modified DB and Jumo engines,
pressurized cockpits and canopies, four-bladed propellers, and Hirth TK-11 turbo
superchargers. Annular radiators mounted in front of the in-line power plants
provided for engine cooling. For the 18th
prototype it was proposed to
 mount the Hirth turbo supercharger unit on the
belly in a large, streamlined intake housing which gave the V18 the appearance
of a Känguruh complete with pouch: the name stuck.
mount the Hirth turbo supercharger unit on the
belly in a large, streamlined intake housing which gave the V18 the appearance
of a Känguruh complete with pouch: the name stuck.
The Hirth turbo supercharger was an exhaust-driven unit that provided pressurized air to the engine thereby boosting performance at high altitude. On the V18, the hot exhaust gasses were captured at the engine exhausts by heavy gauge steel exhaust tubes that ran to the trailing edged of the wing and conveyed the exhaust to the Hirth unit on the belly. The extremely hot exhaust gases from the DB603 were calculated to be ~800C (1,472F) so to protect the airframe and pilot from the heat, “alloy sheet” coverings were affixed to each side of the fuselage.
In addition, photos of the V18 clearly show enlarged and modified wing-to-fuselage fillets that had a recessed area within which the tubular exhausts snugly fit. In addition, the V18 airframe had an enlarged vertical stabilizer and rudder similar to that used on the Ta-152 and a four-bladed propeller. It was not modified with a pressurized cockpit (more on that below).
Initial flight tests were disappointing. Chief Focke Wulf test pilot Hans Sander reported excessively high coolant temps and pronounced engine over-heating. Despite this, modification and testing of the V18 (and multiple similar prototypes) continued during which the Känguruh made 66 flights totaling 42 hours of flight time. When the project was cancelled in 1944, the surviving airframes were incorporated into development of the ultimate version of the Fw-190 series, the Ta-152.
| THE KIT |
The Hobby Boss V18 isn’t
the only 1/48 Känguruh hopping around (sorry). The very nice and rather pricey
kit by RV resins is also available (MM review link). The HB kit (#81747) is
molded in light grey plastic and is composed of 68 injected and 2 clear parts.
The modest decal sheet provides markings for one aircraft, the V18. The moldings
are crisp with practically no flash and the inscribed panel lines and details
are nicely done and appropriate for this scale. I suspect the Fw-190 experts out
there could point to a multitude of inaccuracies in panel lines, bulges, ports,
etc but I’ll confine my comments to just a couple of the most noticeable issues.
Some of these are fixable: others, not so much. The biggest issue is the nose
cowl. Multiple photos of the V18 in the Smith and Creek book clearly show the
dorsal part of the cowl as having two circular covers instead of the large
intakes as depicted on the kit part. Interestingly, the color drawings of the
V18 in Special Drawings: Focke Wulf Part II by CMK Photo Hobby Publications
depicts the cowl with intakes as presented on the kit part. Perhaps this is
where the Hobby Boss designers got their inspiration? Nonetheless, this is a
fixable issue so to match the available photographic evidence; I built my V18
sans nostrils.
noticeable issues.
Some of these are fixable: others, not so much. The biggest issue is the nose
cowl. Multiple photos of the V18 in the Smith and Creek book clearly show the
dorsal part of the cowl as having two circular covers instead of the large
intakes as depicted on the kit part. Interestingly, the color drawings of the
V18 in Special Drawings: Focke Wulf Part II by CMK Photo Hobby Publications
depicts the cowl with intakes as presented on the kit part. Perhaps this is
where the Hobby Boss designers got their inspiration? Nonetheless, this is a
fixable issue so to match the available photographic evidence; I built my V18
sans nostrils.
The second most noticeable inaccuracy is the wing to fuselage fillets. The Känguruh had fillets that were heavily modified with recessions into which the overlying exhaust tubes partially fit. The kit parts appear to be standard wing fillets that would be very difficult to modify without a lot of work. I learned to live with it. Likewise, the windscreen side panels have a noticeable curvature as opposed to being flat as they should be. I’ve trained myself to just look past them: easier than fashioning replacements. Other than these issues, the kit accurately captures the nose section and enlarged rudder and vertical stabilizer characteristic of the Känguruh. Moreover, the exemplary fit of all the major components makes building the kit a breeze.
| CONSTRUCTION |
This is my first Hobby Boss
build. My normal modeling diet is rich in Special Hobby, MPM, and RS:
high-fiber, limited-run kits. I’m accustomed to sweeping the plastic shavings
and dust off my bench after every build session. Not so with this kit. The fit
of the major parts is spot-on. With the exception of a few goodies from the
spares box, the kit was built OOB. Only one area required putty and sanding and
I suspect that was self-inflicted. Although the kit has accuracy issues (above),
all the inaccurate
 parts fit together beautifully resulting in a fast and
effortless build.
parts fit together beautifully resulting in a fast and
effortless build.
As usual, construction commenced with the cockpit. An injector pin on the right fuselage and a circular depression on the corresponding left halve were leveled with a sanding stick. Test fitting of the cockpit tub revealed that the rear bulkhead is too far back and insufficiently high. A taller replacement made from sheet styrene and positioned closer to the seat fixed the problem. The only other parts added were a resin seat from the Fw-190 detail set by Teknics (#4827/4828) and color PE seat belts from an Eduard sheet (#49002).
The cockpit was painted
LifeColor RLM-66 (#UA030) lightened 10% with LifeColor White. After the cockpit
details were picked out with LifeColor paints, the tub and fuselage interior
were sprayed with Alclad Aqua Gloss (#ALC600). The parts were then given an oil
wash with Tamiya Dark Brown Panel Line Accent Color (#87140) and a little
weathering with pastels and silver ink. Of note are the nicely fitting
instrument decals, which lined up almost perfectly with the instrument panel
parts and snugged down nicely with a little AK Decal Adapter (#AK582). To seal
t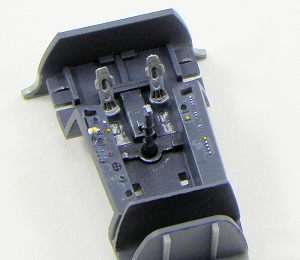 he pastels and ink, the completed cockpit was sprayed with Vallejo Satin
Varnish (#70.522) diluted to ~25% with Vallejo thinner.
he pastels and ink, the completed cockpit was sprayed with Vallejo Satin
Varnish (#70.522) diluted to ~25% with Vallejo thinner.
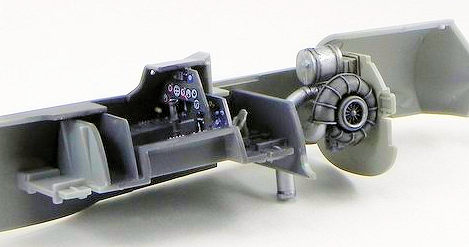
With the cockpit completed, I started in on the nicely detailed rear engine accessories section and tail wheel assembly. The 11-part accessories section nicely duplicates the engine components that are visible through the wheel wells. The various parts were painted aluminum, steel, or grey as appropriate, sprayed with Alclad Aqua Gloss (#ALC600), and washed with Black Tamiya Panel Line Accent Color (#87131). The tail wheel assembly consisting of a one-piece wheel captured between left and right halves of the wheel fork was painted with LifeColor acrylics and assembled with CA glue (Bob Smith Industries).
 After the subassemblies
were glued into the left fuselage halve, the halves were joined with Tamiya
Extra Thin Cement. Unfortunately, a 0.5mm step developed along the centerline of
the upper fuselage nose section (just behind nose cowl) that required filing,
putty, and re-contouring with a Flexi-file. I suspect this was caused by me
over-clamping the fuselage halves together for gluing. I’ve got to stop working
out so much.
After the subassemblies
were glued into the left fuselage halve, the halves were joined with Tamiya
Extra Thin Cement. Unfortunately, a 0.5mm step developed along the centerline of
the upper fuselage nose section (just behind nose cowl) that required filing,
putty, and re-contouring with a Flexi-file. I suspect this was caused by me
over-clamping the fuselage halves together for gluing. I’ve got to stop working
out so much.
The lower chin cowl (part C2) has very prominent sink marks behind the intake that have to be filled since this part will have a metal finish. This was done with Mr. Surfacer 1,000, sanded smooth, and blended with a 3600 Micromesh pad. The lower cowl was then affixed with Tamiya Extra Thin Cement. With the major fuselage components assembled, I prepared to do a little riveting.
Volume one of Smith
and Creek Fw190 book has a total of 6 excellent photos of the V18 four of which
are full-page reproductions showing re-worked rivet lines in the cockpit area of
the fuselage. It is reported that the Känguruh was not modified with a
pressurized cockpit so perhaps this rivet work indicates the V18 received one of
the new fuselage components made of an aluminum-zinc alloy? The rivets appear to
have been installed after the skin was
painted RLM-02 as each line has unpainted rivet heads and scratches. In
addition, these riveted panels appear to have been painted a slightly darker
shade of RLM-02 compared to adjacent panels. In preparation for duplicating
this, the rivet lines were drawn on the model with a mechanical pencil using
photographs as a guide. “Rivet heads” were then embossed along the lines using
the UMM-USA embosser (Mega Tool). After the riveting was complete, the separate
but unposeable rudder was glued in place and I turned my attention to the canopy
and rear cockpit decking.
One puzzling aspect of this kit is the lack of a headrest. A quick trip to the stash produced the appropriate part from the Tamiya Fw190 D-9, which is an almost perfect fit. The inaccurate decking behind the pilots seat was smoothed with a sanding stick and a photo-etch over-lay from the Teknics detail set was glued in place. The rear decking and instrument panel hood were then painted LifeColor RLM-66 (lightened as described above). The Smith and Creek pictures show that no gun sight was mounted in the V18 so a simulated cover panel made from soda can aluminum was placed over the hole normally occupied by the sight. Now for “the glass.”
The front and rear canopy pieces fit beautifully and I decided to pose this Känguruh open. The internal rear bulkhead of the rear canopy fit too far forward and was reduced in height and repositioned farther aft. In preparation for painting, the canopy pieces were polished with a Kimwipe then dipped in Future (or Pledge with Future Shine). They were allowed to dry for 24 hours. The canopy pieces were masked with a combination of Tamiya yellow tape and Mr. Hobby Mr. Mask Sol (#M-133) and the front windscreen was glued in place with Super-Gold CA (Bob Smith). The fuselage was then set aside so I could start re-working the nose cowl.
As described above, photos
of the Känguruh show that the planes nose cowl differed greatly from the
corresponding kit part. The offending intakes were plugged with pieces of sprue
and raised details behind each intake were smoothed sanding sticks. Since the
nose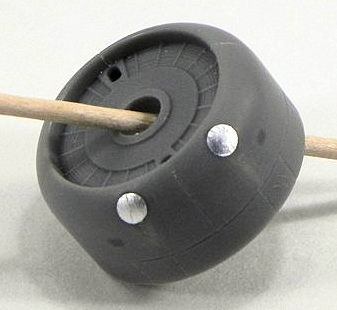 cowl was natural metal, the re-worked area was painted with Mr. Surfacer
500 then sanded with a Flexi-File using a Medium (grey) grit tape. This process
was repeated a second time using Mr. Surfacer 1,000 and a Fine (red) grit tape.
A final wet buffing with Micromesh 3600 completed the job. Circular patches were
duplicated with Bare-Metal Foil and pressed in place. For better access during
painting, the cowl was left unattached until the end of the build: now for the
wings.
cowl was natural metal, the re-worked area was painted with Mr. Surfacer
500 then sanded with a Flexi-File using a Medium (grey) grit tape. This process
was repeated a second time using Mr. Surfacer 1,000 and a Fine (red) grit tape.
A final wet buffing with Micromesh 3600 completed the job. Circular patches were
duplicated with Bare-Metal Foil and pressed in place. For better access during
painting, the cowl was left unattached until the end of the build: now for the
wings.
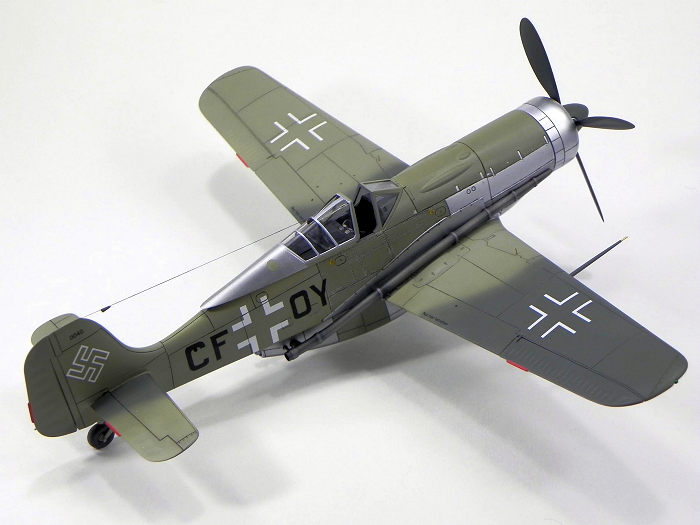
The wing parts fit together perfectly requiring no filler whatsoever. Unfortunately, the one-piece ailerons on my example had small, misshaped divots on each side of the trim tabs, which were filled with a dab of a pasty mix of talcum powder and CA glue. When dry, the dabs were sanded smooth and re-shaped with micro files. The inboard gun ports on the Känguruhs’ wing were faired over. To duplicate this, the holes in the leading edge of the wing were filled with sprue, sanded smooth, and covered with circular pieces of Bare Metal Foil. After the small repair job, the ailerons were inserted into the wings and fit so tightly that just a drop of Tamiya Thin was required to lock them in. After small holes were drilled on the top of each wing for main gear indicator pins (to be installed later), the wings were complete. The fuselage was then joined to the wings and the fit was flawless. Like Legos, they clicked together and the join was set with a couple drops of Tamiya Thin Cement. Join lines were wet sanded with a 3600 micromesh pad and the job was done. Cool, I’m not used to that. [Pic 6]
Every Känguruh needs a pouch so the two-piece belly housing was assembled with Tamiya Thin Cement and here again, the fit was ideal. Once assembled, the housing fit perfectly to the fuselage but was left off for painting. Similarly, the nicely detailed horizontal stabilizers were cleaned-up with a soft file followed by a 3600 micromesh pad but left unattached.
The main gear and retraction mechanisms are beautifully cast and required little preparation. The landing gear parts and wheel well covers were sprayed with LifeColor RLM-02 with 10% White followed by a light coat of Alclad Aqua Gloss. Once dry, details were highlighted with a wash of Tamiya Brown Panel wash. Brake lines were fashioned from fine solder and the small electrical relay boxes on the retraction arms were scratch built. Not satisfied with the kit wheels, accurate replacements were generously donated from a sympathetic Eduard 1/48 Fw190 in the stash. These were painted with LifeColor acrylics, weathered slightly with MIG pigments, and sprayed with Vallejo Matt Varnish diluted to 25% with Vallejo thinner. The completed landing gear was set aside so I could turn my attention to spraying paint: my favorite part.
| COLORS & MARKINGS |
Prior to being sprayed with
a primer coat, the model and all parts were wiped down with a tissue saturated
with denatured alcohol (Crown): a great de-greaser that’s cheap and dries
quickly. In preparation for the multiple metallic lacquers the scheme required,
the model was primed with Gunze Mr. Color White lacquer (#1) diluted to 30%
paint with Gunze Leveling thinner. This, and all the paint used on this build,
was sprayed using Harder&Steenbeck Evolution or Infinity airbrushes fitted with
a .15, .20, or .40mm tips as the job required. An Iwata Studio series compressor
supplied compressed air that was adjusted with an H&S in-line control valve. The
Gunze white was applied at ~12 psi as a dry coat fo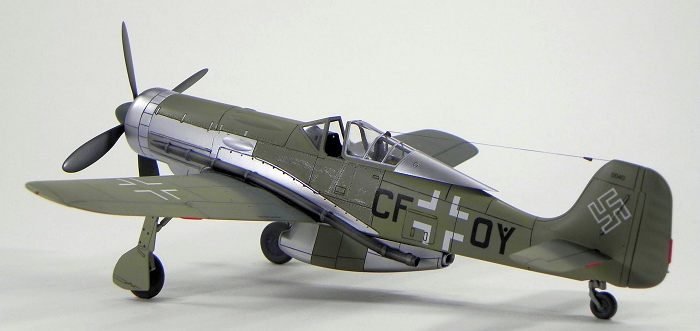 llowed by a wet fill-in coat.
Once dry, the Gunze White was wet buffed with a sheet of micromesh 6,000 and the
model readied for the first coat of paint.
llowed by a wet fill-in coat.
Once dry, the Gunze White was wet buffed with a sheet of micromesh 6,000 and the
model readied for the first coat of paint.
Using the photographs in the Smith and Creek book as a guide, the scheme on this Känguruh was begun by spraying the riveted fuselage side panels and upper nose decking with Gunze Mr. Color Silver #8 diluted to ~25% paint with Gunze Leveling Thinner. This is an interesting paint. Once dry, over-sprayed paint adheres very loosely to Gunze Silver #8 making it an ideal base for simulated paint chipping. When dry, the side panels and upper nose decking were covered with Tamiya tape and the wing fillets and lower chin cowl sprayed with AK Aluminum (AK479) straight from the bottle. [Pic 8] The exhaust panels on each side of the nose were then taped off and sprayed AK Dark Aluminum (AK480), again straight from the bottle. The cooling shutters on the trailing edge of the nose cowl were sprayed AK White Aluminum (AK478) and, after drying, were taped off and the remainder of the cowl sprayed Alclad II Dull Aluminum (ALC-117). Not satisfied with the finish of the dull aluminum, the cowl was buffed with a tissue until an acceptable metal sheen was obtained: lucky save, there.
The canopy, was masked off with Tamiya tape and Mr. Hobby Mr. Mask Sol, and then sprayed with LifeColor RLM-66 lightened with 10% White followed by a primer coat of Gunze White lacquer as described above. The canopy on the Känguruh was modified for high altitude operations resulting in multiple colors on the various sections. These were taped off with Tamiya tape and Parafilm (a waxy material carried by many online scientific supply companies) and sprayed simultaneously with the fuselage. Likewise, the belly intake housing was taped off and sprayed at the same time.
With the metallic colors
sprayed, I set about finishing the scheme off with acrylics. After the
surrounding metal areas were covered with Tamiya tape, the side panels and upper
fuselage decking previously shot with Gunze #8 were sprayed with LifeColor
RLM-02 (UA504) lightened with 5% White. I used 5% white for these panels and
decking so later adjacent panels could be painted with the same paint lightened
with 10% White. This was required to duplicate the two shades of RLM-02 evident
in photos of the V18. When the RLM-02 was dry, a Flexi-File polisher/finisher
stick was cut at an angle and use d to carefully remove the RLM-02 paint from the
rivet lines and create scratches on the side panels. To prevent additional
damage from occurring, the delicate panels were over-sprayed with Alclad Aqua
Gloss shot straight from the bottle. This is my go-to gloss coat: excellent
stuff. [Pic 9]
d to carefully remove the RLM-02 paint from the
rivet lines and create scratches on the side panels. To prevent additional
damage from occurring, the delicate panels were over-sprayed with Alclad Aqua
Gloss shot straight from the bottle. This is my go-to gloss coat: excellent
stuff. [Pic 9]
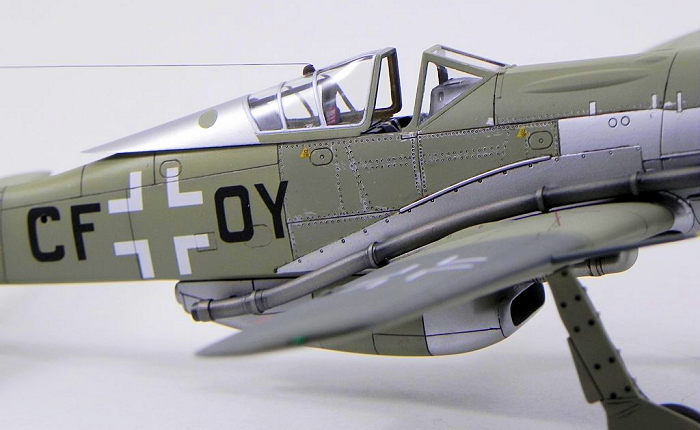
Prior to spraying the rest of the model, the painted nose section was covered with Tamiya tape and Parafilm; the wheel wells were taped off and stuffed with foam fillers, and the trailing edges of the wing fillets were carefully taped off. The model, belly intake, and horizontal stabilizers were sprayed LifeColor RLM-02 lightened ~10% with LifeColor White. Using the Smith And Creek photographs as a guide, areas of the wings and horizontal stabilizers were sprayed with LifeColor RLM-74 (UA507) lightened with 10% White. Of note are the rather soft lines where the RLM-74 meets the 02. After this was dry, the wing, rudder, and elevator trim tabs were taped off and shot with LifeColor Red (LC06) darkened with a touch of blue (LC60). [Pic 10]
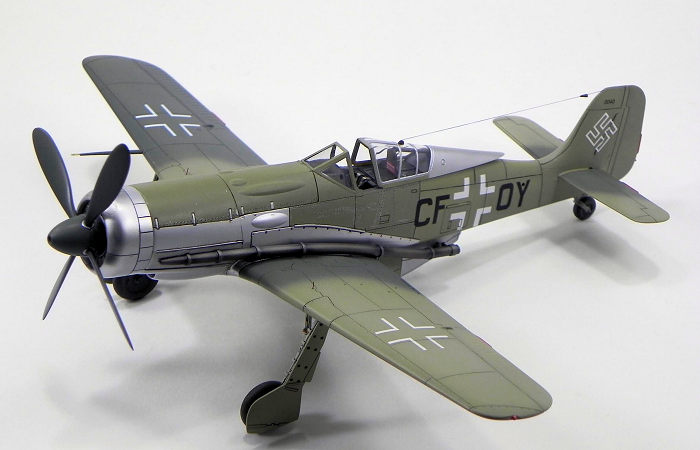
In preparation for decals, the model was sprayed with Alclad Aqua Gloss straight form the bottle and set aside for 24 hours. The kit decals were used for the “CF OY” aircraft identifier while the balkenkreuz and hakenkruez were from the decal stash. All were applied with Micro Set/Sol using conventional methods. Available photos of the Känguruh show very little wear so weathering was kept to a minimum. Panel lines were brought out with Tamiya Dark Brown Panel Wash applied with a small, thin brush. After drying, excess wash was removed using Q-tips slightly damp with Mona Lisa Odorless Thinner. After the belly housing, landing gear and gear doors were attached with CA, the aerial was made from Uschi rigging material (#4005) and attached with white glue. The model was given a final coat of Vallejo Satin varnish diluted to 20% with Vallejo thinner. This was applied at 15psi with the airbrush held back from the model as though delivering a dry coat. In this way, light, misty coats were applied in a controlled manner to ensure the model didn’t become too dull. To protect the areas with metal finishes, the tape and Parafilm masking was left in place during this step.
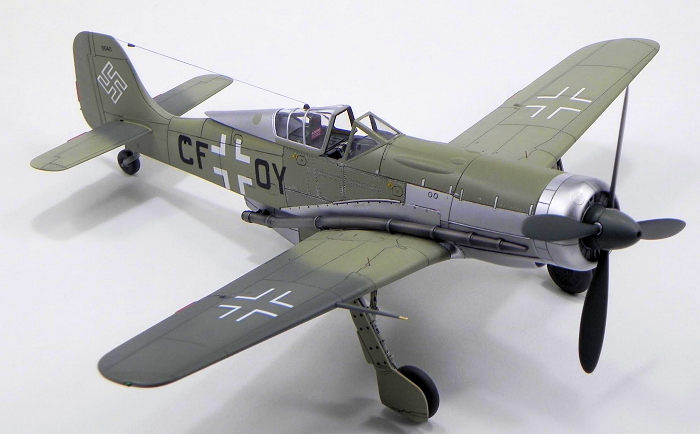
 With the airframe
completed, I started in on the four-bladed propeller and exhaust tubes which
feature so prominently on the V18. The propeller blades and hub were primed with
Gunze White lacquer followed by Gunze Mr. Color RLM-70 Schwarzgrun (#18)
lightened with 5% Gunze white. This was then set aside to dry. The ends of the
exhaust tubes were hollowed out with a small drill bit and a rather annoying
seem line was removed with an X-acto blade and micro files. After priming with
Gunze White lacquer, the tubes were sprayed with AK Steel (AK476) straight from
the bottle. Not satisfied with the appearance, the tubes were sprayed with light
coats of Alclad Exhaust Manifold (#ALC123). To add some contrast, the junctions
along each tube were masked with Tamiya tape and AK Jet Exhaust (AK486) was
carefully sprayed around each junction. The tapes were removed and the tubes
attached with thick CA glue. [Pic 11]
With the airframe
completed, I started in on the four-bladed propeller and exhaust tubes which
feature so prominently on the V18. The propeller blades and hub were primed with
Gunze White lacquer followed by Gunze Mr. Color RLM-70 Schwarzgrun (#18)
lightened with 5% Gunze white. This was then set aside to dry. The ends of the
exhaust tubes were hollowed out with a small drill bit and a rather annoying
seem line was removed with an X-acto blade and micro files. After priming with
Gunze White lacquer, the tubes were sprayed with AK Steel (AK476) straight from
the bottle. Not satisfied with the appearance, the tubes were sprayed with light
coats of Alclad Exhaust Manifold (#ALC123). To add some contrast, the junctions
along each tube were masked with Tamiya tape and AK Jet Exhaust (AK486) was
carefully sprayed around each junction. The tapes were removed and the tubes
attached with thick CA glue. [Pic 11]
| CONCLUSIONS |
I really enjoyed this build: fast, easy, and unique. To my eyes the aircraft of the 190 stables have some of the most pleasing lines of all the WWII single engine fighters. The V18 in particular, strikes me as having a functional lethality that’s distinctive. It’s an interesting looking airplane and was long on my “to build” list. So much so, I started this kit as soon as I got it home without the normal multi-year ageing process in the stash. Although the kit could be more accurate, the finished product looks like a V18 and sits like a V18 so for all but the purist, it’s a V18. The engineering on this kit is some of the best I’ve seen making the assembly a hop, skip, and a jump (sorry again). The distinctive paint scheme incorporating bare metal (a rarity on Luftwaffe aircraft) and RLM-02 really sets it apart from the well-known Fw190 schemes with which we’re all familiar. It strikes an awesome pose on the shelf. I recommend it to beginner and “experten” alike.
| REFERENCES |
More details and photos from this build can be found on my web site.
Focke Wulf Fw190 Volume one 1938-1943 by Richard Smith and Eddie Creek, Ian Allen Publishing, 2011
Special Drawings Focke Wulf Fw-190c/D-9/Ta-152 Part 2 by Radek Vavrina, CMK Photo Hobby Manual, 2007, ISBN 978-80-903778-5-1
13 March 2017
Copyright ModelingMadness.com
If you would like your product reviewed fairly and fairly quickly, please contact the editor or see other details in the Note to Contributors.
Back to the Main Page Back to the Review Index Page Back to the Previews Index Page