Tamiya 1/48 FW-190D-9
|
KIT #: |
61041 |
|
PRICE: |
$32.00 SRP
|
|
DECALS: |
Three options |
|
REVIEWER: |
Jonathan Prestidge |
|
NOTES: |
Aeromaster 48-722 and Eduard belts & wheels. |
The
Focke-Wulf Fw190D-9 was the first production version of the Fw190 series to use
the 1750hp Jumo 213 liquid-cooled, inverted V-12 engine in place of the BMW 801
radial engine. Its development was started in response to an RLM request for a
high altitude version of the Fw190. The prototype was based on the
 Fw190A
airframe which was stretched to accommodate the longer Jumo engine, giving it a
more streamlined shape. The use of an annular radiator in front of the engine
gave the D-9 a rounded nose profile that was unique among inline engined
fighters. It was first flown in the winter of 1941-1942. After a series of
prototypes, the Fw190D-9 began production in June of 1944. It went into combat
with the III/JG 54 (Green Hearts) in September of 1944, at Achmer, Germany, as
top cover for the Messerschmitt Me 262 jet fighters then entering service.
Fw190A
airframe which was stretched to accommodate the longer Jumo engine, giving it a
more streamlined shape. The use of an annular radiator in front of the engine
gave the D-9 a rounded nose profile that was unique among inline engined
fighters. It was first flown in the winter of 1941-1942. After a series of
prototypes, the Fw190D-9 began production in June of 1944. It went into combat
with the III/JG 54 (Green Hearts) in September of 1944, at Achmer, Germany, as
top cover for the Messerschmitt Me 262 jet fighters then entering service.
The
high altitude performance of the D-9 was still inferior to the allied fighters
ranged against it. However, at lower altitudes the Fw190D-9 was formidable.
Realizing its high altitude shortcomings, the Germans used the D-9 at lower
levels, earning it the nickname of “The Downstairs Maid”. The first real high
altitude fighter produced by Focke-Wulf was the TA152. It was an entirely new
design despite its outward similarity to the Fw190D series of fighters.
The Tamiya
Fw190D-9 was originally released in the mid 1990’s. It was criticized by the “Luft-Experten”
for its undersized tires, D-13 wing, short main landing gear, and enclosed wheel
wells (carried over from their Fw190A kits). While these faults made it
unbuildable to some, the kit was not entirely without merit. On the plus side:
the parts were well molded with crisp engraved detail, t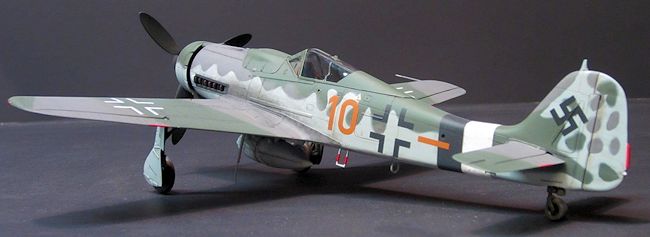 he clear parts were of
good quality, there were two canopy options, markings were included for three
aircraft, and the fit of the parts was excellent.
he clear parts were of
good quality, there were two canopy options, markings were included for three
aircraft, and the fit of the parts was excellent.
The
kit decals were on the thick side and, in my example, had wrinkled on the
backing paper (probably due to moisture and years of storage). Because of this,
I bought a set of AeroMaster decals and decided to give them a try. The only
other problem with the kit that I couldn’t live with was the low-rider look of
the main landing gear. In an effort to fix this, I replaced the Tamiya’s wheels
with a set of Focke-Wulf Fw190 wheels from an Eduard kit.
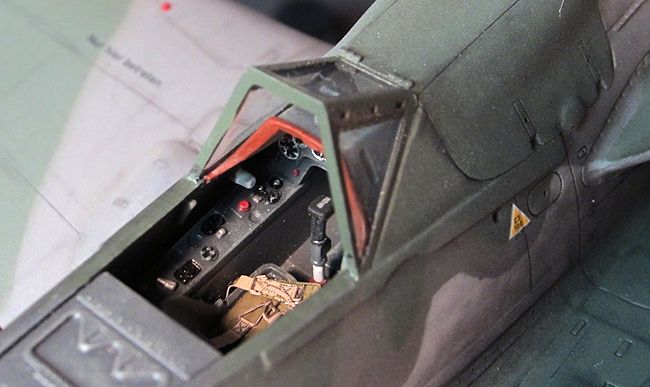
Construction
began with painting and detailing the cockpit. PolyScale acrylic RLM 66 was
applied first. I brush-painted the cockpit details and gave the interior a thin
black wash. Once the wash had dried, I dry-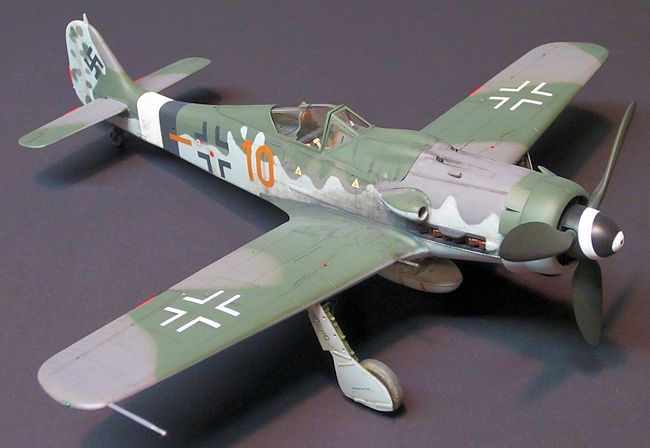 brushed the interior with a slightly
lighter shade of gray. I added the Eduard photoetched seatbelt for the pilot’s
seat, then closed up the fuselage which fit perfectly. Next, I glued the upper
wings to the fuselage before attaching the lower wing. While this yielded a nice
upper-wing-to-fuselage join, the upper and lower wings required putty in the
cannon area. To facilitate sanding, I removed the wing cannons and drilled holes
to locate them later. Several sessions of adding putty, Mr. Surfacer and sanding
followed.
brushed the interior with a slightly
lighter shade of gray. I added the Eduard photoetched seatbelt for the pilot’s
seat, then closed up the fuselage which fit perfectly. Next, I glued the upper
wings to the fuselage before attaching the lower wing. While this yielded a nice
upper-wing-to-fuselage join, the upper and lower wings required putty in the
cannon area. To facilitate sanding, I removed the wing cannons and drilled holes
to locate them later. Several sessions of adding putty, Mr. Surfacer and sanding
followed.
As
the final step in preparation for paint, I added the canopy. The kit canopy was
multi-part, allowing me to tack it in place for painting and open it later. The
clear parts were dipped in Future prior to assembly. I then used Tamiya tape to
mask the clear parts.
Since I had
no photo of the plane I modeled, I used the nicely printed AeroMaster
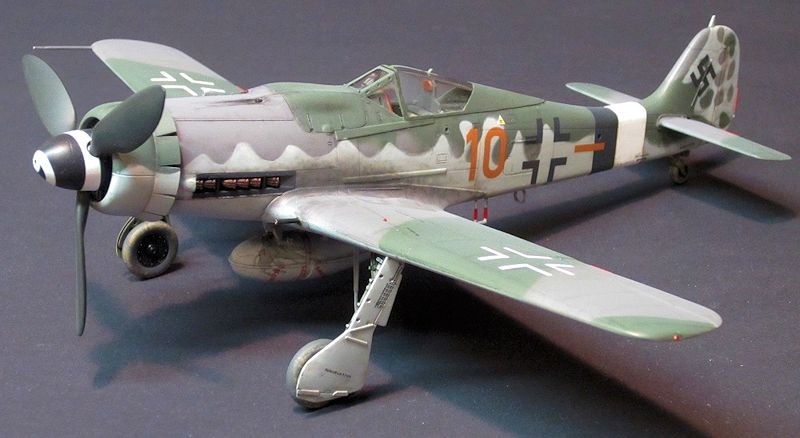
instructions as a painting/marking guide. I chose to model Oblt. Walter
Radener’s Dora 9 of 7/JG26. Radener flew “Brown 10” from the
Nordhorn-Claushheide airfield, Germany, during 1945. It wears a standard RLM
75/82/76 scheme with black & white defense of the Reich bands and a spiraled
spinner.
All
paints used in this build were Polly Scale acrylics. RLM 66 was sprayed on the
canopy framing first, followed by RLM 02 on the gear doors and landing gear. The
RLM 75, 82, & 76 were added in sev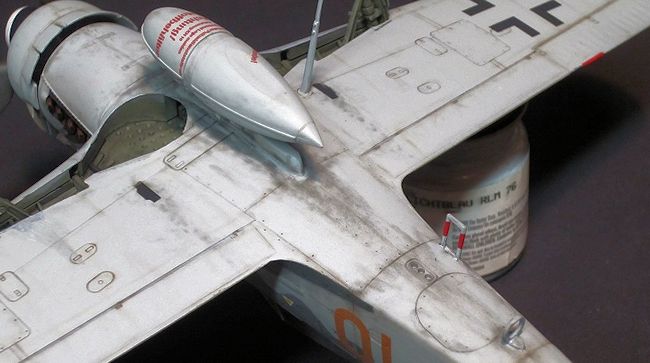 eral painting and masking sessions.
At
this point I used pastels to emphasize the panel lines and dirty the airframe up
a bit. I added structural detail to the Dora 9 by using the pastels to highlight
the underlying stringers, etc. I tried to keep things subtle, adding just enough
to enhance detail. I used a reference book to locate the stringers, bulkheads,
etc. I then sealed everything with a coat of Future in preparation for decals.
The
AeroMaster decals were wonderful! They went down without drama and responded
well to MicroSol. The markings are correct and in register. I had a little bit
of difficulty getting the fuselage bands to conform to the compound curves of
the fuselage. I needed to make relief cuts with a razor blade and touch up the
bands with paint once they were dry. As a modeler with some experience, I should
have known to paint the bands. Laziness is the mother of all sorts of things,
but efficiency is not one of them! After weathering the decals, I gave the plane
a final flat clear coat.
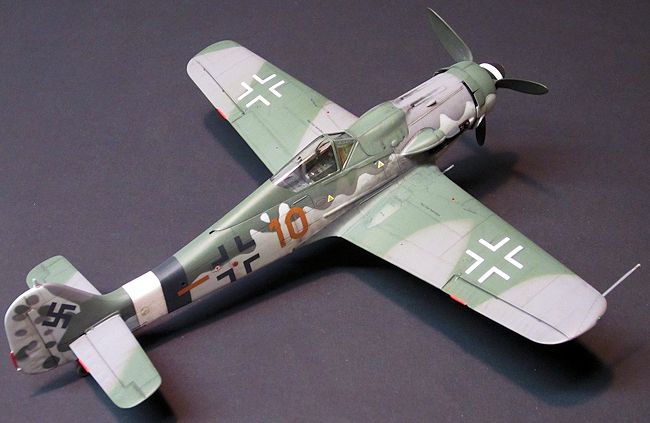
The
landing gear and other final bits were added at this time. I added the Eduard
Fw190 wheels, positioning them as far down on the axles as I could. Between the
larger diameter of the Eduard wheels and the careful positioning, I was able to
“mostly” cure the low-rider look of the kit parts. Final detailing was then
completed.
 I
am very happy with the end result. When I started this kit I was looking for a
quick, pain-free build and Tamiya’s Fw190D-9 delivered. With the simple
replacement of the kit wheels, the “sit” of the model (the most visible of the
kits flaws) was greatly improved. I’m quite sure that no one who sees it on the
shelf will ever notice the Tamiya’s other “fatal” flaws. I would recommend the
Tamiya Fw190D-9 to any modeler save the “Luft-Experten”.
I
am very happy with the end result. When I started this kit I was looking for a
quick, pain-free build and Tamiya’s Fw190D-9 delivered. With the simple
replacement of the kit wheels, the “sit” of the model (the most visible of the
kits flaws) was greatly improved. I’m quite sure that no one who sees it on the
shelf will ever notice the Tamiya’s other “fatal” flaws. I would recommend the
Tamiya Fw190D-9 to any modeler save the “Luft-Experten”.
As
for the AeroMaster decals and Eduard pre-painted seatbelts, they were a breeze
to use and look great! I look forward to using them again. Recommended!
March 2014
Jonathan Prestidge
If you would like your product reviewed fairly and fairly quickly, please contact the editor or see other details in the
Note to
Contributors.
Back to the Main Page
Back to the Review
Index Page