Revell 1/32 FW-190F-8
| KIT #: | 04869 |
| PRICE: | £ |
| DECALS: | Two options |
| REVIEWER: | Frank Reynolds |
| NOTES: | Minimal aftermarket |
| HISTORY |
There is something fascinating about a BMW-engined
Focke Wulf 190, a true classic in military aircraft history. The design was well
proportioned and logical, its wide track landing gear suited to a wide variety
of r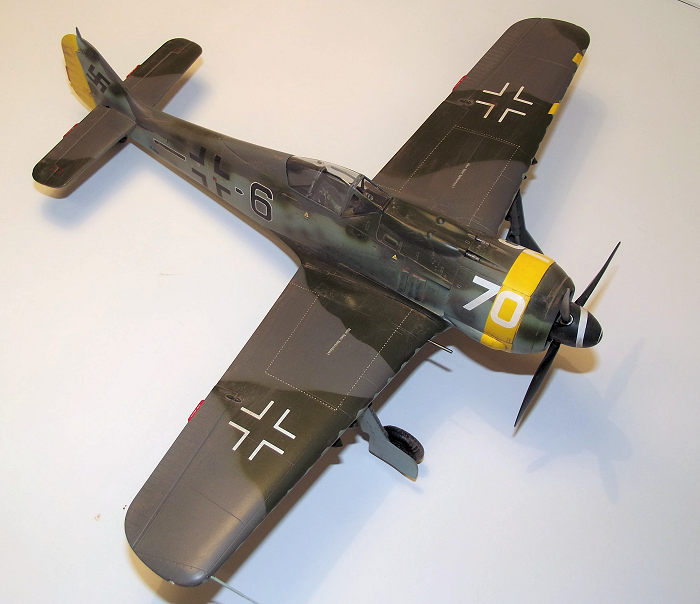 unway surfaces. The pilot was positioned at the highest point of the
airframe under a bubble-like canopy. The fuselage was sparing in its design,
matched to the width of engine, and then tapering to a width just sufficient to
accommodate the pilot’s cockpit. The strong stubby wing could accommodate
internal guns and external stores. First flown on June 1st 1939 the
FW190 was a typical second generation piston engine monoplane fighter of the
World War 2 era. If it looks right, it is right- and never more so than with
Germany’s Butcher Bird.
unway surfaces. The pilot was positioned at the highest point of the
airframe under a bubble-like canopy. The fuselage was sparing in its design,
matched to the width of engine, and then tapering to a width just sufficient to
accommodate the pilot’s cockpit. The strong stubby wing could accommodate
internal guns and external stores. First flown on June 1st 1939 the
FW190 was a typical second generation piston engine monoplane fighter of the
World War 2 era. If it looks right, it is right- and never more so than with
Germany’s Butcher Bird.
The F-8 series went into service in early 1944 and was specifically designed for a ground attack role. With an armoured forward fuselage and nose and featuring provision for up to five externally mounted bombs, combined with two MG131 and two MG151 machine guns it was a formidable weapon. The type appeared with both a flat tapered and bubble canopy.
| THE KIT |
I approach FW190 kits with some caution as I am still reeling from the anguish of trying to build Eduard’s first attempts at ’190s in 1:48th scale. They were kits that appeared to expose my inability to assemble a plastic model aircraft kit correctly and after three were purchased, started, then consigned to the trash bin I decided that the Butcher Bird was probably not for me. I was persuaded to come out of my darkened room by two elements of Revell’s release – the stunning box art and the price. I had also acquired over twenty Luftwaffe paints from the Xtracrylix range and they deserved a suitable canvas. I hoped that the larger scale might avoid assembly problems.
This originates with Revell of Germany. Their
familiar end opening blue box features a spectacular illustration of a pair of
aircraft low over a smoky wooded landscape. The well packed box contained
fifteen parts frames in bags, the parts moulded crisply in a pale grey plastic.
Surface detail is nicely rest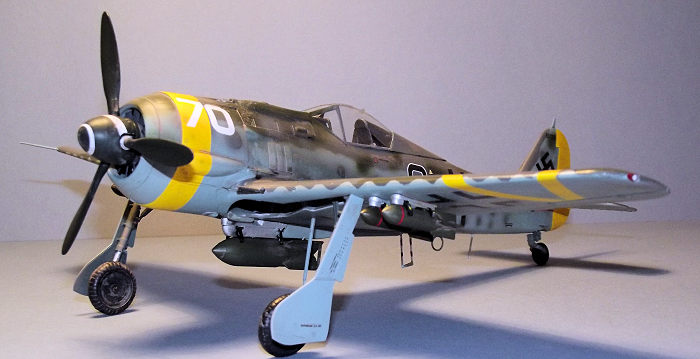 rained and there was no evidence of flash.
Unusually, the kit includes a large display stand.
rained and there was no evidence of flash.
Unusually, the kit includes a large display stand.
A sixteen page instruction sheet in grey scale has seventy eight stages of construction to lead the builder gently through the project. The main camouflage colours are helpfully identified with RLM paint numbers.
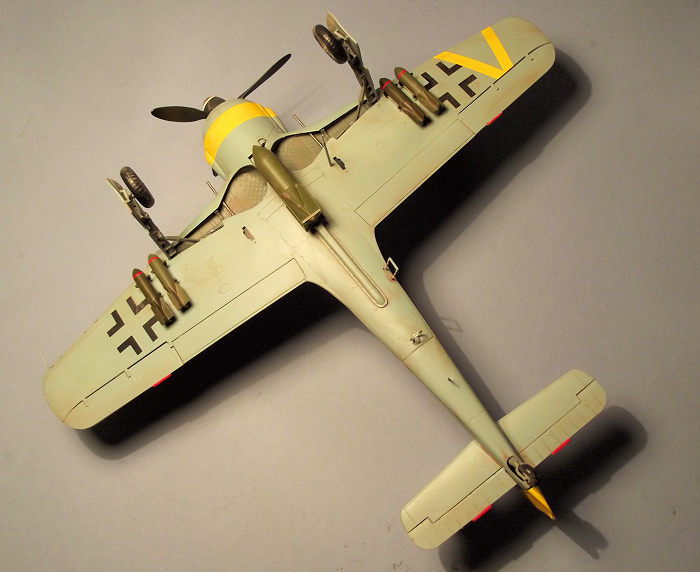
There are so many options in this kit that a long and careful perusal of the instructions is recommended. The engine cowlings and cockpit hood can be modelled open. There is a choice of underside stores consisting of a single SC500 or SC250 bomb for the centre section; a pair of fuel tanks for the underwing or two pairs of SC50 bombs. A retracted gear option is available for those who feel the need.
I checked methodically through the instructions and the parts frames, firstly taking out the parts that Revell highlight as not for use, secondly those parts that I did not plan to use. 61 parts were consigned to the spares box but there were still plenty left to play with. Next I went through the instructions and struck out the build stages that were not relevant for me such as retracted landing gear or cowl panels open.
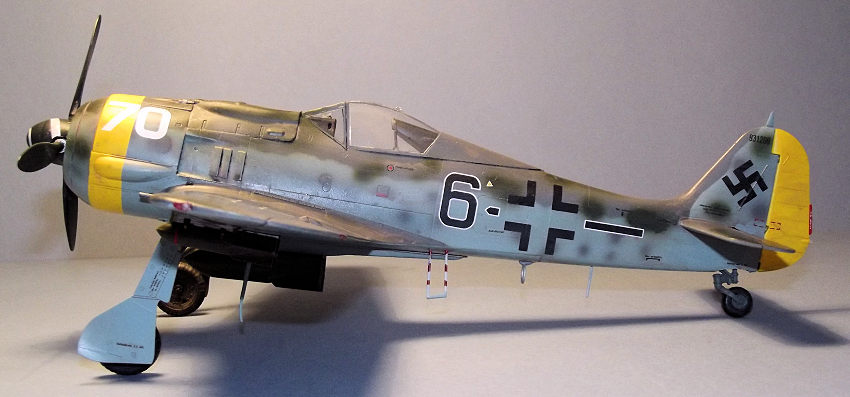
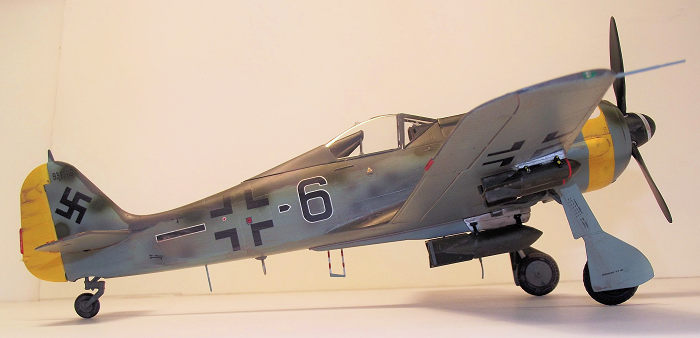
A smallish decal sheet gives two options for F-8s in Czech territory, 1945. They are both bubble canopy variants. Airframe stencils are clearly printed. Swastikas for the tail fin must be obtained from aftermarket sources.
| CONSTRUCTION |
I had no plans to open any hatches or the canopy and I had already eliminated many of the unwanted parts. I had decided that the engine mouldings, being buried under the cowling would simply serve to support the exhaust pipes and the propeller assembly. Nothing can be seen of the engine front behind the cooling fan so I would not paint the engine. This has the advantage that unpainted plastic is much easier to glue and that location holes are not compromised with paint so I hoped that I would be able to build the engine assembly accurately.
The instructions flag up the need to select and
drill out appropriate holes in the lower wing according to the stores load out
that has been selected. The build commences with the cockpit and a substantial
one piece 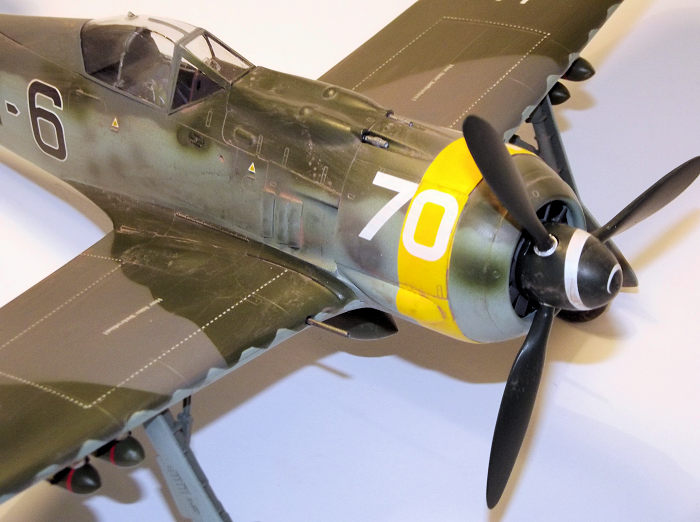 moulding that incorporates the floor, cockpit sides, side consoles and
the long rear shelf under the canopy. A rudder bar frame with separate pedals is
glued in place followed by the lower instrument panel and a bucket seat. I chose
the base cockpit colour to be Xtracrylix RLM 66 Schwarzgrau Matt (XA 1203)
heavily dry brushed with a slightly lighter grey to give some contrast. A seat
cushion is provided with moulded in seat belts and decals for the shoulder
belts, although I chose to replace these with some laser cut fabric belts from
the excellent HGW Models range. The upper instrument panel and coaming is built
up as a separate unit. The instruments are represented in low relief on the
mouldings and could be painted. I used a few on line reference pictures to
assist in the placement of decals from Airscale’s generic Luftwaffe sets for
both dials and cockpit placards. The shelf forward of the instrument coaming is
a separate sub assembly and this was put by for later in the build.
moulding that incorporates the floor, cockpit sides, side consoles and
the long rear shelf under the canopy. A rudder bar frame with separate pedals is
glued in place followed by the lower instrument panel and a bucket seat. I chose
the base cockpit colour to be Xtracrylix RLM 66 Schwarzgrau Matt (XA 1203)
heavily dry brushed with a slightly lighter grey to give some contrast. A seat
cushion is provided with moulded in seat belts and decals for the shoulder
belts, although I chose to replace these with some laser cut fabric belts from
the excellent HGW Models range. The upper instrument panel and coaming is built
up as a separate unit. The instruments are represented in low relief on the
mouldings and could be painted. I used a few on line reference pictures to
assist in the placement of decals from Airscale’s generic Luftwaffe sets for
both dials and cockpit placards. The shelf forward of the instrument coaming is
a separate sub assembly and this was put by for later in the build.
The tailwheel assembly is a little jewel. The wheel is formed from separate halves for both the hub and tyre and this helps avoid one of my pet hates - picking out tyres with a paint brush - for the hubs and tyres sides can be painted pre-assembly. After joining up the parts the centreline join on the tyres can be cleaned up and touched in and if that turns out to be a slightly different colour you can insist that it represents wear on the tyre contact surface. The tail leg and hub were painted RLM Grau 02 ( XF-22 from Tamiya’s range) and the tyre XF-85 Rubber Black.
The tail wheel is glued into positive locations inside the fin and the fuselage halves can be joined, trapping the instrument coaming in place. The cockpit assembly is added from underneath and the forward cowling shelf glued up to the instrument panel hump.
 Attention now turns to the wing structure. Two
very substantial spar sections are glued to the one piece lower wing, the front
one incorporates the engine firewall. These dictate the shape and strength of
the rest of the build so I took care to ensure that all moulding tags were
completely removed and the joining areas smoothed over. I omitted the gun
barrels that pass through the wheel bays into the leading edge, having
established that I could juggle then into position later. The large one piece
wheel bay mouldings fitted snugly into place and I made sure that all joints
were fully secured with Plastic Weld liquid cement to give a strong centre
section. Two large ammunition boxes to the front of the firewall complete this
section and it was left for a couple of days to set.
Attention now turns to the wing structure. Two
very substantial spar sections are glued to the one piece lower wing, the front
one incorporates the engine firewall. These dictate the shape and strength of
the rest of the build so I took care to ensure that all moulding tags were
completely removed and the joining areas smoothed over. I omitted the gun
barrels that pass through the wheel bays into the leading edge, having
established that I could juggle then into position later. The large one piece
wheel bay mouldings fitted snugly into place and I made sure that all joints
were fully secured with Plastic Weld liquid cement to give a strong centre
section. Two large ammunition boxes to the front of the firewall complete this
section and it was left for a couple of days to set.
No paint had been used on the centre section assembly so I had a clear view of how to install the two N struts that link the circular engine mount to the firewall. The struts and mount were dry fitted together and checked to ensure that they were lined up correctly. Revell’s parts are well engineered so there were no problems and the joints were washed over with Plastic Weld applied with a small brush and left to set.
The engineless fuselage was lowered onto the wing structure and I was pleased to find that it fitted without fuss. The upper wing halves were fitted with their ailerons and then glued down to complete a strong basic structure.
Next the wing flaps, horizontal tail and elevators were glued in place. The rudder halves were assembled but set aside to be painted separately.
Perhaps I should have an attack of conscience that the 190’s magnificent engine assembly would be buried forever, but I was committed. I followed the instructions to the letter and omitted nothing since the cowls are intended to be supported by the engine unit. The complicated cat’s cradle of exhaust pipes was fitted using tube cement since this dries slowly and permits any small adjustments that are needed. The ends of the exhaust pipes were painted Red-brown since only the tips would be visible. The engine cowl ring and lower quarter teardrop shaped cowl panels were kept close at hand while the installation was checked and rechecked, then the engine was eased into place and the ring and teardrop section added. The armoured cowl ring and engine fan were dry fitted to ensure that everything lined up.
The main gear can conveniently be built at this point and it features the same split assembly for the wheels and tyres. The simple gear legs are moulded as a one piece unit to which a single oleo link is fitted.
 It was now time to fit the nose panels and it
turned out to be an anti-climax. I omitted the nose machine guns and would fit
the exposed barrel ends later. There are two long top panels from the cowl ring
to the windscreen, two lower cowl panels and two inset side panels above the
teardrops. After being dry fitted and taped into place to ensure a snug fit they
were secured with tube cement and the butt joints between the panels filled with
Plastic Weld. The inner cowl ring was added but the cooling fan was set aside to
be painted separately.
It was now time to fit the nose panels and it
turned out to be an anti-climax. I omitted the nose machine guns and would fit
the exposed barrel ends later. There are two long top panels from the cowl ring
to the windscreen, two lower cowl panels and two inset side panels above the
teardrops. After being dry fitted and taped into place to ensure a snug fit they
were secured with tube cement and the butt joints between the panels filled with
Plastic Weld. The inner cowl ring was added but the cooling fan was set aside to
be painted separately.
The canopy interior features a headrest which was painted Schwarzgrau then the canopy fixed closed and the glazing masked with Tamiya tape.
The airframe was checked over for any areas that needed to be smoothed out but there was no need for any significant filler so it was primed with medium Grey Auto primer from a rattle can.
| COLORS & MARKINGS |
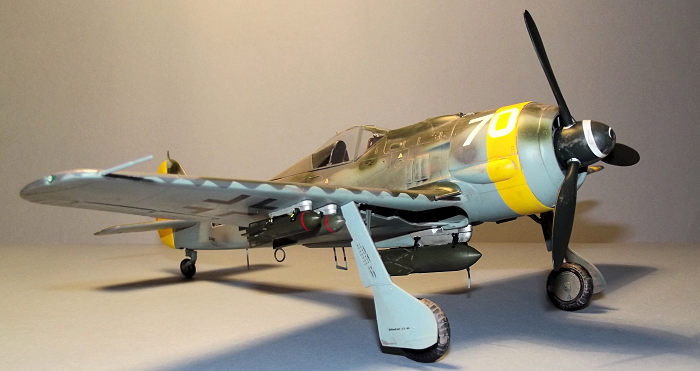
I used my ever-faithful Iwata HP-C airbrush. The yellow nose band, under wing chevron and rudder were painted white as an undercoat, then the finish built up with Tamiya XF-3 Flat Yellow with an overlay of Xtracrylix XA1011 Trainer Yellow. The yellow areas were covered up with Tamiya tape and the undersides, fuselage sides, wing leading edges and fin painted with Tamiya XF-23 to represent RLM76 Lichtblau.
 The ragged demarcation on
the fuselage was assisted with the use of a stainless steel mottle mask that I
bought from Hannants in the UK. This has many perforations to create a hard edge
mottle but I found its most useful feature to be a ragged edge where a card mask
can be traced onto a long strip cut from the kit’s box which is then taped to
the fuselage side. The scalloped camouflage demarcation of the wing leading edge
was achieved by laying a strip of Tamiya tape onto a sheet of glass then cutting
a wavy line down the centre of the strip. Each side can then be peeled away to
mask to leading edge. The remaining areas of the lower surfaces were masked over
and the upper surfaces sprayed with RLM75 Grauviolet (Xtracrylix XA1207).
Further masking permitted the counter shading of RLM 83 Dunkelgrun (XA1226) to
be applied with an irregular division line. The fuselage side masking was stripped away and
the airbrush set to a low pressure to enable the soft mottle of 75 and 83 to be
applied.
The ragged demarcation on
the fuselage was assisted with the use of a stainless steel mottle mask that I
bought from Hannants in the UK. This has many perforations to create a hard edge
mottle but I found its most useful feature to be a ragged edge where a card mask
can be traced onto a long strip cut from the kit’s box which is then taped to
the fuselage side. The scalloped camouflage demarcation of the wing leading edge
was achieved by laying a strip of Tamiya tape onto a sheet of glass then cutting
a wavy line down the centre of the strip. Each side can then be peeled away to
mask to leading edge. The remaining areas of the lower surfaces were masked over
and the upper surfaces sprayed with RLM75 Grauviolet (Xtracrylix XA1207).
Further masking permitted the counter shading of RLM 83 Dunkelgrun (XA1226) to
be applied with an irregular division line. The fuselage side masking was stripped away and
the airbrush set to a low pressure to enable the soft mottle of 75 and 83 to be
applied.
The propeller assembly was painted in Schwarzgrun while still on the frame and the engine fan also. This permitted the small spinner spiral decal to be applied before the prop was assembled. The bombs and their carriers were built up and painted alongside the main airframe. The bombs were finished in Tamiya XF-62 Olive Drab
The airframe was unmasked and the paintwork was touched in where necessary and sealed with two hand brushed coats of Future/Klear floor polish to provide a glossy surface for the application of decals.
The decals went on fairly easily and did not need the assistance of any decal setting solution. They were sealed in place with a sprayed coat of Xtracrylix matt varnish.
 The main landing gear was a fuss free installation
into positive locations that set the distinctive angle of the legs. The doors
were glued up to the legs. The wing guns were juggled into position through the
wheel wells and the cut down cowl guns slipped into the slots in the upper cowl.
Bomb carriers and their bombs, aerials and access step were added and the tiny
wing tip lights to complete the build.
The main landing gear was a fuss free installation
into positive locations that set the distinctive angle of the legs. The doors
were glued up to the legs. The wing guns were juggled into position through the
wheel wells and the cut down cowl guns slipped into the slots in the upper cowl.
Bomb carriers and their bombs, aerials and access step were added and the tiny
wing tip lights to complete the build.
The whole airframe was covered with a brushed on coat of Promodeller Weathering Wash Mud Brown which was allowed to dry. The wash was progressively wiped away with a damp sponge until I got the effect that I wanted – just a hint of dust and dirt. Finally the airbrush was fired up with a little Tamiya Smoke wafted along the fuselage from the exhausts to the trailing edge of the wing.
| CONCLUSIONS |
What a beautiful kit! It’s big and imposing and looks great on the shelf. I managed to simplify the build to suit the limits of my skillset and I got a result that pleases me. Instead of seeing Fw190s in my nightmares I might start seeing them in my dreams.
At the price asked it can be built with a clear conscience even if that luxurious engine assembly is buried. Highly recommended.
| REFERENCES |
Butcher Bird, The Focke-Wulf Fw190 by Edward Shacklady. Cerberus Publishing 2003.
24 August 2017
Copyright ModelingMadness.com. Kit courtesy of my wallet. If you would like your product reviewed fairly and fairly quickly, please
contact
the editor or see other details in the
Note to
Contributors. Back to the Main Page
Back to the Review
Index Page
Back to the Previews Index Page