1/72 Mistel II Conversion
|
KIT #: |
Matchbox PK-109,
Hasegawa AP3, Falcon Unnumbered |
|
PRICE: |
$? |
|
DECALS: |
Spares box |
|
REVIEWER: |
Brian Baker |
|
NOTES: |
An interesting and challenging conversion. |
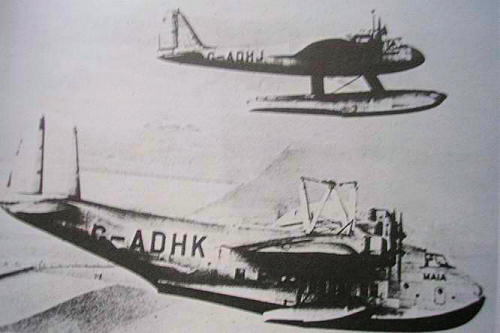 The
Mistel, or Beethoven project was inspired by the British Short-Mayo Composite
Seaplane-Flying Boat aircraft used in
1937-1938 to extend the range of the
Imperial Airways’ Short Empire flying boats carrying mail across the
Atlantic. This consisted of a standard Short S.23
Empire flying boat modified to S.21 Maia standard
with mounting struts (Maia was the name of the individual flying boat),
and a specially built four engine seaplane, the S.20 Mercury , a small four
engine floatplane which rode piggy-back on top of the S.23, and which was
launched in the air at half of the Maia’s range,
completing the flight to its destination with the mail, while the flying
boat went back to its departure point.
Although the aircraft completed its first Trans Atlantic flight in
January, 1938, and its record long distance flight, 6,045 miles between
Dundee,
Scotland
and
Cape Town,
South
Africa,
was completed in October, 1938, development was interrupted by the outbreak of
World War II, when the aircraft were taken over by the RAF.
The photo shows the first in air
separation of Short S.23
Empire “Maia” (G-ADHKM), and the
original Short S.20 “Mercury” (G-ADHJ).
The
Mistel, or Beethoven project was inspired by the British Short-Mayo Composite
Seaplane-Flying Boat aircraft used in
1937-1938 to extend the range of the
Imperial Airways’ Short Empire flying boats carrying mail across the
Atlantic. This consisted of a standard Short S.23
Empire flying boat modified to S.21 Maia standard
with mounting struts (Maia was the name of the individual flying boat),
and a specially built four engine seaplane, the S.20 Mercury , a small four
engine floatplane which rode piggy-back on top of the S.23, and which was
launched in the air at half of the Maia’s range,
completing the flight to its destination with the mail, while the flying
boat went back to its departure point.
Although the aircraft completed its first Trans Atlantic flight in
January, 1938, and its record long distance flight, 6,045 miles between
Dundee,
Scotland
and
Cape Town,
South
Africa,
was completed in October, 1938, development was interrupted by the outbreak of
World War II, when the aircraft were taken over by the RAF.
The photo shows the first in air
separation of Short S.23
Empire “Maia” (G-ADHKM), and the
original Short S.20 “Mercury” (G-ADHJ).
German
Developments
 In 1942,
the
DFS
firm, known for its
DFS.230
troop glider, began experiments to extend the range of the glider using the same
principle, mounting a powered aircraft on top, which would release when the
glider was near its intended landing point. They were aware of the British
Short-Mayo developments. First
experiments were conducted in
Bavaria
in September, 1942, using a
DFS-230
glider with a Klemm 35 primary trainer mounted on top.
The combination was towed into the air
by a JU-52 transport, and it
was found that the engine of the Klemm was not powerful enough for the
combination to maintain altitude.
Practice separations were successful, however.
Next, they tried a Focke Wulf FW-56 Stosser trainer, which produced
enough power to maintain altitude, but not enough for an independent takeoff.
By 1943, they got serious about the project, and replaced the FW-56 with
a Messerschmitt Bf-109E, which finally achieved independent flight, requiring a
takeoff run of only about 1200 feet (400 meters).
Although the aircraft was considered to be successful, it was never used
in the glider role.
In 1942,
the
DFS
firm, known for its
DFS.230
troop glider, began experiments to extend the range of the glider using the same
principle, mounting a powered aircraft on top, which would release when the
glider was near its intended landing point. They were aware of the British
Short-Mayo developments. First
experiments were conducted in
Bavaria
in September, 1942, using a
DFS-230
glider with a Klemm 35 primary trainer mounted on top.
The combination was towed into the air
by a JU-52 transport, and it
was found that the engine of the Klemm was not powerful enough for the
combination to maintain altitude.
Practice separations were successful, however.
Next, they tried a Focke Wulf FW-56 Stosser trainer, which produced
enough power to maintain altitude, but not enough for an independent takeoff.
By 1943, they got serious about the project, and replaced the FW-56 with
a Messerschmitt Bf-109E, which finally achieved independent flight, requiring a
takeoff run of only about 1200 feet (400 meters).
Although the aircraft was considered to be successful, it was never used
in the glider role.
Early
in the war, Junkers test pilot
Siegfried Holzbaur came up with the idea of using the principle to attack
targets on the ground. The idea was
initially rejected, but eventually, after it was discovered that the Luftwaffe
was losing 27 aircraft for every ship sunk, the idea was again considered, this
time using a JU-88 controlled by a fighter mounted above.
Finally, in 1943, a JU-88A-4/Bf-109F combination was successfully flown
and separated, and tactics for its use were developed.
By 1944, hollow charge warheads had been developed and tested,
and flight tests showed some promise. A number of JU-88’s slated for
scrapping were converted to Misteln, and these were test flown with their
original nose sections, provision being made for the installation of a 3.5 ton
warhead for operational use. Assembly and
flight testing was done at Nordhausen, and twelve aircraft of IV/KG
101were transferred to
France
after the
Normandy
invasion. The first attacks were
inconclusive due to weather and other factors.
Later,
III/KG
66 was formed, and 5/KG 200 served as a pathfinder unit while
7/KG 200 became an operational training unit. Most combat missions during
this period were failures, mainly because of the difficulty in controlling these
planes after release. They were
also very vulnerable to enemy fighters. Plans to attack specific targets usually
were canceled, and the Misteln were frittered away attacking individual targets,
usually without success. Most just
hit the ground in open country causing terrific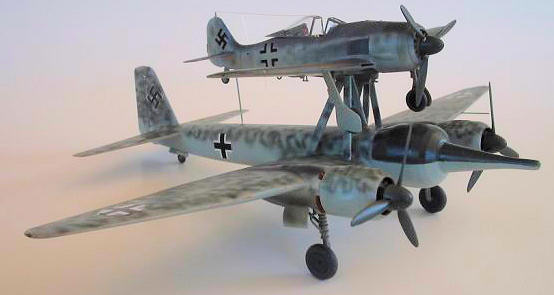 but harmless explosions.
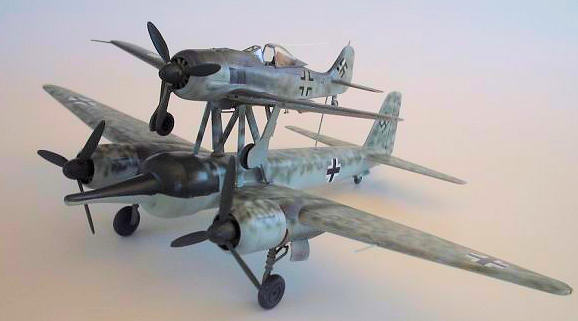
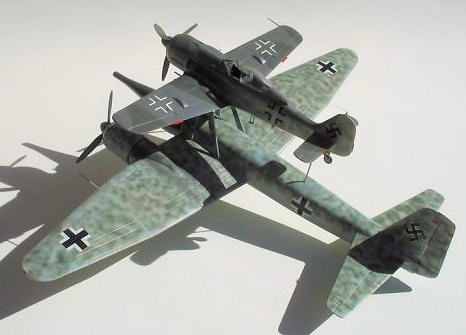
Variations
included the Mistel I, with a Bf-109 control plane, and the Mistel II, using am
FW-190A. Versions preceded with an
”S” were training versions. Some long fuselage JU-88H-4’s were converted,
but although all types of Misteln were used to attack various bridges during the
final days of the Third Reich, many survived to be captured and examined by the
Allies. A number of training
combinations were converted, but usually BMW powered JU-88G’s were controlled by
FW-190A’s burning the same type of fuel, while Jumo powered JU-88A’s had
Bf-109’s, although training models varied. Photos
show fairly large groups of Misteln on the ground, but their effect on the
overall war was extremely limited, and many were discovered and captured at
various locations by the Allies at the end of the war.
Although
Italeri has produced an excellent
Mistel I, with a JU-88A-4 and
Bf-109F, it is left to the modeler to come up with the Mistel
II combination.
Possibilities include the Italeri JU-88G-1 night fighter kit, and the old
Matchbox JU-188 kit, which is obsolete by modern standards with the appearance
of the Italeri JU-188. The Matchbox
kit only requires a few modifications to become acceptable, although serious
modelers will want to do some superdetailing for a real first class model. Not
being that ambitious, I built mine almost OTB, except for the wingtip change and
warhead installation. I did use the
radial engine and propeller units from the Italeri JU-188 kit, as the Matchbox
engines and props are really poor. I was surprised by the results.
 First,
the Matchbox is an old kit, and I used the one I had because I
wanted
to save my only remaining Italeri kit for another model.
It is reasonably accurate in outline for a JU-188, with the squared tail
unit and pointed wingtips, but the cockpit arrangement is very poorly done, with
some windows on clear plastic and others with just indentations in the plastic
that, I suppose, are intended to be painted, although really serious modelers
would probably trim them out and somehow fill them with transparent plastic if
they don’t just go to the Italeri kit.
The engines are a bit crude, and the props and cowling fronts are
identical to those of Matchbox’s FW-190A kit---not too bad for the FW-190 but
totally inadequate for the JU-188. My solution was to scavenge the engines,
cowlings, and propellers from an Italeri JU-188 kit, as these are much better,
although they lack the cooling fan that the German BMW engines had.
I used star washers from the hardware store, and they worked out OK.
Strange that Italeri left these out on the JU-188, as they are included in their
DO-217 kit, which has the same identical engines.
First,
the Matchbox is an old kit, and I used the one I had because I
wanted
to save my only remaining Italeri kit for another model.
It is reasonably accurate in outline for a JU-188, with the squared tail
unit and pointed wingtips, but the cockpit arrangement is very poorly done, with
some windows on clear plastic and others with just indentations in the plastic
that, I suppose, are intended to be painted, although really serious modelers
would probably trim them out and somehow fill them with transparent plastic if
they don’t just go to the Italeri kit.
The engines are a bit crude, and the props and cowling fronts are
identical to those of Matchbox’s FW-190A kit---not too bad for the FW-190 but
totally inadequate for the JU-188. My solution was to scavenge the engines,
cowlings, and propellers from an Italeri JU-188 kit, as these are much better,
although they lack the cooling fan that the German BMW engines had.
I used star washers from the hardware store, and they worked out OK.
Strange that Italeri left these out on the JU-188, as they are included in their
DO-217 kit, which has the same identical engines.
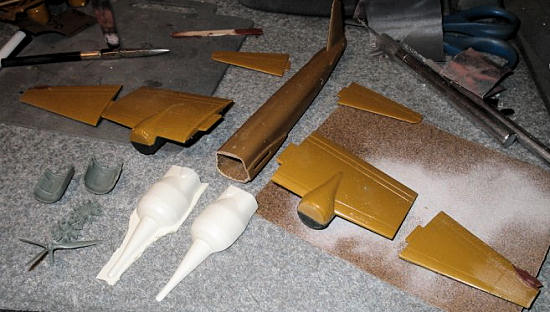
The
Matchbox kit is extremely basic, and the only real drawback is the trench-like
panel lines which really need to be filled in and re-scribed.
The wings are molded in inner and outer sections, which means that they
have to be aligned carefully.
You’ll need a lot of filler on this kit, which is to be expected of a kit of
this vintage. The tail unit is also very simple, and can be glued in place with
no trouble. The wingtips need to be reshaped, and it means more than just
cutting off the tips, as a small sheet of card needs to be added to get the
right contour. This is explained in
the Falcon kit instructions.
The Falcon Conversion Kit
The
Falcon Mistel II conversion kit is very old, and mine must have been in my
vacuform kit box for at least twenty five years, although there is no indication
on the instruction sheet when this was issued. Since it was issued for the
Matchbox kit, which is copyrighted 1974, and my earliest Italeri JU-188 model,
which I estimate was built around 1977, my suspicion is that the Falcon
conversion kit was issued in the late seventies, which could make it as much as
forty years old. It consists of a small vacuform sheet of thick plastic with the
halves of the warhead molded in accurate outline.
The plastic was extremely brittle, but this may have been due to its age
and the fact that it was stored in an unheated airplane hangar for many years.
The parts are processed
 by trimming carefully, and sanding the edges down
on a rough sheet of sandpaper, not a difficult task, but the brittleness of the
plastic requires careful handling. The
instructions tell exactly where to trim the fuselage so that a fairly good fit
is achieved, and the warhead even
has part of the leading edges of the wing roots included, which helps align it
properly. It is molded in styrene,
so my Tenax worked perfectly. It
sanded and filled easily, and I continued assembling the kit.
by trimming carefully, and sanding the edges down
on a rough sheet of sandpaper, not a difficult task, but the brittleness of the
plastic requires careful handling. The
instructions tell exactly where to trim the fuselage so that a fairly good fit
is achieved, and the warhead even
has part of the leading edges of the wing roots included, which helps align it
properly. It is molded in styrene,
so my Tenax worked perfectly. It
sanded and filled easily, and I continued assembling the kit.
The main
problem was that although the mounting struts are outlined on the instruction
sheets, they don’t coincide with the three view drawing in 1/72 scale that is
provided, and you just have to eyeball the strut length to get them right.
The attachment points are easy to locate, and the three struts on each
side are easy to line up. In
addition, there is no marking information provided, nor decals, but this isn’t a
real problem if you have good references. Speaking of references,
a small paperback, “Mistel” by Hans-Peter Dabrowski was my main
reference, as it has many photos of Mistels, although many of them are of
aircraft without warheads, with just the struts attached.
William Green’s old “War Planes of the Third Reich” is also useful if you
can find a copy. There is some information on line, but nothing that wasn’t in
the above listed publications.
There is
a more recent resin conversion kit available for this airplane based on the
Italeri JU-88G-1 kit. This is produced by Aries, and would probably be an easier
conversion than the one I did, but I did this one because I had it, and I enjoy
a challenge.
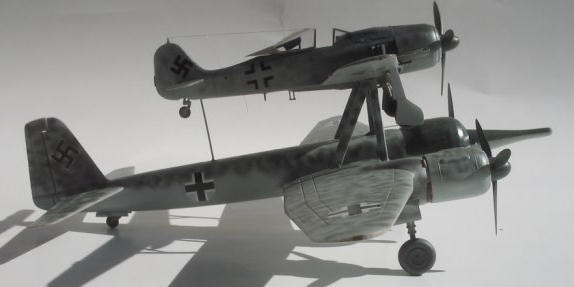
The
Hasegawa FW-190A-8 kit has been reviewed many times, so I won’t repeat it again.
It is probably the best kit available of the A-8/F-8 version, and has the
bubble canopy in addition to the flat hatch.
It can be displayed in open position, and it an acceptable model in all
cases. There are some aftermarket
detail sets available for this kit, which are very nice, but an OTB model was
sufficient for this project. I used a
standard 74/75/76 scheme with black outline crosses except for the upper wing
surfaces, which used white outline crosses. When finished, it needs to be
attached to the struts on top of the JU-88G. This can be a rather delicate
proposition, but nothing a fairly experienced modeler with a lot of patience
can’t handle.
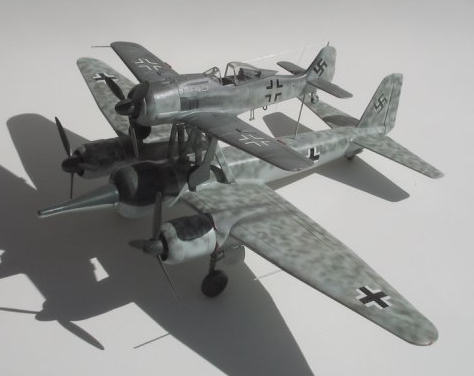 Since I
was doing the BMW powered JU-88G,
and since nearly all JU-88G’s were night fighters, I used standard night fighter
camouflage. I don’t think that at
that stage of the war, anyone was willing to devote much time and effort to
repainting an airplane that was going on a one way mission, although some of
these appear in photos with dark green patches all over the upper surfaces,
probably hastily added for ground camouflage by ground crews after the
rebuilding process. I used
RML
76 overall, with
RML
75 grau speckled pattern, topped with
RML
70 grun splotches for better ground camouflage. Many photos of these aircraft
show them heavily camouflaged with nets or tree limbs, so an exact color match
would be extremely difficult. I think I am safe going with the 76/75/70 scheme.
Few of these aircraft carried any kind of unit markings, and I haven’t
seen a photo of one of the FW-190A’s with anything other than the usual
Luftwaffe crosses. Most of the night fighters carried black crosses with white
edging, and this is the scheme I used on my missile aircraft. The warhead was
painted
RML
70 on top, and RLM 76 below, and this shows in the few photos I have seen.
Since I
was doing the BMW powered JU-88G,
and since nearly all JU-88G’s were night fighters, I used standard night fighter
camouflage. I don’t think that at
that stage of the war, anyone was willing to devote much time and effort to
repainting an airplane that was going on a one way mission, although some of
these appear in photos with dark green patches all over the upper surfaces,
probably hastily added for ground camouflage by ground crews after the
rebuilding process. I used
RML
76 overall, with
RML
75 grau speckled pattern, topped with
RML
70 grun splotches for better ground camouflage. Many photos of these aircraft
show them heavily camouflaged with nets or tree limbs, so an exact color match
would be extremely difficult. I think I am safe going with the 76/75/70 scheme.
Few of these aircraft carried any kind of unit markings, and I haven’t
seen a photo of one of the FW-190A’s with anything other than the usual
Luftwaffe crosses. Most of the night fighters carried black crosses with white
edging, and this is the scheme I used on my missile aircraft. The warhead was
painted
RML
70 on top, and RLM 76 below, and this shows in the few photos I have seen.
If I had
to do this again, I would probably opt for the Italeri kit.
First choice would probably be the Aires conversion kit, as it is newer
and resin. The Italeri JU-88G would
be easiest to convert, but the JU-188 kit would also be useable if the wingtips
are suitable modified. I understand that the Italeri JU-88G is rather hard to
find, but either kit would work.
This proves the old adage about the silk purse and sow’s ear. Take the
challenge. That’s what modeling is all about.
Brian Baker
April 2010
If you would like your product reviewed fairly and quickly, please
contact
me or see other details in the
Note to
Contributors.
Back to the Main Page
Back to the Reviews Index Page