Tamiya 1/48 He-162A
| KIT #: | 61097 |
| PRICE: | 2400 yen |
| DECALS: | Four options |
| REVIEWER: | Ben Brown |
| NOTES: | Eduard belts used. |
| HISTORY |
The Heinkel He-162 Spatz (Sparrow) arose out of a September, 1944 requirement from the German Air Ministry for a small, lightweight, jet-powered interceptor. It must be built by unskilled labor around the BMW 003 engine and must use a minimum of strategic materials. At some point during development, it was even suggested that the new aircraft be flown by novice pilots whose only previous experience was in gliders. Generalleutnant Adolf Galland vehemently opposed the "Volksjager" (Peoples' Fighter) project, on the grounds that it would drain valuable resources for the Me-262 and would be a death trap in inexperienced hands. Galland was overruled by Goering and others, so the project continued. The new fighter was to weigh about 4400 pounds, have a top speed of 466mph at sea level, and be equipped with two 20mm or 30mm cannon. Competing companies had just ten days to submit their proposals and the winning design had to be ready for production by January 1, 1945. Heinkel submitted a design with a metal fuselage, wooden shoulder-mounted wing, twin vertical stabilizers, and the engine mounted on top of the fuselage. In addition to the wings, the landing gear doors and nose cone were also made of wood. The main landing gear from the Bf-109 to simplify production. A simple ejection seat was fitted to ensure the pilot cleared the engine when bailing out. The design submitted by Blohm & Voss, which had its engine imbedded in the fuselage, was preferred by many officials because it used less aluminum in construction and it’s engine didn’t block the pilot’s view to the rear. Heinkel's proposal was accepted instead, because it had the best chance of meeting the required delivery dates and needed fewer man-hours to build.
 The first prototype was flown on
December 6, 1944. It reached a top speed of 522mph and handled well except for
some longitudinal stability problems. The flight ended with one of the wooden
main gear doors coming adrift, due to defective bonding of the plywood. Four
days later the aircraft crashed, killing test pilot Flugkapitan Peter.
The wooden leading edge of the right wing had delaminated, also as a result of
defective bonding. This lack of quality control haunted the Spatz
(“Salamander” was actually the code name covering the factories that built the
jet’s wooden components) throughout its short career. The furniture
manufacturers and other woodworking companies that were to build the wood parts
for the jet produced substandard parts and often failed to use the correct grade
of wood, proper procedures for bonding the parts, or maintain required design
tolerances. Entire shipments were sometimes rejected due to poor quality.
The first prototype was flown on
December 6, 1944. It reached a top speed of 522mph and handled well except for
some longitudinal stability problems. The flight ended with one of the wooden
main gear doors coming adrift, due to defective bonding of the plywood. Four
days later the aircraft crashed, killing test pilot Flugkapitan Peter.
The wooden leading edge of the right wing had delaminated, also as a result of
defective bonding. This lack of quality control haunted the Spatz
(“Salamander” was actually the code name covering the factories that built the
jet’s wooden components) throughout its short career. The furniture
manufacturers and other woodworking companies that were to build the wood parts
for the jet produced substandard parts and often failed to use the correct grade
of wood, proper procedures for bonding the parts, or maintain required design
tolerances. Entire shipments were sometimes rejected due to poor quality.
Because wing assemblies were already in production, it was decided that decreasing the dihedral of the wings to fix the stability problems encountered in the prototypes would be too costly and time-consuming. Dr. Alexander Lippisch suggested that small, downward-turned winglets be added to the jet, which had the same aerodynamic effect. The new wing tips became known as “Lippisch Ohren” or “Lippisch Ears.” Further testing resulted in the addition of ballast in the nose to move the center of gravity forward, a lengthened fuselage, downward-turned trailing edges at the wing root, and small stall strips on the inboard leading edges to improve stability and slow-speed handling.
The aircraft was put into production as the 30mm cannon-armed He-162A-1 and the 20mm-armed He-162A-2. Only a few A-1s were built because the factory building the 30mm guns was overrun by the Soviet Army and, according to one source, the nose structure of the jet couldn't handle the recoil of the guns. Besides serial number, the only way to spot an A-1 is the cannon barrels barely protruded from the blast tubes and the shell ejection ports are larger, while the 20mm cannon barrels on the A-2 protruded quite a bit out of the blast tube. An unknown number of A-1s were built with 20mm cannon due to the supply shortage. One can only imagine the din inside the cockpit when the guns were fired, since the cannons were only inches from the bottom of the seat! The top speed of the A-2 was 553mph at sea level, and 562mph at 19,500ft. It's weight of nearly 6200 pounds was conveniently overlooked since the top speed of the little jet was so high.
 Problems in training new pilots and
a rush to get the Spatz into combat finally led to the cancellation of
the idiotic program to put young, inexperienced pilots in the cockpit and an
order went out to put together a wing made up of experienced pilots. During
February, 1945, 1st Gruppe of Jagdgeschwader 1 traded
their Fw-190s for He-162s. By April, they had transferred to Leck, near the
Danish border, where they continued to learn to operate the new fighter. The
first claimed victory by an He-162 was on April 19, 1945. Feldwebel
Kirchner was credited with shooting down a British aircraft, but he crashed
before he could return to base. Jeffrey Ethell's research into British records
could not confirm or deny the kill, since several Allied aircraft were lost that
day. On April 20, Leutnant Schmitt became the first and possibly only
pilot to use the jet's ejection seat and survive. Ten days later,
Unteroffizier Rechenbach was credited with a British aircraft and confirmed
by two witnesses, but once again, the claim could not be confirmed through
British records. In early May, Schmitt, apparently recovered from his ejection
seat test, made the only confirmed kill by the Spatz, shooting down a
Tempest flown by F.O. M. Austin.
Problems in training new pilots and
a rush to get the Spatz into combat finally led to the cancellation of
the idiotic program to put young, inexperienced pilots in the cockpit and an
order went out to put together a wing made up of experienced pilots. During
February, 1945, 1st Gruppe of Jagdgeschwader 1 traded
their Fw-190s for He-162s. By April, they had transferred to Leck, near the
Danish border, where they continued to learn to operate the new fighter. The
first claimed victory by an He-162 was on April 19, 1945. Feldwebel
Kirchner was credited with shooting down a British aircraft, but he crashed
before he could return to base. Jeffrey Ethell's research into British records
could not confirm or deny the kill, since several Allied aircraft were lost that
day. On April 20, Leutnant Schmitt became the first and possibly only
pilot to use the jet's ejection seat and survive. Ten days later,
Unteroffizier Rechenbach was credited with a British aircraft and confirmed
by two witnesses, but once again, the claim could not be confirmed through
British records. In early May, Schmitt, apparently recovered from his ejection
seat test, made the only confirmed kill by the Spatz, shooting down a
Tempest flown by F.O. M. Austin.
The He-162's small fuel load and the engine's high fuel consumption gave it an endurance of around 30 minutes at sea level. Pilots who flew the Spatz reported that it had good handling qualities and an excellent roll rate, but was a handful at low airspeeds. Overenthusiastic use of the rudders to increase the jet’s already excellent roll rate could cause the tail section to leave the airplane, which is what happened to an unfortunate RAF test pilot during a post-war demonstration. In the traffic pattern, the throttle could not be reduced to idle until landing was assured. Once in idle, the engine took more than 20 seconds to spool up to full power (assuming it didn’t flame out instead) when the throttle was pushed up to initiate a go-around. To add to the pilot’s workload in the pattern, the hydraulically-actuated flaps had to be lowered manually by 21 strokes on a hand pump. Failure to turn the pump handle to lock the flaps resulted in their retraction, and the jet had a bad tendency to settle as the flaps came up. To add to this ergonomic nightmare, the flap and landing gear handles were very close together in the cockpit. Retraction of the flaps or the landing gear required their respective levers to be pushed down. Just the ticket for an inadvertent gear retraction after landing!
 Royal Navy test pilot Lt. Cdr. Eric
Brown found the He-162 to be very stable and was probably the best gun platform
of any of the WWII-era jets. The view from the cockpit was excellent, except
for the critical six o’clock position, which was blocked by the engine. Brown
also like the jet’s brakes, which were not as good as British brakes, but much
better than those on other German planes. Like every other early jet, the
aircraft was underpowered and had a terrible safety record. Between April 13
and the end of the war, JG1 lost thirteen aircraft and ten pilots, about one
crash every two days. Most crashes were due to engine flame out, but several
were due to structural failure caused by poor workmanship. This is
understandable, since the He-162 was built by what amounted to slave labor
working under horrible conditions.
Royal Navy test pilot Lt. Cdr. Eric
Brown found the He-162 to be very stable and was probably the best gun platform
of any of the WWII-era jets. The view from the cockpit was excellent, except
for the critical six o’clock position, which was blocked by the engine. Brown
also like the jet’s brakes, which were not as good as British brakes, but much
better than those on other German planes. Like every other early jet, the
aircraft was underpowered and had a terrible safety record. Between April 13
and the end of the war, JG1 lost thirteen aircraft and ten pilots, about one
crash every two days. Most crashes were due to engine flame out, but several
were due to structural failure caused by poor workmanship. This is
understandable, since the He-162 was built by what amounted to slave labor
working under horrible conditions.
In Brown’s opinion, had the Luftwaffe been able to take the time to fully develop the Spatz and put fully-trained pilots in the cockpits, the world's first operational single-engine jet fighter would have become a very formidable opponent. Today, only seven He-162s survive.
For a much more detailed account of the He-162's development, see "WWII Fighting Jets", by Jeffrey Ethell and Alfred Price.
| THE KIT |
This one seems to have left a lot of people scratching their heads over why Tamiya has chosen this subject. Not that I’m complaining, since I happen to be one of the few people who really like this interesting aircraft.
Molded in Tamiya’s usual grey
plastic, you get a bunch of parts (I never did find out how many). The model
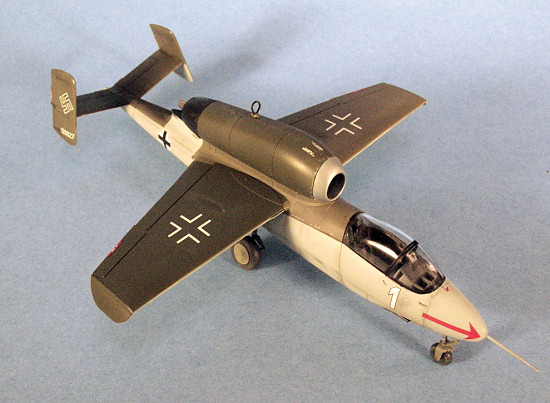
can be displayed with the engine cowling open or closed, and Tamiya has provided
separate parts for both options. Poly caps are used to hold the engine/cowling
assembly in place, so you can display the cowling open for a while, then swap it
out for the closed one should you feel the need to fly your Spatz around
the room. A stand is provided to hold the exposed engine while you’re out
flying. The poly caps fit over two metal pins that mount on the wing spar, and
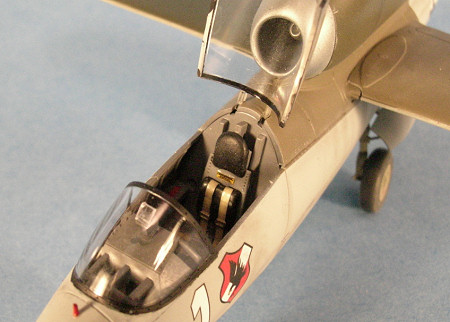
a ball bearing in provided to keep the model on all three tires. A clear, thin
canopy can be displayed open or closed over a well-detailed pilot figure. Since
the pilot isn’t added until late in the
 construction process, it looks like you
might be able to leave him out to better display the cockpit, then put him in
for the afore-mentioned flights around the room. No provision is provided to
build an A-1 version, but the only necessary modifications are to shorten the
cannon barrels and enlarge the shell ejection chutes.
construction process, it looks like you
might be able to leave him out to better display the cockpit, then put him in
for the afore-mentioned flights around the room. No provision is provided to
build an A-1 version, but the only necessary modifications are to shorten the
cannon barrels and enlarge the shell ejection chutes.
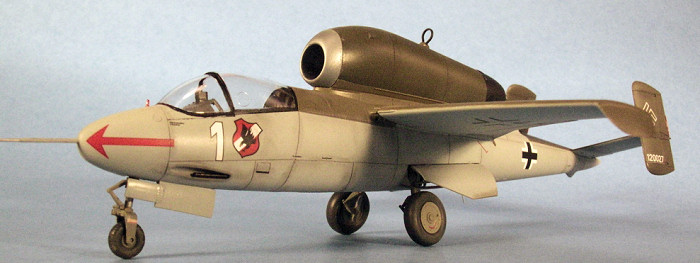
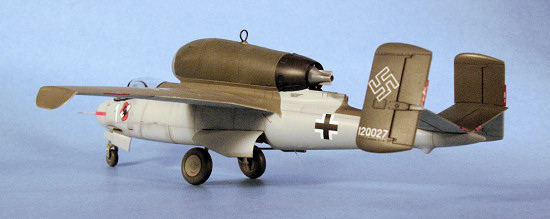
Decals provide options for four aircraft, "White 23" flown by Oberst Ihlefeld, "Yellow 11" flown by Oberleutnant Demuth, “Red 1” flown by Leutnant Gerhard Hanf, and "White 1" flown by Leutnant Rudolf Schmitt. Swastikas are not shown on the box art, but are provided on the decal sheet. For jets where the cannon ports were painted black, black outlines are provided so you don’t have to mask them.
Since there have been comments as to whether Tamiya’s Spatz is better than Dragon’s older kit, a quick comparison might be in order. Tamiya’s is better-engineered than the DRAGON kit. For example, Tamiya’s wings don’t have a messy seam to fill on the tops of the flaps. The nose on the Tamiya kit is a little more blunt than the DRAGON kit's. Tamiya's main gear well and engine are a few mm farther forward than Dragon’s. Both kits’ wings are close in dimensions, but Dragon’s vertical fins are slightly taller, and the span of the horizontal stabilizer is almost 2cm greater than Tamiya's. Both kits have similar levels of detail, but I think Tamiya's combination of injected instrument panel with decal instruments is better than Dragon’s photo-etched panel. It looks like the instrument panel from Eduard's detail set will work on Tamiya's kit, but I think most of the other bits in the set would be a step backward over Tamiya's kit parts. Tamiya’s cockpit sidewalls are better-detailed, but the rest of the cockpit is fairly similar in both kits. Having built several DRAGON He-162s, I can say that they require a lot of patience and filler to build, but they are still pretty good kits.
| CONSTRUCTION |
 This kit is so simple and fits
together so well that there isn’t a lot to comment on. This is probably about
as close to a “shake the box” kit as you’ll get. The parts breakdown enables
you to paint the major components separately, just like on the real jet, but
I’ll leave all of the exterior painting comments below in the “Painting and
Markings” section. Construction starts with the engine stand, which I skipped,
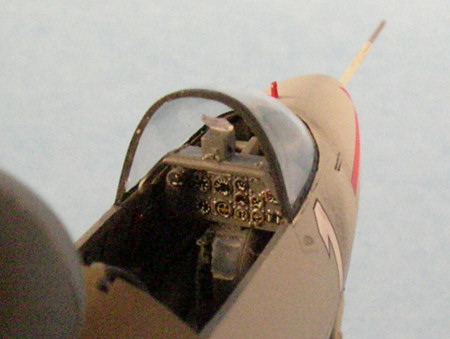
then proceeds to the cockpit. Tamiya provides decals for the instrument panel
and seat belts. The instrument panel turned out pretty nice, but I used
Eduard’s color photo-etched seat belts instead of the decal. Tamiya forgot the
pull handles for the sides of the seat, so I added these using some thin wire.
The Revi gunsight had a seam running right through the middle of the clear
glass, so I cut this part off and glued a small square of clear plastic in its
place. The Spatz’s cockpit was so simple that a super detailer would
only have to add a couple of knobs and some extra wiring here and there to
improve the cockpit. The rear bulkhead of the cockpit combines with a part for
the belly and two pins protruding from the fuselage sides to trap a large ball
bearing nose weight. I hit the ball with a couple of blobs of super glue to
keep it from rattling when the model was picked up.
This kit is so simple and fits
together so well that there isn’t a lot to comment on. This is probably about
as close to a “shake the box” kit as you’ll get. The parts breakdown enables
you to paint the major components separately, just like on the real jet, but
I’ll leave all of the exterior painting comments below in the “Painting and
Markings” section. Construction starts with the engine stand, which I skipped,
then proceeds to the cockpit. Tamiya provides decals for the instrument panel
and seat belts. The instrument panel turned out pretty nice, but I used
Eduard’s color photo-etched seat belts instead of the decal. Tamiya forgot the
pull handles for the sides of the seat, so I added these using some thin wire.
The Revi gunsight had a seam running right through the middle of the clear
glass, so I cut this part off and glued a small square of clear plastic in its
place. The Spatz’s cockpit was so simple that a super detailer would
only have to add a couple of knobs and some extra wiring here and there to
improve the cockpit. The rear bulkhead of the cockpit combines with a part for
the belly and two pins protruding from the fuselage sides to trap a large ball
bearing nose weight. I hit the ball with a couple of blobs of super glue to
keep it from rattling when the model was picked up.
The nose gear well makes up part of the cockpit, and has a bulkhead (A13) that is glued to its forward end. There is a second part (A12) that the nose gear strut plugs into that fits into a slot in the bulkhead, then is pushed down to its final position. Be sure A12 is securely attached to A13. If it isn’t, when you push the nose gear strut into its mounting hole, A12 could come loose, and it is very hard to work back into position. It is too small to pull out and you can’t get tweezers in the hole to reposition it. I found this out the hard way during final assembly and ended up cutting the sides of the strut’s mounting pin down for a slightly looser fit, then super gluing it in its hole. Fortunately, I was then able use it to reposition the mount and use some brass tube to pipette a drop of liquid cement in to secure it.
 Once the cockpit was finished, I
assembled the main gear well. I was able to leave the gear struts and other
details off until after the model was painted. A wing spar containing two
engine-mounting pins fits through slots just above the main gear well, then the
fuselage halves were glued together. The fit was so good, I was able to “click”
the fuselage halves in place and glue them together without applying much
pressure to close the seam. The only filler I used on the entire model was in
the trough aft of the engine exhaust.
Once the cockpit was finished, I
assembled the main gear well. I was able to leave the gear struts and other
details off until after the model was painted. A wing spar containing two
engine-mounting pins fits through slots just above the main gear well, then the
fuselage halves were glued together. The fit was so good, I was able to “click”
the fuselage halves in place and glue them together without applying much
pressure to close the seam. The only filler I used on the entire model was in
the trough aft of the engine exhaust.
The wings were also “click together” parts, with no filling and just a little sanding where I had cut the parts from the sprues. I built up the closed engine cowling, but left the intake and exhaust parts off to save myself the trouble of masking.
After adding the canopy to the cockpit, I sanded the few seams that were visible and headed out to the paint shop to paint the fuselage and other sub-assemblies. I wish I had kept track of how little time it took me to get to this point in the build. This kit was so easy, it just flew together.
| COLORS & MARKINGS |
He-162 components were built and painted in several locations and just about all known photographs are in black and white, so camouflage colors are a problem. Often, the “official” RLM 76/81/82 camouflage pattern was either reversed, or the entire upper surfaces were just painted one color. Black and white photos make it hard to tell what camouflage colors were used, since there is little contrast between the two topside colors (if two were used at all). The undersides were painted RLM76 light blue, and one source states that the landing gear doors were often RLM65 Light Blue. Another states that the ailerons were painted RLM 82 top and bottom, since they were interchangeable between the left and right wings. After much searching, the only photos I could find of the undersides of the ailerons showed light-colored paint, so there may have been at least a little painting done at the final assembly point. Vertical stabilizers could have been underside or topside color, depending on where they were built. Many He-162s were unpainted, exposing the dark grey putty used to fill panel lines on the aircraft.
 Many color profiles and just about
every aftermarket decal sheet’s instructions depict the He-162 as having a
silver, red, or yellow engine intake lip. According to the Monogram Close-Up
#11, the intake lip was delivered as part of the engine and was either natural
aluminum, or one of the two greens specified for the engine cowling. Another
recent article states RLM02 was also occasionally used on the intake lip. Both
sources state there is no evidence that the intake lip was ever painted in a
squadron color. Apparently, it is just a myth that originated in the 1960s.
Many color profiles and just about
every aftermarket decal sheet’s instructions depict the He-162 as having a
silver, red, or yellow engine intake lip. According to the Monogram Close-Up
#11, the intake lip was delivered as part of the engine and was either natural
aluminum, or one of the two greens specified for the engine cowling. Another
recent article states RLM02 was also occasionally used on the intake lip. Both
sources state there is no evidence that the intake lip was ever painted in a
squadron color. Apparently, it is just a myth that originated in the 1960s.
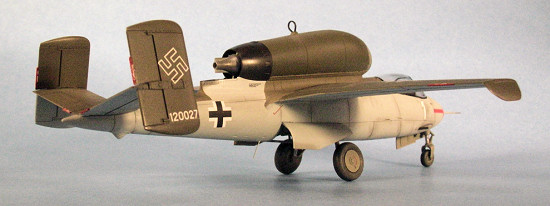
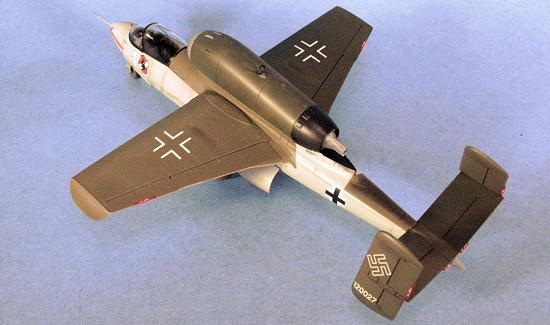
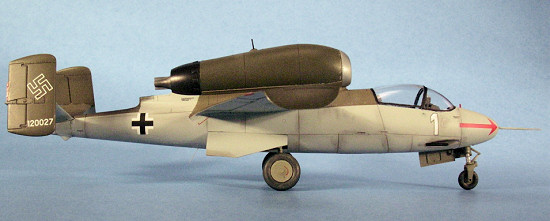
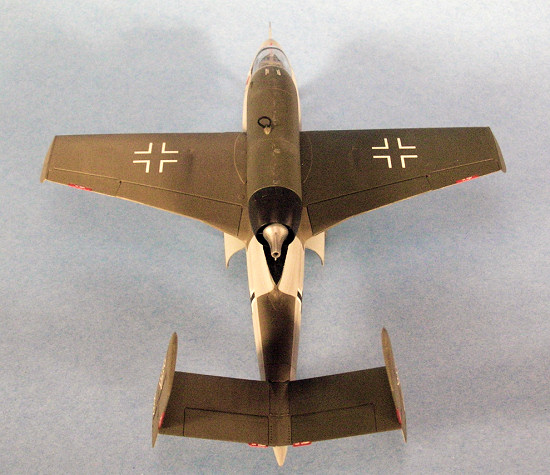
I decided to build Schmitt’s “White 1,” since I’ve always preferred the camouflage scheme with the green tails and I already have a “Yellow 11” in my collection. I started by painting the fuselage, undersides of the wings, and horizontal stabilizers Polly Scale RLM 76. There isn’t any information as to whether “White 1” was overall one shade of green or the RLM 81/82 combination, so I went with the latter. I painted the starboard wing, port horizontal stabilizer, and engine cowling Polly Scale RLM 82 Dark Green. The port wing, port horizontal stabilizer, upper fuselage, and vertical stabilizers were painted RLM81. Some sources show the vertical stabs to be green and some RLM 81, so I went with RLM 81, just for fun. I didn’t like the color of Polly Scale’s RLM 81, so I went with Model Master’s which isn’t quite as red-brown and has a hint of green in it. I don’t know if it’s right or not, but to my eye, it looked closer to that in the few color He-162 photos I’ve found. I also painted the dark patch on the top of the aft fuselage RLM 81 instead of Tamiya-suggested black. A photo of a crashed He-162 with the same paint scheme is just grey on the aft fuselage. After seeing a photo of an He-162 engine start, I suspect that dark patch might actually have been soot instead of paint. The photo shows a huge blast of flame shooting aft past the tail!
The intake and engine internal parts were painted aluminum, with other shades of silver for the details. The canopy frames on the He-162 were actually internal, meaning that the clear parts fit over a black metal frame and were then secured with screws from the outside. To be completely accurate, you should paint only the insides if the canopy frames black. I was lazy (and didn’t want to hear, “Hey, you forgot to paint your canopy frames,” so I painted the outsides of the frames. Once everything was dry, I sprayed a coat of Polly Scale Clear Gloss to give the decals a smooth surface.
I used the kit decals, and these turned out to be the best I’ve used from Tamiya. They came off of the paper within seconds of being dipped in water, and mostly went down without any trouble. After letting the decals dry overnight, I sprayed on a coat of clear gloss, followed by a couple of coats of Polly Scale Clear Flat.
| FINAL CONSTRUCTION |
 I combined all of the painted
subassemblies and added the main gear well details and gear struts. Remember to
be careful when pushing the nose gear strut into it’s hole! The wings and
tailplane popped into place without any filler required.
I combined all of the painted
subassemblies and added the main gear well details and gear struts. Remember to
be careful when pushing the nose gear strut into it’s hole! The wings and
tailplane popped into place without any filler required.
The engine options are an interesting gimmick, but not really worth the hassle. The poly caps fit tightly over the pins, and I popped the glue joint loose on the closed engine cowling when I tried to install it. The base plate for the engine also flexes, making it almost impossible to close the gaps under the engine. I would bet that the model would survive a couple of engine swaps before something was broken, since you’d be trying to hold the model in the main gear area while wrestling with the engine cowling. I ended up drilling out the poly caps and gluing the engine in place. With the caps out of the way, the engine assembly fit perfectly.
Rather than try to drill the ends of the tiny gun barrels, I made some new ones from sections of brass tube. I finished everything up with the pitot tube, nose gear position indicator (the red rod just in front of the windscreen), and an antenna on the belly that Tamiya left out of the kit.
I gave the model a dusting of pastels to highlight the panels, and simulate mechanics’ dirty handprints. I also chipped the paint on metal areas, such as the engine cowling, with a silver pencil.
| CONCLUSIONS |
So, how does Tamiya’s new kit compare with Dragon’s older one? Should you throw out your Dragon He-162 kits and pick this one up? Well, I wouldn’t go that far, but Tamiya’s definitely is the better of the two. It’s more accurate and far easier to build. Just ditch the engine swap option. This is a very nice little kit, and I’ll definitely be adding at least one more of these little gems to the pile!
Kit courtesy of my wallet.
| REFERENCES |
Monogram Close-Up 11 Volksjager, J. Smith & E. Creek, Monogram Aviation Publications
Aero Detail #10, Dai Nippon Kaiga CO, Ltd.
He-162 Volksjager, Steve Muth, Peregrine Publishing
Aeroplane Magazine April 2006, The Salamander in France Part 1, by Philippe Couderchon
Aeroplane Magazine May, 2006, The Salamander in France Part 2, by Philippe Couderchon
Heinkel He-162 Spatz, M. Balous & M Bily, MBI Publications
Heinkel He-162 Volksjager, Heinz Nowarra, Schiffer Publishing
Luftwaffe Profile Series #16, Heinkel He-162, Manfred Griehl, Schiffer Publishing
He-162 Volksjager, Janus Ledwoch, Wydawnictwo Militaria
X Planes of the Third Reich, Heinkel He-162, David Myhra, Schiffer Publishing
For detailed accounts of the development, operations, and flying qualities of the Spatz:
World War II Fighting Jets, Jeffery Ethell & Alfred Price, Naval Institute Press
Wings of the Luftwaffe, Capt. Eric Brown, MacDonald and Janes
June 2006
Copyright ModelingMadness.com. All rights reserved. No reproduction in part or in whole without express permission.
If you would like your product reviewed fairly and fairly quickly, please contact the editor or see other details in the Note to Contributors.