Revell 1/72 He-219A-2 'Uhu'
| KIT #: | 04690 |
| PRICE: |
SEK 140 (approx. $20) |
| DECALS: | Two options |
| REVIEWER: | Ingemar Caisander |
| NOTES: |
| HISTORY |
The Heinkel He 219 "Uhu" (Eagle Owl) was the only Luftwaffe fighter designed
from the outset as a dedicated night fighter, and it was planned as a
counterpart to the RAF night fighter versions of the de Havilland "Mosquito".
The He 219 prototype took to the air on 15 November, 1942. The design proved an
instant success; being powerful, manouverable, and having good flying
characteristics. Its top speed of up to 585 kph at an
 altitude of
6,000 meters in combination with the powerful on-board radar equipment meant
that the "Uhu" could intercept enemy bombers en-route to their targets, instead
of having to wait until they were reported by ground based stations.
altitude of
6,000 meters in combination with the powerful on-board radar equipment meant
that the "Uhu" could intercept enemy bombers en-route to their targets, instead
of having to wait until they were reported by ground based stations.
This capable night fighter also sported the world’s first operational ejection
seats.
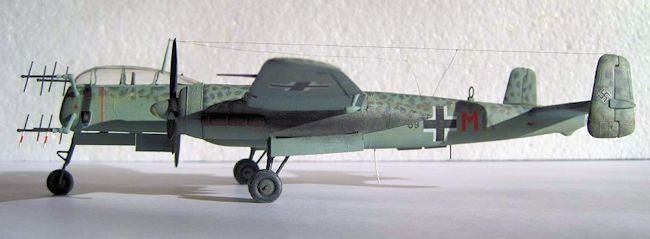
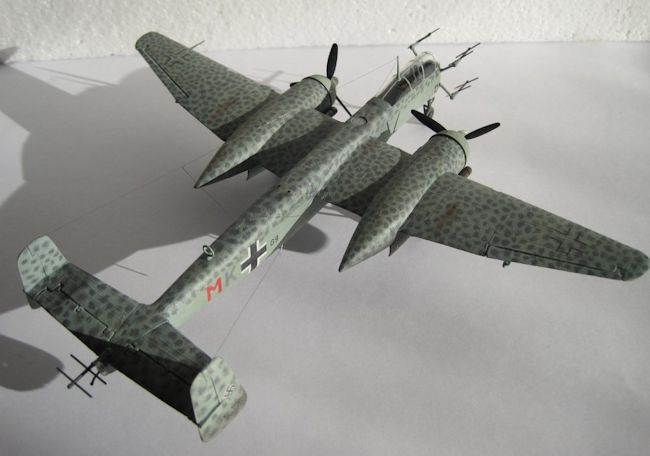
Armament consisted of one autocannon mounted in each wing root and two to four
further autocannons in a ventral tray. In addition, provision was also made for
mounting two 30mm MK 108 autocannons in the rear fuselage. These guns, known as
"Schräge Muzik" and aimed through a separate Revi 16 A-N gunsight, were
angled forward and upwards at 65 degrees, allowing the night fighter to engage
Allied four-engined bombers from their blindspot. Firing non-tracer rounds,
these guns proved highly effective.
During the first experimental mission, flown on the night of 11-12 June, 1943,
Major Werner Streib managed to stalk and shoot down no less than five British
"Lancaster" bombers, heading for Berlin, in just 30 minutes!
Built in rather limited numbers, most He 219 served with 1./NJG 1.
The He 219 A-2 was one of the three main production variants (the other two
being the earlier He 219 A-0 and the later He 219 A-7), sporting the improved
FuG 220 SN-2 "Lichtenstein" radar with some aircraft also carrying a
second circuit for the FuG 220 "Neptun" tail warning radar.
Armament varied a lot between the different sub-types, with
field-modification kits (Rustsätze) offering further combinations of
guns.
Typically, the He 219 A-2 sported one 20mm MG 151/20 autocannon with 300 rounds
in each wing root. In addition to this, four 30mm short-barrelled MK 108
autocannons were carried in the ventral tray under the belly. Soon delivery
problems developed, though, and often these large-caliber guns were replaced by
MG 151/20 autocannons. Also, when the rear fuselage "Schräge Muzik"
installation was carried, the belly pack had to be reduced to just two
autocannons due to weight and space limitations.
 Standard
ammunition load was 300 rounds per MG 151/20 and 100 rounds per MK 108.
Standard
ammunition load was 300 rounds per MG 151/20 and 100 rounds per MK 108.
Today, the restored fuselage and partly restored engine nacelles of the (until
recently) only known surviving He 219 A-2 (Werknummer 290202) is on
display at the Steven F. Udvar-Hazy Center by Dulles Airport, with the
wings still undergoing restoration at the Paul E. Garber Facility in
Silver Hill, Maryland.
This aircraft was one of seven He 219s captured in (or near) airworthy condition
at the Karup/Grove base of NJG 1 in South Jutland, Denmark, at the end of the
war.
Incredibly, though, in April 2012 another previously unknown He 219 A-7 was salvaged from the seabed in shallow water north of Hirtshals, Denmark. Although severly damaged and missing many parts, the remains of this aircraft will be preserved and then put on display at the Forsvars- og Garnisonsmuseum in Aalborg, Denmark.
| THE KIT |
This kit, although released by Revell, is, I believe, actually a modern reissue
of the old Frog kit (#F177) of 1966. Frog reissued the kit themselves back in
1968 and then again in 1973 with a different box top and new decals. In 1977,
Revell bought the Frog moulds and tools and released the kit under their own
label in 1992 as #4116 – in the process replacing the original Revell line of
1/72 scale He 219 kits, the last being #4127 issued in 1981 and 1983 (same kit
but different box tops). Finally, Revell reissued the Frog kit yet again in
2010, with a new box and listed as #04690 – this review article is based on that
kit.
 This
re-using of an old classic is actually a good thing, though, as the Frog kit is
superior to the Revell one in certain areas, with the former having a more
logical parts layout and also featuring positionable control surfaces.
This
re-using of an old classic is actually a good thing, though, as the Frog kit is
superior to the Revell one in certain areas, with the former having a more
logical parts layout and also featuring positionable control surfaces.
Total parts count is just under 100 pieces, moulded in a light grey plastic and
divided across six "trees" without any protecting frames around the parts. This
is a bit of a drawback as it make the parts more susceptible for breaking off
and/or becoming damaged, despite the "trees" being packed in individual plastic
bags. Especially the delicate dipoles of the FuG 220 Lichtenstein radar
set are prone to damage – fortunately, though, they had survived on my example
despite all four being loose in the box.
General detailing is acceptable, definitely not up to modern standards but good
enough in 1/72 scale IMHO. All panel lines are raised (as opposed to the
engraved panel lines of more modern kits).
 Decals are
provided for two aircraft: G9 + MK (W.Nr.290010), a He 219 A-2 of II./NJG
1 at Münster-Handorf, Germany, and D5 + BL (W.Nr.290126), a He 219 A-5 of
III./NJG 3 at Grove, Denmark (according to the instructions).
Decals are
provided for two aircraft: G9 + MK (W.Nr.290010), a He 219 A-2 of II./NJG
1 at Münster-Handorf, Germany, and D5 + BL (W.Nr.290126), a He 219 A-5 of
III./NJG 3 at Grove, Denmark (according to the instructions).
Both these listings are slightly incorrect, though, as the real Werknummer of G9 + MK was 290019, and D5 + BL (W.Nr. 290126) was actually also of the He 219 A-2 variant (no He 219 A-5 was ever produced). This latter machine is the very same aircraft that was captured intact by the Allies at the end of the war and given the registration AM20. It was testflown by Eric Brown on the 21st of August, 1945, from Farnborough to Brize Norton. Typical of Revell kits, no swastikas are included on the decal sheet.
| CONSTRUCTION |
Construction began with the cockpit and detailing here is pretty much
non-existing – you get a floor and two seats and that´s about it. I added
painted-on seatbelts and also scratchbuilt some of the radar equipment using
small pieces of lead.
The model will be a heavy tail-sitter if you don´t add any weight in the nose,
so I used as much lead as possible for detailing the cockpit as well as stuffing
the lower nose gear bay full. The instructions call for 40 grams of ballast, but
I seriously doubt this will be enough – to counter the long rear fuselage in
combination with the large tailplane, all behind the main gear, I probably close
to doubled the amount of nose weight. If you notice during construction that
more ballast is needed all is not lost, however, as you can add more weight at
the front of each engine nacelle.
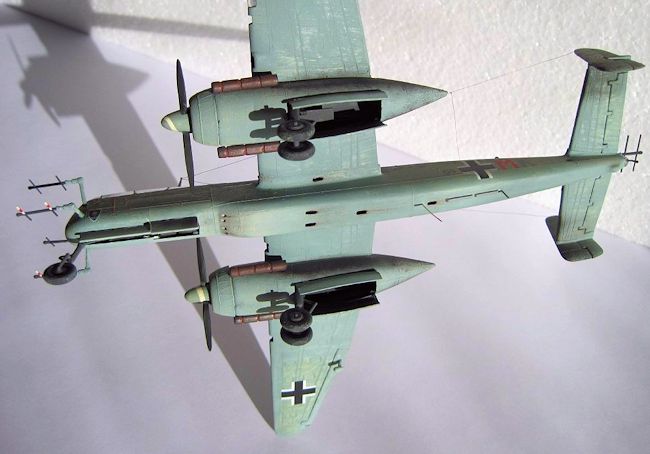
Before the fuselage halves were joined together, I drilled and filed open the
four muzzle openings in the front of the ventral tray, as well as the shell
ejector chutes on the fuselage underside (none of this is indicated either on
the parts themselves or in the instructions (except in the painting/marking
section)). Note that there should be a total of only three shell ejector chutes
for the guns in the ventral tray – this is because the two centre/rearmost
weapons ejected their empty casings through a common opening.
 At the top
rear fuselage the two muzzle openings for the "Schräge Muzik" cannons
were drilled out, and at the same position on the fuselage underside I opened
the shell ejector chute for these weapons – as for the centre guns in the
ventral tray, there should only be a single rectangular hole for the "Schräge
Muzik" installation on the fuselage underside, as both MK 108 autocannons
also ejected their empty shells through a common opening.
At the top
rear fuselage the two muzzle openings for the "Schräge Muzik" cannons
were drilled out, and at the same position on the fuselage underside I opened
the shell ejector chute for these weapons – as for the centre guns in the
ventral tray, there should only be a single rectangular hole for the "Schräge
Muzik" installation on the fuselage underside, as both MK 108 autocannons
also ejected their empty shells through a common opening.
The final drilling operations on the fuselage were the cooling intake (for the
radar electronics) in the center of the nose, and the small exhaust outlet for
the rear fuselage de-icing heater – this exhaust port is actually supplied as a
decal in the kit, but will look much more convincing if drilled out. The exhaust
port is located below and just in front of the left tailplane.
While the cemented fuselage was setting, I moved on to completing the tailplane.
Both the rudders and elevators can be made movable, but I choosed to glue them
in place. The small air intake for the rear fuselage Kärcher-Öfen BL 30/U
de-icing heater was drilled in the leading edge of the right tailplane – the
intake is located a small distance out from the fuselage.
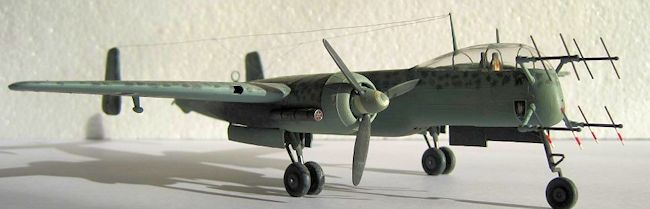
Then it was time for the wings and engine nacelles. This is where most of the
inaccuracies of the kit exist. Starting at the front of the engines, both
propeller spinners will have to be extensively sanded as they are totally wrong
in shape. Rather than being the blunt "cones" as supplied in the kit, they
should be much more smooth and pointed in appearance.
 Propeller
blades are fine in shape and only need to have their trailing edges thinned down
a bit.
Propeller
blades are fine in shape and only need to have their trailing edges thinned down
a bit.
Note that you will have to blank off the inside of the radiator cowling to
prevent any see-through, as the entire lower engine nacelle and main gear wheel
well is open (that is, no engine firewall is supplied).
Now onto the wings themselves.
For some odd reason, there are apertures for two(!) landing lights present, one
in the right wing and one in the left wing. Fill in the right one, as the He 219
only had a twin light fitted in the left wing.
Next to landing light on the left wing is a small leading edge air intake, this
is for the wing Kärcher-Öfen de-icing heater, and it need a small piece
of ducting (painted black) on the inside. The exhaust for the heater is present
on the wing upper surface, roughly at the centre and just to the left of the
engine nacelle. A decal is provided for this exhaust but I choosed to drill it
out instead.
Further towards the left engine nacelle on the wing leading edge is the large
air intake for the DB603 engine – this intake only need a little bit of sanding
and of course an internal duct leading towards the compressor.
 Finally,
both wings need the blast tubes for the wingroot-mounted MG 151/20 autocannons
drilled open: these openings are located exactly at the seam between the wings
and fuselage. I also added gun barrels made from thin electrical wire
insulation, painted flat black and treated with graphite powder to give a
metallic look.
Finally,
both wings need the blast tubes for the wingroot-mounted MG 151/20 autocannons
drilled open: these openings are located exactly at the seam between the wings
and fuselage. I also added gun barrels made from thin electrical wire
insulation, painted flat black and treated with graphite powder to give a
metallic look.
The shell ejector chutes for the wingroot weapons are located roughly at the
wing centre line and in the middle of the small wing "stubs" extending out from
the fuselage. The chutes were drilled open, sanded into rectangular shape, and
then blanked off from the inside using lead foil.
Moving on to the engine nacelles themselves, when the halves of these are
cemented together they are meant to trap the main gear inbetween, thereby making
the latter workable. It´s a nice feature, but as for the nose gear I skipped
this and cemented the main gear fixed in place instead. Note that the frame
mudguards on the main gear aren’t included in the kit (they can be replicated
from pieces of stretched sprue, though). I realize now that I forgot to add
these to my model…how embarrassing...
A little bit of filler and some sanding was needed in order to blend in the
lower engine nacelle with the upper fixed part on the wing.
The cylindrical flame arrestors for the engine exhausts are each made up from three pieces and they needed quite a bit of clean-up, as there is a lot of flash present especially on the front piece. I also drilled out the end section of the flame arrestors, making for a more realistic look. With all the major assembly work completed, it was time to hit the paint booth.
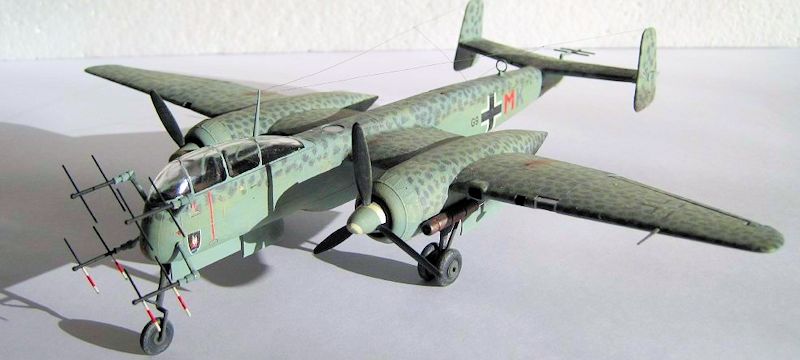
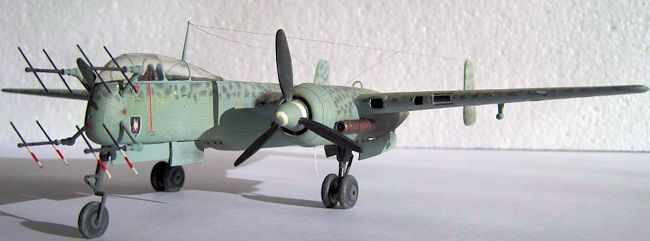
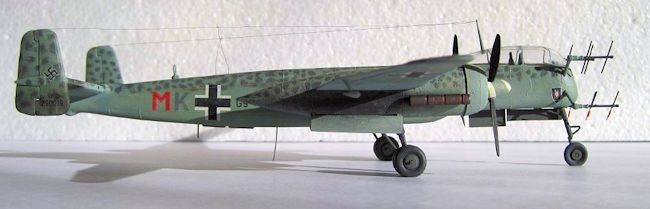
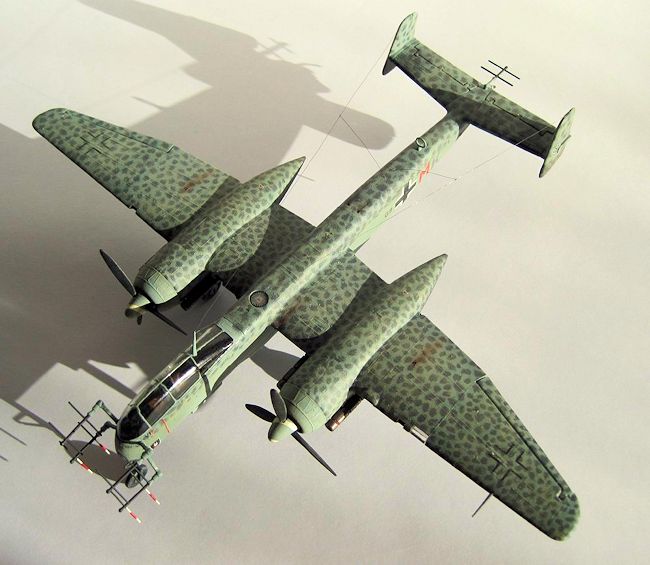
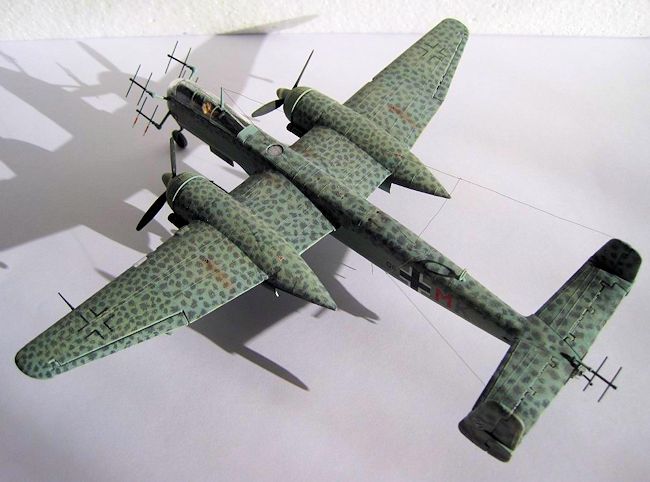
| COLORS AND MARKINGS |
The particular aircraft my model is representing is G9 + MK, a He 219 A-2 (Werknummer
290019) of II./NJG 1 based at Münster-Handorf, Germany, in November 1944. It
was flown by Lt. Kurt Heinz Fischer and Uffz. Hermann Bauer, and unfortunately
got a rather short wartime career.
Lt. Fischer and Uffz. Bauer had just recently joined NJG 1 and on the morning of
28th November, 1944, during a training flight near Greven, Münster,
they were attacked by a British Hawker Tempest Mk V (US-B, s/n EJ536)
flown by Flight Lieutenant A. F. Moore of No.56 Sqn RAF. A couple of short
cannon bursts hit the He 219 and set it on fire.
 Upon
realizing his aircraft was badly damaged, Lt. Fischer attempted a belly landing
in a winter corn field but the He 219 stalled on approach and plunged into a
nearby coppice, bursting into flames.
Upon
realizing his aircraft was badly damaged, Lt. Fischer attempted a belly landing
in a winter corn field but the He 219 stalled on approach and plunged into a
nearby coppice, bursting into flames.
Radar operator Bauer managed to eject using the pneumatic ejection seat, but his
parachute did not deply in time and he hit the ground suffering fatal injuries.
W.Nr.290019
carried a typical He 219 camoflage of RLM 75 Grauviolett on the upper
surfaces, with RLM 76 Lichtblau on the undersides. Furthermore, the upper
fuselage and wings featured a "squiggle" pattern of RLM 76 sprayed over the base
Dark Grey color.
I began by painting the entire aircraft in RLM 76 (Revell 76), then the upper
surfaces of the wings and fuselage were mottled with RLM 75 (Humbrol 125) using
a semi-drybrushing technique. Although this sort of mottling is easier to do
using an airbrush, I had to imitate the sprayed-on appearance of the paint the
best I could, as I always brush paint my models.
In real life during the war, the colours were also actually applied the other
way round - that is, the upper dark grey RLM 75 (or, in some cases, RLM 74
Graugrün) was painted first and then oversprayed with the lightblue RLM 76
in a squiggle pattern.
The propellers were finished in RLM 70 Schwarzgrün (Humbrol 116 and 33
mixed 50/50), with the spinners in RLM 76. I took some "artistic license" and
added white spirals to the spinners too, although W.Nr.290019 never had
them IRL.
The FuG 220 dipoles were painted flat black, with the lowermost four aerials of
the front radar sectioned in white and red (Humbrol 34 and 19) as a ground crew
warning. The exhaust flame arrestors were brown (Humbrol 62) and then treated
with graphite powder, and all interior areas (cockpit, landing gear bays, etc)
were finished in darkgrey (Humbrol 79), and then drybrushed with off-white (Humbrol
121).
The entire model was clearcoated with flat varnish and then it was time for
weathering.
I did a light overall drybrushing with off-white (Humbrol 121) on the fuselage
and wings, and then some light black and brown soothing around the gun muzzles
and the three Kärcher-Öfen BL 30/U heater unit exhaust ports.
The areas behind the engine exhausts were a bit more extensively soothed with
black as the DB603s were notoriously "dirty" powerplants, as well as the German
aviation fuel this late in the war often being of a sub-standard quality.
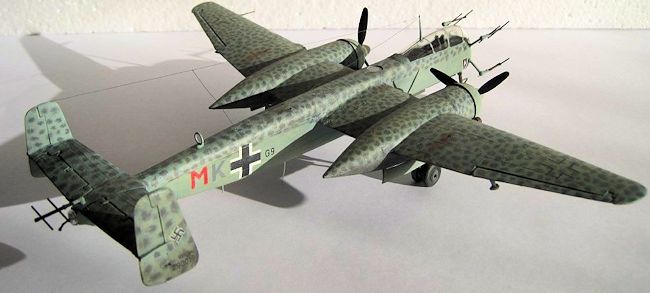
| FINAL BITS |
With general painting, decaling, and weathering completed, it was time for final
assembly. This included fitting the dorsal G6 Peil D/F aerial with a
scratchbuilt clear acrylic cover, and adding the FuG 16ZY radio and FuG 25A IFF
masts under the rear fuselage. I fabricated these both masts from pieces of
stretched sprue.
 I also
added scratchbuilt antennas for the FuBl 2F blind landing device under the rear
fuselage: in some photos of late-production aircraft, these antennas are fitted
with covers (this is what I did on my model), while some (earlier?) aircraft
featured the bare “towel rack” antennas.
I also
added scratchbuilt antennas for the FuBl 2F blind landing device under the rear
fuselage: in some photos of late-production aircraft, these antennas are fitted
with covers (this is what I did on my model), while some (earlier?) aircraft
featured the bare “towel rack” antennas.
The main FuG 10P radio aerials, stretching from the front dorsal mast and to
both tailfins, were made from a piece of very thin copper strand. This wire was
wound off from a small radio coil and then carefully burnt with a cigarette
lighter to remove the laquer insulation and give the wire a black, oxidized
look. The connecting leads between the main wires and the rear fuselage were
attached with tiny drops of flat varnish.
The rear trailing antenna (below the FuG "Neptun" dipoles) is also part
of the FuG 10P installation, and this was supplied in the kit.
| CONCLUSIONS |
| REFERENCES |
"Heinkel He 219 Uhu" by Marek Rys, Aircraft Monograph 21 (AJ Press 2008)
"Heinkel He 219 Uhu Vol I" by M. Murawski & M. Rys, 3D Monographs 49 (Kagero
2012)
"Heinkel He 219 Uhu Vol II" by M. Murawski & M. Rys, 3D Monographs 50 (Kagero
2013)
"The Heinkel He 219 Uhu" by Richard A. Franks, Airframe Album 1 (Valiant
Wings 2012)
"Wings of the Luftwaffe" by Eric Brown (Hikoki 2010)
"The Heinkel He 219 – A Research Paper" (3rd Ed.) by R.
Francis Ferguson (2012)
Thanks to for the preview kit. You can find this kit at your favorite hobby shop or on-line retailer.
If you would like your product reviewed fairly and fairly quickly, please contact the editor or see other details in the Note to Contributors.