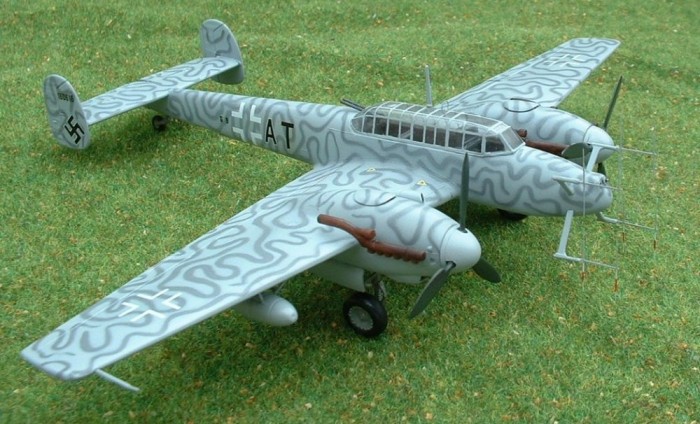
Italeri 1/72 Bf-110G-4
| KIT #: | 1039 |
| PRICE: | $16.98 |
| DECALS: | Two options |
| REVIEWER: | Pat Cauthery |
| NOTES: | Falcon Vac Canopy & Extratech radar antenna used |
| HISTORY |
Other reviewers have provided detailed histories of this machine – you could probably do no better than follow this link
http://www.modelingmadness.com/reviews/axis/luft/cleaver110g.htm
| THE KIT |
 The kit
is typical of Italeri models of what I would guess is late 80’s vintage, in
that it features fine raised detail. My kit bought on E-bay came without
instructions – I was able to get hold of a copy of these from other
modellers although it would have helped if I had then studied them!
The kit
is typical of Italeri models of what I would guess is late 80’s vintage, in
that it features fine raised detail. My kit bought on E-bay came without
instructions – I was able to get hold of a copy of these from other
modellers although it would have helped if I had then studied them!
Italeri’s Bf110G has their Bf110E version as its basis, and this is evidenced by the fact that they have not bothered to replace the E variant canopy. I decided to use the Falcon vac-form canopy to replace the kit one as the G canopy is noticeably different. The main option in the kit is to build a variant with an extra radar array protruding from the centre of the nose – this I think helped with short range detection on early versions of the FuG220 sets.
| CONSTRUCTION |
 I found
the main pitfalls as follows. Firstly if you fit the engines so that they
are flush with the mountings on the wing, they have a pronounced inwards
cant. For some reason this only became obvious to me after gluing, so off
they came and were fitted straight. You then have to deal with a lip of
plastic on each side. I had the same problem with the nosecap, which also
leaves an overhang if you fit it straight. These areas required a fair bit
of carving, filling and sanding.
I found
the main pitfalls as follows. Firstly if you fit the engines so that they
are flush with the mountings on the wing, they have a pronounced inwards
cant. For some reason this only became obvious to me after gluing, so off
they came and were fitted straight. You then have to deal with a lip of
plastic on each side. I had the same problem with the nosecap, which also
leaves an overhang if you fit it straight. These areas required a fair bit
of carving, filling and sanding.
Aside from these, construction was fairly straightforward. There is quite a nice cockpit tub which was painted RLM66, and I thought the mounting for the twin rear firing mgs meant that they were too far apart so I made my own mounting from a small piece of plasti-card.
If you are using the Falcon vac-canopy, you are required to remove a small piece of the fuselage in order to fit it. I suggest you do this before gluing the fuselage sides together. I did not, and wished I had! I should have also drilled a small hole in the canopy to take the aerial mast, as my superglued butt join meant that the mast was not strong enough to take an aerial wire.
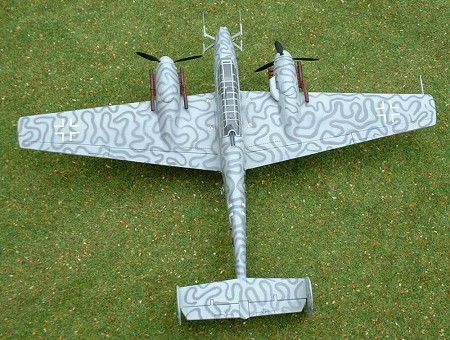
Don’t forget to open out the holes for the drop tanks before gluing the wings together!
I think another reviewer said that he had lost the landing light cover from this kit. In fact there isn’t one – I made one from a scrap of clear plastic from the vac-canopy.
| COLORS & MARKINGS |
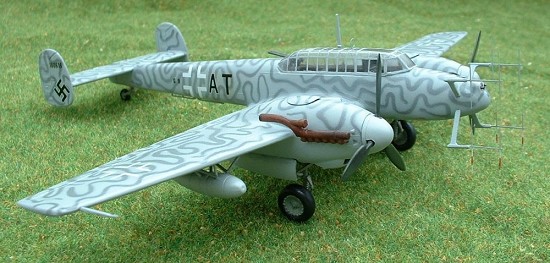
 After
deciding to paint the aircraft in the “wellenmuster” scheme on an aircraft
from NJG 1 as suggested by
the rear box art, I pondered how to best achieve this. In the end I went
for a variant on the “reverse-mottle” technique. I painted the top and side
of the aircraft Gunze RLM75 before rolling some very fine sausages of Blu-Tak and arranging these to try to replicate the spaghetti pattern. As
the Blu-Tak preferred to stick to my fingers more than the glossy Gunze
finish this took some time! At this point I realised that I had forgotten
to install the small blisters on top of the engines plus what I think is
supposed to be additional armour plating outside of the pilots cockpit. I
fitted the blisters but did not have the will to add the plating!
After
deciding to paint the aircraft in the “wellenmuster” scheme on an aircraft
from NJG 1 as suggested by
the rear box art, I pondered how to best achieve this. In the end I went
for a variant on the “reverse-mottle” technique. I painted the top and side
of the aircraft Gunze RLM75 before rolling some very fine sausages of Blu-Tak and arranging these to try to replicate the spaghetti pattern. As
the Blu-Tak preferred to stick to my fingers more than the glossy Gunze
finish this took some time! At this point I realised that I had forgotten
to install the small blisters on top of the engines plus what I think is
supposed to be additional armour plating outside of the pilots cockpit. I
fitted the blisters but did not have the will to add the plating!
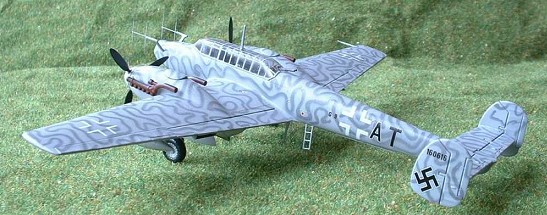
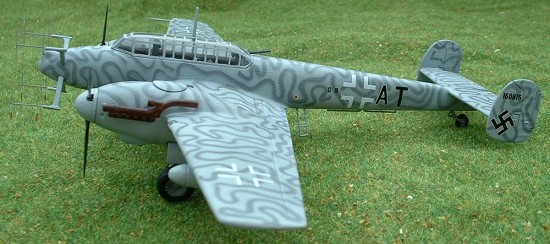
The whole aircraft was then sprayed Gunze RLM 76 and the Blu-Tak removed. A light misting of RLM 76 was then given to tone down the squiggles and give them a more sprayed on effect. I was delighted with the overall effect although truthfully the pattern is probably overscale and the technique is perhaps more suitable for larger models (and I have subsequently seen a very nice example on another modelling website).
Mention should probably be made of the utter tedium of masking the greenhouse which was made more difficult because the canopy frames are very lightly indicated on the Falcon canopy. I used small lines of masking tape to mask each section, and despite my best efforts the framing “wanders” somewhat from front to back.
 The kit
decals were used and no problems at all were experienced bedding them down
with decal setting solutions. I sprayed a coat of Gunze Gloss Varnish
before applying the decals just to be on the safe side.
The kit
decals were used and no problems at all were experienced bedding them down
with decal setting solutions. I sprayed a coat of Gunze Gloss Varnish
before applying the decals just to be on the safe side.
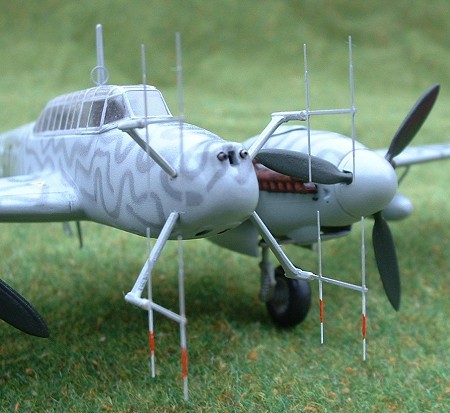
Another curious absence in the kit are the 30mm cannon barrels that protrude from the nose. I used some small pieces of fine steel tubing which I heated under the gas ring to give them a gunmetal look. I secured them in the nose with white glue.
Then the tense finale of fitting the FUG radar arrays. I used the kit part for the radar mounting and Extratech photo-etched aerials. You need to sand flat the base of the mounting and it then rests in grooves in the fuselage. I used superglue gel after first putting some future over the nose to prevent the superglue frosting the paint. Reckon on knocking these off at least a couple of times before you are finished! Before fixing the aerial mountings I pricked a small hole in the ends with a needle to give the photoetch aerials a positive area to locate. The aerials were superglued in place. They are very flimsy indeed but a massive improvement on the kit ones. For the last step, a DF loop was added to the roof of the canopy.
| CONCLUSIONS |
 Certainly
this was a superior kit to the Airfix and Matchbox Bf110s that I have also
built. I don’t know how it stacks up against the Fujumi kit which is rated
by some. I think there is also a Frog and a Revell (same mould perhaps?)
night fighter version which I imagine is a generation older than the Italeri
kit. I believe this kit has been recently reissued by Italeri – I wonder if
they have corrected the canopy?
Certainly
this was a superior kit to the Airfix and Matchbox Bf110s that I have also
built. I don’t know how it stacks up against the Fujumi kit which is rated
by some. I think there is also a Frog and a Revell (same mould perhaps?)
night fighter version which I imagine is a generation older than the Italeri
kit. I believe this kit has been recently reissued by Italeri – I wonder if
they have corrected the canopy?
| REFERENCES |
Warplanes of the Luftwaffe – Aerospace Publishing – Edited by David Donald
May 2005
Copyright ModelingMadness.com
If you would like your product reviewed fairly and fairly quickly , please contact the editor or see other details in the Note to Contributors.