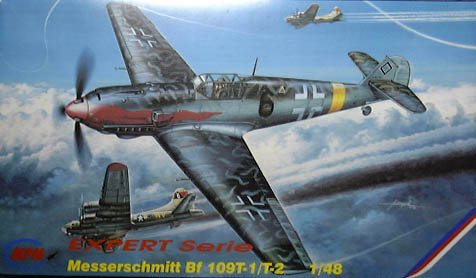
MPM 1/48 Bf-109T
|
KIT # |
48023 |
|
PRICE: |
$19.95 |
|
DECALS: |
Three aircraft |
|
REVIEW : |
Tom Choy |
|
NOTES: |
Kit is short run with resin and vac parts. |
|
HISTORY |
Pretty much everyone knows about the famous Messerschmitt Bf-109 series, so I won’t delve into a detailed history of this remarkable aircraft. However, how many of you knew that there was actually a carrier-based version of this aircraft? Well, this is it – the Bf-109T series.
Design work on the 109T actually began in 1937, developed concurrently at the same time as the Graf Zepplin, Germany’s sole aircraft carrier. Based on the –E series of 109s, several modifications were made in order to turn it into a carrier-based aircraft: The wings were extended from 9.87m to 11.08m, which makes it one of the distinguishing marks of this aircraft. The landing gear was also strengthened for carrier landings, an arrestor hook installed and a modified air inlet was designed to accommodate the Daimler Benz 601N engine. Unfortunately (or perhaps, fortunately), the Graf Zepplin was cancelled in 1940, and all 109Ts (now designated 109-T1) were converted to land use, redesignated 109T-2. The main difference distinguishing the T-1 and T-2 is that the T-2 has no arrestor hook , removed to save weight (also no catapult attachments and the slats were bolted in the up position, Ed). Here’s a little trivia for you – the first B-17s over Europe were shot down by 109T-2s.
|
THE KIT |
I’ve always believed that I should give a shot at every opportunity that comes by. This 109T-2 is no exception. This MPM kit is my first attempt at a limited run kit – it’s also my first attempt at using resin components, my first attempt at using a vacform canopy, and also, my first attempt at scratch-building (more on that later). I was looking around for my first 109 to build, I happened to find the MPM kit going on sale at $9. I looked at the picture, and thought, “wow, that’s a cool looking plane! I love those flames!” and saw the description, “MPM Expert Series.” I thought to myself, “wow, Expert Series huh? It must be MPM’s version of the ProModeler line.” If anything, I thought I could learn from building this kit. So I ordered the kit, not knowing what was in store for me. Apparently, MPM was serious when they labeled this is the “Expert Series.” – you either need to be a real expert model builder of just plain crazy to do this kit!
When I opened the box, there were two flimsy sprues with a small bit of flash around the large parts, and a lot of flash on the small parts. Fortunately there wasn’t enough flash to ruin some parts, and all it needs is a bit of cleaning up. The resin parts were well cast, though the casting blocks were in some odd places (the blocks are flush against some parts, instead of to one side like the ones from Black Box and True Details.
The decals are from Propagteam, which means that they’re pretty nice, but super thin and can be tricky to use.
|
CONSTRUCTION |
 You’re going to need two essential items to
build this kit: a Flex-I-File or lots of sanding sticks, and a scriber of some
sort. A good sanding device for the resin parts would be nice too (don’t forget
a breathing mask!). The kit starts with a cockpit, which is a mix of the
injected and resin parts. They fit pretty decent, except for the little levers
which can break off when you’re trying to squeeze the cockpit into the
fuselage. Also, the trim wheels and seat don’t get along very well, you’ll have
to resize the trim wheel and perhaps even cut away part of the cockpit sidewall
to get it to fit between the wall and seat.
You’re going to need two essential items to
build this kit: a Flex-I-File or lots of sanding sticks, and a scriber of some
sort. A good sanding device for the resin parts would be nice too (don’t forget
a breathing mask!). The kit starts with a cockpit, which is a mix of the
injected and resin parts. They fit pretty decent, except for the little levers
which can break off when you’re trying to squeeze the cockpit into the
fuselage. Also, the trim wheels and seat don’t get along very well, you’ll have
to resize the trim wheel and perhaps even cut away part of the cockpit sidewall
to get it to fit between the wall and seat.
 The fuselage joins very well, but
the flash on the edges were difficult to clean, so I opted to glue the fuselage
together then sand off the flash sticking out with a Flex-I-File. Then I went
to work on re-scribing the lost detail. When I was satisfied with the fuselage,
I popped in the cockpit. I left out the propeller and cowl as I felt that it
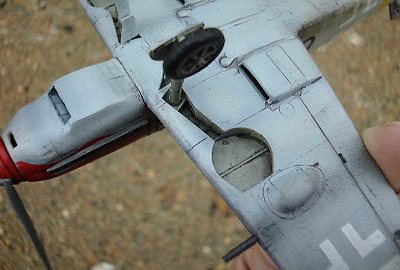
was fragile. Next up was the wings, and this is where the scratch-building
comes in. I was happily dry-fitting the wings when I realized that this kit has
no wheel wells!!! I panicked a little, and decided that this was my first
limited run kit, and I was in this hobby for fun anyway. Then, out of impulse,
I grabbed some sheet styrene, cut it up, and glued it to the wings. After two
days of marking, dry-fitting, cutting, gluing my fingers to the wings, removing
my fingers, and generally questioning why I decided to build the wheel wells in
the first place, I was done. I wasn’t able to replicate the rounded ceiling of
the wheel well, as I found that I wasn’t very good at scratch-building, but I
made the little holes in the spars and also put a piece of tape at the back of
the wheel well to represent the canvas cover protecting the innards of the
wing. It’s not totally accurate, but it sure looks better than that huge gaping
hole!!!
The fuselage joins very well, but
the flash on the edges were difficult to clean, so I opted to glue the fuselage
together then sand off the flash sticking out with a Flex-I-File. Then I went
to work on re-scribing the lost detail. When I was satisfied with the fuselage,
I popped in the cockpit. I left out the propeller and cowl as I felt that it
was fragile. Next up was the wings, and this is where the scratch-building
comes in. I was happily dry-fitting the wings when I realized that this kit has
no wheel wells!!! I panicked a little, and decided that this was my first
limited run kit, and I was in this hobby for fun anyway. Then, out of impulse,
I grabbed some sheet styrene, cut it up, and glued it to the wings. After two
days of marking, dry-fitting, cutting, gluing my fingers to the wings, removing
my fingers, and generally questioning why I decided to build the wheel wells in
the first place, I was done. I wasn’t able to replicate the rounded ceiling of
the wheel well, as I found that I wasn’t very good at scratch-building, but I
made the little holes in the spars and also put a piece of tape at the back of
the wheel well to represent the canvas cover protecting the innards of the
wing. It’s not totally accurate, but it sure looks better than that huge gaping
hole!!!
 The horizontal stabilizers have to be butt-joined, and be careful –
it’s really hard to get the stabilizers and those support spars on at the same
time. You might have to re-drill some holes to get them to hold up right. If I
were to do this kit again, I’d insert a little rod to act as a spar for the
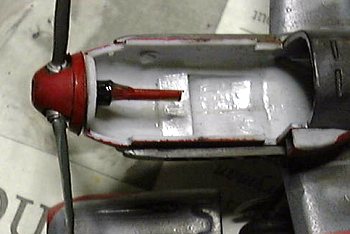
stabilizers. I also had to do one more piece of scratch-building, which has to
be done after decaling: the kit has no prop shaft. I ended up cutting off a
piece of brass rod and glued it to the back of the prop, and then held the prop
in place with one of those little spare vinyl caps from the newer Hasegawa and
Tamiya kits. My brass rod wasn’t thick enough, so I put some white glue on the
cap to hold it in place. I also did not glue the cowl into place as I figured
that it would be easier to make any repairs or repositioning of the prop shaft
if I could just open up the cowl. By the way, the cowl’s a little too big for
the fuselage – you’ll have to sand it down to size. Don’t put on the little
filter (B21) or the exhausts yet – you’ll want to decal the fuselage first.
The horizontal stabilizers have to be butt-joined, and be careful –
it’s really hard to get the stabilizers and those support spars on at the same
time. You might have to re-drill some holes to get them to hold up right. If I
were to do this kit again, I’d insert a little rod to act as a spar for the
stabilizers. I also had to do one more piece of scratch-building, which has to
be done after decaling: the kit has no prop shaft. I ended up cutting off a
piece of brass rod and glued it to the back of the prop, and then held the prop
in place with one of those little spare vinyl caps from the newer Hasegawa and
Tamiya kits. My brass rod wasn’t thick enough, so I put some white glue on the
cap to hold it in place. I also did not glue the cowl into place as I figured
that it would be easier to make any repairs or repositioning of the prop shaft
if I could just open up the cowl. By the way, the cowl’s a little too big for
the fuselage – you’ll have to sand it down to size. Don’t put on the little
filter (B21) or the exhausts yet – you’ll want to decal the fuselage first.
The final bit of scratch-building that you should do (and I did not) is to build the support structure that holds up the little armor plate in the canopy. I didn’t, and stupidly glued the part to the top of the canopy. There’s a little glue spot there now that will have to do until I get a replacement canopy. The vacform canopy is pretty clear, but will need a little resizing to fit. I masked the canopy with liquid mask and left it to dry overnight. Finally, I left off the propeller, landing gear and antenna until after painting and decaling.
|
CAMO & MARKINGS |
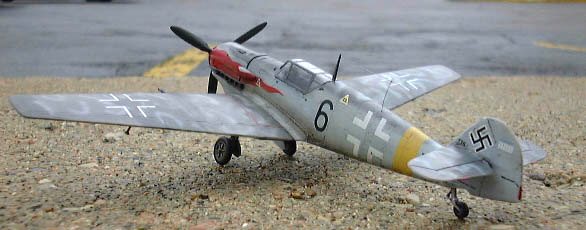
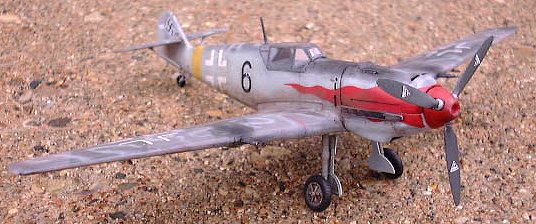
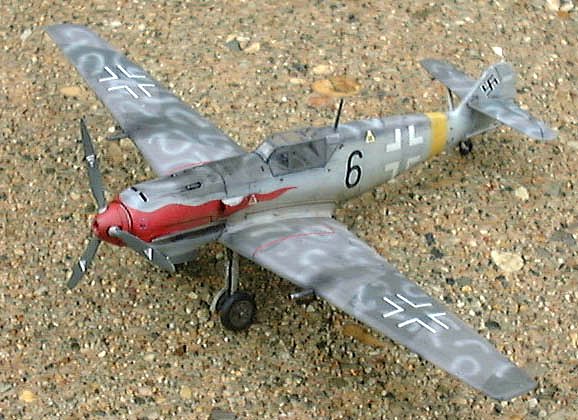
I chose to do the paint job on the box – which is 109T-2 W.Nr. 7767 of JG 11 flown by Oberleutnant Herbert Christmann in Lister base, Norway, in the summer of 1944. I started off by pre-shading the lines, then spraying a thin coat of RLM 76 over the entire plane, then masking the splinter scheme, painting that with RLM 75 and 74, and finally adding the broken squiggles with more RLM 76. I also had to paint the yellow stripe myself, which was RLM 04. After a good gloss coat, it was ready for decals.
 The first decal you’ll want to put
in, if you’re doing Christmann’s plane, are those huge red flames. Here’s why
you shouldn’t glue the cowl: Put the decal on, zap if with lots of decal
solvent, and when it’s dry, use a sharp No.11 blade and score a line separating
the cowl from the fuselage. Now you can start putting the prop on (though I
recommend that you do that as the second last step). Also, you’ll notice that
the flame decal goes over the little filter on the side - As mentioned earlier,
these are Propagteam decals, so be extra careful when sliding them – they’ll
stick to the surface on contact, so you’ll need to float the decal on instead.
Once the flame decal is on, attach the exhausts and filter – the color of the
flame is Guards Red with a spot of white – you’ll have to touch up the decal
here and there, and repaint part of the flame on the filter once the filter’s
attached. As for the exhausts – well, on my kit one was slightly shorter than
the other, which may have been a result of over-sanding, or just plain bad
luck.
The first decal you’ll want to put
in, if you’re doing Christmann’s plane, are those huge red flames. Here’s why
you shouldn’t glue the cowl: Put the decal on, zap if with lots of decal
solvent, and when it’s dry, use a sharp No.11 blade and score a line separating
the cowl from the fuselage. Now you can start putting the prop on (though I
recommend that you do that as the second last step). Also, you’ll notice that
the flame decal goes over the little filter on the side - As mentioned earlier,
these are Propagteam decals, so be extra careful when sliding them – they’ll
stick to the surface on contact, so you’ll need to float the decal on instead.
Once the flame decal is on, attach the exhausts and filter – the color of the
flame is Guards Red with a spot of white – you’ll have to touch up the decal
here and there, and repaint part of the flame on the filter once the filter’s
attached. As for the exhausts – well, on my kit one was slightly shorter than
the other, which may have been a result of over-sanding, or just plain bad
luck.
After the decals were done, I sprayed one coat of gloss coat and started to weather the plane with a mixture of water, dishwashing soap, and a spot of black and brown paint. I brushed the panel lines, waited for them to dry, and then wiped off the excess. The exhaust streaks were done with pastels, and brushed on over a flat coat. After the exhaust stains were done, I did a final coat of flat coat and removed the canopy masking. I then attached all the remaining fiddly bits like landing gear and probes, and made the antenna with a bit of 2-pound fishing line stretched taut with some smoke from a blown-out match. I painted the antenna Testor’s Metalizer Dark Anodonic Grey.
Well, decals and weathering took me a day and a half, but when it’s done, it’s sure nice!!!
|
CONCLUSIONS |
After a week of crying and gnashing of teeth, I had in front of my first limited run kit!!! It’s not an IPMS prizewinner, but to me, it takes first place in the Super Tom Super Private Modeling Contest, in which I’m the winner every time!!! I also showed it to my girlfriend, who gave it the Harmony Stamp of Approval: “Pretty.” Well, good enough. I feel really good about myself in completing this kit, and I’ve had a lot of fun doing it (though it didn’t feel like fun when I was trying to unglue the kit from my fingers). I wouldn’t recommend this to the beginner, but intermediate and experienced modelers shouldn’t have any trouble with it as long as they take their time and plan ahead. Plus, for $9, it’s perfect for those who’d like to learn how to build limited run kits and resin components without paying a lot of money.
|
REFERENCES |
Green, W. (1970). Warplanes of the Third Reich. Doubleday, NY.
If you would like your product reviewed fairly and fairly quickly, please contact the editor or see other details in the Note to Contributors.