|
KIT: |
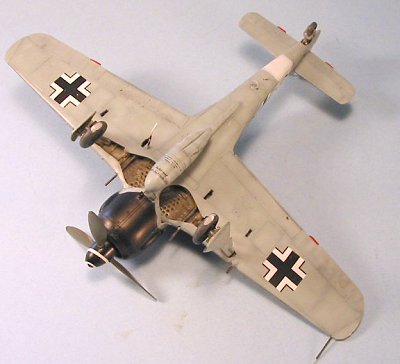
Dragon 1/48 Fw-190A-8 'Rammjager' |
|
KIT # |
? |
|
PRICE: |
$ Out of production |
|
DECALS: |
Three options |
|
REVIEWER: |
Tom Cleaver |
|
NOTES: |
Cutting Edge cockpit used. |
|
HISTORY |
The Fw-190A-8 was built in larger numbers than any other sub-type of the famous Focke-Wulf fighter. It was externally similar to the preceding Fw-190A-7, which was the first sub-type to carry the fuselage armament of two 13mm MG 131 machine guns. Where the original Fw-190A-3 had been so light that the 1,800 h.p. BMW 801 engine could be derated to 1,600 h.p. to save wear and tear on the powerplant while still out-performing its opponents, the heavy A-8 was modified to use the MW 50 power-boosting system, with a 25-gallon methanol-water tank aft of the cockpit; this resulted in the radio equipment being moved forward, while the ETC 501 rack for the centerline drop tank was moved forward 8 inches, to compensate for the weight of the MW 50 system.
Of the many variants of the Fw-190A-8, the Fw-190A-8/R7 - known as the Rammjaeger - was intended for ramming attacks against Allied bombers. Carrying 20mm MG 151 cannon inboard, it had MK 103 30mm cannon in the outboard weapons position, the R7 was also fitted with additional armor to increase the chance of penetrating defensive machine gun screen of the bomber formations. It was determined that only three hits from 30mm cannon fire was sufficient to shoot down even the hardy Boeing B-17 “Flying Fortress” and as a result the Sturmstaffeln adopted the tactic of attacking from the rear of the formation, allowing the pilot to make use of the heavy armor protection in order to concentrate on a single victim in a way that could not be done in the “Twelve O’clock High” head-on attack formation.
 Of course, the heavy Rammjaeger could
not survive combat against escorting P-47s or P-51s, since its heavy
armor made it some 25% heavier than a standard Fw-190; the aircraft was
vulnerable to attack from the rear due to the fact the armor was
primarily in front for protection during the assault on the bombers. This
meant the Sturmgruppen had to be escorted by Bf-109 fighters for
protection while forming up and approaching the bomber stream, when they
were at their maximum vulnerability to the American escorts.
Of course, the heavy Rammjaeger could
not survive combat against escorting P-47s or P-51s, since its heavy
armor made it some 25% heavier than a standard Fw-190; the aircraft was
vulnerable to attack from the rear due to the fact the armor was
primarily in front for protection during the assault on the bombers. This
meant the Sturmgruppen had to be escorted by Bf-109 fighters for
protection while forming up and approaching the bomber stream, when they
were at their maximum vulnerability to the American escorts.
As the American bomber formations had grown in size and striking power from the summer of 1943, Reichsmarschall Goering had - after the first Schweinfurt mission in August 1943 - ordered that, if necessary, fighter pilots must continue their attack on a bomber formation to the point of ramming. This did not become a tactic of the Jagdflieger until Major Hans-Guenther von Kornatzki persuaded OKL to allow the formation of Sturmstaffel 1, to attempt the development of deliberate ramming of enemy bombers as a tactic.
The unit was formed in late 1943 and attached to I/JG1 at Dortmund in January 1944. The concept was based on the army’s Sturm detachments, whose mission was to close with the enemy and engage him in hand-to-hand, close-quarter combat. While the unit closed the enemy formation and engaged from the rear, it was only in exceptional circumstances and as a last resort that a pilot was expected to ram, and then only if he could bail out before impact. The Sturmstaffel was not the German version of the Kamikaze. Most of the time, if the pilot had closed on a bomber that close, the target was usually done for from the 30mm hits. Of pilots who did ram, at least 50 percent were reported to have escaped by parachute uninjured.
Sturmstaffel 1 entered combat on January 11, 1944, when Oberleutnant Zehart scored the unit’s first victory - a B-17. Unteroffizier Willi Maximowitz got his first, a B-24, near Hanover on January 30. The unit saw more successful action during the air battles known as “Big Week” in February, and in the battles over Berlin during early March.
In late April 1944, IV/JG 3, which had recently converted from the Bf-109 to the Fw-190,was selected to take the success of von Kornatzki’s Sturmstaffel 1 to the next level: the unit was to become the first Sturmgruppe. Based at Salzwedel, it was equipped with the Fw-190A-8/R7, specifically produced for the role. The surviving pilots from Sturmstaffel 1 were assigned to the unit to provide a leavening of experienced veterans.
 In late May,
1944, all 68 pilots of the unit were assembled to hear the Gruppe
Kommandeur, Hauptman Wilhelm Moritz read the Sturmgruppe Oath: “We
swear to fight in defense of the Reich true to the principles and rules
of engagement of the Sturmgruppe. We know that, as pilots of the
Sturmgruppe, we are called upon in a special way to protect and
defend to the utmost of our ability the population of our homeland. We
undertake that, on every mission resulting in contact with four-engine
bombers, we shall press home the attack to the shortest range and - if
unsuccessful in shooting down the enemy by gunfire - we will destroy him
by ramming.”
In late May,
1944, all 68 pilots of the unit were assembled to hear the Gruppe
Kommandeur, Hauptman Wilhelm Moritz read the Sturmgruppe Oath: “We
swear to fight in defense of the Reich true to the principles and rules
of engagement of the Sturmgruppe. We know that, as pilots of the
Sturmgruppe, we are called upon in a special way to protect and
defend to the utmost of our ability the population of our homeland. We
undertake that, on every mission resulting in contact with four-engine
bombers, we shall press home the attack to the shortest range and - if
unsuccessful in shooting down the enemy by gunfire - we will destroy him
by ramming.”
IV/JG 3s first successful mission came on July 7, 1944, when 1,100 heavy bombers escorted by 750 fighters were sent against synthetic oil refineries in central Germany. Escorted by two Bf-109 Gruppen from JG 300, the unit attacked a formation of B-24s that were temporarily deprived of fighter cover. 28 B-24s were shot down, including 12 of 18 sent up from the 492nd Bomb Group. Nine Fw-190s were shot down and five pilots killed; by the standards of the time, the mission was considered an outstanding success. As a result, II/JG 300 was ordered to convert to the Sturmgruppe role, while Major Kornatzki took command of II/JG 4 which was activated specifically for the mission.
The American
response to the Sturmgruppen was to take advantage of their
superiority in numbers, sending fighter groups on sweeps ahead of the
bomber formation specifically to find and break up the formations of
Sturmbocks before they could find and attack the American
formations. By August 1944, this was so successful that the Luftwaffe
was losing a fighter pilot killed for each bomber shot down, a level of
attrition the Jagdwaffe could not withstand.
By early September, the Fw-190s of the Sturmgruppen were the only Fw-190s committed to the defense of the Reich, while the other Wurger-equipped units recuperated from the terrible losses in Normandy that previous summer. On November 2, 1944, Oberleutnant Werner Gerth, a veteran of Sturmstaffel 1 flying with IV(Sturm)/JG 3 who had survived being shot down 11 times since February, rammed a B-17 over Halle - this time his parachute failed to open. 25 of his final total of 30 victories - all scored since February - were B-17s and B-24s.
One of the longest-serving pilots of the Sturmgruppen was Willi Maximowitz, who had been an original member of Sturmstaffel 1. By April, 1945, the heavy Sturmbocks were pressed into ground attack service against advancing Soviet armies. After surviving 15 months of all-out combat on the Western Front against overwhelming odds and scoring 25 victories, of which 15 were B-17s and B-24s, Maximowitz failed to return from an Eastern Front strafing sortie on April 20, 1945. Shortly thereafter, the unit was disbanded for lack of pilots, aircraft, and gasoline.
|
THE KIT |
The Trimaster
kit of the Fw-190A-8 originally appeared in 1992. The series of Fw-190
kits released by the company represented a quantum leap in the state of
the art, with photo-etch details, white metal landing gear, and engraved
surface 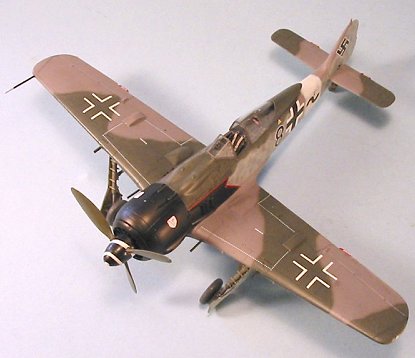 detail on the injection-molded parts. The kits were also
incredibly expensive. At a time when the Hasegawa Bf-109E kits were
selling for $18.00, the Trimaster kits were priced over $40! While many
Luftwaffe maniacs among the modeling fraternity did buy the kits, the
company went bankrupt and its molds were bought by Dragon Modelworks Ltd
in Hong Kong. In 1994, the kits were re-released. The photoetch and white
metal detail parts were presented in injection plastic. Eventually DML
dropped the line, some of which were picked up by Italerei and some by
Revell of Germany. DML kits can still be found at kit swap meets and at
dealers tables at model shows. (Editor's Note: some of these kits are
slowly being reissued by Shanghai Dragon so you just need to keep your
eyes open for what's being done.)
detail on the injection-molded parts. The kits were also
incredibly expensive. At a time when the Hasegawa Bf-109E kits were
selling for $18.00, the Trimaster kits were priced over $40! While many
Luftwaffe maniacs among the modeling fraternity did buy the kits, the
company went bankrupt and its molds were bought by Dragon Modelworks Ltd
in Hong Kong. In 1994, the kits were re-released. The photoetch and white
metal detail parts were presented in injection plastic. Eventually DML
dropped the line, some of which were picked up by Italerei and some by
Revell of Germany. DML kits can still be found at kit swap meets and at
dealers tables at model shows. (Editor's Note: some of these kits are
slowly being reissued by Shanghai Dragon so you just need to keep your
eyes open for what's being done.)
Many modelers prefer the later Tamiya Fw-190 kits on grounds of better kit design, but Tamiya only produced the Fw-190A-3, and Fw-190F-8 of the radial-engine Focke-Wulfs, while the DML series eventually covered every version of the radial-engine fighters except the Fw-190A-3 and earlier versions. The Tamiya kits are easier to construct, but not as accurate - specifically, the propellers are not of the correct shape and the landing gear is too short.
|
CONSTRUCTION |
While it is true that the DML kit is more difficult to build, modelers who can touch the tip of their nose with their forefinger on consecutive attempts do in fact possess the necessary hand-eye coordination to build the kit. There are, however, some “tricks of the trade” a modeler should be aware of when taking on one of these kits. Using these tricks, the kit becomes much easier to build, and results in a good-looking and accurate model of this famous warbird.
 The primary
“trick” is to get the fuselage to fit to the wing without having to use a
ton of putty on the upper wing-fuselage joint. The secret is to push the
fuselage out and widen it so that it fits the wing exactly. I use pieces
of sprue, which I position immediately fore and aft of the cockpit
assembly. Once the cockpit has been glued in position, I push them in,
then test-fit the fuselage and wings until I have a perfect fit on the
upper wing surface. I then glue the sprue braces in position. If you do
this, you can build this kit with only a need to use Mr. Surfacer on the
centerline seam for the upper and lower rear fuselage.
The primary
“trick” is to get the fuselage to fit to the wing without having to use a
ton of putty on the upper wing-fuselage joint. The secret is to push the
fuselage out and widen it so that it fits the wing exactly. I use pieces
of sprue, which I position immediately fore and aft of the cockpit
assembly. Once the cockpit has been glued in position, I push them in,
then test-fit the fuselage and wings until I have a perfect fit on the
upper wing surface. I then glue the sprue braces in position. If you do
this, you can build this kit with only a need to use Mr. Surfacer on the
centerline seam for the upper and lower rear fuselage.
The next trick is to assemble the multi-part engine cowling so it maintains its shape and has a strong attachment to the forward fuselage. Break out the .010 Evergreen sheet here, and cut some narrow strips. Glue them to the main upper and lower cowling pieces, so that there is an increased area to glue the side parts to. Then cut two strips about 1/2 inch long and 1/4 inch wide, and glue them inside the forward fuselage, to make tabs. The cowling can then be fitted to these tabs, which will provide increased “grab area” for the glue, resulting in a good firm joint.
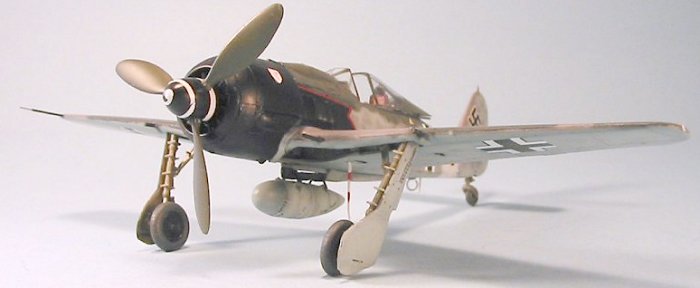
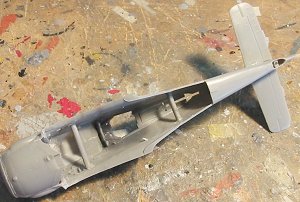
Past these, the third “trick” is to get the landing gear properly aligned, and this one is much harder to do than the first two. Trust me, the number of DML Fw-190 models - all beautifully constructed, magnificently painted and wondrously marked - that have failed to make the first cut of a judging sweep at a model contest for the crime of having misaligned landing gear is likely approaching more than 1,000 by now, just in North America! The mistake can range from landing gear that hangs straight down, to gear where one wheel is further forward of the leading edge than the other.
Here’s the secret: the correct position for Fw-190 landing gear is to be
at such an angle forward that when you look straight down at the model
from above, the rearmost point of the main wheel hub is just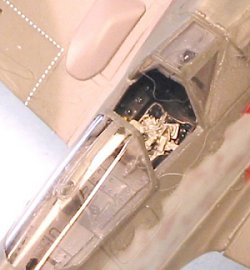 visible in front of the wing leading edge. Yes, it’s tricky to get
this, and it’s too bad there isn’t another visual clue to use in doing
this, but after building some 20-plus of these, that is the only
reference point I have found that works every time. It is also important
to be certain that both gear legs are angled the same; again looking down
at the model from above, the wheels should be about 5/16 inch outboard of
the inboard cannon barrels.
visible in front of the wing leading edge. Yes, it’s tricky to get
this, and it’s too bad there isn’t another visual clue to use in doing
this, but after building some 20-plus of these, that is the only
reference point I have found that works every time. It is also important
to be certain that both gear legs are angled the same; again looking down
at the model from above, the wheels should be about 5/16 inch outboard of
the inboard cannon barrels.
If you use these three secrets, the DML Fw-190 will lose its difficulty rating. Other than these items, the rest of the kit is easy to assemble.
While the kit cockpit is more than acceptable - there just isn’t that much of a cockpit to be seen in a fully-assembled Fw-190! - I can recommend both the True Details and Cutting Edge resin cockpits. Both sets include well-executed seats with realistically-posed seatbelts. Since the seat is the one thing everyone can see easily in the Fw-190 cockpit, this is an important point for ending up with a good-looking model. In the case of this particular project, I used the Cutting Edge set. It’s designed for the DML kit, and fits easily once it’s removed from its molding block.
|
COLORS AND MARKINGS |
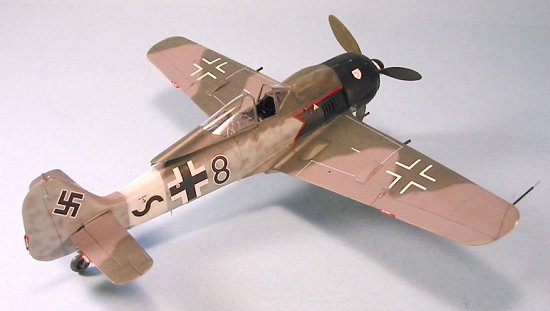
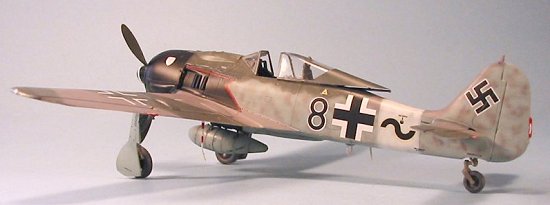
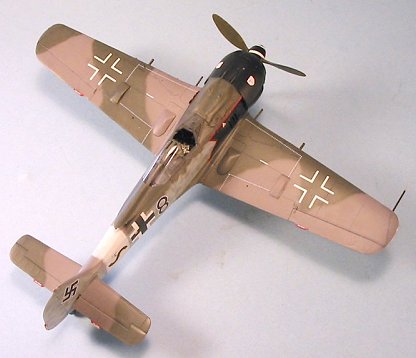
 The model was
freehanded using Gunze-Sangyo paints. I used Gunze’s “RLM74" Graugrun
and “Medium Sea Grey” for the upper surfaces. The “Medium Sea Grey” has
a distinct violet tone which to my eye is a more accurate representation
of RLM75 Grauviolett than the standard Gunze paint. The lower
surface color was painted with Gunze “RLM76" Lichtblau. The
cowling was painted with Tamiya Semi-gloss Black. The gear wells,
landing gear and interior of the gear doors was painted with Tamiya “RLM
Grey,” and then given a black wash. The entire model was given a coat of
Future when finished.
The model was
freehanded using Gunze-Sangyo paints. I used Gunze’s “RLM74" Graugrun
and “Medium Sea Grey” for the upper surfaces. The “Medium Sea Grey” has
a distinct violet tone which to my eye is a more accurate representation
of RLM75 Grauviolett than the standard Gunze paint. The lower
surface color was painted with Gunze “RLM76" Lichtblau. The
cowling was painted with Tamiya Semi-gloss Black. The gear wells,
landing gear and interior of the gear doors was painted with Tamiya “RLM
Grey,” and then given a black wash. The entire model was given a coat of
Future when finished.
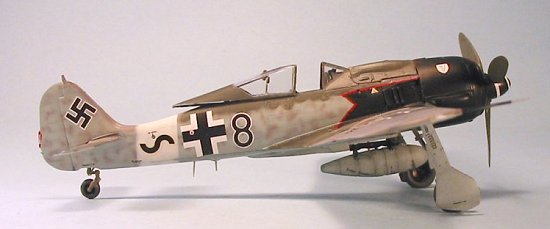
There was a set of Aeromaster decals which included markings for Willi Maximowitz’s “Black 8", but I didn’t have it. I made the stylized exhaust with black decal sheet, edging it with red stripes, while I found a red-bordered black 8 in the Luftwaffe wing of the Decal Dungeon. The rest of the markings came from a Cutting Edge Fw-190 sheet. (Editor's Note: Superscale sheet 48-853 has these markings on it, but the sheet's instructions don't show it!)
|
FINAL CONSTRUCTION |
I gave the model a coat of Future over the decals after washing it off to get rid of dried solvent, then applied two coats of thinned Dullcote. I applied exhaust staining with Tamiya “Smoke.”
Once all was dry, the landing gear was assembled and attached and the cockpit canopy was unmasked and attached.
|
CONCLUSIONS |
 I like
Luftwaffe models, but I do not consider myself a “Luftnut” - that
said, I also like the look of the Fw-190 over that of the Bf-109. The
Wurger in all its subtypes and varieties is a purposeful-looking
airplane with great aesthetics. To me, there is no competition between
the Tamiya and DML kits, for reason of overall accuracy and a better
final look. The DML kit is not a “self-assembler.” It’s a fact that
“some modeling ability” is definitely required. The result is worth it.
I like
Luftwaffe models, but I do not consider myself a “Luftnut” - that
said, I also like the look of the Fw-190 over that of the Bf-109. The
Wurger in all its subtypes and varieties is a purposeful-looking
airplane with great aesthetics. To me, there is no competition between
the Tamiya and DML kits, for reason of overall accuracy and a better
final look. The DML kit is not a “self-assembler.” It’s a fact that
“some modeling ability” is definitely required. The result is worth it.
Kit courtesy of my wallet!
March 2004
If you would like your product reviewed fairly and quickly by a site that has nearly 250,000 visitors a month, please contact me or see other details in the Note to Contributors.