|
KIT: |
RV Resins 1/48 FW-190C-0/v18 |
|
KIT # |
4805 |
|
PRICE: |
$50.00 |
|
DECALS: |
one aircraft |
|
REVIEWER: |
|
|
NOTES: |
Resin |
|
HISTORY |
The first attempt to deal with this problem was introduced in late 1942, when the Fw-190 V13, a modification of the 29th Fw-190A-0 airframe was flown with nitrous oxide, known as GM1. This was disappointing, inasmuch as it only raised the effective combat altitude to 26,000 feet, and only for the brief period that the GM-1 could be injected; additionally, the weight of the GM-1 system, with compressed air cylinders and heavy pressurized tank, was nearly as much as the total armament of the fighter.
 Kurt Tank was
convinced that the problem could never be solved with the BMW 801 radial
engine. Tank favored the Daimler-Benz DB 603, which was looked on with
disfavor by the Reichluftfartsministerium (RLM), who informed Tank
he should use either the BMW 801 or the Jumo 213, which had just entered
series production. This would be a fight that Tank would carry on for the
rest of the development of the Fw-190 series.
Kurt Tank was
convinced that the problem could never be solved with the BMW 801 radial
engine. Tank favored the Daimler-Benz DB 603, which was looked on with
disfavor by the Reichluftfartsministerium (RLM), who informed Tank
he should use either the BMW 801 or the Jumo 213, which had just entered
series production. This would be a fight that Tank would carry on for the
rest of the development of the Fw-190 series.
Tank proposed the Fw-190B, which would use the BMW 801; the Fw-190C, using the DB 603; and the Fw-190D, powered by the Jumo 213 engine. While the Fw-190D elicited the most promising response from the RLM, it was agreed that Tank could construct a series of prototypes of the DB 603-powered Fw-190C.
The GM-1 test vehicle, the V13, and a second pre-prototype, the V15, were flown in April 1942. Built from a Fw-190A series airframes, the fuselage was lengthened 2 feet, 2.5 inches, to accommodate the DB 603 engine, which was some 300 lbs. lighter than the BMW 801. The first genuine built-from-the-ground-up prototype of the C series was the Fw-190C-0 V18. Initially, all three lacked both a pressurized cabin and turbosupercharger, but these were added during the summer of 1942. Using MW 50 and GM 1 experimental systems, the V16 achieved 450 m.p.h. at 22,500 feet, and a climb rate of 4,330 ft/min utilizing MW 50 injection. In October 1942 the airplane was being regularly flown at 39,000 feet.
The
Technisches Amt required an operational altitude of 40,000 feet. In
November 1942, the V18 was fitted with the DVL TK-11 turbocompressor,
resulting in a change in designation to Fw-190C-0 V18/U1. The TK-11 was
mounted ventrally - which was what led to the unofficial nickname of "Kangaruh"
(Kangaroo) - with the hot exhaust gases being led back over the wing in
external pipes. The DB 603 was rated at 1,900 h.p. for takeoff and 1,560
h.p. at 24,000 feet; with the TK-11, 1,600 h.p. was available at 35,000
feet. A 4-blade wooden paddle prop was adopted to improve high altitude
acceleration.  In
May 1943, a broad-chord fin and pressure cabin were added. By this time
five further airframes had been built as C-series prototypes.
In
May 1943, a broad-chord fin and pressure cabin were added. By this time
five further airframes had been built as C-series prototypes.
Pressure cabin trials were delayed constantly by failures of cockpit panels and valves, along with the need to continually replace the rubber packing pieces sealing the canopy.
Throughout 1943, teething troubles plagued the turbocompressor system in all the Fw-190C prototypes, with the most constant failure being the inability of the pipes carrying the exhaust gases to withstand the high temperatures generated.
By the autumn of 1943, it was tacitly accepted by both the RLM and Focke-Wulf that the turbocompressors required more time-consuming development before they would attain sufficient reliability to allow operational use. The Fw-190C series was then deleted from further development, though the five surviving prototypes were used for continued turbocompressor development.
|
THE KIT |
Radek Vavrek, the "R.V." of R.V. Resins, seems determined to produce 1/48 kits and conversion sets to allow modelers to build every version of the Fw-190 ever flown. Two years ago he introduced his all-resin Ta-152C-0 V7 kit, which was vastly superior to the Ta-152C that Trimaster had haphazardly created from their Ta-152 kit several years earlier.
R.V. Resins released models of each of the five Fw-190C-0 prototypes this past Spring. All are essentially similar, though with small differences between each and all.
 When I received
my first resin kit, I was surprised to discover that there were pinholes
all over the surface of the parts, to the degree that the kit was
unbuildable. DMC Models, the U.S. distributor, provided a second review
sample from the second shipment of kits from the Czech Republic. This was
far better, though once the model was painted I discovered there were
still a myriad of pinholes on the wings and tail surfaces. This
surprised me, because I have not had this problem with either the Ta-152C
kit or the earlier conversion fuselages for Fw-d and Fw-f. The problem
stems from an increased level of production. One hopes that R.V. Resins
will get control of this problem, because a decline in quality will
completely negate an increase in numbers of kits available.
When I received
my first resin kit, I was surprised to discover that there were pinholes
all over the surface of the parts, to the degree that the kit was
unbuildable. DMC Models, the U.S. distributor, provided a second review
sample from the second shipment of kits from the Czech Republic. This was
far better, though once the model was painted I discovered there were
still a myriad of pinholes on the wings and tail surfaces. This
surprised me, because I have not had this problem with either the Ta-152C
kit or the earlier conversion fuselages for Fw-d and Fw-f. The problem
stems from an increased level of production. One hopes that R.V. Resins
will get control of this problem, because a decline in quality will
completely negate an increase in numbers of kits available.
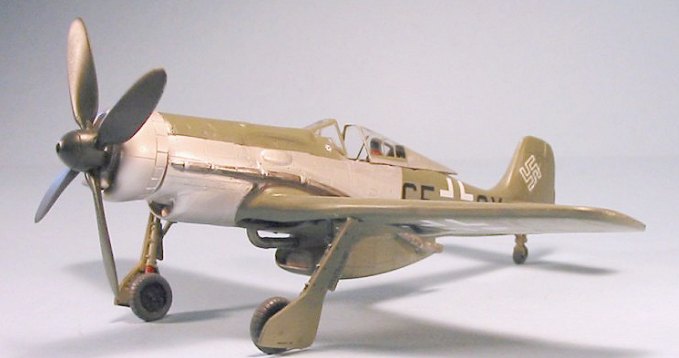
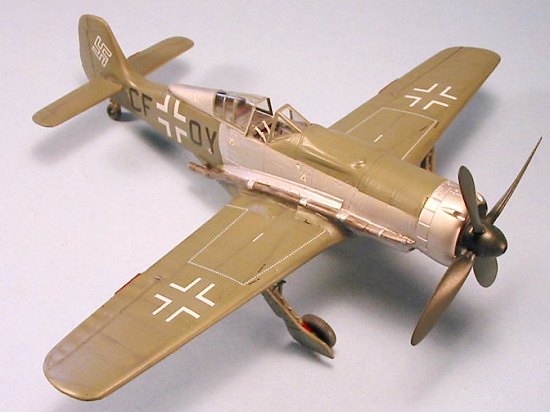
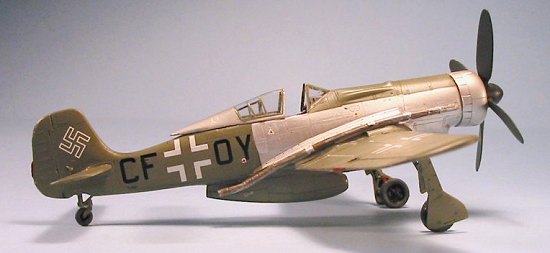
That said, the model has sensible design. There is a one-piece lower wing, two upper wings, fuselage halves, annular radiator, horizontal stabilizers prop with separate blades and gear doors and wheel well in resin, with white metal landing gear, a photo-etch fret of detail parts, and one vacuform canopy which has the increased stiffening of the canopy used with the pressurized cockpit. While the Ta-152C was obviously based on DML Fw-190D kits, this kit is based on the Tamiya Fw-190A. As with the Ta-152C, there is a wealth of very fine engraved surface detail, that gives a good rendition of the flush riveting of the overall construction. Good decals are provided for the markings carried by the V18 prototype.
|
CONSTRUCTION |
One look at the way the upper wings attached to the fuselage, with the molded-in exhaust pipes on the fuselage, and I knew that I wanted to build the fuselage without the canopy, and the wings, and get the two sub-assemblies to mate up on the upper wing to fuselage joint, before I proceeded with anything else.
 I first
dremeled the inner mating surfaces of the wings to insure a thin trailing
edge. Comparing the one-piece lower wing to that of a Tamiya Fw-190A
kit, I realized the resin wing did not have enough dihedral. I brought
water just to the point of boiling, dipped the lower wing in the hot
water, withdrew it and bent it to the correct angle, then ran it under
cold water to "freeze" the modification.
I first
dremeled the inner mating surfaces of the wings to insure a thin trailing
edge. Comparing the one-piece lower wing to that of a Tamiya Fw-190A
kit, I realized the resin wing did not have enough dihedral. I brought
water just to the point of boiling, dipped the lower wing in the hot
water, withdrew it and bent it to the correct angle, then ran it under
cold water to "freeze" the modification.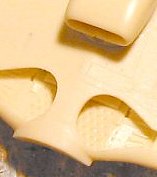
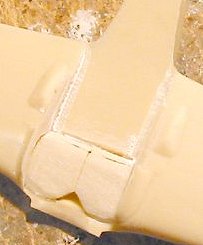
I then glued the fuselage halves together, being sure to insert the photo-etch radiator face in the lower intake. Other than sanding the mating surface of each fuselage half to be sure they were straight, I wasn't worried about sealing seams or anything yet. I then hauled out the Dremel and began work on the joint with the upper wings, test-fitting the upper wings to the fuselage frequently. The final result wasn't as good as I hoped, but I figured I could fill in the gaps with cyanoacrylate glue and putty, which is what I ended up doing when the time came. I then assembled the wing parts.
The cockpit tub was as easy to assemble as its Tamiya forebear. I painted and detailed the cockpit, then inserted it up into the fuselage and glued it in position. The glare shield is made with photo-etch, so I left that and the rear decking for later installation along with the seat.
I glued the wing to the fuselage, and used gap-filling glue and putty to fill the gaps in the upper wing joint. When all this was dry, I spent an evening with various files, cleaning up the joint. Fortunately, I was able to do this without losing much surface detail.
With the "heavy lifting" complete, I attached the annular cowling and the turbocompressor housing. A friend says this makes the airplane look like "the bastard child of an Fw-190 and a P-51D," and that is an accurate description. I puttied the joints and smoothed them, then used Mr. Surfacer 500 on all the seams and joints of the model. Once all this was sanded smooth and I had re-done lost surface detail, I attached the horizontal stabilizers and the rest of the exhaust piping, and assembled the propeller.
|
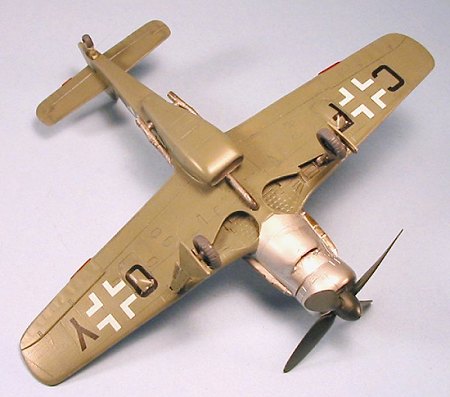
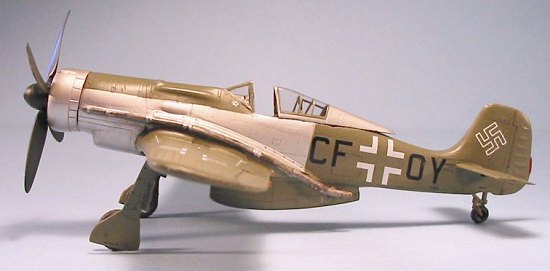
CAMOUFLAGE & MARKINGS |
Painting:
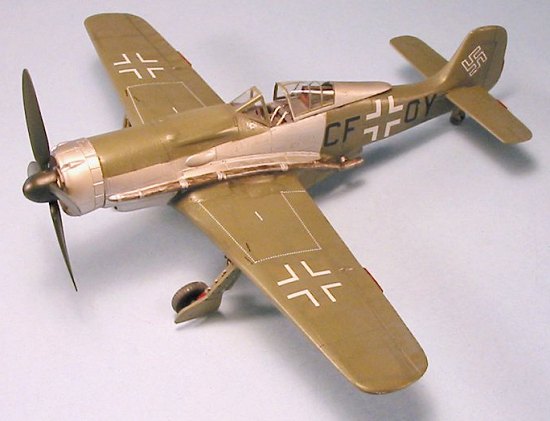 The Fw-190C-0
V18 was painted in overall RLM02, with the radiator, and lower forward
fuselage left in natural metal, as was the rear canopy.
The Fw-190C-0
V18 was painted in overall RLM02, with the radiator, and lower forward
fuselage left in natural metal, as was the rear canopy.
I painted the NMF areas with SnJ aluminum, then masked that off. I preshaded the rest of the model with black, then painted it overall with Tamiya RLM Grey, which I then lightened and "post-shaded" to get a multi-hue finish. I consider this really necessary when doing an airplane in a single color. When that was dry, I applied a coat of Future.
Decals:
When the Future was dry, I unmasked the SnJ-painted areas, and then applied the kit decals. Looking at the few photos of the V18 that exist, I concluded that the swastika on the kit sheet was too big, and replaced that with a smaller one from the decal dungeon. The decals went down over the surface detail and needed only two additional applications of Micro-Sol to make them sink into the surface detail without further problems. I then Futured the model again, and when that was dry I applied thinned Dullcote to the RLM02 areas.
|
FINAL CONSTRUCTION |
 The resin tail
wheel broke when I attempted to position it, so I used a Focke-Wulf tail
wheel from the spares box. I also discovered on assembling the landing
gear that there were no retraction actuators; these also came from the
spares box. (R.V. Resins has since replaced the tail wheel with a white
metal part, and shipped retraction actuators. If you have the resin tail
wheel, or lack the retraction actuators, you can contact David Cooper at
DMC Models and get replacements.)
The resin tail
wheel broke when I attempted to position it, so I used a Focke-Wulf tail
wheel from the spares box. I also discovered on assembling the landing
gear that there were no retraction actuators; these also came from the
spares box. (R.V. Resins has since replaced the tail wheel with a white
metal part, and shipped retraction actuators. If you have the resin tail
wheel, or lack the retraction actuators, you can contact David Cooper at
DMC Models and get replacements.)
The landing gear is the short Tamiya gear, so the model sits too low. I contemplated using some DML gear legs and doors from the spares box, but decided not to.
I had planned to assemble the canopy closed, but once it was cut from its backing, I saw that I should have attached it during construction so that I could putty it into the fuselage, due to the fact that the fit was not great. Having not done that, I decided to display it open, and cut it apart. I used a headrest and other canopy interior parts from the spares box, since the photoetch parts were too thin and fragile to really be useful.
|
CONCLUSIONS |
I have to say that in terms of production quality, this kit is not up to the standards set by the Ta-152C and the conversion sets previously released by R.V. Resins. Both kits received had numerous pinholes - the first to the point of unuseability, and the second to the point that it is a definite "18-incher," (i.e., it looks fine from a distance of 18 inches or more). Given that this model is going to be displayed at Planes of Fame where it will be behind glass and viewed by non-modelers, this is not a problem; if you want to make a model for your own collection, however, this could be a problem. This is not a model you should consider as the basis for a Nats entry.
 Additionally,
this is not a model you should attempt if you do not have at least two or
three "difficult" resin kit projects successfully completed. The work on
getting the upper wing to fit the fuselage is exacting, and I cannot see
any simple way of doing it. You should prepare to spend a bit of time
with rat tail and wedge files to get something that looks right.
Additionally,
this is not a model you should attempt if you do not have at least two or
three "difficult" resin kit projects successfully completed. The work on
getting the upper wing to fit the fuselage is exacting, and I cannot see
any simple way of doing it. You should prepare to spend a bit of time
with rat tail and wedge files to get something that looks right.
All that said, if you are a Focke-Wulf fan, this is a model you will want in your collection, as it is unlikely to ever be made by any other company. I have through this distinctive-looking Butcher Bird would be interesting to see as a model ever since the first time I saw a photograph of the V18 30-odd years ago, and I was right. It is a very different-looking Focke-Wulf and looks cool sitting between an Fw-190A and a Dora-9.
August 2003
Thanks to DMC Models for the review kit. DMC does not have its web site up yet, but can be reached at dmcmodels@aol.com
If you would like your product reviewed fairly and quickly by a site that has over 200,000 visitors a month, please contact me or see other details in the Note to Contributors.
Back to the Reviews Index Page