| KIT: | Hasegawa 1/32 Bf-109G-6 |
| KIT #: | ? |
| PRICE: | $44.98 MSRP |
| DECALS: | Two options |
| REVIEWER: | Tom Cleaver |
| NOTES: |
| HISTORY |
By 1943, it was clear to the Luftwaffe that the lightly-armed Bf-109G-2 and G-4 fighter (1 20mm cannon, 2 7.62 machine guns) was underarmed for the opponents flying against it on both the Eastern and Western fronts. In the West, the Jagdgeschwaders were equipped with two Fw-190 Gruppen for anti-bomber operations and one Bf-109G Gruppe to take on the escort fighters. More and more, though, both types were used against the bombers, and fighters like the P-47 were remarkably resistant to rifle-caliber machine gun fire.
The Bf-109G-6 variant was the most-produced Gustav sub-type, first
appearing in the fall of 1943 and constituting the major equipment of
Bf-109-equipped Jagdstaffeln until the fall of 1944. The airframe could
accept several versions of the DB605A - from the spring of 1944, the DB605D
could also be installed. GM1 or MW50 could be used for increasing engine
power. MW50 boosted takeoff power from 1,475 h.p. to 1,800 h.p., at the
cost of reducing spark plug life and vastly increasing fuel consumption.
The sub-type marked the first upgrade in armament since the introduction of
the Friedrich 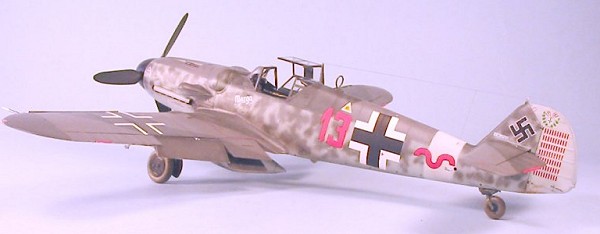 series.
To accommodate the 13mm machine guns in the cowling, Messerschmitt's
engineers came up with remarkably-non-aerodynamic bulges that quickly led
to the G-6 being called the "Beule" (bumps) when it arrived on
operations. Inasmuch as Adolf Galland had managed to have a Bf-109F
modified with 13mm armament with very refined streamlined cowl bulges, one
has to wonder why that design could not be carried forward.
series.
To accommodate the 13mm machine guns in the cowling, Messerschmitt's
engineers came up with remarkably-non-aerodynamic bulges that quickly led
to the G-6 being called the "Beule" (bumps) when it arrived on
operations. Inasmuch as Adolf Galland had managed to have a Bf-109F
modified with 13mm armament with very refined streamlined cowl bulges, one
has to wonder why that design could not be carried forward.
While this new armament was more than satisfactory when used against the Soviet aircraft on the Eastern front, it was apparent that even this upgrade was insufficient to assure a kill against the B-17 or B-24 in the limited amount of time a pilot had to bring his weapons to bear as he dove through the American formations. As early as the Bf-109F-4, the Ruestsaetze Sechs (R6) had been available as a field modification; this was a 20mm cannon in a gondola under each wing immediately outboard of the main gear wells. The heavy weapons had a deleterious effect on maneuverability in fighter vs. fighter combat, but in 1943 the Germans could afford to wait until the escort fighters turned back for lack of fuel, before commencing attacks on the bomber formations. Thus, the "Kannonenboot," or "gunboat" became the must numerous version of the G-6 to see combat in the West. Of course, later in the year, and in 1944, the gunboats would be "meat on the table" to P-47s and P-51s equipped with drop tanks that enabled them to escort the bombers to the target and back, and by late Spring 1944, the guns were no longer to be seen, replaced by a 30mm cannon in the nose.
 JG27, the
Afrika Geschwader, received Bf-109G-6s in the summer and fall of 1943,
after the unit had been withdrawn from North Africa and been stationed in
the Greek Islands, where their main opponents were Allied anti-shipping
strike aircraft. The majority of JG 27's Bf-109G-6s were equipped at this
time with Rustsatze 6, two 20mm cannon in underwing gondolas,
inasmuch as they were not primarily tasked with opposing Allied
single-engine fighters, which were far more maneuverable than the Bf-109G-6
when carrying this armament.
JG27, the
Afrika Geschwader, received Bf-109G-6s in the summer and fall of 1943,
after the unit had been withdrawn from North Africa and been stationed in
the Greek Islands, where their main opponents were Allied anti-shipping
strike aircraft. The majority of JG 27's Bf-109G-6s were equipped at this
time with Rustsatze 6, two 20mm cannon in underwing gondolas,
inasmuch as they were not primarily tasked with opposing Allied
single-engine fighters, which were far more maneuverable than the Bf-109G-6
when carrying this armament.
Among the pilots assigned to IV Gruppe when it was activated in Greece in May 1943 was Feldwebel Heinrich Bartels, who flew with 11 Staffel. Bartels had first established his reputation as an experte with JG5 in the far north of the Eastern Front before being transferred to JG 27 just before the Geschwader left Africa. By the fall of 1943, when IV/JG 27 was based at Kalamaki, near Athens, he was the leading ace with 70 victories.
JG 27 was transferred to Hungary in March 1944 to face the 15th Air Force’s offensive. Bartels scored there to, before the unit was finally transferred to Germany for Defense of the Reich duties in the summer of 1944. With his score at 99, Bartels was killed in combat with P-47s in the vicinity of Bonn, Germany, on December 23, 1944. His remains were found, still strapped in the cockpit, in 1968.
| THE KIT |
 Hasegawa’s
1/32 Bf-109 series first appeared two years ago, with the release of a
Bf-109G-6 kit. For about the same ultimate price as the Tamiya Zero, the
modeler who wants to make a "definitive" Bf-109G-6 from this kit can do so,
by purchasing the many, many aftermarket sets that are now and will become
available for use with the basic kit. Not only are the resin manufacturers
operating at maximum capacity, but decal manufacturers are too; no two
units of the Luftwaffe had similar markings on their airplanes.
Hasegawa’s
1/32 Bf-109 series first appeared two years ago, with the release of a
Bf-109G-6 kit. For about the same ultimate price as the Tamiya Zero, the
modeler who wants to make a "definitive" Bf-109G-6 from this kit can do so,
by purchasing the many, many aftermarket sets that are now and will become
available for use with the basic kit. Not only are the resin manufacturers
operating at maximum capacity, but decal manufacturers are too; no two
units of the Luftwaffe had similar markings on their airplanes.
This particular model reviewed here is not that kit, but rather the ProModeler Bf-109G-4 kit, with the Bf-109G-6 parts - the machine gun fairings and upper cowling - from a Bf-109G-14 kit that is part of an upcoming conversion project.
| CONSTRUCTION |
Other than adapting parts from two kits, this model is basically an out-of-the-box project, with the exception of using aftermarket decals from Eagle Editions and Cutting Edge posable resin seat belts.
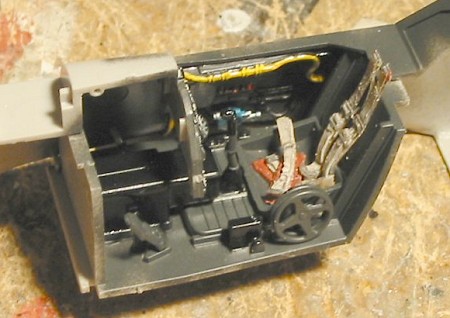 I first painted the cockpit parts overall RLM66, then painted the details
according to the instructions. In this scale, even with there being more
detail than you get with a 1/48 kit, all the work was mostly taking the
time to do the painting, and most of it can be done with a 000 brush,
though I did use my 00000 brush for some of the smaller items.
I first painted the cockpit parts overall RLM66, then painted the details
according to the instructions. In this scale, even with there being more
detail than you get with a 1/48 kit, all the work was mostly taking the
time to do the painting, and most of it can be done with a 000 brush,
though I did use my 00000 brush for some of the smaller items.
While the cockpit was being painted in stages and while the paint was drying, I proceeded with sub-assemblies for the airframe.
All the kit parts fit beautifully, and I only used a very little bit of Mr. Surfacer for the centerline seam of the fuselage, and the leading edges of the wings. Following the instructions is easy and there are no "glitches."
Overall, this entire effort described above took about 6 hours of actual work over about 10 hours while paint dried and parts set; your mileage and performance may vary. But even if you are someone who needs to read the instructions twice and test fit the parts three times before gluing once, this is an easy model to build.
| COLORS & MARKINGS |
Painting:
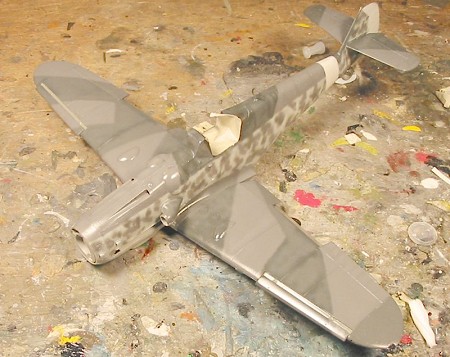 I first “pre-shaded” the model by airbrushing Tamiya semi-gloss black along
all the panel lines. When that was dry, I painted the rudder and fuselage
panel with Tamiya White, then masked those off. The model was painted in
camouflage with the new Xtracrylix paints produced by Hannant’s, using
their RLM74, RLM 75, and RLM 76 paints. I use a mixture of 60% rubbing
alcohol, with retardant, to 40% paint, which allowed the model to be
free-handed easily. The Xtracrylix paints dry to the touch within an hour,
allowing the kit to be handled for the next colors, then the model is left
overnight for the paint to cure completely. The next day I gave it a coat
of Future.
I first “pre-shaded” the model by airbrushing Tamiya semi-gloss black along
all the panel lines. When that was dry, I painted the rudder and fuselage
panel with Tamiya White, then masked those off. The model was painted in
camouflage with the new Xtracrylix paints produced by Hannant’s, using
their RLM74, RLM 75, and RLM 76 paints. I use a mixture of 60% rubbing
alcohol, with retardant, to 40% paint, which allowed the model to be
free-handed easily. The Xtracrylix paints dry to the touch within an hour,
allowing the kit to be handled for the next colors, then the model is left
overnight for the paint to cure completely. The next day I gave it a coat
of Future.
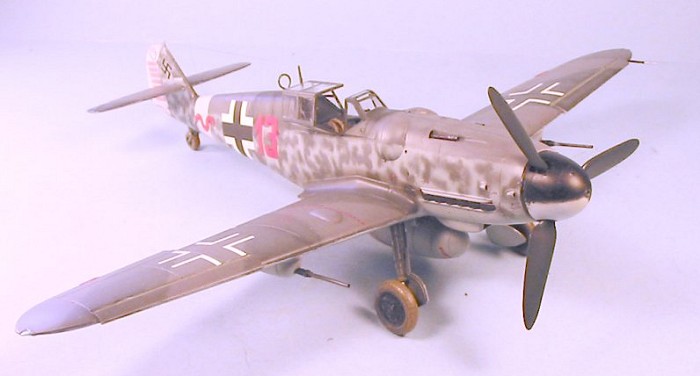
There is one special note to the painting. The various profiles of this particular airplane show it with the “barber pole” paint scheme for the spinner. This was not adopted by the Luftwaffe until June 1944. While I couldn’t find a photo of “Red 13" to confirm this, all the photos of other JG 27 Bf-109G-6s from this period show black spinners with the white “flicker” marking, which is what I did for this model.
Decals:
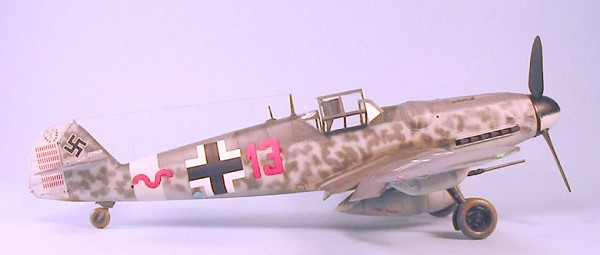
I used the Eagle Editions sheet for this model. I am not entirely sure of the accuracy of these markings, since the sheet provides the standard late war IV Gruppe “squiggly” marking, while other profiles note that IV/JG 27 used an individualistic marking of two horizontal bars. Again, I couldn’t find a photo of this particular airplane to confirm the marking one way or the other, so I went with what the sheet provided in the absence of any red bars with black surround I could have used as a substitute marking. The decals are printed by MicroScale and went down without problem.
| FINAL CONSTRUCTION |
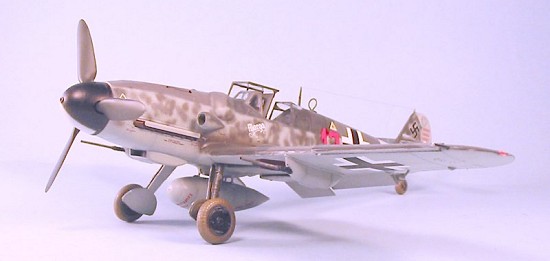
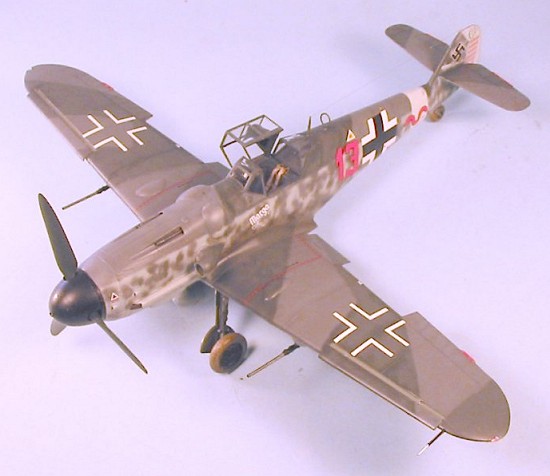 I applied
exhaust staining on the fuselage sides and lower fuselage with Tamiya
“Smoke,” then gave the model a coat of Future. All photos of this
particular airplane show it in nearly a “factory-new” condition, and very
well-maintained, so I did not “ding” it other than some minor places around
the Dzus fasteners of the cowling. I gave the model two coats of thinned
Dullcote to leave it with a semi-matte sheen, as shown in photos of
well-maintained German aircraft of the period. The antenna wire was done
using nylon repair thread.
I applied
exhaust staining on the fuselage sides and lower fuselage with Tamiya
“Smoke,” then gave the model a coat of Future. All photos of this
particular airplane show it in nearly a “factory-new” condition, and very
well-maintained, so I did not “ding” it other than some minor places around
the Dzus fasteners of the cowling. I gave the model two coats of thinned
Dullcote to leave it with a semi-matte sheen, as shown in photos of
well-maintained German aircraft of the period. The antenna wire was done
using nylon repair thread.
| CONCLUSIONS |
For those who enjoy doing Bf-109s for the many varied camouflage schemes and markings possibilities, the Hasegawa 1/32 series of kits provides a wonderful “large canvas” to work on. Even doing the kit OOB without all the various aftermarket doo-dads that are available results in a good-looking model, and at the cheap discounted prices one can find these kits at, building a big 1/32 kit of this popular airplane is not that much more than the smaller 1/48 kit.
November 2004
Review kit courtesy of my wallet.
If you would like your product reviewed fairly and quickly by a site that has nearly 300,000 visitors a month, please contact me or see other details in the Note to Contributors.