|
KIT: |
Hobbycraft 1/48 Bf-109E-1 |
|
KIT # |
1564 |
|
PRICE: |
$12.98 |
|
DECALS: |
Two aircraft |
|
REVIEW & |
Dwight Emery |
|
NOTES: |
Camo scheme is fictitious` |
|
HISTORY |
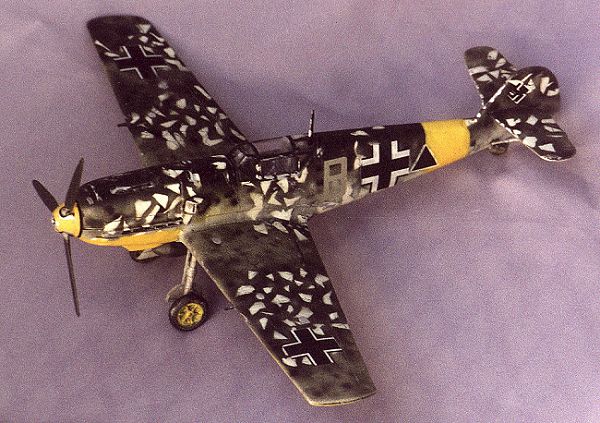
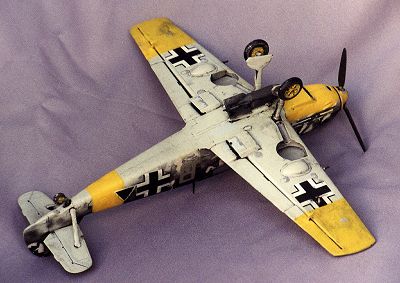
The Bf 109 E-1 was the back bone of the Blitz during WWII, but as the war progressed it soon found itself serving in secondary roles on other fronts and more or less becoming a target for more advanced allied fighters. The aircraft depicted by this HobbyCraft kit came from reading information on snow speckled schemes used on the Russian front by Germans during WWII. The majority of the Emils used in this theater got dabbed with a water based paint that could be easily removed by the ground crews. This provided some room for creativity on the part of ground crews for effective camouflage. This particular Emil depicts one that may have been used by II/Schlachlgeschwader 1 in the battle of Stalingrad in 1942. The aircraft was armed with one prop hub fired 20 mm cannon and four 7.9 mm machine guns, and finally the centerline bomb for suppressing ground units of the Soviet Union.
|
THE KIT |
The HobbyCraft kit of this particular Emil is relatively simple. It comes in gray molded plastic and my box had no major head aches with pock marks or sink holes or excessive plastic. The model in the box is only available in two versions from the Blitz. As well, it has a single piece canopy which for detailers isn't that great and a bit thick. But for the purpose I had in mind for this kit it would suit me well!
|
CONSTRUCTION |
 It has five steps to
complete and the plastic is molded nicely. The kit goes together easily but does
require a bit of putty in spots and sanding - the usual tedium. The canopy is
molded in one piece, so if you are looking for an open cockpit you will have to
order a vacuum formed canopy from Squadron or somebody because it is a bit on
the thick side. (Unless you really like cutting and are very good at it)!! The
cockpit itself is not very detailed, but if you are not planning on opening it
up as I choose for this model then the cockpit is fine for the purpose at hand.
It has five steps to
complete and the plastic is molded nicely. The kit goes together easily but does
require a bit of putty in spots and sanding - the usual tedium. The canopy is
molded in one piece, so if you are looking for an open cockpit you will have to
order a vacuum formed canopy from Squadron or somebody because it is a bit on
the thick side. (Unless you really like cutting and are very good at it)!! The
cockpit itself is not very detailed, but if you are not planning on opening it
up as I choose for this model then the cockpit is fine for the purpose at hand.
I did not alter or replace anything on the kit since this model was for a painting experiment. I did however dislike the prop assembly, it likes to fit loosely, so will need additional attention to get a good snug fit. The main function of the model from my building point was to test a major painting experiment combining both Acrylic and Enamel paints on a cheap kit to discover the limits and function ability of such techniques. The kit does not have the quality of a Hasegawa model, but for those of you wishing to experiment with ideas in construction and painting is a better choice for experimental modeling.
|
PAINT & DECALS |
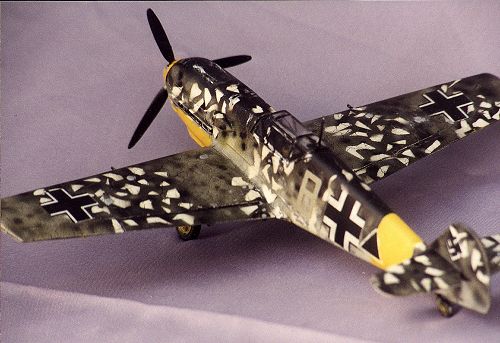
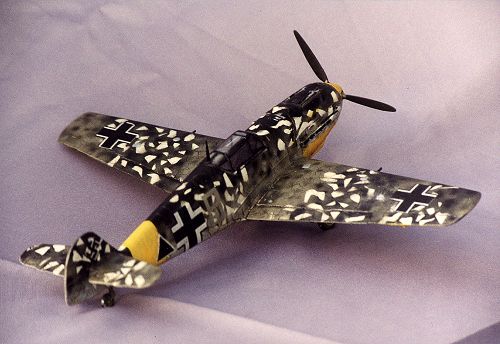
This kit being an experiment with Acrylic and Enamel paint was a chore!!! I decided to build a II Gruppe Emil in snow speckled camouflage from the Battle of Stalingrad. Doing some studies on techniques the Germans used in reality of applying a water based paint to the aircraft they flew pushed me to decide to experiment on the kit in a similar way. The first step in the process of building the paint scheme on this Emil was masking the kit without having applied any detail parts like gun barrels and antennas, etc. After masking I sprayed the model completely in white enamel by Model Master and let that dry for a day. After that paint had settled for 24 hours, I applied the light blue RLM 76 to the bottom of the kit in Acrylic by ProModeler which is no longer produced. As that dried over night I went to the next stage.
This was a long tedious process to achieve the speckles I wanted. I took regular masking tape, but the kind was artists masking tape in black so I'd have a good contrast of that color on my white upper surface and cut tons of tiny little pieces which I applied in a pattern similar to an aircraft I had seen in the book Warplanes of the Luftwaffe. I spent a day just working this out and applying it to the model=B9s upper surface. After I finished this step, I went ahead and masked the bottom of the model along the demarcation lines I wanted for the next step, the Splinter scheme application.
SPLINTER SCHEME APPLICATION
 The next process I went
ahead and free handed the ProModeler Acrylic Black Green RLM 70 areas of the kit
- easy enough. I applied masking tape to the upper surfaces where the second
part of the splinter scheme was to go and completely covered the RLM 70 areas
with black tape spots that the second color of the Splinter scheme would go. I
sprayed this with the lighter color of the Splinter Scheme, again in ProModeler
Acrylic RLM 75 gray violet. (The remaining half of the Splinter Scheme). I set
this aside and let it dry over night.
The next process I went
ahead and free handed the ProModeler Acrylic Black Green RLM 70 areas of the kit
- easy enough. I applied masking tape to the upper surfaces where the second
part of the splinter scheme was to go and completely covered the RLM 70 areas
with black tape spots that the second color of the Splinter scheme would go. I
sprayed this with the lighter color of the Splinter Scheme, again in ProModeler
Acrylic RLM 75 gray violet. (The remaining half of the Splinter Scheme). I set
this aside and let it dry over night.
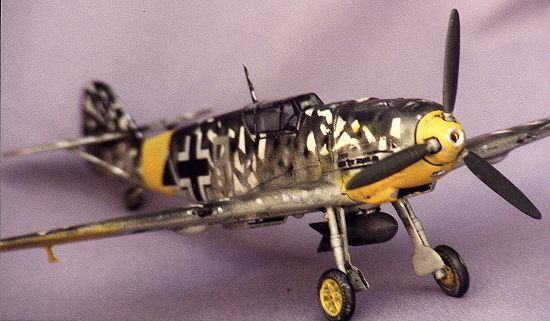
The next day I carefully removed tape from areas where I wanted my yellow theater markings for the Russian Front painted, masked the wing tip areas, the nose area and the stripe around the back fuselage area and sprayed RLM 04 yellow, this time using Model Master enamel since I had no acrylic in that color.
DECALS
I let that all dry, then removed all the tape. Everything looked fine, really nice so I went ahead and clear coated the entire model in Model Master High Gloss for the decal step. Before all this painting I had already preassembled my desired decals from an old Fujimi FW 190 set, an Aeromaster sheet of Swastikas, and the gray decals from my Pandora's Decal Box - where it came from I have no idea! A long time ago, and a galaxy far far away, I suppose. Anyway - I applied all my decals and let them dry over night. The next day I applied my dull coat.
DISASTER STRIKES
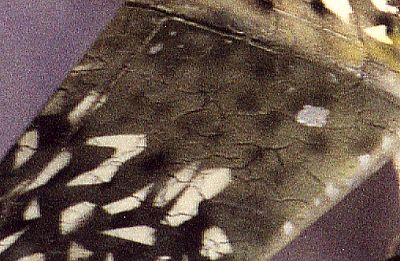
After a couple more days drying, a disaster occurred, the paint on top began to crackle all over, and in the areas that the yellow RLM 04 had been applied. The bottom remained fine. I really felt the angst of failure and let the model sit for several days while I thought about the problem. (Editor's note. This is a common problem when using acrylics and then not allowing the paint to fully cure between coats. The upper paint will cure before the underlying colors and when the lower colors finally cure they will shrink slightly causing the upper coats to crack. This is even more accentuated by applying the fast drying lacquer Model Master gloss coat, but can occur when using clear top finishes like Future. A rule of thumb on paint curing is if you can smell it, it isn't cured.)
 After a while I decided to
incorporate my disaster into the model and make it a part of the camouflage
scheme. Who knows - the Germans had creative camouflage schemes, and the
crackles reminded me of something. I went ahead with my unusual wash technique
using burnt umber and lamp black mixed together in water based Designers Gauche
by Windsor and Newton. I completely painted the entire model with the Gauche
mixture and allowed it to dry for a day, so now the model is a muddy black brown
color over all.
After a while I decided to
incorporate my disaster into the model and make it a part of the camouflage
scheme. Who knows - the Germans had creative camouflage schemes, and the
crackles reminded me of something. I went ahead with my unusual wash technique
using burnt umber and lamp black mixed together in water based Designers Gauche
by Windsor and Newton. I completely painted the entire model with the Gauche
mixture and allowed it to dry for a day, so now the model is a muddy black brown
color over all.
The next day, I got a bowl of water, a bunch of coffee filters and a box of Q-Tips and slowly removed the Gauche from the model surface, careful to leave the crackles filled and panel lines. As well, during removal of the Gauche I allowed for panel shading due to the staining nature of the Gauche. I allowed the cleaned off model to dry for a few days this time, and had some areas that would need working on. But over all I achieved the result I was after! A crackled earth effect on the upper surfaces of the aircraft!
 Luckily my undersurface
was fine, all that needed repair was a few crackles in the yellow, and on some
decals. With sand paper and another application of paint those problems found
themselves erased. The next step - yes it goes on - tremendous tedious work - I
remasked portions of the white I did not want messed up along the aircraft spine
and wings and such and used Model Master Flat black heavily diluted to darken
the spine and black green splinter areas of the model. This was to create
a better contrast for the white snow speckled areas. As well, I went ahead and
did some dark splotches on the lighter RLM 75 areas to help bring the whole
paint scheme together.
Luckily my undersurface
was fine, all that needed repair was a few crackles in the yellow, and on some
decals. With sand paper and another application of paint those problems found
themselves erased. The next step - yes it goes on - tremendous tedious work - I
remasked portions of the white I did not want messed up along the aircraft spine
and wings and such and used Model Master Flat black heavily diluted to darken
the spine and black green splinter areas of the model. This was to create
a better contrast for the white snow speckled areas. As well, I went ahead and
did some dark splotches on the lighter RLM 75 areas to help bring the whole
paint scheme together.
FINALITY OF PAINT SCHEME AND DECALS
Finally I went back over the model after the dull cote was dry and added my metal flakes with a fine brush, to bring out the fuel caps and such, and the gun smoke and exhaust stains and such. I glued the little detail parts on with super glue, and made sure they all worked with the surrounding model scheme.
The hardest part of this experiment was over, and through it and the disaster of mixing paint media I accomplished the paint scheme and it looked better than I expected.
|
CONCLUSIONS |
 Building models can be
fun, but trying experimental paint schemes can really bring out the beast in a
project! This HobbyCraft Bf 109 E-1 is a cheap kit , but the paint scheme I've
accomplished through experimenting has created one of my most looked at models
in my collection. It definitely is an attention getter despite all the struggle!
What is amazing to me is the fact it isn't Tamiya, or Hasegawa, or some other
high priced kit. (And I've got lots of the higher quality kits!!) It seems the
freedom I enjoyed knowing if I messed up this kit was no big loss allowed for a
really unique paint scheme that may have been a possibility in the Battle of
Stalingrad since ground crews and pilots corroborated on paint schemes for
survival. And it is a scheme I would not have attempted at the time on a more
expensive model. This was one I had to learn by experience.
Building models can be
fun, but trying experimental paint schemes can really bring out the beast in a
project! This HobbyCraft Bf 109 E-1 is a cheap kit , but the paint scheme I've
accomplished through experimenting has created one of my most looked at models
in my collection. It definitely is an attention getter despite all the struggle!
What is amazing to me is the fact it isn't Tamiya, or Hasegawa, or some other
high priced kit. (And I've got lots of the higher quality kits!!) It seems the
freedom I enjoyed knowing if I messed up this kit was no big loss allowed for a
really unique paint scheme that may have been a possibility in the Battle of
Stalingrad since ground crews and pilots corroborated on paint schemes for
survival. And it is a scheme I would not have attempted at the time on a more
expensive model. This was one I had to learn by experience.
I would not advise combining enamels and acrylics unless you are tremendously patient and willing to work out any dire consequences in chemical reactions the paint may have with each other. Stick with one type of paint if possible for the scheme, then switch after the kit is in the final stage for weathering to another different type of paint if weathering is desired.
Above all else, complicated schemes require an equal amount of complicated time in patience! Always plan ahead for long drawn out complicated paint schemes, and if experimenting use a cheaper kit!!! (So if you have to stomp it into oblivion you can)!!!! But remember, sometimes disasters can be turned into master work if you step back and think before action is taken!
|
REFERENCES |
Warplanes of the Luftwaffe (First published 1994)- Edited by David Donald, Pages 206 and 207. Highly recommend this book if you are a Luftwaffe builder. ISBN 1874023 56 5
Luftwaffe Ring on the world wide web and the associated stories from these many sites.
If you would like your product reviewed fairly and quickly by a site that averages thousands of visits a day, please contact me or see other details in the Note to Contributors.