Eduard 1/48 Bf-110 Royal Class Kit (Bonus Part)
| KIT #: | R0005 |
| PRICE: | $158.00 MSRP |
| DECALS: | Twelve options |
| REVIEWER: | Andrew Garcia |
| NOTES: | No decals for the instrument panel. |
| BACKGROUND |
NOTES: This review is only of the “bonus part” a Bf-110 Instrument Panel.
When I received it my initial impressions were quite good. Crisp moulding, lots of options and variety – an unbelievable kit(s) in a reasonably sized box. But I kept going back to the instrument panel etched metal. In one word – stunning. It is what we have come to expect from Eduard. But who wants to build an instrument panel? There must be a SIG group somewhere that our friends at Eduard know about and they must be doing this for those folks. Then I see a “You Tube video” on how to build one and how easy it is and ‘click” all projects are put on hold and the instrument panel becomes priority #1.
| THE KIT |
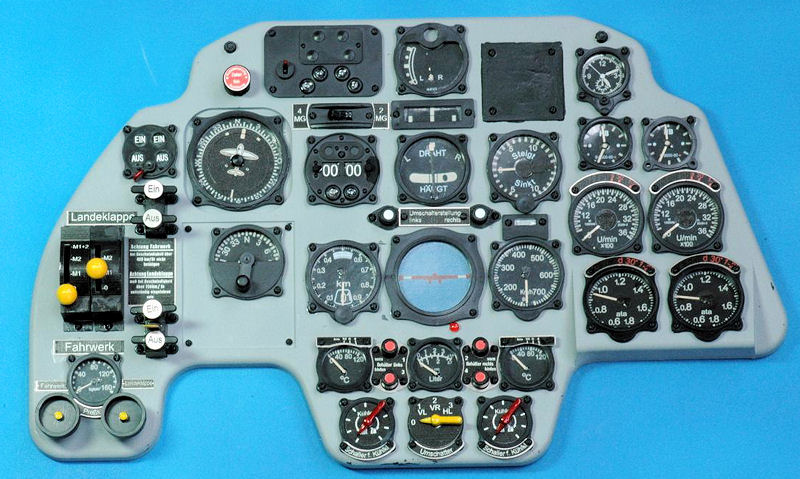
The instrument panel is actually a “bonus” component of a large and well executed two complete kit boxing comprising over 500 parts in olive colored plastic; 24 parts in clear; nine photo-etched frets including four in color with even a workshop ladder on a large photo-etched fret. There are four resin parts; masking sheets; markings for 12 aircraft; a replica Iron Cross; and last but not least a 1/4 scale Messerschmitt Bf 110 instrument panel including additional clear parts and two extra color photo-etched frets for the instrument panel.
The instrument panel could be conceivably packaged into a small box and sold as a kit. The main panel is about 8” wide (i.e. 20cm) and 5” high. There is one black plastic parts tree with the dials and knobs/switches. There are two clear plastic trees for the instrument dial faces and clear light domes. The package is completed with two color photo etched trees and one die cut vinyl sheet which represents the instrument dial faces.
It is as advertised; it can be called the “Royal Class” because it is fit for royalty. You will be delighted with a perfect build. Now I am wondering if this is a test market effort. Eduard has mastered all the technology pieces to properly execute a fantastic series of cockpit instrument panels. The size is just right – ¼ scale (not 1/48th). It is large enough to permit the smallest detail to be easily applied yet small enough to impress modelers. Eduard is to be commended on this display of future thinking. With their state of the art CAD/CAM, perfect injection moulding, precision die cut and printed vinyl and unbelievable micro printing of etched metal components, a complex kit like this instrument panel is a reality. My only negative – the instructions call it a ‘dashboard”. That’s an accurate term for an automobile but I wouldn’t use it for an aircraft instrument panel. That’s about the only mis-step with this kit and I can live with it!
| CONSTRUCTION |
 There are
no hidden tricks or superior modeling skills required to build the instrument
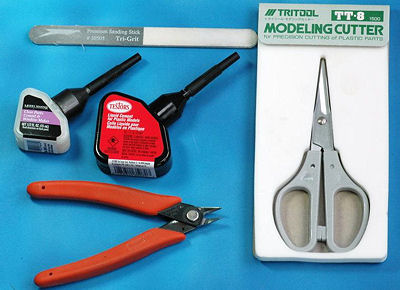
panel. I did however find some tools to be especially helpful. A Squadron
Tri-stick file was used to sand and polish every part before gluing.
I used Testors
TES3507 Liquid Cement with Applicator for the first time. It has a long thin
tapered nozzle which can be used to precisely apply a small drop or two in a
controlled fashion. Careful gluing is required for this build. You do need to be
careful not to apply it onto the clear parts. I also used Model Master - 8876C
Clear Parts Cement to attach the instrument needles and other small components
to the die cut vinyl instrument faces. The clear instrument covers are just
pressed into place without glue. The black plastic instrument surrounds hold
them in place. When the dial surrounds are properly glued into the pre-drilled
holes everything comes together and the panel detail quickly unfolds. All the
instrument dial frames were attached using Testors TES3507 Liquid Cement with
Applicator. This cement seemed to be thicker than other liquid glues including
the Testors liquid glue in a
bottle with a brush. For example, the thick viscosity
allowed me to place a small drop on the instrument dial pegs that align the
dials into their proper position. This avoids any accidental drips and damage to
the clear dial surfaces. The
etched metal also requires a very sharp cutter or hobby knife. I pulled out my
special Trimaster cutter for the etched metal fret.
There are
no hidden tricks or superior modeling skills required to build the instrument
panel. I did however find some tools to be especially helpful. A Squadron
Tri-stick file was used to sand and polish every part before gluing.
I used Testors
TES3507 Liquid Cement with Applicator for the first time. It has a long thin
tapered nozzle which can be used to precisely apply a small drop or two in a
controlled fashion. Careful gluing is required for this build. You do need to be
careful not to apply it onto the clear parts. I also used Model Master - 8876C
Clear Parts Cement to attach the instrument needles and other small components
to the die cut vinyl instrument faces. The clear instrument covers are just
pressed into place without glue. The black plastic instrument surrounds hold
them in place. When the dial surrounds are properly glued into the pre-drilled
holes everything comes together and the panel detail quickly unfolds. All the
instrument dial frames were attached using Testors TES3507 Liquid Cement with
Applicator. This cement seemed to be thicker than other liquid glues including
the Testors liquid glue in a
bottle with a brush. For example, the thick viscosity
allowed me to place a small drop on the instrument dial pegs that align the
dials into their proper position. This avoids any accidental drips and damage to
the clear dial surfaces. The
etched metal also requires a very sharp cutter or hobby knife. I pulled out my
special Trimaster cutter for the etched metal fret.
The instructions are complete and have you place parts from left to right in a clear and methodical approach. The first step is to paint the panel RLM 66. I allowed it to dry over night then over a three day weekend continued to add parts until it was done per the kit instructions.
| CONCLUSIONS |
When it was finished I asked my wife to come and take a look at it. She was impressed (or tried to make it look that way). She smiled and said “That’s quite large does it go into an airplane model”? You should have seen the look of disbelief on my wife’s face when I said “Yes, it does but the plane is about the size of this office and I don’t know where I can put it on display!” I could tell by the worried look she thought I was serious.
What’s next – maybe a nicely detailed resin gunsight with decals and color etch to go with the instrument panel?
August 2008
Copyright ModelingMadness.com
If you would like your product reviewed fairly and fairly quickly, please contact the editor or see other details in the Note to Contributors.
Back to the Review Index Page 2020