Testors/Hawk 1/48 Me-163 Komet
|
KIT # |
7625 |
|
PRICE: |
$6.00 |
|
DECALS: |
See Review |
|
REVIEW : |
Grenville Davies |
|
NOTES: |
Decals show some incorrect colours for the Tstoff and Cstoff labels. The kit is barely recognizable as a Komet with many inaccuracies. Most of the cockpit was scratch built |
Editors note: This is the first of a two part series on building a pair of Komets.
|
HISTORY |
The Komet began life as a tailless glider, the brainchild of Dr Alexander Lippisch. Lippisch took up the idea in 1920 with very little in the way of experience in tailless airplanes, making it true pioneering work.
The first manned flight of a tailless glider was made in 1929 when Günther Groenhoff flew the all-wing glider, named “Storch” (Stork), immediately after Lippisch’s firstborn son had been baptized “Hangwind”.
In 1928-29 this design had matured to become the “Storch IV”, a tailless sailplane and the “Storch V”, a motor glider with a 2-cylinder 8 horsepower motor. This latter design had such good flying characteristics that Lippisch presented it to government representatives and the press at Tempelhof Airfield, Berlin. The pilot was Groenhoff. He was later killed in a separate glider accident in the 1932 Rhon competition.
Work continued and the predecessor of the Me 163, the DFS 39 (DFS- German Research Institute for Glider Flight), in the hands of Groenhoff’s successor, Heini Dittmar proved the aircraft to be a good reliable plane for courier and overland flights. A 75-HP Pobjoy motor powered this aircraft.
In 1937 Lippisch received news that shocked him when the Reich Air Ministry’s research office issued a contract for a second prototype of DFS 39 with a slightly changed fuselage to allow the installation of a “special power plant”. This unit was a liquid-fuel rocket being built by Hellmuth Walter at Kiel. This power plant had 750 kp of thrust and an exhaust gas temperature of 800 degrees Celsius. (The Me 163B’s engine had an exhaust temperature of 2000 degrees Celsius
This aircraft was designated DFS 194 and the development was conducted
at the Messerschmitt works in Augsburg. The construction of the world’s first
rocket powered, combat-ready, airplane had begun. On October, 1941 with Heini
Dittmar at the controls of the rebuilt DFS 194, now a Me 163A (V3), crossed the
1000 kph barrier for the first time.
|
THE KIT |
|
CONSTRUCTION |
The Cockpit
 I simply discarded everything presented in the kit, which amounted to
four parts – the pilot (hahaha), the pilot’s seat, the console and, of
course the canopy. I then used the Hasegawa kit as a template for
the plastic card required to build up the floor pan, back seat plate and the two
fuel tanks that make up the cockpit tub. I scavenged a spare seat from the Hasegawa
kit (it has two!) and used the Eduard Photo etch to make up a new
instrument console and scratch built the dials and control levers that sit on
both sides of the cockpit. Other incidentals were built using pieces of rod and
wire to match my photo references. I did manage to grab a control stick from the
‘spares’ box, although it is not similar to the one represented by the Hasegawa
kit.
I simply discarded everything presented in the kit, which amounted to
four parts – the pilot (hahaha), the pilot’s seat, the console and, of
course the canopy. I then used the Hasegawa kit as a template for
the plastic card required to build up the floor pan, back seat plate and the two
fuel tanks that make up the cockpit tub. I scavenged a spare seat from the Hasegawa
kit (it has two!) and used the Eduard Photo etch to make up a new
instrument console and scratch built the dials and control levers that sit on
both sides of the cockpit. Other incidentals were built using pieces of rod and
wire to match my photo references. I did manage to grab a control stick from the
‘spares’ box, although it is not similar to the one represented by the Hasegawa
kit.
Once the cockpit had been completed it was painted in Model Master
RLM 66 Schwarz Grau. Various knobs and levers were painted in red and the whole
thing was dry brushed with silver to simulate wear and tear.
The canopy caused me sleepless nights and after much deliberation decided
to cannibalise my Me-163S-1 kit for the pilot’s canopy, Revi gunsight and the
armoured plate-glass screen. Why have the aftermarket vacuum canopy makers not
built a 1:48 Komet canopy, I ask!
The final bit of scratch building involved the top of one of the fuel
tanks that sits behind the pilot – a curved piece into which the aerial is
glued. It is visible from either side of the aircraft and has a brace on top
that commences at the back of the pilot’s seat and ends at the fuselage sides
– This is given as metal etch in the Hasegawa kit (I needed that
one) and also in the Me-163S-1 ‘Habicht’ Dragon kit (this one
is not used, due to the trainee sitting directly behind the pilot so I opted to
knock this one off!).
The Fuselage and Wings
This kit has a separate leading edge flap that needs attaching prior to
joining the wings to the fuselage. No fit problems to speak of, although the
wing has a lot of detail missing, especially when compared to the Hasegawa
kit and reference photographs. One thing that shows up is a glaring error in
having no ejection chutes on the lower side of the wing root for the MG-151/200
cannons. Although it does have the lower air brakes, which may be displayed open
or closed. They are very thick and I opted to close them and cover them with the
photo-etch parts.
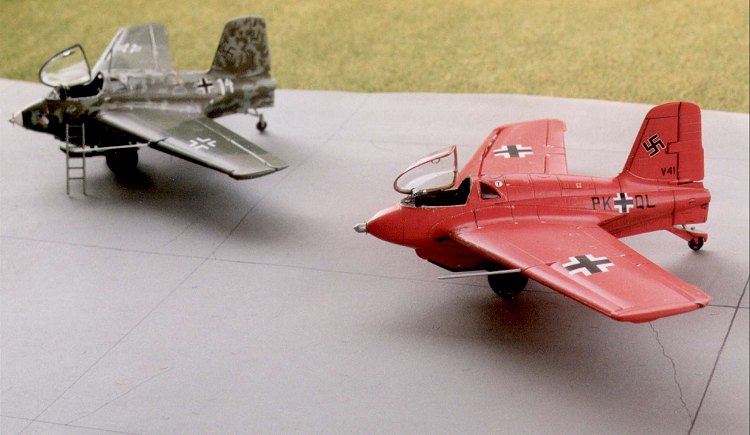
I drilled a hole in each wing root and inserted a length of brass pipe to simulate the barrels and left it to extend outside the leading edge as this aircraft was to be a Me 163B-0 V41 (PK+QL), an all surfaces RLM 23 (Rot) as flown by Wolfgang Spate – Erprobungskommando 16, Bad Zwischenahn, 1943. Photographs of this aircraft don’t confirm the extended barrels, although the reference material shows a plan with both barrels protruding out from the leading edge. My local hobby store has a Me 163 “nutcase” named Bernie, who assures me that the barrels did NOT protrude – I bow down to superior knowledge and will eventually cut them off flush with the leading edge. For now the photos show the cannon barrels protruding!
The wings were connected to the fuselage halves prior to joining the whole thing together. I checked and corrected the fit problems as most of the cockpit was cobbled together with bits and pieces of photo etch and plastic card. The whole thing seemed to go together well enough.
I did end up using the foot thick side windows behind the cockpit. As these are fixed I figured it did not matter whether they were effectively the same thickness as the armour plated glass screen or not!
|
PAINT & DECALS |
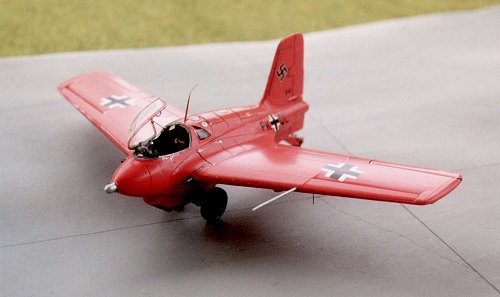
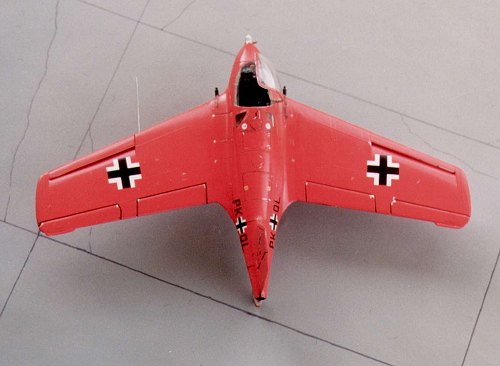 As mentioned above I had decided to paint the Me 163B as a ‘B-0’
variant, specifically V41 (PK+QL), Werk No. 16310050, which was flown by
Wolfgang Spate during 1943 at the EK 16 (Erprobungskommando 16) based at Bad
Zwischenahn. This aircraft had been specifically repainted in a “tomato” red
colour (RLM 23) for Wolfgang’s birthday. Some present!
As mentioned above I had decided to paint the Me 163B as a ‘B-0’
variant, specifically V41 (PK+QL), Werk No. 16310050, which was flown by
Wolfgang Spate during 1943 at the EK 16 (Erprobungskommando 16) based at Bad
Zwischenahn. This aircraft had been specifically repainted in a “tomato” red
colour (RLM 23) for Wolfgang’s birthday. Some present!|
CONCLUSIONS |
Despite the obvious problems with the Testors
kit it does provide a challenge and that is what keeps us going. I guess it is
good value for money, although I would probably have not purchased the kit in
favour of the much better presented Dragon kit. There have been
some later additions to companies offering this aircraft in 1:48 scale, so I may
just choose another manufacturer for my next kit.
Copyright ModelingMadness.com. All rights reserved. No reproduction in part or in whole without express permission from the editor.
If you would like your product reviewed fairly and quickly, please contact the editor or see other details in the Note to Contributors.