| KIT #: | 1653 |
| PRICE: | $10.00 MSRP |
| DECALS: | Two options |
| REVIEWER: | Jon Hudak |
| NOTES: |
| HISTORY |
To make a long story short the A6M3 Type 32 Zero actually preceded the
Type 22 model. You would think otherwise by the numbers alone but
that’s how it went, kind of like how the Messerschmitt Bf 109 G14
variant preceded the G10 variant. Therein lies the only similarity that
I can think of. Everyone knows that by 1944 the war situation for
Germany was not going good for them. The continuous bombing raids by
the Allied "heavies" on industry were taking their toll along with the
high losses of skilled Luftwaffe pilots who were being replaced by far
less experienced greenhorns who had slim chances of surviving in
clashes against some of their more experienced combat hardened Allied
foes. Shortages of fuel would also hurt the once mighty Luftwaffe let
alone all of the snags and bottlenecks that were hampering fighter
plane production no doubt in part to poor planning and the
 many
numerous small sub-contractors involved. It was for these latter
problems that the Jager Stab(fighter staff) was designed and their
purpose was to streamline fighter production and get the ball rolling
so to speak for the much needed fighter aircraft in these times of
turmoil.
many
numerous small sub-contractors involved. It was for these latter
problems that the Jager Stab(fighter staff) was designed and their
purpose was to streamline fighter production and get the ball rolling
so to speak for the much needed fighter aircraft in these times of
turmoil.
| THE KIT |
| CONSTRUCTION |
Risking a possible arrest by the M.A.P. (Model Aircraft Police)
and a night in the hoosegow I decided to defy them and make my own exit
off the modeling highway of thou shall and thou shall nots by not
starting with the cockpit for once and instead started with the three
piece wing assembly and the separate tail unit. The latter is no doubt
a wise engineering move on Academy's part to get more versions out of
the same basic mold without having to change much else. Henceforth
their G6 kit. With these couple of
 subassemblies out of the way I glued
in the seat and control stick to the cockpit floor. Also supplied is a
two piece trim wheel ( a nice touch) for the port fuselage half and
once these items were set and dry I painted them and all the related
interior bits with Model Master RLM 66. Details were picked out later
like some khaki for the "shifter boot" as well as a rubbing with a
silver pencil over the instrument panel gauges which I'd previously
painted black along with the control column grip. A few final splotches
of color were added for some of the switches on the instrument panel
and some seat belts made from painted masking tape before gluing it and
the completed cockpit tub between the fuselage halves.
subassemblies out of the way I glued
in the seat and control stick to the cockpit floor. Also supplied is a
two piece trim wheel ( a nice touch) for the port fuselage half and
once these items were set and dry I painted them and all the related
interior bits with Model Master RLM 66. Details were picked out later
like some khaki for the "shifter boot" as well as a rubbing with a
silver pencil over the instrument panel gauges which I'd previously
painted black along with the control column grip. A few final splotches
of color were added for some of the switches on the instrument panel
and some seat belts made from painted masking tape before gluing it and
the completed cockpit tub between the fuselage halves.
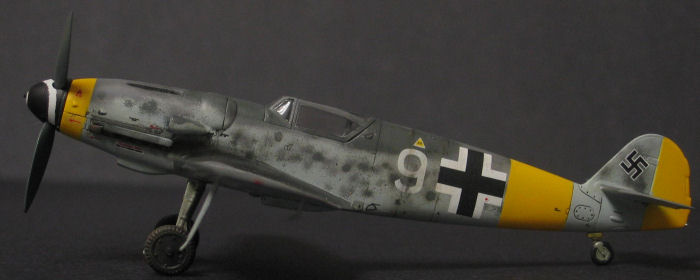
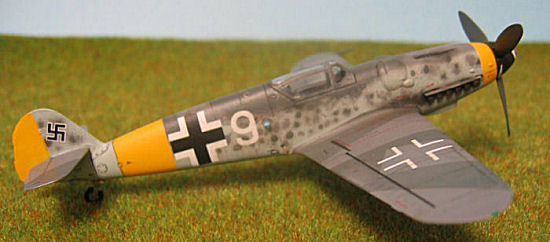
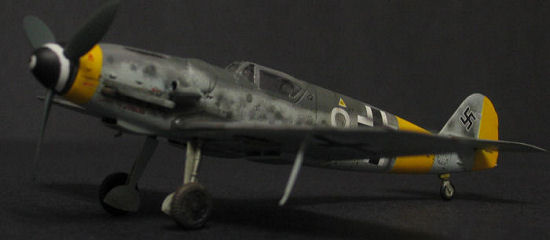
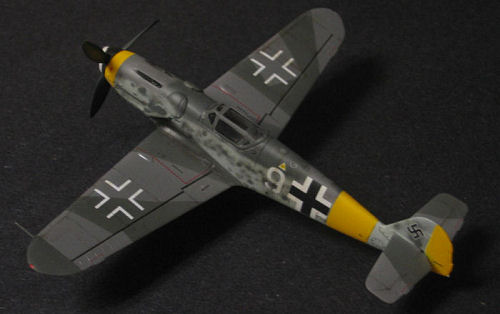
| COLORS & MARKINGS |
 basically sprayed the wings and the upper parts of the fuselage first
then tried to basically "feather and spot" the sides. My first attempt
at doing this was only so-so and my touch ups only made things worse.
It was here that I decided to go with a different scheme, this time
"white 9" from JG/11 in the popular RLM 74, 75 over 76 scheme.
basically sprayed the wings and the upper parts of the fuselage first
then tried to basically "feather and spot" the sides. My first attempt
at doing this was only so-so and my touch ups only made things worse.
It was here that I decided to go with a different scheme, this time
"white 9" from JG/11 in the popular RLM 74, 75 over 76 scheme.
| FINAL CONSTRUCTION |
Rather than try and use a decal for the spinner which I've heard can cause nausea and sleeping disorders, I decided to try a new product from Eduard and that is their pre-cut(uh-oh is that a true word?) Luftwaffe spinner masks. This is a great idea and simple to use, just paint the spinner with the first color, usually black or white depending on the color of the band/spinner and when dry apply the spinner mask and paint your secondary color. Allow to dry, carefully remove and Voila! you're all done, no endless hours of applying decal solvents and offering sacrifices to the model gods that the decal will turn out alright.
 n between things I'd also assembled the tail wheel and landing gear
units, the struts and insides of the gear doors being painted RLM 02
and the wheels in black and the tires with Pollyscale Nato Black I
believe. The spinner and prop assembly were then glued together and put
off to the side and allowed to dry. A coat of Pollyscale clear flat was
then sprayed onto the entire airframe and when dry the canopy masking
was removed. I then highlighted the panel lines and control surfaces
using raw umber oil paint and turpentine as well as a black/dark gray
acrylic sludge wash.
n between things I'd also assembled the tail wheel and landing gear
units, the struts and insides of the gear doors being painted RLM 02
and the wheels in black and the tires with Pollyscale Nato Black I
believe. The spinner and prop assembly were then glued together and put
off to the side and allowed to dry. A coat of Pollyscale clear flat was
then sprayed onto the entire airframe and when dry the canopy masking
was removed. I then highlighted the panel lines and control surfaces
using raw umber oil paint and turpentine as well as a black/dark gray
acrylic sludge wash.| CONCLUSIONS |
I now had a late war 109 sitting before me decked out in its
mottle camouflage scheme and the ever present mesmerizing spinner. What
I like about it are the combination of the fuselage mottling with the
splinter pattern on the wings and the yellow defense
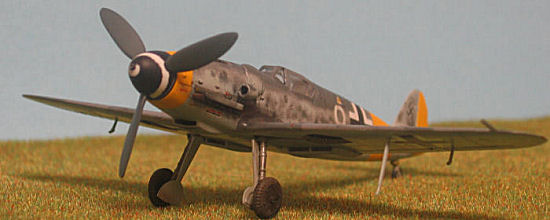 bands and rudder
add a splash of color. Lastly there's that cool barber pole spinner
which I like so much and the underwing FuG antenna mast that let you
know this aint no G6 baby! Also it makes a perfect stablemate to my E4
and reminds me I still have a bunch more 109s to build. I had a fun
time building this kit and didn't run into any snags the whole time.
It's high quality, ease of build and attractive pricing definitely make
it a winner and I recommend it. Unfortunately during the construction
phase I'd forgotten to drill out the locating points for the drop tank
mount, only realizing it after I was well into the painting stage. Not
wanting to mar the finish I decided to leave it off. Sigh.....shades of Shiden-Kai! Also somewhere along the way I'd lost the loop antenna that
should be atop the fuselage behind the canopy so double d'ohs on that!
At least the knowledge that some late war 109s didn't have them and
that one day I might be able to cobble something up is helping me come
to grips. Either that or I could work out a trade with the carpet
gnomes for some Poppies or applebush root or something and they might
consider a trade!
bands and rudder
add a splash of color. Lastly there's that cool barber pole spinner
which I like so much and the underwing FuG antenna mast that let you
know this aint no G6 baby! Also it makes a perfect stablemate to my E4
and reminds me I still have a bunch more 109s to build. I had a fun
time building this kit and didn't run into any snags the whole time.
It's high quality, ease of build and attractive pricing definitely make
it a winner and I recommend it. Unfortunately during the construction
phase I'd forgotten to drill out the locating points for the drop tank
mount, only realizing it after I was well into the painting stage. Not
wanting to mar the finish I decided to leave it off. Sigh.....shades of Shiden-Kai! Also somewhere along the way I'd lost the loop antenna that
should be atop the fuselage behind the canopy so double d'ohs on that!
At least the knowledge that some late war 109s didn't have them and
that one day I might be able to cobble something up is helping me come
to grips. Either that or I could work out a trade with the carpet
gnomes for some Poppies or applebush root or something and they might
consider a trade!
| REFERENCES |
January 2006
If you would like your product reviewed fairly and fairly quickly, please contact the editor or see other details in the Note to Contributors.