Italaerei 1/72 Ju-86E-1/2
| KIT #: | 120 |
| PRICE: | $8.00 'used' |
| DECALS: | Two options |
| REVIEWER: | Torben Plesberg |
| NOTES: |
Conversion to Tp 73, Flygvapnet 1957. |
| HISTORY |
The Ju-86 was designed in the early thirties with a pair of Jumo 205 diesel engines, also known from the flying boat Blohm & Voss Bv-138 Seedrache (sea dragon), which was nick-named Donald Duck by the Danes during the German occupation 1940-45. It was the sound of the diesels, that made the Danes think of Donald Duck, we all know what it sounds like, when Donald is upset! The Ju-86 was designed as an airliner, and the diesels were very well fit for this purpose, where long running times at the same settings were the normal way of operation.
However, the emerging Luftwaffe needed bomber aircraft and bomber trainers, and the Ju-86 was about a perfect plane for these jobs in the mid-thirties. The only problem was the diesels, which were not suitable for the military way of flying, and it was decided to switch to radial gasoline engines, the BMW 132, which were actually license-built American Pratt & Whitney Hornet engines. This change solved the problem for the Luftwaffe. The Ju-86 competed with the Heinkel He-111 about becoming the standard bomber of the Luftwaffe. As we know, the He-111 was the winner, and this opened up for export of the Ju-86.
 Junkers
Flugzeugbau offered two versions of the Ju-86 for export: The Ju-86 K version
was bomber plane, and the Ju-86 Z was an airliner. The letter K is short for
Krieg (war) and the letter Z is short for Zivil (civil). The Swedish Air Force,
Flygvapnet, needed modern bombers. A modern bomber roughly the same size as the
Ju 86 was the Handley Page Hampden from England. Both aircraft were candidates
for being the standard medium bomber of the Flygvapnet. The Ju-86 was preferred,
either because it offered better room for the crew in the fuselage or for
political reasons. Maybe both! The Junkers Flugzeugbau got the Swedish orders
for the Ju-86 K. The Ju 86 entered service in 1937 with Flygvapnet, and the
single Hampden bomber ordered by Flygvapnet did not arrive from the factory in
England until September 1938. The Swedes had decided to buy the Ju 86 even
before they had the Hampden for comparison. Apparently, the Hampden was bought
for another purpose than that of a bomber!
Junkers
Flugzeugbau offered two versions of the Ju-86 for export: The Ju-86 K version
was bomber plane, and the Ju-86 Z was an airliner. The letter K is short for
Krieg (war) and the letter Z is short for Zivil (civil). The Swedish Air Force,
Flygvapnet, needed modern bombers. A modern bomber roughly the same size as the
Ju 86 was the Handley Page Hampden from England. Both aircraft were candidates
for being the standard medium bomber of the Flygvapnet. The Ju-86 was preferred,
either because it offered better room for the crew in the fuselage or for
political reasons. Maybe both! The Junkers Flugzeugbau got the Swedish orders
for the Ju-86 K. The Ju 86 entered service in 1937 with Flygvapnet, and the
single Hampden bomber ordered by Flygvapnet did not arrive from the factory in
England until September 1938. The Swedes had decided to buy the Ju 86 even
before they had the Hampden for comparison. Apparently, the Hampden was bought
for another purpose than that of a bomber!
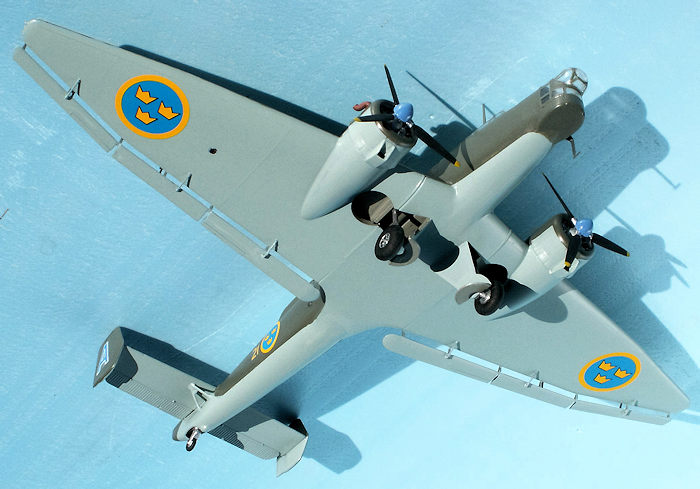
Alltogether the Flygvapnet got 47 aircraft and out of this number, the last 15 were license built by Svenska Aeroplan Aktie Bolaget (SAAB). Other export orders were for Hungary and South Africa. The SAAB company was supposed to build as many as 60 Ju-86 K. However, a Swedish design, the B-17 bomber got priority. The B-17 was designed as a dive-bomber, the Swedish Stuka so to say!
The engines for the Swedish Ju-86 K were license built British Bristol Mercury III or XII gasoline radials rated at 865 HP for start and 640 HP at 20.000 feet.
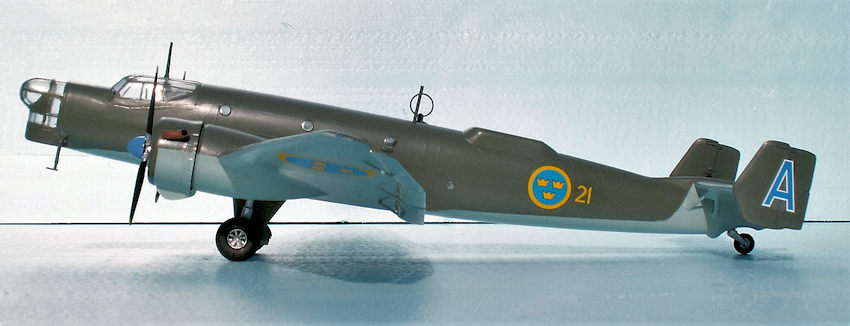
There was a single Ju-86 Z serving with the Flygvapnet. Originally, the civil Ju 86 was operated by AB Aerotransport, a Swedish airline. In 1940 the plane was sold to Flygvapnet and got the designation Tp 9. This plane served with Flygvapnet until 1958.
 The Ju-86 K
got the Flygvapnet designation B3, and served as a bomber during the war years.
In 1948 it was decided to modify all surviving planes to transport aircraft. The
Ju-86s were stripped of all their armament, they got circular windows in the
fuselage, and they got a “hump” on the dorsal to provide better room for the
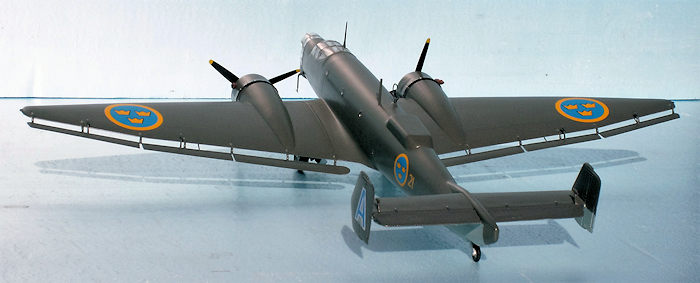
passengers – especially their heads! The Ju-86 K got a new designation – Tp 73,
and the Ju-86 served for another seven years in the new role with Flygvapnet.
The last flight with a Ju-86 took place on the 3rd
of June 1958 and was a transfer flight from Luleå (F 21) and to Malmen (F 3),
where the aircraft was preserved and got a permanent place in the Swedish AF
museum at Malmen.
The Ju-86 K
got the Flygvapnet designation B3, and served as a bomber during the war years.
In 1948 it was decided to modify all surviving planes to transport aircraft. The
Ju-86s were stripped of all their armament, they got circular windows in the
fuselage, and they got a “hump” on the dorsal to provide better room for the
passengers – especially their heads! The Ju-86 K got a new designation – Tp 73,
and the Ju-86 served for another seven years in the new role with Flygvapnet.
The last flight with a Ju-86 took place on the 3rd
of June 1958 and was a transfer flight from Luleå (F 21) and to Malmen (F 3),
where the aircraft was preserved and got a permanent place in the Swedish AF
museum at Malmen.
In 1962 a great airshow took place at Malmen to celebrate 50 years of military aviation in Sweden. Among the aircraft on static display was the blue “Adam”, the only surviving Ju-86 in the world. I was there with a handful of other Danish teenage-spotters, and I am happy for my photos of the Ju-86 K5, the subject of this model. This particular aircraft was built by Junkers in Dessau, as one of two K5 for the Flygvapnet.
| THE KIT |
It is an old kit from 1976. At that time, Italeri appeared under the original name: Italaerei. The kit comes in a large box with a German bomber on the top. There are three sprues, two very large ones in dark grey styrene, and a smaller one with the clear parts. The decal sheet has two options. The instructions is a single large fold-out sheet with a short story of the Ju-86, a review of the sprues, and four drawings showing how to put the model together, and color guides for the two options.
The kit is a high quality kit for its time, and the parts fit well together, especially the nacelles to the wings. By following the instructions, you can’t miss to put the model correct together.
| CONSTRUCTION |
Since my Ju-86 was not going to be an out of the box model, I had to consider the necessary changes, which I had to make:
The aircraft should be without armament or bomb bays
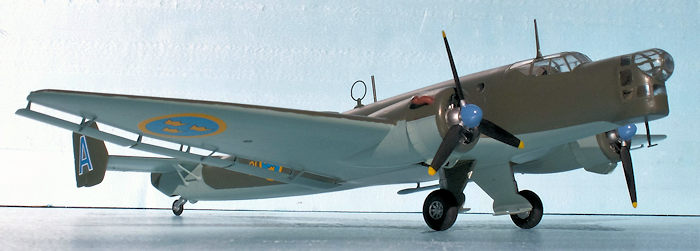
The engines should be modified to match the British Bristol Mercury engines.
The fuselage halves should have three 3.5 mm gauge windows and one window gauge 2.5 mm.
The dorsal should have its hump for the comfort of the passengers
 The first
thing to do was to drill the holes for the windows in the fuselage halves. The
windows were made of a 4.5 mm acryl rod, which was turned down to 3.5 mm in the
lathe. A small piece of the rod was turned further down to 2.5 mm gauge. Then
the windows were cut, the acryl rod was sliced into pieces of 3 mm thickness.
Now the windows could be pressed into the holes and they were locked from the
inner sides by clear varnish. Then it was time for filing the windows to conform
with the slope of the fuselage. This must be done very carefully to avoid any
scratches in the fuselage. The windows could now be water sanded (grain 1200)
and at last polished up with toothpaste to regain transparency. Both the inner
and the outer side got this treatment. From Tamiya tape, I punched small
protective roundels for the windows to make the paint job easy. Of all the parts
inside the fuselage, I only used the floor (20) with parts no 1, 2, 7, 8, 9 and
10. No crew – no armament!
The first
thing to do was to drill the holes for the windows in the fuselage halves. The
windows were made of a 4.5 mm acryl rod, which was turned down to 3.5 mm in the
lathe. A small piece of the rod was turned further down to 2.5 mm gauge. Then
the windows were cut, the acryl rod was sliced into pieces of 3 mm thickness.
Now the windows could be pressed into the holes and they were locked from the
inner sides by clear varnish. Then it was time for filing the windows to conform
with the slope of the fuselage. This must be done very carefully to avoid any
scratches in the fuselage. The windows could now be water sanded (grain 1200)
and at last polished up with toothpaste to regain transparency. Both the inner
and the outer side got this treatment. From Tamiya tape, I punched small
protective roundels for the windows to make the paint job easy. Of all the parts
inside the fuselage, I only used the floor (20) with parts no 1, 2, 7, 8, 9 and
10. No crew – no armament!
Before
the assembly of the fuselage, I milled away the area, where the hump should be.
Normally it is easier to clamp a fuselage half than an assembled fuselage.
However in this case it was possible to clamp the assembled (with tape!)
fuselage because the wing stubs were parallel and therefore secured a sa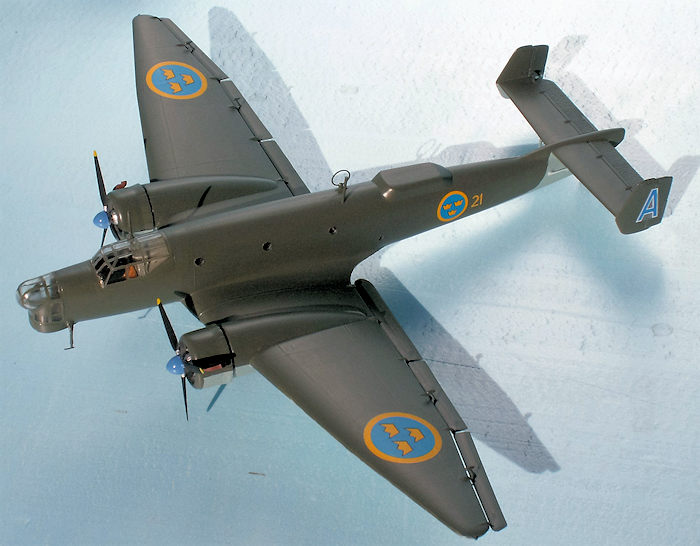 fe
clamping. The hump was made of a piece of Ureol, which is “artificial wood”,
meaning a stuff that can be treated with wood carving tools, but without the
inherent bad characteristics of the wood – grains and growth rings.
fe
clamping. The hump was made of a piece of Ureol, which is “artificial wood”,
meaning a stuff that can be treated with wood carving tools, but without the
inherent bad characteristics of the wood – grains and growth rings.
After the assembly of the fuselage halves, the hump work-piece was glued in place with super glue. Karlström’s drawing of the Tp 73 in Flygplansritningar vol. 5 p. 51 shows clearly the exact shape of the hump. This was of course a great help during my final shaping of the hump with a scalpel, some files of different shapes and sanding paper.
The fuselage had four openings on the belly relating to the bomber plane. These openings had to be closed. For one of them the kit supplied a door, part no 78. This opening is in fact the entrance to the aircraft and it is an option to have open door and a small ladder to facilitate entrance. The two small bomb bays were closed with doors made of 1 mm plastic card. The fourth opening was for the retractable belly gun position. This opening was closed, too, with 1 mm plastic card. Three pieces were needed + a lot of filling and sanding.
The engine nacelles needed two small modifications to simulate the Bristol Mercury engine: In the bottom there is an intake, probably for oil cooling. This intake was made of a piece of plastic strip 4 x 3 mm. The opening was milled with a 3 mm cutter, and the shape as seen from the side was simply sanded. The other item was a small exhaust pipe placed at 10 o’clock on the starboard cowling and at 2 o’clock on the backboard. They were made of bent sprue.
 The
remaining assembly was rather easy and the parts fit very well together. I was
especially impressed by the precision of the nacelles: they matched exactly the
curving of the wing profile – no filling necessary! The tail plane assembly was
also an easy one, but I sanded some exaggerated raised lines away – from the
tail plane and the fins. The undercarriage was very simple: just a leg and a
wheel, no supports at all. The outer half circle part of the wheel doors must be
bent about 110 degrees, and the upper edge (i.e. against the wing) had to be
sanded to get the correct angle to make the small round “bubble” match the wheel
shafts. This small inaccuracy is the only flaw of this kit!
The
remaining assembly was rather easy and the parts fit very well together. I was
especially impressed by the precision of the nacelles: they matched exactly the
curving of the wing profile – no filling necessary! The tail plane assembly was
also an easy one, but I sanded some exaggerated raised lines away – from the
tail plane and the fins. The undercarriage was very simple: just a leg and a
wheel, no supports at all. The outer half circle part of the wheel doors must be
bent about 110 degrees, and the upper edge (i.e. against the wing) had to be
sanded to get the correct angle to make the small round “bubble” match the wheel
shafts. This small inaccuracy is the only flaw of this kit!
The nose canopy had an opening in the circular front piece for a protruding gun. The Tp 73 did not have this opening. I found it too difficult to try to make a transparent plug for the opening. I solved the problem in another way. I milled away the circular piece and replaced it by a new one. With the utmost care the canopy was clamped in the vice, using some soft materials to protect the canopy from being crushed, and very slowly the front circular window was milled away. Now I made a new circular front window in the end of an 8 mm gauge acryl rod, and being very careful to get the correct curving to match the cupola. In the end, I succeeded in making the new transparent window and it was glued in place with clear varnish. However, the window is in fact a convex lens! I don’t hope that the sun one day might cause a cockpit fire.
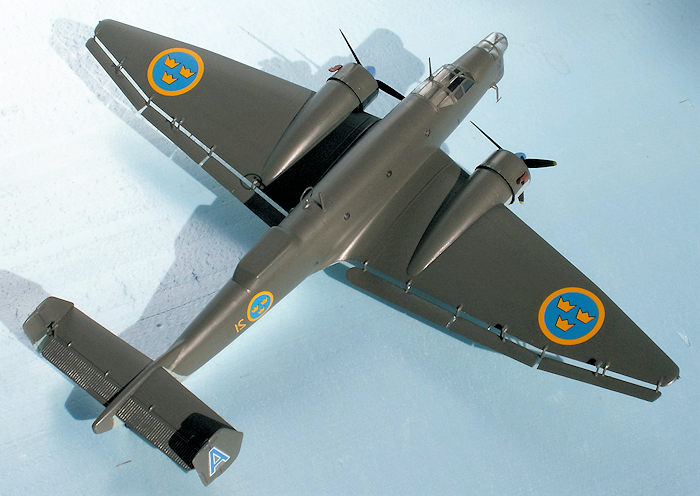
| COLORS & MARKINGS |
The
color scheme of the Tp 73 is as follows: All upper surfaces including antennas
dark green, Model Master RLM 71. Interior, wheel wells and doors are grey, Model
Master RLM 02. Underside is light grey-blue, Model Master RLM 65. Wheel legs are
silver, tires and propeller blades are flat black, Model M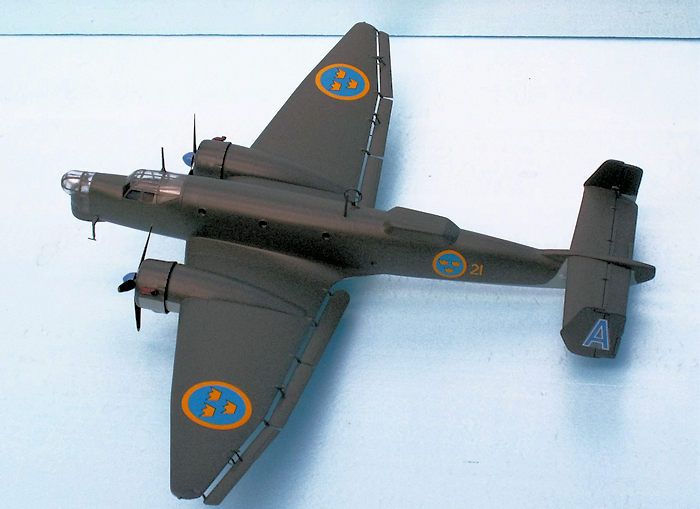 aster
FS 37038. Exhaust pipes are brick-red, HB 70. The RLM colors are Acryl, and this
type of paint is very easy to apply with a brush. It dries quickly and the
surface is very smooth, but not glossy. I would say it looks, as if it had a
layer of Satin Cote from HB.
aster
FS 37038. Exhaust pipes are brick-red, HB 70. The RLM colors are Acryl, and this
type of paint is very easy to apply with a brush. It dries quickly and the
surface is very smooth, but not glossy. I would say it looks, as if it had a
layer of Satin Cote from HB.
The decals was a problem, since they did not come with the kit. I had, however, in my stocks a large sheet with Swedish roundels to 1/72 scale (Flying colors Aerodecals). The scale one to one sizes are indicated at each roundel, and it was easy to find the right sizes, 1800 mm for the wings, and 1320 mm for the fuselage. The blue A with a white outline was taken from a B-17 kit (not Boeing – SAAB!). I did not need this A for my B.17 model, since it will get Danish markings. The yellow 21 (for F 21 Luleå) was found in a Marivox SK-60 kit, which had options for three different Swedish wings, and among luckily F 21, the northern Swedish AFB close to the polar circle. For protection all the decals got a layer of Satin Cote, and it was not possible to detect any difference in the finish between the Satin Cote and the acryl colors.
| CONCLUSIONS |
It is always a challenge to make a conversion of a kit. This was only a simple conversion to do. The reward by taking the extra trouble of a conversion is that probably only a few other modelers have a similar model. In this case the original is a truly outstanding aircraft - being the only surviving Ju-86 in the world. I recommend this kit warmly, if you take an interest in bombers from the late thirties, WWII and the Spanish Civil War, or in military transport aircraft from the late forties and fifties.
| REFERENCES |
Wikipedia: Junkers Ju-86
Björn Karlström: Flygplansritningar 5 (Swedish transport aircraft 1926-1989) Allt om Hobby AB, Box 42006, S-126 12 Stockholm. ISBN 91-85496-30-8
Torben Plesberg My photos of the Adam blue at Malmslätt from 1962.
If you would like your product reviewed fairly and fairly quickly, please contact the editor or see other details in the Note to Contributors.
Back to the Main Page Back to the Review Index Page Back to the Previews Index Page