Airfix 1/72 Bf-110C
| KIT #: | A03080 |
| PRICE: | 7.95 Euros at the local shop |
| DECALS: | Two options |
| REVIEWER: | Jeroen Koen |
| NOTES: | New mold kit |
| HISTORY |
The Messerschmitt Bf110, was a twin-engine heavy fighter in the service of the Luftwaffe during World War II. Development work on an improved type, the Me210 that was to replace the Bf 110, begun before the war started, but due to teething troubles, this resulted in Bf110 soldiering on until the end of the war in various roles, alongside its replacements, the Me210 and the Me 410.
 The Bf110
served with success in the early campaigns, the Polish, Norwegian and Battle of
France. The 110's lack of agility in the air was its primary weakness. This flaw
was exposed during the Battle of Britain, when some 110 equipped units were
withdrawn from the battle after very heavy losses and redeployed as night
fighters and fighter bombers, a role to which the aircraft was well suited. The
Bf110 enjoyed a successful period following the Battle of Britain as an air
superiority fighter and strike aircraft in other theatres. During the Balkans
Campaign, the North African Campaign, and on the Eastern Front it rendered
valuable ground support to the German Army as a potent fighter-bomber.
The Bf110
served with success in the early campaigns, the Polish, Norwegian and Battle of
France. The 110's lack of agility in the air was its primary weakness. This flaw
was exposed during the Battle of Britain, when some 110 equipped units were
withdrawn from the battle after very heavy losses and redeployed as night
fighters and fighter bombers, a role to which the aircraft was well suited. The
Bf110 enjoyed a successful period following the Battle of Britain as an air
superiority fighter and strike aircraft in other theatres. During the Balkans
Campaign, the North African Campaign, and on the Eastern Front it rendered
valuable ground support to the German Army as a potent fighter-bomber.
The first really combat ready versions were the 110C variants. These were powered by the Daimler Benz DB 601A, giving quite a boost in power and performance over the previously Jumo engined aircraft. The 110C was to be the last version developed as it was anticipated that the Me210 would be quickly replacing it. However, as the Me210 was a failure, the 110 stayed in production until near the end of the war. (History section taken from Scott's preview with a few minor edits, not lazy, but a lack of inspiration!)
| THE KIT |
After what appears to be a very long time, finally, Airfix has taken the plunge and gave us a new-tool Bf110. I'd expected an outfit like Dragon or Hasegawa, even Eduard for that matter, to incorporate a new one into their catalogues, but, even though more 1/72 110s have been announced, Airfix is the first to be available, replacing the Jurassic old-mould 110-ish looking kit from their catalogue. I had this new kit in my hands while visiting Munchen in Germany for holiday last year, but did not buy it then. When it appeared at the local hobby shop a few weeks later, I thought again and traded my 8 Euro for a shiny new red box with attractive CGI-boxart of 110s being under attack by Spitfires. As I don't have a particular interest in 110s at all, I guess box-art still sells!
 Upon
ripping the box open I was greeted by a few light grey sprue in soft grey
plastic, and one clear. A thick A4 sized instruction book and a nicely printed
decal sheet and the usual Airfix Club membership leaflet was there too. The new
box is very nicely done and quite sturdy, no flappy side-opening boxes here. The
panel lines are what I expected and read about earlier on: engraved, but heavy,
the latter can also be said about the sprue attachment points.
Upon
ripping the box open I was greeted by a few light grey sprue in soft grey
plastic, and one clear. A thick A4 sized instruction book and a nicely printed
decal sheet and the usual Airfix Club membership leaflet was there too. The new
box is very nicely done and quite sturdy, no flappy side-opening boxes here. The
panel lines are what I expected and read about earlier on: engraved, but heavy,
the latter can also be said about the sprue attachment points.
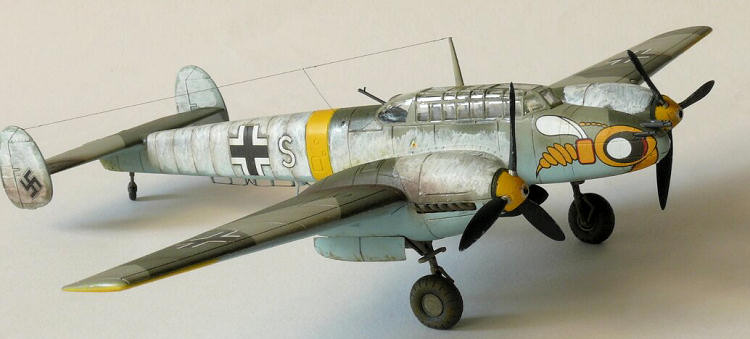
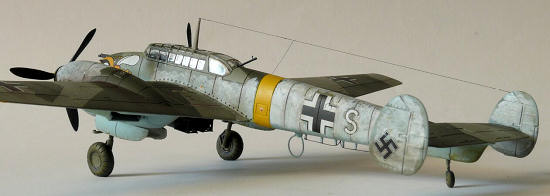
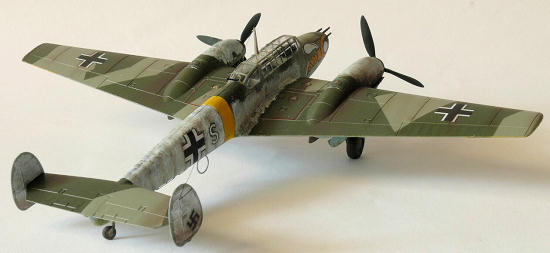
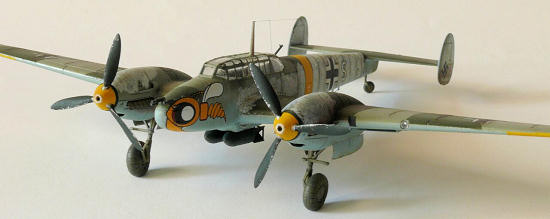
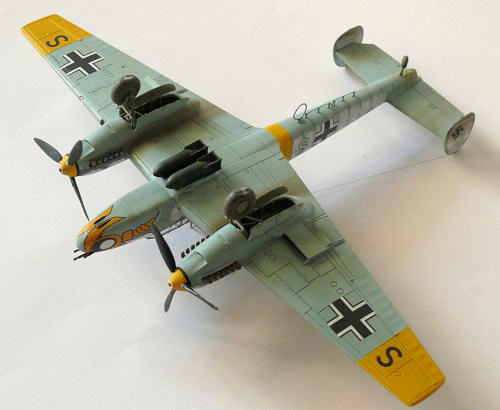
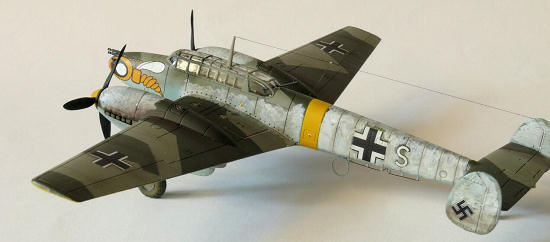
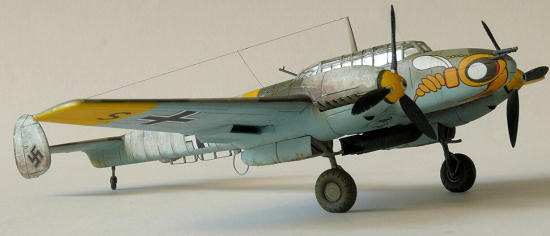
The decal sheet caters for 2 versions, a ZG76 shark-mouthed Bf110C-2 from the BoB era in the dark scheme of RLM70/71/65 with a low demarcation, and an SKG210 Bf110C-4/B JaBo from the winter of 1941/42 on the Eastern Front with yellow outer wing panels, spinners and fuselage band. The base scheme of this option is RLM71/02/65, in addition to this it has a partial winter wash applied over the engines, fuselage sides and entire rear fuselage. This also sports the famous espe insignia on the fuselage nose. The decals themselves on my sheet looked good and opaque, yet, the smaller items like oil and fuel triangles were printed off-register.
Ammunition is plentiful: four bombs to choose for the centreline rack (either 2x 500Kg, 2x 250Kg), four under wing drop tanks (either 2x 300l, 2x 900l) and an extended-range fuselage mounted oil tank is included as well. From what I could understand most of this is inappropriate for the C-4/B as this types wing wasn't fitted for any racks or plumbing, but not really being up there as far as Bf110 knowledge goes I suggest you'd better research that a bit. The C-2 uses none of these options, being a pure fighter. Well, sort of, as we all know...
As far as options go, there's a longer tail part included, as well as a larger tail wheel, marked not for use. Detailing is very good in some places (landing gear for example) but clunky in others, like the guns, fuselage loop antenna and thick clear parts.
All in all, not bad for the price, though!
| CONSTRUCTION |
Conventionally, I first built up the rather simple cockpit. This is really just a floor, a few seats, stick, an instrument panel with decal and some ammo drums for the 20mm MG-FFs buried in the floor. I thought about adding radio boxes and such, but refrained from that after dry-fitting the fuselage halves and putting the clunky clear part on top of it. 2 Crew members are optional to hide the emptiness!
 So, just a
bunch of tape-seatbelts would do for this one! I then airbrushed the cockpit
Xtracolor RLM02 and, being gloss paint, I applied a dirty brown wash and sealed
this all with Revell Aqua flat varnish. While doing the cockpit I also used the
instrument panel decal (no details on the plastic part) and found out just how
thick and unmanageable the decal was. I then assembled the fuselage and tail,
which I didn't do according to the instructions. I put the (short) fuselage
extension on first and blended that in, then used some small strips of Evergreen
to level out the vertical tails and remove the gaps. This is just about the only
area needing any serious filling and sanding. The nose was also attached at this
point and the faint panel lines on that were scribed a bit deeper to keep them
uniform with the rest. Before glueing the nose I attached the machine guns;
these are moulded on a backing plate for easy alignment and glueing, but I
feared it would be impossible to properly get any nose decals over them, so I
cut off the barrels and inserted the backing only.
So, just a
bunch of tape-seatbelts would do for this one! I then airbrushed the cockpit
Xtracolor RLM02 and, being gloss paint, I applied a dirty brown wash and sealed
this all with Revell Aqua flat varnish. While doing the cockpit I also used the
instrument panel decal (no details on the plastic part) and found out just how
thick and unmanageable the decal was. I then assembled the fuselage and tail,
which I didn't do according to the instructions. I put the (short) fuselage
extension on first and blended that in, then used some small strips of Evergreen
to level out the vertical tails and remove the gaps. This is just about the only
area needing any serious filling and sanding. The nose was also attached at this
point and the faint panel lines on that were scribed a bit deeper to keep them
uniform with the rest. Before glueing the nose I attached the machine guns;
these are moulded on a backing plate for easy alignment and glueing, but I
feared it would be impossible to properly get any nose decals over them, so I
cut off the barrels and inserted the backing only.
The assembled wing could be snapped in place, but the fit was so tight the dihedral would become too flat, so I sanded the mating surfaces, resulting in a bit of filling and sanding needed. I also re-scribed the aileron lines as Airfix made very fine ribbing on these, but forgot the hinge lines on all four sides! The nacelle extensions could also do with a bit of sanding as these protrude onto the flaps (and should not) but I left these alone. After sanding all seams I attached the rather clunky machine gun for the gunner, but not before cutting off the barrel as well. I then glued the canopy on and had hours of fun masking it off. The rather heavy framing makes this quite do-able, though.
 Attention
was then turned to the nacelles. The exhausts are cleverly interlocking and
Airfix would have you insert them from the back, but the fit of the nacelles
isn't really the best so they would be in the way. I found out by glueing the
nacelles to the wing, that with a bit of careful fiddling the exhausts can be
glued together and inserted afterwards by sliding them in from the side. The
nacelles needed some sanding to get rid of a step on the bottom, and a bit of
filler where the exhausts end, and they mate to the front of the wing. Being
able to install the exhausts later is a real help here!
Attention
was then turned to the nacelles. The exhausts are cleverly interlocking and
Airfix would have you insert them from the back, but the fit of the nacelles
isn't really the best so they would be in the way. I found out by glueing the
nacelles to the wing, that with a bit of careful fiddling the exhausts can be
glued together and inserted afterwards by sliding them in from the side. The
nacelles needed some sanding to get rid of a step on the bottom, and a bit of
filler where the exhausts end, and they mate to the front of the wing. Being
able to install the exhausts later is a real help here!
At this point, after all seams were properly sanded and re-sanded, damaged panel lines re-scribed I shot a thin coat of primer. After a tiny bit of more sanding and scribing I made the antenna posts for the blind-landing antenna on the rear fuselage. I also re-filled the opened up holes for the wing tanks as apparently the C-4/B was incapable of carrying these.
| COLORS & MARKINGS |
Then it was time for a bit of colour. When I got the kit I wanted to make the Haifisch ZG76 option,but after using the decal for the instrument panel I quickly figured the Wespe insignia for SKG210 would be slightly easier to apply, hopefully... Anyway, the bottoms of both options are RLM65 and I used Xtracolor for this. I wasn't really happy with this colour; too dark and grey, so I re-shot it with Revell 49. This is really too blue, so I added a bit of grey and misted that over and that gave me the colour I wanted. I added the underwing radiators and their inserts. Then I masked off everything to be kept RLM65, and used rolls of knead-able eraser to give the fuselage demarcation a soft edge and shot a coat of Xtracolor RLM02 over the remaining topsides. At this point all other parts that needed RLM02, like inner gear doors and gear parts, were airbrushed at the same time. Pretty efficient use of modelling time, eh?
I then masked off the splinter camouflage according
to the Airfix plans, which actually look quite different from those of, say,
Eduard or Dragon, and shot the final coat of Xtracolor RLM71. I finally unmasked
everything when dry and was rewarded by an
 oops-moment...
forgot the yellow fuselage band and wing panels! A bit of masking, a coat of
Revell 5 Flat White (I find this the best covering white I've found so far!) and
finally Xtracolor RLM04 Yellow, which matched the warm yellow of the Wespe decal
the best. I also painted the spinners at this time.
oops-moment...
forgot the yellow fuselage band and wing panels! A bit of masking, a coat of
Revell 5 Flat White (I find this the best covering white I've found so far!) and
finally Xtracolor RLM04 Yellow, which matched the warm yellow of the Wespe decal
the best. I also painted the spinners at this time.
Airfix will tell you to do a low hard-edged demarcation line for the fuselage, but since most of it would be covered with white-wash later I figured I'd do a high one with mottling. I've never done that before and since it would be covered, it would leave plenty of room for error. Thinning my paint and turning the air pressure down to a mere 0,7 bar, I first softened the demarcation even more and then I just went ahead, using my Badger 150 with a Fine tip and needle. I was pleasantly surprised at how it all came out, so surprised in fact, I thought about getting a decal sheet with code letters and making a non-winter version!
However, as the white-wash would also be a first, I went ahead anyway. As I had painted my trusty poor Hasegawa paint-test P-40 (must be about half a centimeter thickness of paint on that, by now!) with the same colours as the 110 during the painting sessions, after a bit of testing I went for Revell 301 Satin White enamel and a small brush to make the white wash. But not before glossing the RLM65 portions of the kit over. The Xtracolor paints used on the rest are gloss already, by the way. To give an impression of a field applied white-wash I applied the decals first. These are incredibly stiff and uncooperative. Even though the panel lines are quite wide no amount of Daco Strong setting solution would let them snuggle down into them. As I feared the worst for the Wespe nose decal, I cut the Wespe's head in a few small pie-shaped pieces and puzzled those together. It also turned out the underlying paint changed the hue of the decal, so they didn't quite match the yellow I painted any more. Sigh... After many hours of slicing, prodding, Future-ing and pressing I finally got them somewhat to conform to the curved nose. All in all the effort expended did somewhat work out, but touch-ups were needed anyway. The decals silver badly, even on a very gloss undercoat and the smaller ones, like the fuel triangles and red cross symbol, are badly out of register, as well. There's also quite a lot of carrier film around them, so some stencils (like that on the bomb rack) required cutting to make them actually fit. Since most of the plane would be covered later, I gladly omitted nearly all of the stencils. I sincerely hope Airfix improves on these or suggest you get aftermarket!
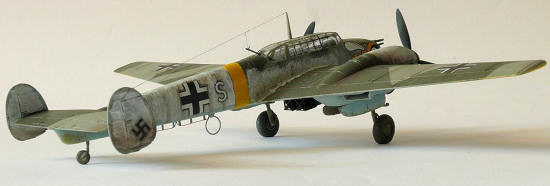 After that
ordeal was over, I went to work on the white-wash. I can't really describe how I
did that, I just went to work with my brush and applied a bit here and there,
and all of a sudden I was looking at a very roughly applied white-wash, just
like the real thing. The mottling is pretty much gone: from the cockpit to the
end everything is white, and up-front there's that big wasp decal. Ah well..
more than enough kits to re-try mottling on, and not have to paint it over! I
did carefully paint around the markings and fuselage band to reveal the
underlying camouflage for a bit of interest. After airbrushing the exhaust
stains I went to work on the remaining small bits, or so I thought, as a very
helpful fellow modeller thought the tails looked pretty white without the
swastika's. They're not included on the kit sheet. He then gave me 2 from an
Xtradecal sheet so I could add these last, and then re-did the exhaust stains on
the tails. Thanks again, Jelmer! Actually, these 2 decals worked really well, so
it wasn't my fault the decalling was such a mess!
After that
ordeal was over, I went to work on the white-wash. I can't really describe how I
did that, I just went to work with my brush and applied a bit here and there,
and all of a sudden I was looking at a very roughly applied white-wash, just
like the real thing. The mottling is pretty much gone: from the cockpit to the
end everything is white, and up-front there's that big wasp decal. Ah well..
more than enough kits to re-try mottling on, and not have to paint it over! I
did carefully paint around the markings and fuselage band to reveal the
underlying camouflage for a bit of interest. After airbrushing the exhaust
stains I went to work on the remaining small bits, or so I thought, as a very
helpful fellow modeller thought the tails looked pretty white without the
swastika's. They're not included on the kit sheet. He then gave me 2 from an
Xtradecal sheet so I could add these last, and then re-did the exhaust stains on
the tails. Thanks again, Jelmer! Actually, these 2 decals worked really well, so
it wasn't my fault the decalling was such a mess!
| FINAL CONSTRUCTION |
I first went to work on the landing gear. Being pre-painted RLM02 (efficiency, remember?!) I gave the parts a black-brown watercolour wash to accentuate the nice looking details, and assembled them as far as possible. Then I glued the parts to the kit and added the tail wheel, pre-flattened main wheels, and gear doors. The main wheels have a clever notch to make sure the flat side is at the bottom, yet, the fit is quite sloppy, so be careful. The props were assembled before painting to get rid of some imperfections so painting the blades and backplate RLM70 proved to require quite a steady hand! An even steadier hand was required for the white tips as these proved impossible to mask. They're not perfect, but will have to do.
Turning my attention to the bombs, I assembled and
sanded these. From a 0,25mm sheet of Evergreen I made the fin braces, a bit
overscale, but better than nothing. I painted them RLM70 by hand and weathered
them by stippling them with a stiff brush and some Humbrol RAF Dark Earth. I
also dinged them a bit with a lead 2B pencil. The yellow strip decals don't fit
at all so I left these off. I normally don't really weather my bombs (one way
trip, you know), but these looked quite good, even for one way trips! I
 thought
the pair of 500Kg bombs looked too bulky on the sleek Messerschmitt airframe, so
went with the 250Kg bombs. They were easily fitted to the fuselage bomb rack.
Next came the loop antenna. I cut the existing clunky part off and made a new
one from a bit of thin brass wire, wrapped around a paintbrush. This was
dry-fitted but not attached yet, as the owel rack antenna on the rear fuselage
had to be done first. This, however, was saved for last, to avoid droplets on
the wires when applying the flat coat.
thought
the pair of 500Kg bombs looked too bulky on the sleek Messerschmitt airframe, so
went with the 250Kg bombs. They were easily fitted to the fuselage bomb rack.
Next came the loop antenna. I cut the existing clunky part off and made a new
one from a bit of thin brass wire, wrapped around a paintbrush. This was
dry-fitted but not attached yet, as the owel rack antenna on the rear fuselage
had to be done first. This, however, was saved for last, to avoid droplets on
the wires when applying the flat coat.
At this stage, with the model nearly done, I used a toothpick and added some subtle chips to propellers (a bit overdone...), wing roots, and leading edges. I also muddied up the wheels and carefully did the areas that would be muddy from splattering as well. With the guns re-attached I flatcoated the entire model. The exhausts were painted Humbrol RAF Dark Earth at this point, given a dry-brush with Panzergrau and the ends painted black for depth. Their flat shape and smallness makes drilling them out not really easy. Finally they were rubbed in with pencil lead for a metallic shine and slided sideways into the nacelles, with a bit of fiddling. Of course I mounted them wrongly (the inner exhaust stack should face down, the outer pair up) so I was fortunate I hadn't glued them yet. Removed and re-attached, they looked pretty good.
The last bits to be attached were the nylon fishing wire (0,2mm) pulled through a black Edding marker for the Lorenz blind-landing antenna, the radio antenna wires (0,08mm nylon fishing wire, with insulators made from a blob of white painted superglue) and finally the copper wire loop was added.
I took some pictures, wrote this review, took a beer, and called her all done!
| CONCLUSIONS |
 Apart from
the heavy handed panel lines, a few inaccuracies and the horrible decals, the
kit is really quite nicely done, and certainly lightyears ahead of the Jurassic
Bf110 that it replaces. It also comes with quite a few optional parts, even more
so in the newer Bf110D/E boxing, and with a bit of scratch building will look
the part.
Apart from
the heavy handed panel lines, a few inaccuracies and the horrible decals, the
kit is really quite nicely done, and certainly lightyears ahead of the Jurassic
Bf110 that it replaces. It also comes with quite a few optional parts, even more
so in the newer Bf110D/E boxing, and with a bit of scratch building will look
the part.
Can I recommend it? I guess it mostly depends on whether you can live with the heavy handed panel lines. If you're not a 110 fanatic, like me, this will fit the bill, if you're interested in a real scale-down of the real article I'd suggest you just build this for fun while waiting for Dragon or Eduard to scale-down theirs!
| REFERENCES |
-Google found me a picture of the real aircraft
-http://en.wikipedia.org/wiki/Bf_110
Jeroen Koen
October 2011
Thanks to If you would like your product reviewed fairly and fairly quickly, please contact the editor or see other details in the Note to Contributors.