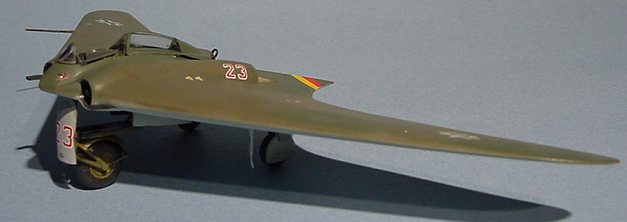
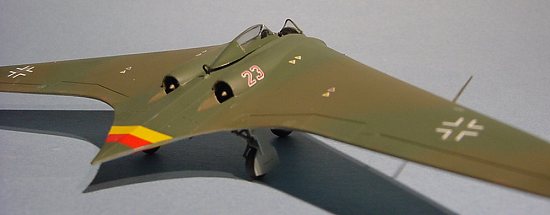
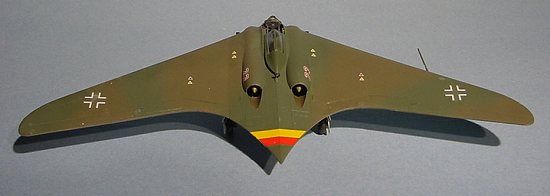
Revell AG 1/72 Horton 229 Flying Wing
|
KIT # |
4329 |
|
PRICE: |
CDN$15.95 |
|
DECALS: |
Two Aircraft |
|
REVIEWER: |
Olivier Lacombe |
|
NOTES: |
|
BACKGROUND |
To have a look of what’s in the box, click here.
|
CONSTRUCTION |
The building started the usual way, by making sub-assemblies. I glued the wings together and built up the small cockpit, which consists of tubing along with the seat and the control panel. Be careful with the tubes, they are very delicate. The whole interior was painted Model Master RLM 66 and the seat belts were finished with Model Master Panzer Dunkelgelb. I used the kit’s decals for the instrument panel. Next, I assembled the engine parts, consisting of the intake bullets and the exhaust cones. They were painted respectively Flat Black and Model Master Jet Exhaust. I also built the nicely detailed guns (for the scale) Gun Metal, but they became invisible once I glued the access panels on (you can leave them off if you wish).
 I painted the inner front wheel well
framing RLM 66, but you can leave them any colour you want, once the fuselage
(if there is such a thing on a flying wing!) is closed, it can’t be seen. I
painted the landing gears and the wheel wells Olive Drab and glued some ball
bearings inside the top fuselage half to ensure a nose heavy model. I painted
the wing attachments RLM 66 but they are invisible if you elect to build the
model with the wings on (and with the gun bay closed). The instructions have
you glue the nose to the bottom fuselage halve, then add the top one, but I
glued the two halves first, and then went on with the nose to ensure a proper
alignment. The wings were popped in place, and I used a little Tamiya Putty to
fill the seams, which are very easy to sand on a flying wing!
I painted the inner front wheel well
framing RLM 66, but you can leave them any colour you want, once the fuselage
(if there is such a thing on a flying wing!) is closed, it can’t be seen. I
painted the landing gears and the wheel wells Olive Drab and glued some ball
bearings inside the top fuselage half to ensure a nose heavy model. I painted
the wing attachments RLM 66 but they are invisible if you elect to build the
model with the wings on (and with the gun bay closed). The instructions have
you glue the nose to the bottom fuselage halve, then add the top one, but I
glued the two halves first, and then went on with the nose to ensure a proper
alignment. The wings were popped in place, and I used a little Tamiya Putty to
fill the seams, which are very easy to sand on a flying wing!
I masked everything up and the Gotha was ready for the paint shop.
|
PAINT |
The underbelly was sprayed with Model Master RLM 76, after which it was duly masked. The top received a coat of RLM 81 Braunviolett after which I freehanded a pattern of RLM 82 Dunkelgrun. I have to say that Model Master’s RLM 82 is very translucent and you should find another brand instead of using it. I realised afterwards that I had picked the wrong colour, since the camo should have been RLM 74 and 75, but since the aircraft is almost a Luft ’46 machine, it’s good enough.
|
CONSTRUCTION CONTINUES |
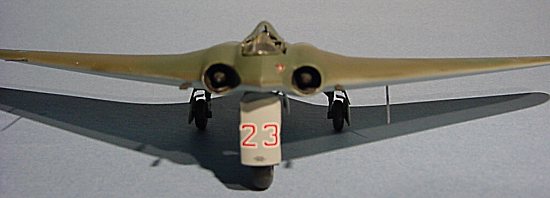 With the masking removed, it was time to
assemble the complex landing gears. Once the oleos were painted Chrome Silver,
I started with the main units. I glued on the small gear doors, then the
lengthy retraction arm, and before the glue had set, I fixed it in place. I
repeated the procedure for the other side and it became only a matter of getting
the right angle. I then went on with the nose gear, and this one was a real
pain in the neck. I tried the same technique, which is gluing everything and
hurrying up before it set, but there is a grappling-pivot-hook thingy that needs
to grab a bar in the wheel well that kept falling off. I decide to glue it
under the bar, holding it in place with my X-Acto while the glue set. You
really can’t tell the difference, since everything is so small. There is also a
small X-brace that goes under another bar, but his one was easy to glue, I
simply twisted it in place. However, once everything is dry, the assembly is
very sturdy. The remaining gear doors were then fitted, and they literally
dropped in place.
With the masking removed, it was time to
assemble the complex landing gears. Once the oleos were painted Chrome Silver,
I started with the main units. I glued on the small gear doors, then the
lengthy retraction arm, and before the glue had set, I fixed it in place. I
repeated the procedure for the other side and it became only a matter of getting
the right angle. I then went on with the nose gear, and this one was a real
pain in the neck. I tried the same technique, which is gluing everything and
hurrying up before it set, but there is a grappling-pivot-hook thingy that needs
to grab a bar in the wheel well that kept falling off. I decide to glue it
under the bar, holding it in place with my X-Acto while the glue set. You
really can’t tell the difference, since everything is so small. There is also a
small X-brace that goes under another bar, but his one was easy to glue, I
simply twisted it in place. However, once everything is dry, the assembly is
very sturdy. The remaining gear doors were then fitted, and they literally
dropped in place.
I airbrushed Future over the model, and it was time for the decaling session.
|
DECALS |
There are two types of Revell AG
decals: the very matt ones and the lesser matt ones. This kit had the very
matt kind, and it gave me troubles, especially when putting the crosses on the
aircraft. For instance, the ones under the wings are not
 100% straight, they just
stuck right were I laid them. Apart from that, they worked well, even the
tail stripes. I tried to apply as much stencilling as I could, but the red
walkway died on me as I was trying to get it straight.
100% straight, they just
stuck right were I laid them. Apart from that, they worked well, even the
tail stripes. I tried to apply as much stencilling as I could, but the red
walkway died on me as I was trying to get it straight.
Once the decals had dried up, I gave the model a coat of Gunze Clear Flat and I don’t like this clear coat very much. It’s hard to work with, you need to get just the right ratio, and if the bottle had been opened a few times, you may need to strain the stuff to prevent white dots from appearing on your model. These dots are actually dry flat particles in suspension in the liquid.
I painted the ADF loop Flat Black and the radio blade RLM 76 before fixing them onto the plane. I installed the canopy with white glue and voilà, one Go 229!
|
CONCLUSIONS |
This kit is fairly easy to build, with all-around good fit and simple assembly process. The only difficulty is the landing gear, but anyone with a few kits under the belt will be able to deal with it, and you always have the option of building the kit with the gears up. Finally, since so few aircraft were actually built, the paint schemes are only limited by your imagination.
Copyright ModelingMadness.com. All rights reserved. No reproduction in part or in whole without express permission.
If you would like your product reviewed fairly and quickly, please contact the editor or see other details in the Note to Contributors.