|
KIT # |
ST 19 |
|
PRICE: |
$39.98 MSRP |
|
DECALS: |
Two options |
|
REVIEWER: |
Bob Laskodi |
|
NOTES: |
MDC cockpit, wheels and exhaust used |
|
HISTORY |
 There are several articles dealing with the history
of the FW190D-9 and how to build the fantastic Hasegawa kit here at
Modeling Madness so I won’t waste the reader’s time with a boring re-hash
of those. What I will present is how to build the Hasegawa FW190D-9 kit
using some of the really nice products available from Model Design
Construction (MDC) that turn this incredible kit into a showstopper.
Since I am an admitted “resin-o-holic” I just can’t resist aftermarket
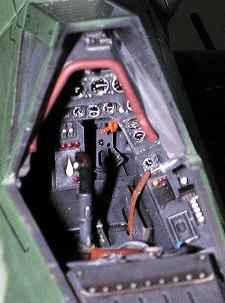
detail sets, and I used the MDC FW190D-9 Cockpit Set (CV32026), Exhaust
Set (CV32027), and Wheel Set (CV32028) in this build.
There are several articles dealing with the history
of the FW190D-9 and how to build the fantastic Hasegawa kit here at
Modeling Madness so I won’t waste the reader’s time with a boring re-hash
of those. What I will present is how to build the Hasegawa FW190D-9 kit
using some of the really nice products available from Model Design
Construction (MDC) that turn this incredible kit into a showstopper.
Since I am an admitted “resin-o-holic” I just can’t resist aftermarket
detail sets, and I used the MDC FW190D-9 Cockpit Set (CV32026), Exhaust
Set (CV32027), and Wheel Set (CV32028) in this build.
|
THE KIT |
The kit (Hasegawa 1/32 FW190D-9) (ST19) is typical Hasegawa; a high quality injected molded plastic with detailed recessed engraving that needs no further introduction. You can search this site for further information on this kit.
|
CONSTRUCTION |
 There is absolutely nothing to report here with the
kit, as the Hasegawa kit builds with only a few minor problems and the
MDC cockpit presents no real challenges (except for the cockpit coaming)
outside the usual resin issues (removing pour stubs, cleaning up parts,
etc.). In addition, the MDC wheels and exhaust are a nice replacement for
the kit parts. Of note, I launched the rudder pedal assembly (RP #11)
into orbit while removing it from the pour stub and e-mailed MDC for a
replacement. I could have easily built a new one from plastic card but I
wanted to test their customer service. They passed with flying colors as
they immediately air mailed a replacement at no cost to me. A great
product with great customer service.
There is absolutely nothing to report here with the
kit, as the Hasegawa kit builds with only a few minor problems and the
MDC cockpit presents no real challenges (except for the cockpit coaming)
outside the usual resin issues (removing pour stubs, cleaning up parts,
etc.). In addition, the MDC wheels and exhaust are a nice replacement for
the kit parts. Of note, I launched the rudder pedal assembly (RP #11)
into orbit while removing it from the pour stub and e-mailed MDC for a
replacement. I could have easily built a new one from plastic card but I
wanted to test their customer service. They passed with flying colors as
they immediately air mailed a replacement at no cost to me. A great
product with great customer service.
Minor surgery is required to adapt the cockpit set to the kit. I started by cutting off the cockpit coaming as stated in the instructions. I will issue a word of caution here; I could not get the MDC resin coaming to fit correctly as it was a bit too small to fit in the identical space. It was almost as if the part was meant for a 1/48 scale kit. I would recommend leaving the kit coaming intact and correcting the coaming by installing a small section of stretched sprue in back of the gun sight to correct the “incorrect” Hasegawa coaming. In addition, some minor detail needs to be removed from the sidewalls, but this is called out in the instructions and is quite easy. Other than that, the MDC cockpit is a “drop-in” replacement for the kit parts and is super easy to use. I installed the cockpit after the fuselage halves were glued together and it easily fit in from underneath with no problems.
 As an added bonus, if the kit is acquired from the
U.S. distributor, you get a nicely done fret of photo-etch detail parts.
While the MDC cockpit set includes a PE fret with many of the same items,
I used the kit supplied PE as I liked it better.
As an added bonus, if the kit is acquired from the
U.S. distributor, you get a nicely done fret of photo-etch detail parts.
While the MDC cockpit set includes a PE fret with many of the same items,
I used the kit supplied PE as I liked it better.
The MDC wheels are nicely done and include a replacement yoke and wheel for the rear tire. Since you have to do a little cutting of the kit part (F21) to retain the assembly, you can also alter the height of the rear wheel as some people feel it causes the rear to sit too “high”. I left everything alone as it didn’t look that far off to my eyes.
The MDC exhausts are also nicely done and feature individual stacks that attach to a base plate. The base plates fit exactly inside the kit provided parts (A13 & 14) and allow you to add the resin exhausts after painting to ease the masking chore. While each stack is done individually, using Jewelers Watch Cement was a great way to attach the parts as it is strong and allows some time to line up each exhaust stack before setting.
Some people have reported that it is difficult to get the bottom cover plate (C1) over the wheel wells and slight gaps at the wing roots, but I had no such problems and the kit assembled easily without having to use a drop of filler. My only complaint about the entire kit is the ejector pin marks in the wheel wells that are difficult to fill.
|
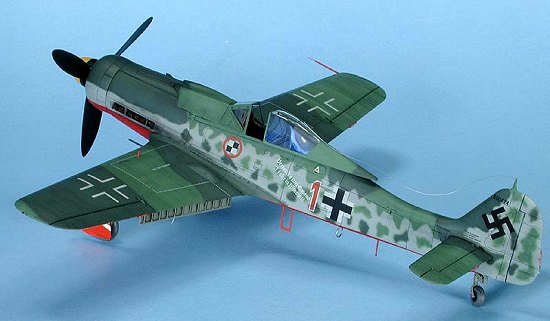
COLORS & MARKINGS |
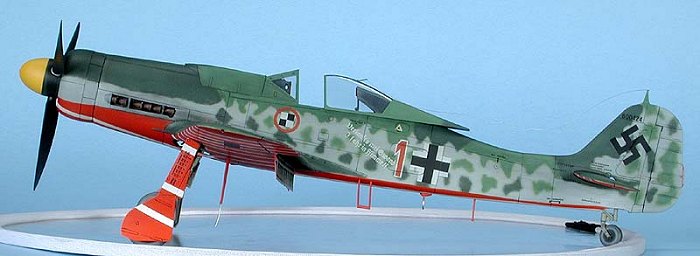
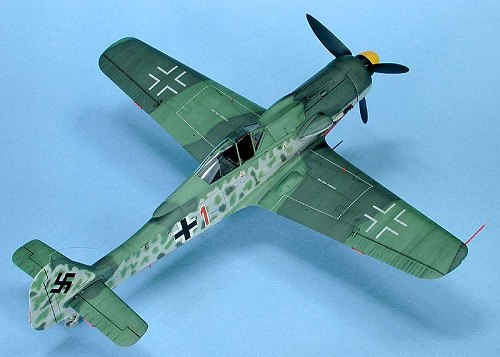
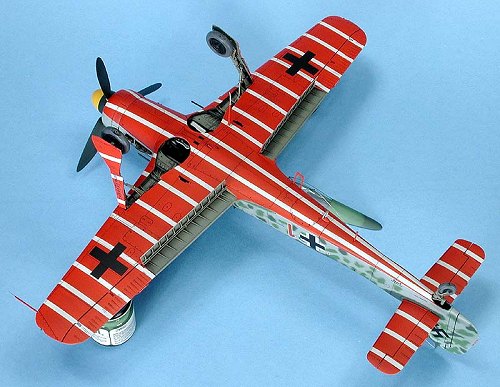 The model was painted entirely with Testor Model
Master (enamel) in Lichtblau RLM76 (#2086), Red RLM23 (#2073), Lichtgrun
RLM83 (#2092), and Dunkelgrun RLM82 (#2091). After airbrushing the inside
of the wheel wells, landing gear, and flaps Grau RLM02 (#2071), I stuffed
wet tissue paper into the wheel wells and airbrushed the bottom wings and
fuselage with Flat White (#1768). After letting this dry overnight I cut
up strips of masking tape to do the bottom striping and masked these off.
Next up was airbrushing the bottom red, letting this dry overnight and
then masking it with Tamiya Masking Tape. The RLM76, RLM83, and RLM82
were then airbrushed using my Iwata Eclipse freehand. The fuselage side
mottle was done using highly thinned paint (30%) airbrushed freehand with
my Iwata airbrush. A light topcoat of Floquil Railroad (enamel) Hi-Gloss
was airbrushed to prepare the flat surface for decaling.
The model was painted entirely with Testor Model
Master (enamel) in Lichtblau RLM76 (#2086), Red RLM23 (#2073), Lichtgrun
RLM83 (#2092), and Dunkelgrun RLM82 (#2091). After airbrushing the inside
of the wheel wells, landing gear, and flaps Grau RLM02 (#2071), I stuffed
wet tissue paper into the wheel wells and airbrushed the bottom wings and
fuselage with Flat White (#1768). After letting this dry overnight I cut
up strips of masking tape to do the bottom striping and masked these off.
Next up was airbrushing the bottom red, letting this dry overnight and
then masking it with Tamiya Masking Tape. The RLM76, RLM83, and RLM82
were then airbrushed using my Iwata Eclipse freehand. The fuselage side
mottle was done using highly thinned paint (30%) airbrushed freehand with
my Iwata airbrush. A light topcoat of Floquil Railroad (enamel) Hi-Gloss
was airbrushed to prepare the flat surface for decaling.
I know most modelers hate Hasegawa decals, but I used them and want to report that those included with this kit represent a quantum leap in improvement over previous Hasegawa decals. Several “experten” have stated that they are “wrong” for Sachsenberg’s aircraft so I did a little research to find out what was “wrong” with them. I identified two “issues” with the kit decals: 1) the bottom striping on the JV44 aircraft was done somewhat haphazardly and they were not of equal width as is found on the Hasegawa decals; and 2) there are two “typos” on the humorous German saying on the fuselage side consisting of a grand total of two letters!
 Well, I knew that there was no way the white
stripes would cover the red (I have yet to find any white decals that are
opaque enough to not turn “pink” atop a red base) plus it is far easier
to paint these stripes than rely on decals. So I cut my masking tape
strips using the old MK.I eyeball to provide a bit of variety in the tape
width. Problem #1 solved quite easily. With regards to the “typo’s”,
aftermarket decals are provided for by Eagle Cals (to name one) to
correct the “wrong” German inscription on the side. So I had the choice
to spend $15 on decals to correct two letters or buy a 12-pack of Sierra
Nevada Pale Ale. Unfortunately, I was quite thirsty when I made the
decision so guess which one I decided (yum, yum, yum, the beer was quite
cold and very good!). Seriously, the Hasegawa decals are very good and if
you are not interested in spending a whole lot of beer money I’d stick
with them. But “your mileage may vary” so if you’d rather not drink
valuable beer, be my guest and buy aftermarket. No nasty e-mails please,
about how I’m not a “real modeler” because I didn’t replace the “wrong”
decals!
Well, I knew that there was no way the white
stripes would cover the red (I have yet to find any white decals that are
opaque enough to not turn “pink” atop a red base) plus it is far easier
to paint these stripes than rely on decals. So I cut my masking tape
strips using the old MK.I eyeball to provide a bit of variety in the tape
width. Problem #1 solved quite easily. With regards to the “typo’s”,
aftermarket decals are provided for by Eagle Cals (to name one) to
correct the “wrong” German inscription on the side. So I had the choice
to spend $15 on decals to correct two letters or buy a 12-pack of Sierra
Nevada Pale Ale. Unfortunately, I was quite thirsty when I made the
decision so guess which one I decided (yum, yum, yum, the beer was quite
cold and very good!). Seriously, the Hasegawa decals are very good and if
you are not interested in spending a whole lot of beer money I’d stick
with them. But “your mileage may vary” so if you’d rather not drink
valuable beer, be my guest and buy aftermarket. No nasty e-mails please,
about how I’m not a “real modeler” because I didn’t replace the “wrong”
decals!
After drying overnight, I wiped the decals off with Polly S Plastic Prep to remove any residue and after drying I shot a very light coat of Future thinned with Polly S Airbrush Thinner (50:50 mix) over the decals to seal them. For weathering, I chose to accentuate the engraved panel lines and surface detail with a sepia watercolor wash.
|
FINAL CONSTRUCTION |
 In order to prevent breakage, I left off the landing
gear, gear doors, cannons, and propeller until after painting/decaling.
These all went on with no problems. After a final “leveling coat” of
Future (great for hiding those superglue splooges!), I airbrushed Testor
Dullcote for the final finish. Remove the canopy masks and you are done
with a great model build.
In order to prevent breakage, I left off the landing
gear, gear doors, cannons, and propeller until after painting/decaling.
These all went on with no problems. After a final “leveling coat” of
Future (great for hiding those superglue splooges!), I airbrushed Testor
Dullcote for the final finish. Remove the canopy masks and you are done
with a great model build.
|
CONCLUSIONS |
This is a great model of a historically significant aircraft and Hasegawa is to be commended for their great quality, engineering, and ease of build. This kit can be built with beautiful results by a beginning modeler. The MDC products are very good, featuring beautiful casting and detail, and are quite easy to use. However, they are fairly expensive (the MDC parts cost almost twice as much as the kit!), so if you are on a tight budget just leave the canopy closed and drink beer instead!
May 2004
If you would like your product reviewed fairly and fairly quickly, please contact the editor or see other details in the Note to Contributors.