Pro
Modeler 1/48 Ju 87R-2 Stuka
| KIT #: | 5975 |
| PRICE: | $Currently out of production, though can be found |
| DECALS: | Three options |
| REVIEWER: | Scott Lyle |
| NOTES: | Superscale Decals #48-444, Ju 87 Stukas, and Verlinden engine |
| HISTORY |
One
of the iconic aircraft of World War 2, the Junkers Ju 87 Stuka became synonymous
with the German “Blitzkrieg” style of warfare during the early years of the war.
Used in its intended role of the “flying artillery”, the Stuka would
range ahead of the ground forces and deliver strikes to enemy targets with
pinpoint accuracy. With its wailing
sirens, whistling bombs and raptor-esque profile the Stuka quickly came to be
detested by the enemy, and the fact that the German propaganda machine turned it
into a symbol of German dominance didn’t help things.
During the 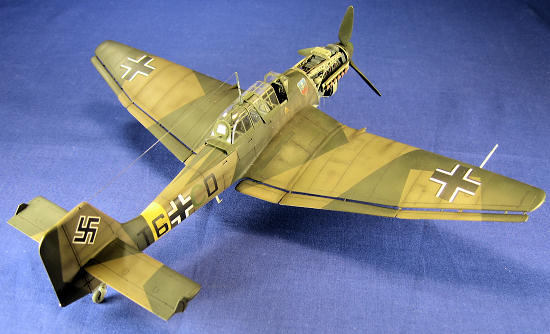 rge
numbers by the RAF. Reassigned to
secondary theaters it recovered some of its early war cache, but whenever the
Luftwaffe didn’t have complete control of the air, the Stuka was in trouble.
rge
numbers by the RAF. Reassigned to
secondary theaters it recovered some of its early war cache, but whenever the
Luftwaffe didn’t have complete control of the air, the Stuka was in trouble.
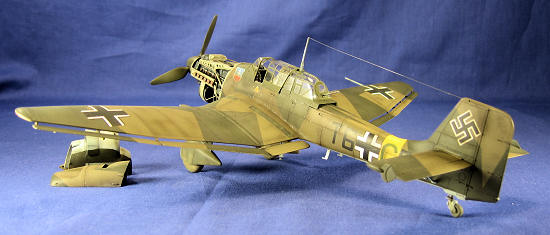
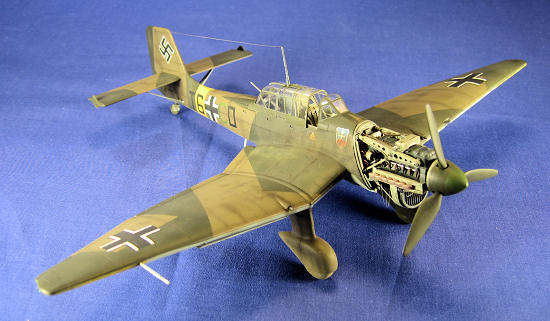
I chose to model a Ju 87R-2 flown by Hans-Ulrich Rudel in the late summer
of 1941 during Operation Barbarossa.
At that time Rudel was a member of Group 3 of Stukageschwader 2, and that
unit was attached to the northern forces of the German Army that were fighting
towards Leningrad. Rudel is famous
for helping to sink the Soviet battleship
Marat on September 23, 1941.
The ship had been shelling German forces and was attacked that day using
unusually large 1,000kg bombs.
Rudel and another Stuka pilot scored direct hits on the forward part of the
ship, sinking it in its moorings.
At the time Rudel was regularly flying an R-2 Stuka marked “T6+CD.” I never would have known this but some discussions about early Rudel Stukas with a kind gent on the web were tremendously informative. As the story goes, Rudel’s commander, Ernst-Siegfried Steen, usually flew “T6+AD” but on the fateful day damaged it during a rough landing returning back to base after the morning’s mission. Pulling rank, he commandeered Rudel’s “T6+CD” for the afternoon’s mission only to never return, both the plane and the crew having been shot down. The Aeromaster decals I had would work fine for this, except I would have to make my own “C” in the “T6+CD”.
| THE KIT |
 Pro
Modeler’s 1/48 Ju 87R-2 is actually the Hasegawa Ju 87B-2 kit with an extra
sprue of parts for the underwing drop tanks included.
As such its quality and kit engineering are excellent with nicely
recessed panel lines, thin canopy parts, and a highly detailed cockpit.
To make a nice and easy build more complicated I decided to add
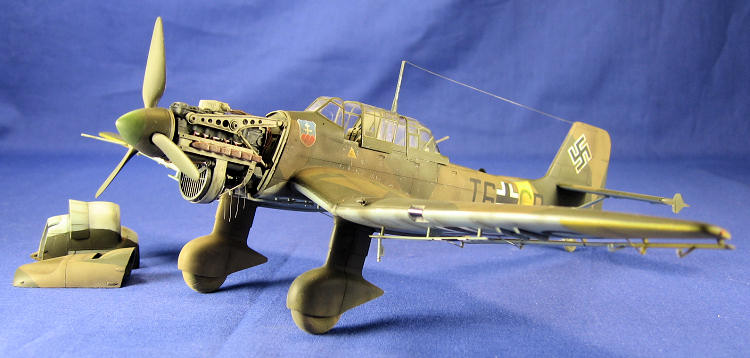
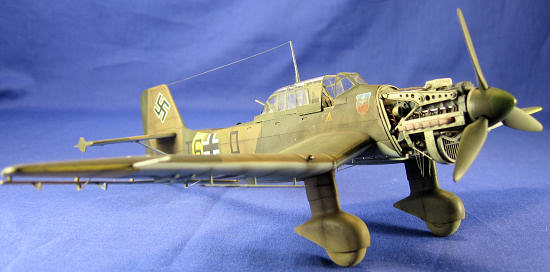
Verlinden’s “Ju 87 Stuka Update Set” (#1137) to depict the engine undergoing
maintenance. I’ve always wanted to
show a fully detailed engine and this is my first stab at it.
I also decided to leave off the 500kg bomb.
Verlinden makes a 1000kg bomb set, and someday I’ll use that and put the
model in a diorama setting.
Pro
Modeler’s 1/48 Ju 87R-2 is actually the Hasegawa Ju 87B-2 kit with an extra
sprue of parts for the underwing drop tanks included.
As such its quality and kit engineering are excellent with nicely
recessed panel lines, thin canopy parts, and a highly detailed cockpit.
To make a nice and easy build more complicated I decided to add
Verlinden’s “Ju 87 Stuka Update Set” (#1137) to depict the engine undergoing
maintenance. I’ve always wanted to
show a fully detailed engine and this is my first stab at it.
I also decided to leave off the 500kg bomb.
Verlinden makes a 1000kg bomb set, and someday I’ll use that and put the
model in a diorama setting.
| CONSTRUCTION |
Construction
began with the cockpit as usual, and with the Stuka featuring so much glass, a
lot of the cockpit is visible when the model is completed.
I painted all of the interior surfaces Testors Acrylic RLM 02 except for
the instrument panel, which was painted Testors RLM 66 Dark Gray.
A decal for the instruments is included and went on nicely, giving the
panel a very detailed look. The
Verlinden update set provides some additional details for the cockpit, and they
were added and then all of the small cockpit details like the control stick,
seat surfaces, and various instrument boxes and switches were picked out by
hand. 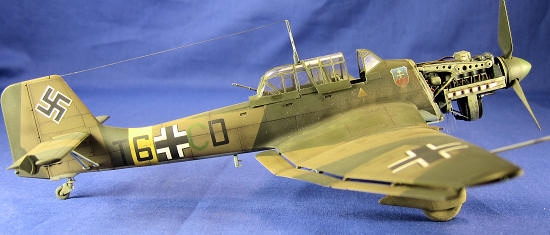 PE
PE
With the cockpit assembly glued to one fuselage half, the fuselage halves
were closed up and set aside to dry.
The fuselage seams were very minor, in part thanks to the fact that the
engine cowling parts are molded separately with an upper cowling piece and two
lower cowling halves. The Verlinden
engine set provides the firewall/bulkhead that supports the engine, and fitting
it to the fuselage took some work.
I had to use my Dremel to open up the fuselage so it would accept the Verlinden
part. Once that was done I glued
the resin bulkhead part on and dressed its seams, but left the rest of the
engine off as I wanted to build, paint, and weather it as a separate assembly.
With the fuselage complete, construction continued with the wings.
The wing assembly is straightforward.
Some holes for the outer wing bomb/fuel tank racks need to be opened up
and then the two upper halves of the wings are glued to the single lower part.
I was a bit disappointed by the flap actuators on the underside of the
wings. Molded as nondescript chunks
of plastic, I sanded them off and scratch-built replacements for a little more
detail. The horizontal stabilizers
are attached to the
 fuselage
next, followed by the wing assembly.
Gaps along the upper wing roots needed attention, but nothing too
bothersome.
fuselage
next, followed by the wing assembly.
Gaps along the upper wing roots needed attention, but nothing too
bothersome.
With the airframe largely complete I attached many of the fiddly bits
like the dive brakes, bomb racks, flap counter balances, and the horizontal
stabilizer struts. The Stuka’s
trademark landing gear “spats” have bases that glue nicely into recessed pockets
in the undersides of the wings, but word to the wise – don’t go ahead and attach
the landing gear! I would have
saved myself a lot of masking later if I had left them off.
For this version I left the fuel tanks off as the anti-shipping missions
then being undertaken did not require the long range tanks.
I also left the bomb off, as I was intending to add the 1,000kg Verlinden
bomb later in a diorama setting.
I attached the tail wheel and the two fixed parts of the greenhouse, the front wind screen and the center section. Masking off all of those little windows was tedious, but once finished, the Stuka was ready for the airbrush booth.
| COLORS & MARKINGS |
I sprayed a primer coat of Mr. Surfacer 1200
onto the aircraft and then checked for any remaining seam lines.
All panel lines were preshaded with Tamiya XF-69 NATO Black, and then the
fuselage band and undersides of the wing tips were sprayed using Testors Acrylic
Yellow. Masking those off, I then
proceeded to spray the lower surfaces with Testors Acrylic RLM 65 Light Blue in
light coats so the preshading would show through.
Before spraying the upper surfaces I did some research on different color
mixes for RLM 70 and 71. The
website “petersplanes.com” is an excellent resource for such a thing, and once
the lower surfaces were masked I sprayed a mix of Tamiya XF62:6 + XF58:2 + XF2:3
for RLM 71 Dark Green onto the upper surfaces.
Finally I masked off those dark green areas in
 the famous
“splinter” camouflage scheme and sprayed a mix of Tamiya XF62:1 + XF49:1 + a few
drops of XF1 for RLM 70 Black Green.
Both of those colors have more of an olive-brown-khaki hue as opposed to
a green hue that I really like. Are
the colors truly accurate? I don’t
think anyone can honestly say.
the famous
“splinter” camouflage scheme and sprayed a mix of Tamiya XF62:1 + XF49:1 + a few
drops of XF1 for RLM 70 Black Green.
Both of those colors have more of an olive-brown-khaki hue as opposed to
a green hue that I really like. Are
the colors truly accurate? I don’t
think anyone can honestly say.
After removing all of the masks I mixed a lightened shade of the two
greens and sprayed random blotches on their respective colors to create a faded
effect. A coat of Future was applied
next, and I set the model aside for three days for it to cure as I customarily
do.
Back to the Future! – sorry, had to say it.
Once the Future was cured I applied the decals.
The Aeromaster decals went on just fine with Walthers Solvaset solution.
Once they had set I sealed them with a coat of Future, and then applied a
thin wash of Mig Productions “Dark Wash” to all of the recessed panel lines.
Basically a premixed oil-based wash, this product is new to my arsenal
but I really like it. Not having to
mix up my own washes is a real timesaver.
A coat of Testors Model Master Flat Finish was airbrushed on next, and
then I had to make my own templates to finish the markings.
Since the decals I had were for “T6+AD” and I needed “T6+CD”, I had to
create a template for the large “C” that is on the undersides of the wingtips
and the “C” that is in the fuselage codes.
Those were sprayed Tamiya XF-69 NATO Black and Tamiya XF-5 Flat Green
respectively. The non skid walkways
on the wings were also sprayed at that time, and then I hand-painted the tips of
the machine guns in the wings.
The next weathering step was to airbrush a very thin mix of 50/50 Tamiya XF1 Black and Tamiya XF64 Red Brown over all of the panel lines and engine exhaust areas. I usually try to keep this effect very subtle, but knowing that Stukas got very grimy in the field I used a heavier hand than usual this time. Next I added some paint chips around the nose, cockpit area, and service areas on the wings using a Silver Berol pencil. Knowing that I’d be attaching the engine next, I held off on attaching any of the “fiddly bits” and concentrated on the Verlinden engine.
| CONSTRUCTION OF THE ENGINE |
The Verlinden engine consists of about 10 resin parts, all of which go together
well with superglue. The kit comes
with an instruction sheet, but the actual locations of the various parts aren’t
really specified. A good reference
is handy, and luckily the Squadron/Signal “In Action” book has a very good
picture of a Stuka with its engine in full view.
I replicated the various pipes
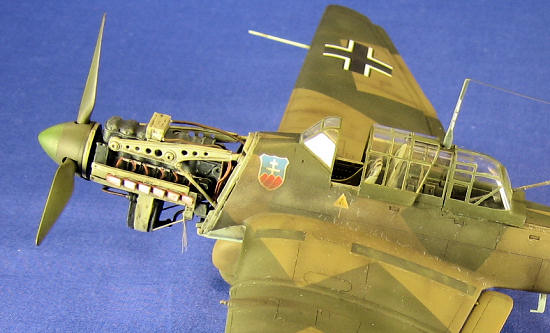 and wires
one would see on an engine with thin gauge wire, making my best guesses as to
how they actually were routed on the real thing as I went along.
I then painted the engine by hand in Vallejo “Black Gray” and drybrushed
it with Testors Enamel Neutral Gray.
I picked out the wires and pipes in Vallejo Leather and Dark Brown, and
picked out some other details in Testors Aluminum.
The exhausts were given a base coat of Vallejo Dark Brown and then
lightly drybrushed with “Dirty Steel” - a homemade mix of Testors Steel and Raw
Umber. Finally the supports and the
bulkhead on the aircraft were painted Testors RLM 02 Gray, and then washed with
the aforementioned
and wires
one would see on an engine with thin gauge wire, making my best guesses as to
how they actually were routed on the real thing as I went along.
I then painted the engine by hand in Vallejo “Black Gray” and drybrushed
it with Testors Enamel Neutral Gray.
I picked out the wires and pipes in Vallejo Leather and Dark Brown, and
picked out some other details in Testors Aluminum.
The exhausts were given a base coat of Vallejo Dark Brown and then
lightly drybrushed with “Dirty Steel” - a homemade mix of Testors Steel and Raw
Umber. Finally the supports and the
bulkhead on the aircraft were painted Testors RLM 02 Gray, and then washed with
the aforementioned
Despite my best intentions the supports arms seemed to be a little too short for the engine. I had to fiddle with it quite a bit to get it to sit right, and I had to grind off some of the details on the rear of the engine with the Dremel. I did get it to sit right, but not after scratching my head as to where I went wrong. Ultimately it looks good and conveys the idea of the Stuka’s engine, but I would recommend a lot of careful fit testing to others adding resin parts such as these.
| FINAL CONSTRUCTION |
I painted the wingtip lights and then glued on the prop, canopy parts, antenna, and Pitot tube. I used stretched sprue to represent the antenna, painted it Dark Gray, and then proclaimed the model finished!
| CONCLUSIONS |
 Hasegawa’s 1/48 Stuka is a popular model and with good reason, it’s a solid,
well detailed kit that builds easily into a handsome rendition of the one of the
most famous birds of the war.
Stukas wore a wide variety of paint schemes during the war, giving modelers lots
of choices and opportunities to have fun.
Whether one chooses a standard European splinter scheme, a desert
camouflage scheme, or a badly weathered winter white wash on the Eastern Front,
one can’t go wrong. Add in the
large range of available aftermarket options, and the sky’s the limit.
Hasegawa’s 1/48 Stuka is a popular model and with good reason, it’s a solid,
well detailed kit that builds easily into a handsome rendition of the one of the
most famous birds of the war.
Stukas wore a wide variety of paint schemes during the war, giving modelers lots
of choices and opportunities to have fun.
Whether one chooses a standard European splinter scheme, a desert
camouflage scheme, or a badly weathered winter white wash on the Eastern Front,
one can’t go wrong. Add in the
large range of available aftermarket options, and the sky’s the limit.
| REFERENCES |
-
Osprey Publications, Combat Aircraft #74, “Junkers Ju 87
Stukageschwader of the Russian Front”
- Squadron/Signal Publications, Aircraft in Action #73, “Ju 87 Stuka in Action”
Scott Lyle
May 2010
Copyright Modelingmadness.com. All rights reserved. No reproduction in part or in whole without express permission. If you would like your product reviewed fairly and quickly, please
contact the editor or see other details in the
Note to
Contributors.