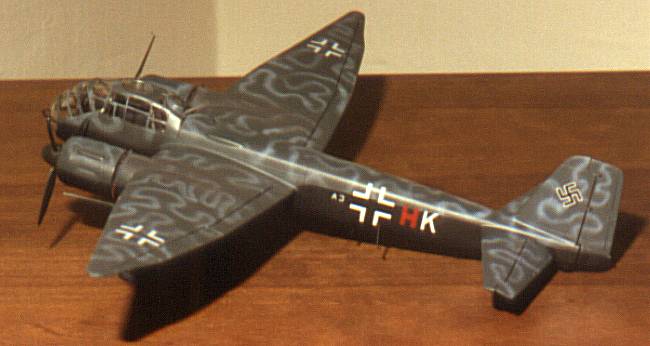
(Ed note: Since Matjaz did not send a photo, here is one that I built a number of years ago)
Kit: Italeri 1/72 Junkers Ju-188 A1/E1
Kit No.: 117
Media: injected plastic; 124 parts + 7 clear parts
Decals: three Luftwaffe versions; one -A1 and two -E1
Review by: Matjaz Menart
The Ju188 was a development of the well-known Ju88 twin engined bomber. The new bomber had wings with increased span and tapered wingtips and a redesigned nose. The main difference between the -A1 and the -E1 version were the engines used (according to the short history of the aircraft in Italeri kit's instruction sheet). The -A1 had Jumo inline engines and -E1 had BMW radial engines.
I bought and built this kit in 1990, with practically no other references at hand than an article about the Ju-88 in a WW2-aircraft book which included a 3-view color drawing of a Ju-188. For the purpose of writing this review, I did some web surfing recently but only found an entry for Ju-188 in Emmanuel Gustin's database . The entry contains basic aircraft data, but only for the -D and the -E version. Most probably, the length and wingspan were the same for the -A version. I can't give you a more detailed information on the kit's accuracy, but the finished model has the correct length and wingspan.
When I was building this kit I wasn't very concerned with accuracy or perfect glueing and paint jobs (I only got more "serious" about these things a few years ago) and I just assembled and painted it according to instructions.
The kit is quite well molded in light gray plastic with raised panel lines. It provides many detail parts, including two pairs of engine nacelles complete with propellers, spinners etc. Upon opening the box, I was quite impressed back then, and even now, my only objection would be concerning the raised panel lines. ( I hate raised panel lines. However, I hate incorrect recessed detail even more as it is much easier to sand away the raised lines than it is to fill the recessed ones.)
The cockpit with crew compartment is well detailed, with floor, acceptable seats, instrument panel and side consoles, and pilot's controls. Also provided are the defensive machine guns installed in the nose. On the top of the cockpit "greenhouse" canopy is a turret with the gunner's seat hanging underneath (if the machine built is a -E1 version). The whole thing can be assembled so that the gunner's seat rotates with the turret on the model. The -A1 version didn't have this turret, so a circular window must be glued on instead. The crew member figures are also provided, but I didn't use them. I painted the interior as the instructions suggested: light green-grey, with black green seats and I used other colors for various details.
Next, the fuselage halves were glued together and they fitted very good, needing very little sanding and no filler. The clear parts were then glued on and they fitted reasonably well, except at the canopy/fuselage joint. The clear parts are reasonably thin and although there is some distortion, the interior is visible. Following the instructions, I glued on the separately molded rudder, but I left it in neutral position. The horizontal tail also has elevators molded separately from the stabilizers, and I glued them on in dropped position.
The top and bottom halves of left and right wing also fit together very well. The wing/fuselage joints weren't so perfect, though, and they are noticeable on my model but if the mating surfaces are prepared, the joints will probably need no filler to smooth them out. When both wings are glued on, the engine and wheel-well nacelles are next. The wheel-well area is glued on first and the fit here was also good. The undercarriage legs look good, with separately molded scissor links. The wheels themselves are quite well detailed, too, and each is molded in two halves. There is no detail inside the wheel wells or on the inside of the undercarriage well covers which were a little too thick.
The engine nacelles come in two halves each. The inline Jumo engine nacelles have the exhaust stubs molded with the nacelle body. I built a BMW-engined machine and in this case, a circular plate is inserted between the wing and engine nacelle assembly as there are exhaust pipes molded on this plate. Both front and back row of the BMW radial engines are provided (but only the front row is visible once the nacelle is assembled). I painted the engines gunmetal and pushrods silver (I don't know if this is correct but it looked good). The assembled engine nacelles were then glued to the wings.
The model was almost finished at this point, and various small parts were added - two antennas on the fuselage, pitot tube on the port wing leading edge, and bomb pylons under the wings between the fuselage and the engine nacelles (the bomb bay doors were molded with the fuselage in closed position).
Decals and painting instructions for three machines were provided with the kit but no details are given as to which units the aircraft belonged to or the year they served with those markings and camouflage. For the -A version machine (Jumo-powered) coded U5-OP the instructions called for black undersides and "dark grey 74" (at that time, I didn't realize the numbers after the paint names in the kit's instructions obviously referred to RLM-standard colors and there is no explanation in the instructions); the camouflage scheme would be easy to reproduce but I liked the radial engined plane better. One option was for an -E version machine (with no code letters) with the Wellenmuster (wave pattern) camouflage; the instructions called for "grey 75 over blue 65" and overall black undersides; I didn't feel like painting the intricate pattern.
(Ed note: Since Matjaz did not send a photo, here is one that I built a number
of years ago)
The alternative which I chose was an -E machine coded F5-AT. The instructions called for "pale blue 65" undersides and "dark grey 74" with "grey" splinter pattern topside. That didn't seem logical to me so I used dark green with black green on the topside instead. I still don't know whether the proposed gray colors are correct as 74/75 topside colors were mostly "reserved" for fighters and nightfighters. I mixed the colors using various Humbrol paints and painted the model with a bristle brush. To reproduce the splinter pattern, I masked the appropriate areas with self adhesive tape. Each spinner was to be painted black with two white stripes but I didn't bother with the stripes. I decided to simulate the exhaust stains and I used flat black with plenty of thinner added; hoping to reproduce the effect of exhaust smoke blending softly with the camouflage paint without using an airbrush.
Well, it didn't work out so good - the black is way too intense and it looks as if both engines had just dumped their oil out the exhaust pipes!
The decal sheet provided just the crosses and fuselage side code letters - no stencils or unit badges (if there were any on Ju-188s) and no swastikas. The decals were as was the practice with Italeri (and ESCI) at that time - very nicely and sharply printed, with beautiful colors and never out of register, but the decal carrier film was always a nightmare. Although quite thin yet strong, it was very inflexible and wouldn't conform to uneven surfaces. It wouldn't respond to Micro system at all (I didn't have a setting solution when I built this particular model, but I recently tested Micro Set and Sol on some unused Italeri decals) and there was a lot of silvering (sometimes even on gloss surfaces). A few years after placing them on the kit, the decals were prone to cracking and peeling off if not thoroughly sealed with varnish. The decals on my Ju-188 are among the worse cases - the underside crosses are just about to peel off completely and other decals with large areas of transparent film give a whole new meaning to the word "silvering". To be fair, decals in recent Italeri kits have a soft decal film which doesn't cause so much problems (but it is much thicker and needs a lot of varnish overcoats).
Overall, this is a nice kit and I was happy with it. I don't know how accurate it is but it looks fine and (like all Italeri kits) it was cheap. There were no fit problems and the only thing I didn't like were the decals.
I think this kit is out of production now but maybe you can still find it somewhere.