
| KIT: | ICM 1/72 Bf-109E-3 |
| KIT #: | 72131 |
| PRICE: | £4.99 MSRP |
| DECALS: | Two options |
| REVIEWER: | Mark Mills |
| NOTES: |
| HISTORY |
I would imagine there's little or nothing I could tell you about the ubiquitous Bf 109E that you don't already know. With this in mind, I'll dive right in to the review.
I'm sure many of you saw the test shot photographs from way back and were probably thinking to yourselves, "my, that looks a lot like the Tamiya kit" and you'd be right. It is a lot like the Tamiya kit. I decided to build a Tamiya E-3 alongside the ICM kit as I thought it would be interesting to compare the two.
| THE KIT |
 The single
sprue is arranged differently from the Tamiya kit and some assemblies have
been altered, the cockpit being an obvious example. This has more parts,
but ends up looking very similar. Unlike the Tamiya kit, both canopy types
are supplied (the E-3 option can be displayed open), but you get no bomb,
no droptank or anything to hang them from.
The single
sprue is arranged differently from the Tamiya kit and some assemblies have
been altered, the cockpit being an obvious example. This has more parts,
but ends up looking very similar. Unlike the Tamiya kit, both canopy types
are supplied (the E-3 option can be displayed open), but you get no bomb,
no droptank or anything to hang them from.
![]() Where the ICM kit differs most of all is in the length of the fuselage,
which unlike the Tamiya kit, is correct. According to my references, the
length should be 120mm or 121.38mm and the span 137.08mm or 136.94mm,
depending on which source you believe. The span came out at 139mm, which is
a little over, but the fuselage matched the plans from the Scale Models
1982 Battle of Britain Special almost exactly. We're talking fractions of
millimetres here. Just to be sure, I checked against other plans, from the
Osprey Bf 109D/E Aces book and these agreed.
Where the ICM kit differs most of all is in the length of the fuselage,
which unlike the Tamiya kit, is correct. According to my references, the
length should be 120mm or 121.38mm and the span 137.08mm or 136.94mm,
depending on which source you believe. The span came out at 139mm, which is
a little over, but the fuselage matched the plans from the Scale Models
1982 Battle of Britain Special almost exactly. We're talking fractions of
millimetres here. Just to be sure, I checked against other plans, from the
Osprey Bf 109D/E Aces book and these agreed.
 I believe the reason why the Tamiya kit is short is the way it was
measured. If you were to measure along the thrust-line, then the Tamiya kit
would be correct. However, if you were to drop a plumb-line from the
aircraft's extremities whilst resting on its undercarriage, the ICM kit and
the plans are spot-on.
I believe the reason why the Tamiya kit is short is the way it was
measured. If you were to measure along the thrust-line, then the Tamiya kit
would be correct. However, if you were to drop a plumb-line from the
aircraft's extremities whilst resting on its undercarriage, the ICM kit and
the plans are spot-on.
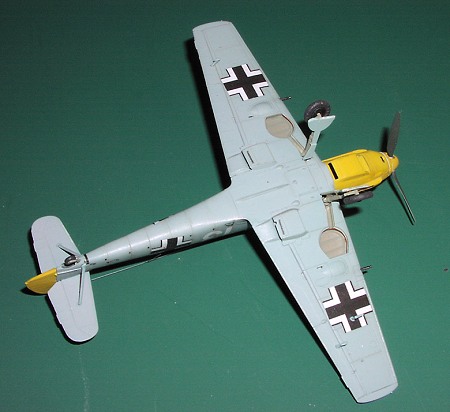
The kit is moulded in white and the plastic is softer than I'm used to, though I didn't find it to be a problem at all. The plastic is a bit on the greasy side, so a quick wash with some washing-up liquid would be prudent. There's some flash evident, but nothing serious. I could only find one sink-mark, this being on the supercharger intake. Detail is good, inside and out, very nearly as good as that on the Tamiya kit. Panel lines are recessed and the rendition of the fabric on the control surfaces is particularly praiseworthy. Under a few coats of paint it's subtle but effective.
| CONSTRUCTION |
So, how does the kit build? Considering its more than passing resemblance to the Tamiya kit, can we expect the same "drop-fit" we've come to expect from that particular company? In a word, no. The Tamiya kit excels in its extremely sharp, crisp moulding. The ICM kit's mating edges are altogether softer and there are no locating pins. I don't personally find this a problem and often choose to "lose them" on older kits where the fit is dodgy. Don't get me wrong, the fit isn't bad by a long shot . It's just that the Tamiya kit is truly exceptional in this respect.
 Starting with the cockpit, you soon notice the differences between this and
the Tamiya kit. Whereas the latter kit's cockpit literally drops into
place, the ICM cockpit needs a bit of work to get it to fit. The forward
bulkhead fouls on the recess for the supercharger intake on the inside of
the port fuselage half and this prevents the fuselage halves from closing
properly. I cut a slot in the intake recess, but still needed to sand down
the forward bulkhead to get a snug fit. In the end, I glued the rear
bulkhead and instrument panel into the starboard fuselage half, joined the
fuselage halves together and when dry, added the remainder of the cockpit
assembly from underneath. There’s no decal for the instrument panel or
seatbelts as with the Tamiya kit, but there’s enough to work with on the
instrument panel, at least. I added seatbelts from lead foil.
Starting with the cockpit, you soon notice the differences between this and
the Tamiya kit. Whereas the latter kit's cockpit literally drops into
place, the ICM cockpit needs a bit of work to get it to fit. The forward
bulkhead fouls on the recess for the supercharger intake on the inside of
the port fuselage half and this prevents the fuselage halves from closing
properly. I cut a slot in the intake recess, but still needed to sand down
the forward bulkhead to get a snug fit. In the end, I glued the rear
bulkhead and instrument panel into the starboard fuselage half, joined the
fuselage halves together and when dry, added the remainder of the cockpit
assembly from underneath. There’s no decal for the instrument panel or
seatbelts as with the Tamiya kit, but there’s enough to work with on the
instrument panel, at least. I added seatbelts from lead foil.
The underside engine cowling was a touch too wide and too deep to fit, but a quick rub-down of the mating surface on some wet and dry and it slotted neatly into place. Interestingly, the Tamiya cowling fitted the ICM kit perfectly here! The upper cowling needed some coaxing to fit, as it was too wide at its lower edge, I glued it into place and then sanded it to shape. The Tamiya cowling fitted identically on the ICM kit, so it's possible I didn't pay as much attention to the fit of the fuselage halves as I should have.
The supercharger intake had the aforementioned sink-mark filled with Mr
Surfacer 500, but needed trimming to get it to fit in the recess. Compare
it to the Tamiya example, and you'll see that a step in the upper edge is
missing. Only a small amount of filler was required, but with the plastic
being somewhat soft, I h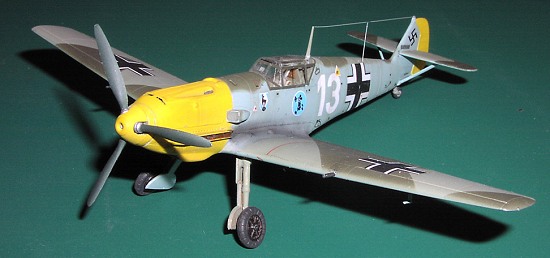 ad to rescribe some of the panel lines back in.
Just remember that the upper and lower seams on the rear fuselage are
evident on the real thing. The wing assembly was straightforward, with no
unpleasant surprises. I had to remove a little from the wing roots to
ensure a good fit. That done, a little Mr Surface 1000 was applied to the
wing/fuselage joints and it was sanded down. I decided to add the
tailplanes and rudder after painting to avoid any complicated masking.
ad to rescribe some of the panel lines back in.
Just remember that the upper and lower seams on the rear fuselage are
evident on the real thing. The wing assembly was straightforward, with no
unpleasant surprises. I had to remove a little from the wing roots to
ensure a good fit. That done, a little Mr Surface 1000 was applied to the
wing/fuselage joints and it was sanded down. I decided to add the
tailplanes and rudder after painting to avoid any complicated masking.
I primed the model with Aeromaster acrylic Medium Sea Grey overall. I then turned my attention to the propeller assembly. The rear of the propeller boss is too deep and a little too wide to fit in the recess on the spinner backplate. This also causes a gap between the spinner and backplate. I started to deepen and widen it but in the end I just drilled it out. That done, these received their primer coats as well. For once, everything seemed to be in order with no remedial work required, so it was onto the paint job.
| COLORS & MARKINGS |
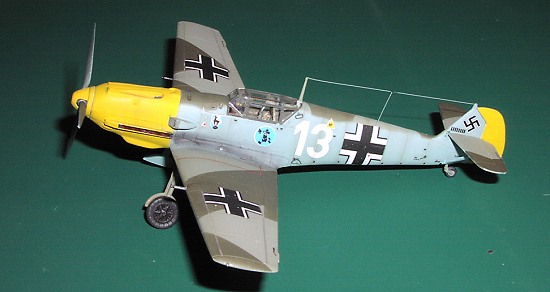
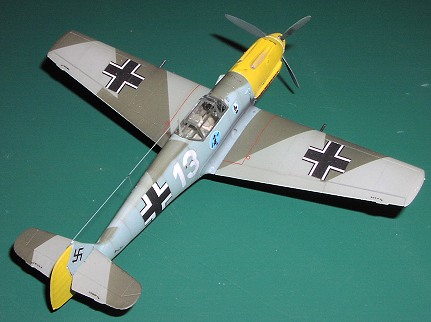
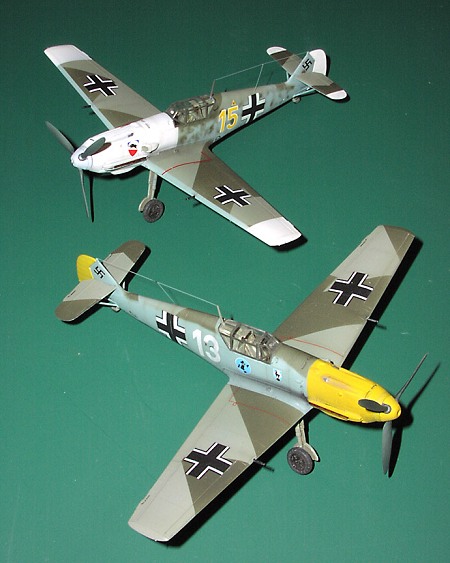
Two schemes are provided for; White 13 from 1./JG51 flown by Heinz Bar and Red 16 from 2./JG26 flown by Fritz Losigkeit. However, Red 16 should be an E-1, and is not really applicable to this model. I used the markings for Bar's machine. As the entire nose, spinner and rudder was to be painted RLM 04 Gelb, I undercoated these areas with white first. Once this was done, the RLM 04 was airbrushed on. Apart from the primer (Aeromaster) and white undercoat (Humbrol), everything else was painted with White Ensign Models' superb Colourcoats enamels. Thinned with cellulose (lacquer) thinners, they spray smoothly and dry quickly.
 With the 04 coat dry, I masked this off and sprayed the RLM 65 Hellblau
coat, covering the entire fuselage. This was then masked and the RLM 02
sprayed. ICM thoughtfully provide 1/72 drawings with the appropriate
splinter scheme on it. The colour callouts are done with Modelmaster
paints, but no RLM numbers are quoted. This is a pet hate of mine and
younger or inexperienced modellers with no access to these paints may well
be left guessing. After masking the final RLM 71 Dunkelgrun coat was
added. The prop blades were sprayed RLM 70 Schwarzgrun. Once this was all
dry, I brush-painted four coats of Johnsons' Klear/Future and then it was
time to apply the decals..
With the 04 coat dry, I masked this off and sprayed the RLM 65 Hellblau
coat, covering the entire fuselage. This was then masked and the RLM 02
sprayed. ICM thoughtfully provide 1/72 drawings with the appropriate
splinter scheme on it. The colour callouts are done with Modelmaster
paints, but no RLM numbers are quoted. This is a pet hate of mine and
younger or inexperienced modellers with no access to these paints may well
be left guessing. After masking the final RLM 71 Dunkelgrun coat was
added. The prop blades were sprayed RLM 70 Schwarzgrun. Once this was all
dry, I brush-painted four coats of Johnsons' Klear/Future and then it was
time to apply the decals..
Stencils are included, but swastikas will have to be sourced elsewhere. I raided an old Aeromaster sheet. The printing on the kit decals is a bit iffy: viewed through a jeweller's loupe, the edges are somewhat rough and the black not all that opaque on the white background of the balkenkreuze. This does give a slightly faded effect when viewed from a few feet away, so not necessarily a bad thing!
The stencilling is fuzzy and indistinct, but does give a reasonable impression of these markings and certainly much better than having none at all. They went on quite nicely, though they are a little on the thick side and somewhat indifferent to decal setting solutions. I found that using Microsol as the setting agent worked best, though you have to work quickly and it may be a bit too strong for the stencils. There was no silvering whatsoever, which I always regard as a major victory!
Incidentally, the stencilling included with the ICM kit is more comprehensive than with the Tamiya kit and despite the fuzzy printing, actually looks better from a distance than the stencilling from the Tamiya. A couple of coats of Humbrol Mattcote and it's on to......
| FINAL CONSTRUCTION |
It was at this point that I decided to fit the tailplanes. The locating tabs needed thinning down a touch so they would fit in their respective sockets. The part numbers for the tailplane braces (nos 33 and 34) are transposed. It pays to dry-fit before slapping the superglue on! I was lucky on this occasion and caught this potential trap in time. The braces were a very snug fit and a quick coat of WEM's RLM 65 and they blended in beautifully.
 I decided to fit the canopy on next, and this is where things started to
go horribly wrong. The E-3 parts simply wouldn't fit, despite trimming,
filing, etc. In the end, I temporarily replaced them with some from another
Tamiya kit until I can source a vacform replacement. The best thing you
could do with the ICM canopy is to lose it as quickly as possible! As the
Tamiya parts fitted the ICM kit perfectly, I think it’s safe to assume that
any vac canopies intended for the Tamiya kit will be suitable here too.
Interestingly, the E-4 canopy, also supplied, is a
far better fit, with only a slight
amount of trimming necessary.
I decided to fit the canopy on next, and this is where things started to
go horribly wrong. The E-3 parts simply wouldn't fit, despite trimming,
filing, etc. In the end, I temporarily replaced them with some from another
Tamiya kit until I can source a vacform replacement. The best thing you
could do with the ICM canopy is to lose it as quickly as possible! As the
Tamiya parts fitted the ICM kit perfectly, I think it’s safe to assume that
any vac canopies intended for the Tamiya kit will be suitable here too.
Interestingly, the E-4 canopy, also supplied, is a
far better fit, with only a slight
amount of trimming necessary.
You have to take care with the fitting of the gunsight, otherwise it fouls the canopy. The ICM gunsight seems slightly larger all round, which may account for the fit problems here. Of course, there are none on the Tamiya kit.
It's best to check your references as regards the fitting of the head armour. ICM would have you not fit it at all, but my references say that Bar's machine had it fitted, so that's what I went with.
Once dry, I gave the transparencies a coat of Klear, ready for the application of the canopy frames. In this case, I used Aeromaster's RLM 02 sheet, overpainted with the WEM RLM 71. This was cut into fine strips and applied over the frames. The arrangement of the canopy frames makes it ideal for this method, plus I hate masking canopies in 1/72!
The tailwheel strut needs whittling down somewhat to get it to fit into its hole, as did the undercarriage legs, but it’s fair to say that I had to do the same on the Tamiya kit. There were also some prominent seams on the gear legs which needed a scrape with scalpel blade. The undercarriage doors were a good fit, but the sprue attachment points are rather more crude than those on the Tamiya kit and need some attention. A touch-up with paint was required here. The last few "fiddly bits" were added, including the aerial lead, which I made from stretched sprue. I then added a touch of weathering and post-shading using MIG pigments using a variety of paintbrushes. Hopefully, I wasn’t over-enthusiastic with them. Anyhow, I was quite pleased with the result.
| CONCLUSIONS |
So, what’s the better kit, ICM or Tamiya? When it comes to fit, the Tamiya ‘109 is pretty much untouchable. In fact, I don’t think I’ve made a better fitting kit. That said, the ICM kit, while it does have a few issues here, isn’t terrible by any stretch of the imagination (canopy excluded!) as long as you test fit the parts first. The canopy for the E-3 is atrocious and really needs replacing, though this isn't an issue if you've bought the E-4 kit. However, I believe that this kit is the most accurate 1/72 Emil regarding shape and once built up, really does look the part. It’s also half the price of the Tamiya kit and so, with the above caveats in mind, I can recommend this kit to modellers with some experience under their belt.
ICM 1/72 Bf 109E-3 courtesy of my wallet
May 2005
I would like to thank “Crazy” Don Flynn for prompting me to do this review and for sending me the Tamiya kit for comparison.
If you would like your product reviewed fairly and quickly by a site that has nearly 300,000 visitors a month, please contact me or see other details in the Note to Contributors.