Tamiya 1/48 Bf-109E
| KIT #: | ? |
| PRICE: | $26.00 MSRP |
| DECALS: | Three options |
| REVIEWER: | Mike Moore |
| NOTES: | TGR Decals and Ultracast seat used |
| HISTORY |
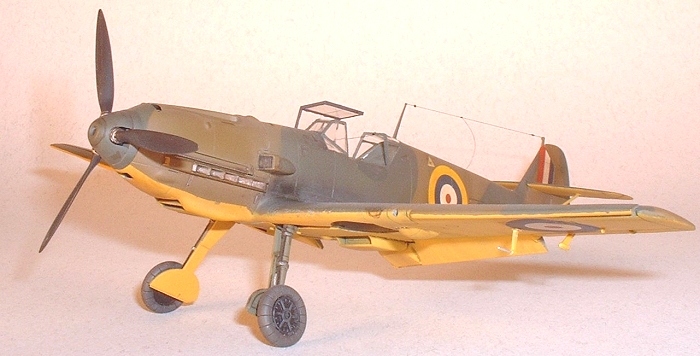
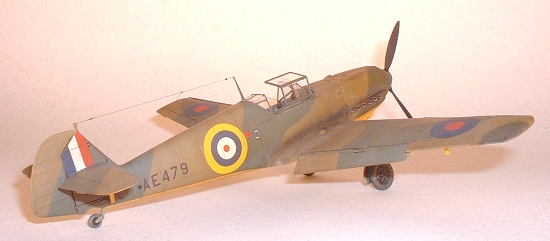
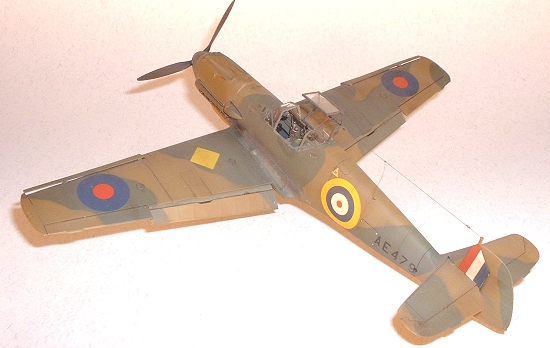
I think most everyone interested knows the history of the Messerschmitt Bf-109. This one landed by mistake in France on November 22, 1939. The French tested it extensively at Orleans-Bricy, and then turned it over to the British just before the invasion of France. Initially flown by the British into Boscombe Down on May 4th 1940, it was evaluated there for 10 days before being moved to Farnborough. There it was repainted and assigned RAF serial number AE 479. Ultimately, it was crated and shipped to the US where it ended its days at Wright Field.
| THE KIT |
The Tamiya Bf109 E is quite well known, and has been covered here at Modeling Madness by others.
| CONSTRUCTION |
 As far as I can tell,
this kit has no vices in regards to construction. With a little care, and
I do mean little, this kit can be built with no putty or filler needed.
As far as I can tell,
this kit has no vices in regards to construction. With a little care, and
I do mean little, this kit can be built with no putty or filler needed.
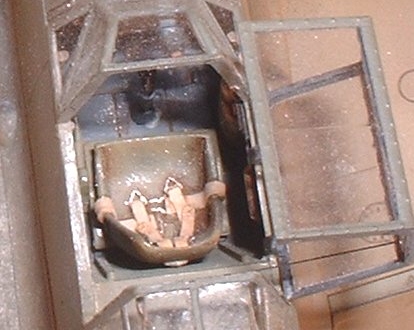
I started this
one, where else, with the cockpit. The only aftermarket here is the seat.
Ultracast makes such beautiful resin seats with cast harnesses, I just
can’t resist. It, and the basic cockpit were painted with Tamiya’s
recommended mix, and the details picked out with appropriate colors. The
instrument panel decal settles down very nicely with a couple applications
of Micro Sol. A coat of flat and then drops of Future in the individual
dials, and it is complete. The cockpit was finished with an oil wash
 of
burnt umber.
of
burnt umber.
From there, the rest of the assembly goes very quickly, and easily. The only real question for me was whether or not to eliminate the seams on the top and bottom of the fuselage. There seems to be a small bit of debate about if that seam would be visible on a 1/48 scale model. I’ve seen photo’s showing the lapped joint on the spine, but for some reason, I couldn’t bring myself to not eliminate the seam. Once the wings and stabilizers are on, it’s time for paint.
| COLORS & MARKINGS |
The first mission is to mask the cockpit. This is actually very easy by simply using the canopy. I masked the canopy glass with Tamiya tape. As long as there are raised frames, I find I get the best results from Tamiya tape. It is thin enough to see through when trying to trim it, and it doesn’t leave a lot of adhesive behind when I pull it up, sometimes weeks later.
 I started painting by
attempting to pre-shade the undersides with black. Thankfully, neatness
doesn’t count here, and with a light color on the undersides, I do like the
effect. I followed up the pre-shade with a mix of yellow trying to get to
a nice Trainer Yellow. Unfortunately, all I remember about the mix is that
it is all Polly S. This is the first time I’ve been happy with the final
pre-shaded effect. I then masked off the undersides and shot the uppers
with Polly S Dark Earth. Finally, I cut masks out of 3M blue masking tape
and shot Polly S British Dark Green. To get a slightly soft edge I lifted
the edges of the masks with thread. If you do lift the edges of the masks,
be sure to aim pretty much straight down with the airbrush or you can end
up with some very fuzzy and inconsistent edges (go ahead, ask me how I
know). The wings around the gear wells were masked with wide pieces of
Tamiya tape and then shot with the interior color, as were the landing
gear. The prop and wheel hubs got Polly S Interior Black, while the tires
were painted Polly S Grimy Black.
I started painting by
attempting to pre-shade the undersides with black. Thankfully, neatness
doesn’t count here, and with a light color on the undersides, I do like the
effect. I followed up the pre-shade with a mix of yellow trying to get to
a nice Trainer Yellow. Unfortunately, all I remember about the mix is that
it is all Polly S. This is the first time I’ve been happy with the final
pre-shaded effect. I then masked off the undersides and shot the uppers
with Polly S Dark Earth. Finally, I cut masks out of 3M blue masking tape
and shot Polly S British Dark Green. To get a slightly soft edge I lifted
the edges of the masks with thread. If you do lift the edges of the masks,
be sure to aim pretty much straight down with the airbrush or you can end
up with some very fuzzy and inconsistent edges (go ahead, ask me how I
know). The wings around the gear wells were masked with wide pieces of
Tamiya tape and then shot with the interior color, as were the landing
gear. The prop and wheel hubs got Polly S Interior Black, while the tires
were painted Polly S Grimy Black.
After a coat of Future, the TGR decals went down great with Micro Set and Sol. After the decals had set for a couple of days, I gave the whole model a light coat of Polly S clear flat and it was time for weathering.
I had recently
read an article in Fine Scale Modeler about weathering with pastels and I
decided to give it a try. Now I have used pastels for quite a while for
applying some grime and dirt, but this was the first time I tried to use
them to simulate paint fading. Essentially I used some white and mostly
yellow in the middle of panels to simulate faded paint. If you are a
little hopeless with fine airbrush work like I am, this is a great
technique to post shade with. While the effect here is quite subtle, I am
very happy with how it looks. In addition to the post shading of the pa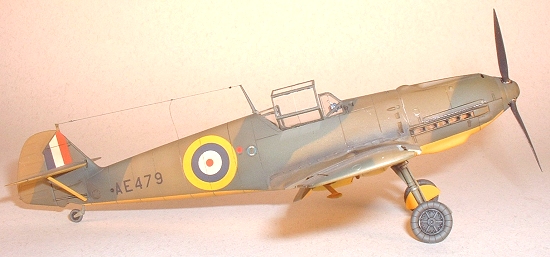 int,
I also used pastels to weather the deals and apply a bit of soiling to the
undersides. Before doing anything else, remember to seal the pastels in
with another coat of clear flat. And be prepared to redo some of the
pastels as I have found that the flat coats will tone down the weathering.
int,
I also used pastels to weather the deals and apply a bit of soiling to the
undersides. Before doing anything else, remember to seal the pastels in
with another coat of clear flat. And be prepared to redo some of the
pastels as I have found that the flat coats will tone down the weathering.
The worn paint on the wing roots is done with Tamiya Metallic Grey, applied with a mangled paintbrush by stabbing the brush down onto the kit. I toned it down a bit with some brown pastel dust. The exhaust staining is a combination of Tamiya Smoke augmented with gray pastels.
The final weathering step is an oil wash for the panel lines. I like to use artists oils thinned with Napatha. The Napatha evaporates quickly, and doesn’t react with the acrylic paints I use. If a little, or a lot, too much ends up on the model, it can easily be removed by wiping with either a tissue or a Q-tip moistened with Napatha. Wipe in the direction of airflow and you will not only remove excess weathering oil, you will leave some subtle streaks. If you don’t like the streaks, just wipe them again. In this case I used mostly burnt umber, with a little black here and there.
| FINAL CONSTRUCTION |
After paint the last bits go on. I left the stabilizer struts off to ease the painting so on they went. The landing gear was detailed with brake lines from fine wire held on with thin strips of Testors chrome foil. The foil got very toned down with some last minute oil wash on the landing gear. The wheels also got a bit of a black wash to pop out the tread. The dropped flaps and slats go on with no issues, and leave only the gear covers, antenna and canopy. The antenna and canopy closing cord are done with invisible thread painted with Polly S Grimy Black. The insulator is a drop of super glue.
| CONCLUSIONS |
 This has got to be one
of the easiest kits going. The fit is fantastic, and the engineering is
great. Both the stabilizers and the landing gear are designed to only fit
on the proper side. The decals lend an interesting twist to a popular
subject. I thought it was great when someone looked at the model on a show
table for a bit before it sunk in. He said his initial thought was that it
was the strangest looking Spitfire he had ever seen.
This has got to be one
of the easiest kits going. The fit is fantastic, and the engineering is
great. Both the stabilizers and the landing gear are designed to only fit
on the proper side. The decals lend an interesting twist to a popular
subject. I thought it was great when someone looked at the model on a show
table for a bit before it sunk in. He said his initial thought was that it
was the strangest looking Spitfire he had ever seen.
The only disappointment I have is what has happened to the paint job. I finished this several months ago, and the paint was fine. However, over the months, the paint appears to have shrunk back from a couple of areas, most noticeably right over the wing roots. I have never seen this before. I’ve had incompatible paint failures, and cracking when undercoats have cured more slowly than topcoats, but this is very strange. If you have any idea what caused this, I’d love to hear from you. The paint is Polly S, with Future, Polly S Clear Flat, and Tamiya Smoke over it. As I don’t really work all that fast, everything has plenty of time to cure before the next coat was applied.
March 2005
Copyright ModelingMadness.com
If you would like your product reviewed fairly and fairly quickly, please contact the editor or see other details in the Note to Contributors.