ESCI 1/48 Henschel Hs-123A
PRICE: $8.95 in 1985
KIT NUMBER: 4001
DECALS: Markings for three aircraft: Grupo 24 “Legion Condor”, II SG. 9, and II SG. 2.
DATE OF REVIEW: April 6, 1999
REVIEWED BY: Drew Nix
When Hitler rejuvenated the Luftwaffe, several aircraft designers submitted proposals for a variety of types--fighters, bombers, ground support, etc. One type that Ernst Udet, head of the Luftwaffe, was particularly intrigued with was the dive bomber, or Stuka. The Henschel Company, previously better known as a maker of railroad locomotives and cars, submitted a Stuka design employing a sesquiplane planform able to carry four 50 Kg SC-50 bombs. Given the designation Hs-123, this aircraft eventually was supplanted by the more renowned Stuka, the Junkers Ju-87. After serving with the Legion Condor in the Spanish Civil War, the Hs-123 soldiered on until 1944 as a ground support aircraft.
Lost in the mists of my memory, is why I ever bought this kit. It seems that at one time I was attempting to get all of the ESCI 1/48 scale kits. They released subjects that were then unavailable in that scale, and some still have not been kitted by any other manufacturers. Unlike most of their 1/72 scale kits, the 48th kits varied in quality from one release to the next. This kit was their very first 48th scale offering and, comparatively is one of their better offerings. When our local hobby club announced a “Multi-wing” theme for the March 1999 quarterly contest, I immediately knew that I wanted to do this kit.
The starting point in the building process is the cockpit (Surprise! Surprise!) The cockpit consists of seven pieces. This area reminds one of recent Hasegawa and Tamiya offerings in its manner of assembly. The seat and stick fit into the floor. To that is added the rear bulkhead, the two side consoles, and the instrument panel, all parts being designed to interlock. The sidewalls have adequate detail for this scale, but the instruments on the instrument panel are represented by a decal, common for ESCI kits. The whole cockpit was painted Aeromaster Acrylic RLM 02. A wash of Payne’s Gray artist’s oils was added, the area drybrushed with 02 successively lightened with white, and various details picked out in red or black. Reheat harnesses were added these being painted Tamiya Khaki with silver buckles.
 The completed
cockpit assembly is attached to the right fuselage half, along with the one-piece
tailwheel assembly, before the two fuselage halves are brought together.
The fuselage upper decking is added next. The fit here is not good.
So...gap-filling super glue, followed by accelerator, was added to the seams.
The seams were sanded and progress checked with correction fluid. Any flaws
were filled with super glue, followed by accelerator, etc. When all of this
was deemed finished, the engine was painted, assembled, then detailed. Poly
S Metalline Anodized Aluminum (unfortunately, no longer available) was used
as the basic color for the engine assembly. Poly S Metalline Bright Silver
was used to highlight the cylinder heads and the pushrods.
The completed
cockpit assembly is attached to the right fuselage half, along with the one-piece
tailwheel assembly, before the two fuselage halves are brought together.
The fuselage upper decking is added next. The fit here is not good.
So...gap-filling super glue, followed by accelerator, was added to the seams.
The seams were sanded and progress checked with correction fluid. Any flaws
were filled with super glue, followed by accelerator, etc. When all of this
was deemed finished, the engine was painted, assembled, then detailed. Poly
S Metalline Anodized Aluminum (unfortunately, no longer available) was used
as the basic color for the engine assembly. Poly S Metalline Bright Silver
was used to highlight the cylinder heads and the pushrods.
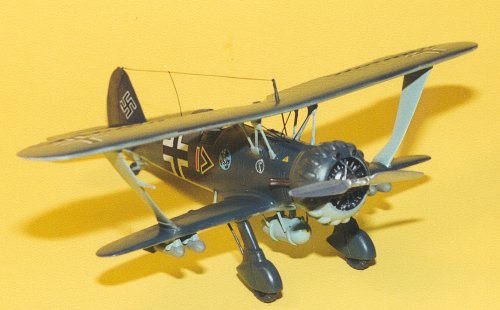
The exhaust system was painted Anodized Aluminum and added to the fuselage before installing the rear part of the engine cowling, the completed engine, and the front part of the engine cowling. Much like the Macchi MC 200, the Hs-123 had a series of rocker arm covers on the cowling, these being represented by teardrop shaped bumps in the kit. I guess there was no way around putting a seam right through the middle of these 18 covers! The fit here, though acceptable, did leave a seam line that was a bear to clean up. The horizontal tails and their bracing, a la early Bf-109s, were also added at this point. One of the bracing struts had to be shortened to get the tails to line up evenly.
The bottom wing is in three parts, one lower and two uppers. The fit here is very good with only a little filling needed to be done in the wing root area. This assembly was cemented to the fuselage where more filling and sanding had to be done. Unfortunately, the lower wings had a warp in them that I was never able to remove. The wing struts and cabane struts were added next. Here major filling and sanding had to be done to get them to blend in with the lower wing and fuselage. The upper wing comes in halves. The fit here was exceptional! Only a little light sanding on the leading edge was required to remove any possible seam. The top wing was left off until all painting was done.
I originally wanted to do the Henschel in the striking pre-WWII camouflage
scheme of 61/62/63 over 65. After much masking and cursing, I eventually
abandoned this plan and wimped out by doing the later 70 over 65 scheme.
The new Testors Acrylics were used for all exterior painting. I also had
to add the headrest/anti-rollover hump to the fuselage once the later scheme
was adopted.
The tires were painted Testors Acrylic Engine Gray (a color that looks good in this scale and also provides a contrast between the tires and the black hubs) before the wheels were added to their spats. These assemblies fit very nicely into the slots in the lower wing provided for them. The spats were painted RLM 70 Schwarzgrun. The four bomb racks were also added to the lower wing, again fit being superb.
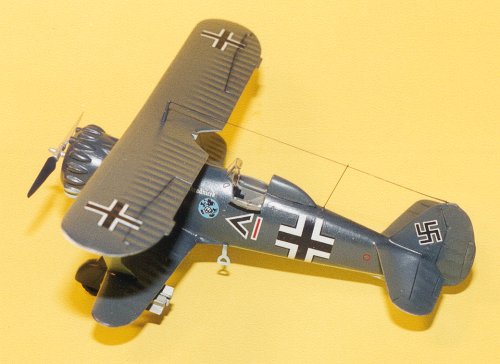
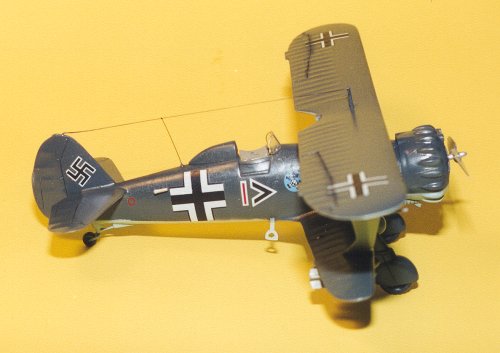
The whole model was now sprayed with Future in preparation for the decals. As mentioned earlier, a later camouflage scheme required one of the two WW II offerings. I chose to do the Hs-123 from II SG. 2. The decals were matte, typical of ESCI. They went on very nicely and laid down fairly well. The upper wing has a corrugated texture, so I tried a little Micro Sol on the decals in this area to get them to conform better. Mistake! Even though Micro Sol is about the gentlest of the available decal solvents, it cracked and wrinkled the old ESCI decals. Luckily, a little water was able to straighten out the wrinkles and a little paint was able to cover the cracks!
The top wing was added next. This was my first biplane and my inexperience jumped up and bit me at this point. First, just super glue and clamps were tried. After leaving the clamps in place about 12 hours, they were gently removed. The top wing promptly separated from the struts! Next 5-minute epoxy was tried with the same results. By this time the locating holes in the top wing were getting filled with dried glue. Out came the Dremel tool armed with a cone-shaped cutting bit! All offending dried glue was removed. After studying the situation for a few days, I finally decided to put one wing strut into the locating slot, slop on the gap-filling super glue, then add accelerator. It worked! So on to the other side...same treatment, same results. Now the center section on the top wing was pushed down to match the cabane struts...ditto, though I did manage to snap one leg of one of the “N”-shaped cabane struts. This was later easily repaired. The, by now, tiresome routine of sanding and filling started. Eventually everything was blended in and the paint touched up. A semi-matte coat was now applied to flatten and blend the decals and paint job.
Next four flying wires made from stretched sprue were placed between the cabane struts and the fuselage, the windscreen was glued in place, and the one-piece bombs were added to the underwing racks, these being painted RLM 02. The Venturi tube was glued into the right fuselage side, and the drop tank was glued to its rack. The side doors to the cockpit were glued in place with the left hand door glued in the down position. A door release latch was made from a Grandt Line nut and a small piece of microfine solder. Stretched sprue, painted black, was used to make the antenna wire.
Admittedly, this was not one of my best efforts. Many glaring errors can be spotted. All that said, I have a biplane in the collection and can recommend this kit as an introduction to multi-wing aircraft because there are only four wires to make for rigging. I do recommend that you have a few kits under your belt before trying this one because of the complexity of construction.
Copyright ModelingMadness.com. All rights reserved. No reproduction in part or in whole without express permission.