Monogram 1/48 Me-262A
|
KIT # |
5410 |
|
PRICE: |
@$10.00 |
|
DECALS: |
Options for 8 aircraft |
|
REVIEW: |
Drew Nix |
|
NOTES: |
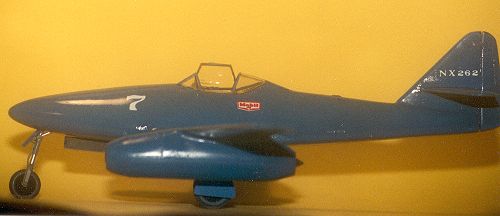
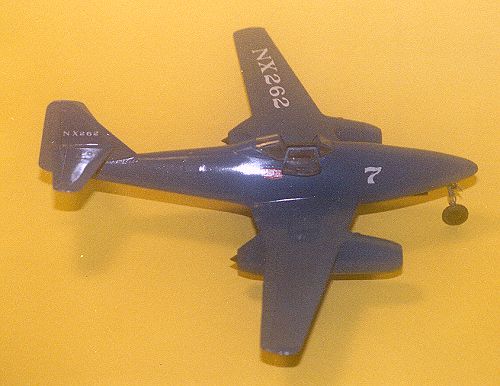
This is the racing version |
|
HISTORY |
We are all familiar, I think, with the story of the Messerschmitt Me-262. This was the world's first turbojet aircraft to see combat. It put such a scare into the Allies that they were determined to test captured examples as soon as they could get there hands on any. Thereby lies the genesis of this modeling project.
Several years ago the late Jeff Ethell wrote a book called The German Jets in Combat. In his book he told how several of the captured -262's were brought to the United States after the War aboard H.M.S. Reaper. One of the examples was sent to Hughes Aircraft for high speed testing. Hughes had his people remove all guns and armament, cover over the gun ports, seal the gaps in the airframe, and apply several coats of a high gloss finish. Hughes, ever the showman, wanted to pit his new toy against the latest U.S. high-performance jet, the Lockheed P-80, in the 1946 Bendix and Thompson Jet Trophy races. Looking back, it is fair to say that the Me-262 would have quite possibly beaten the Shooting Star, causing much embarrassment to the USAAF! When General of the Air Force, "Hap" Arnold, heard what Hughes intended to do; he firmly quashed the project.
All was not lost however. Hughes' toy ended up in the Planes of Fame Museum in Chino, California where it can still be seen today. What if, I conjectured, Hughes had been allowed to compete in the trophy races?
The kit selected to do the "Racing" Messerschmitt Me-262 was the old reliable Monogram 1/48 scale offering of 1978 vintage. I wavered between this kit and the newer Dragon (ex-Trimaster) -262. Both offer about the same amount of difficulty in completion, but the Dragon kit was about $30 compared to the Monogram kit's price tag of between $5 and $10, depending on where one looked for it. Also I could afford to mess up the Monogram kit and replace it if I did so. This tends to make one bolder in his modeling approach!
|
THE KIT |
Monogram's kit is considered "vintage" today, but in its time, it was a top-notch kit, "state-of-the-art". It still holds up good today and a nice representation of the Schwalbe can still be had from this kit. Mine was molded in dark green plastic with raised panel lines and recessed control surfaces. The raised panel lines did not concern me as I was planning to sand the airframe smooth anyway. To add a little spice to the project, I used the True Details brass set (#26016) for this kit.
|
CONSTRUCTION |
First the cockpit was constructed. As per the True Details instruction sheet, details were removed from the left and right consoles of the kit's cockpit tub and replaced by the nine etched brass pieces of the detail set. These were cut from their frets, cleaning up the nubs that were left from where they had attached to the frets, and glued in place with super glue. The cockpit, including the fuselage sidewalls, was then painted RLM 66 Gray. Highlights were picked out in black, white, red, and silver. The True Details replacement lap and shoulder belts were painted Khaki, their hardware picked out in silver, and added to the kit's seat. True Details provides a five-piece instrument panel to replace the kit's instrument panel. Although fiddly to work with and to get everything to line up correctly, the results are a nice 3-D instrument panel. This was painted RLM 66 Gray and the instrument faces were painted flat black.
After being allowed to dry, a white artist's pencil was used to pick out the pips on the instrument faces. A drop of Future Floor Wax was placed on each instrument face to represent the glass. Various knobs and switches on the panel were picked out in white, black, and red. Next True Details rudder pedals were super glued to the rudder bar and the resultant assembly added to the completed instrument panel. This combination was added to the cockpit tub, as was the kit's control stick.
The fuselage halves are glued together and the cockpit tub added through the bottom. This fit O.K, but a little adjusting had to be done to get it to fit flush against the canopy sills. The nose gear well was added next. You are supposed to add the guns, the front bulkhead, and the rear bulkhead to the gun tray next. Since the guns were not needed, only the two bulkheads were glued in place. Lead weights were put where the guns would have gone. A lot of weight was required to keep this from being a tail sitter. The gun tray was next glued to the front fuselage.
Now the hard part started. The front fuselage cowling piece has the openings for the 30mm cannon in it. As you remember, Hughes had these openings filled on the actual aircraft. I did the same by first gluing pieces of styrene sheet on the underside of the openings. Next Acryl Blue putty was put into the openings and, when dry, sanded smooth. This cowling and the one behind it that covered the cannon breeches were next glued in place. Both fit atrociously, especially the rear cowling, leaving large steps and/or gaping seams all around their edges. This part was meant by Monogram to be shown in the open position to show off the cannon bay. Much filling and sanding was required on these two pieces before they would fare in with the fuselage. At this same time the cannon shell ejection ports were filled and sanded using the same technique as was used on the cannon openings.
The wings come in the now customary three parts, two tops and a one-piece bottom. These were glued together and fit very nicely. Assembly of the Jumo turbojets was next. The right pod is fairly simple, consisting of the two pod halves, a nose cap that contains the intake bullet, and two pieces that make up the exhaust cone. While fit here was not great, it sure beat what was coming with the other engine pod! With the left pod one must first build a replica of the Jumo engine itself consisting of five pieces. I didn't bother doing a lot of filling here as I did not plan to show the engine cowls off to preserve the sleek lines of the aircraft. The engine was painted a metallic gray before it was trapped between the engine pod halves.
The nose cap and the two engine cowls were glued in place next. Fit here was horrible! So much sanding and filling was done here that this part alone soon became a putty monster. The problem is that Monogram intends the cowls to be left off so that someone can see all of that neat detail work they've provided in the model, so the cowlings were never meant to fit well! Finally, everything was smoothed out on both engine pods. The engines were next mated to the wings and the engine tail caps were added. Again fit was less than stellar. Out came the putty, the super glue, and the various grits of sandpaper. Eventually the pods were blended in with the wings to my satisfaction. Whew!
Before mating the completed wing/engine pods assembly to the fuselage make sure you've painted the part of the wheel well bay that is molded onto the bottom of the cockpit tub. I used RLM 66 here, but now realize that this should have been RLM 02. Again wires molded into the wheel wells were picked out in various colors. The wings mate to the fuselage surprisingly well, little filling and sanding being required especially when compared to other parts of the model. The horizontal tails (one-piece) were slid into the slot in the vertical stabilizer, glued in place, and a little sanding and filling done. Again fit was surprisingly good. The rudder was added next. It did not fit at all well. Much shaving with an X-Acto knife and sanding had to done to it to get an acceptable fit and I'm still not happy with it.
The crystal clear canopy comes in three pieces. The windscreen and rear glazing were glued in place and fared in with a little putty. The hinged middle canopy piece was tacked in the closed position with white glue. The canopy was masked. The wheel wells were stuffed with facial tissue in preparation for painting.
|
PAINT & DECALS |
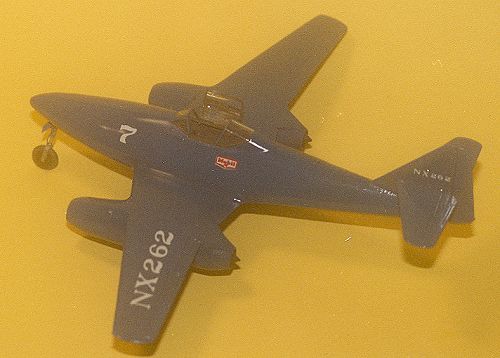
All racing aircraft I have ever seen have a civilian serial number assigned to them. Many racing planes have their serial number preceded by the letters "NX". The "N" is the international code letter for U.S. registered civil aircraft. I can only assume that the "X" represented "Experimental" which if you've ever watched the Reno Air Races you will notice is written somewhere on the outside of the racing aircraft, usually right under the canopy sill. The number "262" is conjecture but seems "right". Since Hughes was, in his own right, a multi-millionaire and a publicity hog, I only put one sponsor's decal on the aircraft, choosing Mobil Oil, again using a Woodland Scenics set. I figured that Hughes would have Hughes Aircraft be the principal sponsor of his racing aircraft and perhaps would want to be the pilot himself!
The canopy was unmasked, as were the wheel wells. Monogram's gear and wheels were used. These are nicely detailed, with the main gear even having molded in brake lines. The gear was painted RLM 02 with Bare Metal Foil applied to the oleos. Monogram's gear doors were discarded and replaced with the thin ones provided in the True Details set. In my opinion, this was the best part to the True Details brass set. The wheels were painted flat black with the tires being painted in Euro I Dark Gray (FS 36018). Little or no weathering was applied, as racing aircraft are usually kept spotless. The middle canopy part was freed from the rest of the canopy before being placed in the open position. Fit here was extremely good and no glue would probably have been required to hold it in place. Just to be on the safe side, I used a little white glue to make sure.
|
CONCLUSIONS |
There you have it. An unusual subject, but one based on a very real "what if" scenario. I had fun doing this and, after all, isn't that what this hobby is supposed to be?
Copyright ModelingMadness.com. All rights reserved. No reproduction in part or in whole without express permission from the editor.
Back to Reviews Page 2023