|
KIT: |
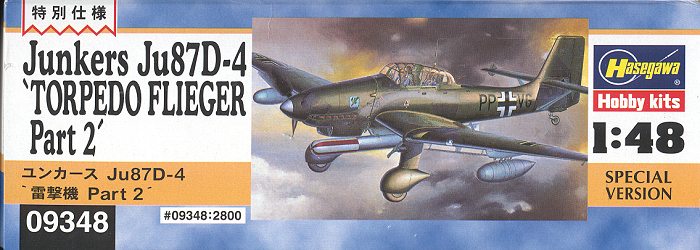
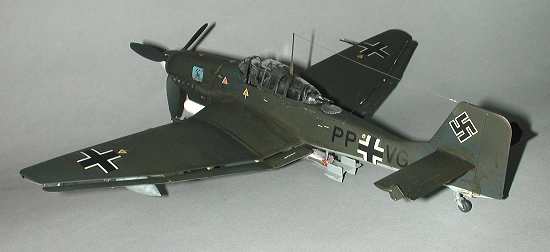
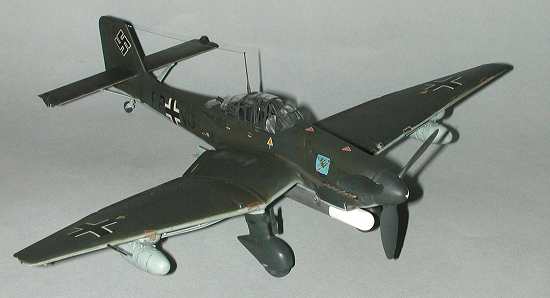
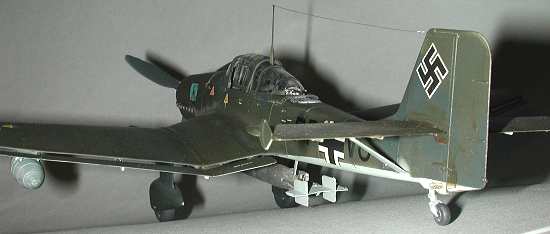
Hasegawa 1/48 Ju-87D-4 'Torpedoflieger' |
|
KIT # |
9348 |
|
PRICE: |
$32.98 |
|
DECALS: |
See review |
|
REVIEW & |
|
|
NOTES: |
` !@#$%^&*+! |
|
HISTORY |
World War I ace, Ernst Udet, had become enamored with the dive-bomber on a trip to the United States after that war. He had been shown Curtiss Hawks delivering their bombs on target with much greater accuracy than could possibly be achieved using conventional level bombers. On returning to Germany, he used his position and influence in the upper echelons of Luftwaffe power to insist that Germany develop a dive-bomber with similar abilities to the American Hawks. After a competition, the Junkers company received a contract to build their entry, this becoming the Ju-87A. If ever an aircraft looked Teutonic, the Stuka was it! It's angular lines, reverse gull wing and spatted undercarriage had a malevolent look about it.
 The Stuka became the primary dive-bomber of the Luftwaffe. Film reels
showing Stukas screaming down in a near vertical dive on the helpless Poles,
French, etc. to deliver their deadly cargoes with pinpoint accuracy is the image
that most people associate with this aircraft and the term
"Blitzkrieg". Actually it was obsolete before the war began.
As long as the Luftwaffe had air dominance over the battlefield the Stukas were
awesome. When they were sent into the fray during the Battle of Britain,
however, they were shot down in such numbers that they were quickly removed from
the battle. Later, in Russia, the Stuka once again was free to roam over a
battlefield dominated by the Luftwaffe and therefore had a rebirth of sorts.
The Stuka became the primary dive-bomber of the Luftwaffe. Film reels
showing Stukas screaming down in a near vertical dive on the helpless Poles,
French, etc. to deliver their deadly cargoes with pinpoint accuracy is the image
that most people associate with this aircraft and the term
"Blitzkrieg". Actually it was obsolete before the war began.
As long as the Luftwaffe had air dominance over the battlefield the Stukas were
awesome. When they were sent into the fray during the Battle of Britain,
however, they were shot down in such numbers that they were quickly removed from
the battle. Later, in Russia, the Stuka once again was free to roam over a
battlefield dominated by the Luftwaffe and therefore had a rebirth of sorts.
The "A" model soon gave way to the "B" model, which
eventually was developed into the "D" version. When Germany
decided to build an aircraft carrier for the Kriegsmarine (Navy), the Stuka was
the natural choice for the dive-bomber. Junkers also decided to test out a
torpedo version of the Stuka using an Italian torpedo. When the Graf
Zeppelin aircraft carrier was cancelled, the point seemed moot, but Junkers
continued to experiment with the "torpedo flieger". Only a few
aircraft were converted and none ever dropped a torpedo in anger as far as I can
determine.
|
THE KIT |
 Hasegawa's kit of the torpedo version of the Stuka is a special boxing of their
Ju-87D. It contains over a hundred various parts on 21 separate sprue
trees. As you might imagine many of the parts are for the "B"
version and thus are not used. Oh well, this adds nicely to the spares
box. Besides the plastic parts, a resin torpedo and its rack are included
in this version. The plastic parts are everything that one has come to
expect from this company: crisp, clean moldings; good detail on the parts,
petite engraved panel lines; and a large number of parts. Unfortunately,
in my example, one of the sprue trees was missing completely while at various
times I found that, while the sprue tree was intact, random pieces would be
missing! Very frustrating to say the least. The resin parts are sub-par,
unfortunately. The torpedo body is molded in with its launch rack.
The fins and torpedo prop blades are on a twisted piece of resin sprue.
They have a lot of flash that has to be carefully removed and some of the pieces
suffer from pinholes and incomplete casting. You must carefully examine
the instruction sheet to make sure which pieces go where and even to be able to
make sense of what is a part of the torpedo and what is not! The
instruction sheet is well done with logical, easy to follow steps guiding
construction. Color call outs are for the Gunze range of paints and in
some cases give mixing formulas for those paints should one choose to use them.
The decal sheet? ah, yes, the decal sheet. There is an old saying,
"If you can't say something nice, then don't say anything at all".
So for right now?
Hasegawa's kit of the torpedo version of the Stuka is a special boxing of their
Ju-87D. It contains over a hundred various parts on 21 separate sprue
trees. As you might imagine many of the parts are for the "B"
version and thus are not used. Oh well, this adds nicely to the spares
box. Besides the plastic parts, a resin torpedo and its rack are included
in this version. The plastic parts are everything that one has come to
expect from this company: crisp, clean moldings; good detail on the parts,
petite engraved panel lines; and a large number of parts. Unfortunately,
in my example, one of the sprue trees was missing completely while at various
times I found that, while the sprue tree was intact, random pieces would be
missing! Very frustrating to say the least. The resin parts are sub-par,
unfortunately. The torpedo body is molded in with its launch rack.
The fins and torpedo prop blades are on a twisted piece of resin sprue.
They have a lot of flash that has to be carefully removed and some of the pieces
suffer from pinholes and incomplete casting. You must carefully examine
the instruction sheet to make sure which pieces go where and even to be able to
make sense of what is a part of the torpedo and what is not! The
instruction sheet is well done with logical, easy to follow steps guiding
construction. Color call outs are for the Gunze range of paints and in
some cases give mixing formulas for those paints should one choose to use them.
The decal sheet? ah, yes, the decal sheet. There is an old saying,
"If you can't say something nice, then don't say anything at all".
So for right now?
|
CONSTRUCTION |
As with 99.9% of all aircraft kits, construction begins with the cockpit.
The floor, bulkhead, seats and the radio console are glued together following
the clear drawings that typify Hasegawa instruction sheets. Fit of
everything is excellent. I recommend that you leave the twin rear machine
guns off until later. I didn't which caused some problems later on.
The interior was painted with Aeromaster RLM 66 enamel. I painted the side
consoles and the fuselage cockpit sides at the same time as the cockpit
assembly. Reheat seat belt harnesses were painted and added to the pilot's
and gunner's seats, the gunner's seat only requiring lap belts. A wash of
black artist's oil color was used to make individual details pop out.
After this had dried, drybrushing began first using Poly Scale Acrylic RLM 66,
followed by two lighter shades of the same paint. Poly Scale Flat White
Acrylic was used to lighten the RLM 66. Next various knobs and details
were picked out with various blacks, whites, reds, and yellows using a 10/0
brush to paint these fine details. Finally a clear flat coat was applied
to the interior to seal everything.
Hasegawa's method of using interlocking interior parts is well appreciated.
The side consoles and the finished cockpit assembly fit together so well that
you may be tempted to not use any cement here. To be on the safe side, I
did. The fuselage halves were cemented together trapping the cockpit parts
between them. Fit was good with little filling and sanding being required
along the fuselage seams. If construction had stopped now I would have
been shouting the praises of Hasegawa. Little did I suspect the problems
that were soon to arise!
 Next the instrument panel was painted with RLM 66. The various dials on
the instruments were picked out using a sharp white artist's pencil. A
drop of future was put in each dial to represent the glass. If you choose
not to follow this path, then Hasegawa provides an instrument panel decal for
you. More about decals later. I left off the gunsight to be
installed later. The instrument panel was glued to the instrument cowl
which had previously been painted RLM 66.
Next the instrument panel was painted with RLM 66. The various dials on
the instruments were picked out using a sharp white artist's pencil. A
drop of future was put in each dial to represent the glass. If you choose
not to follow this path, then Hasegawa provides an instrument panel decal for
you. More about decals later. I left off the gunsight to be
installed later. The instrument panel was glued to the instrument cowl
which had previously been painted RLM 66.
The "D" series of Stukas used a more powerful engine requiring a
longer, reshaped nose. Hasegawa gives this to you as separate pieces.
This led to problems later. The missing sprue tree now reared its ugly
head when I went to get the correct exhaust stacks for this variant. There
were supposed to be two "V" sprues in the kit, but there was only one!
Needless to say one exhaust stack was there but the other was missing.
Scott suggested that I cobble together the other exhaust stack from the two
"B" model exhausts that are still given to the modeler in this kit.
I very carefully did this with the resulting stack turning out very well.
The propeller consists of a backing plate with slots for the dreaded three
individual prop blades. Thank goodness Hasegawa has seen fit to put pins
on each blade collar that fit into corresponding holes in the backing plate.
A poly cap is secured in place with a plastic ring. The prop blades and
backing plate were painted Aeromaster RLM 70 enamel. One third of the prop
spinner was painted white, masked off, and the other 2/3 of the spinner was
painted RLM 70. The spinner was then attached to the backing plate and set
aside to be added later on in the construction.
The completed instrument cowl/instrument panel combination was next glued to the
to front fuselage top. The rear part of the radiator and the bomb trapeze
attachment points were glued to the bottom front of the fuselage next. The
completed nose assembly was now offered up to the front of the fuselage
assembly. The fit was not good. In fact, this was the worse fitting
part of the whole assembly process. Much filling and sanding was required
to get the nose to match up with the rest of the fuselage.
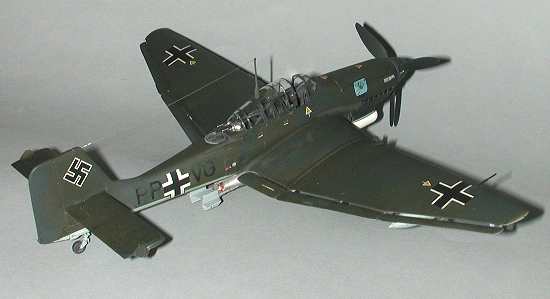
 Using the instructions as a guide, holes were drilled into the lower one-piece
wing in preparation for the many underwing attachments. The top wings were
glued to the bottom wing the fit here being OK. Some filling and sanding
was required. The 20mm gun barrels were drilled out and attached to the
wings.
Using the instructions as a guide, holes were drilled into the lower one-piece
wing in preparation for the many underwing attachments. The top wings were
glued to the bottom wing the fit here being OK. Some filling and sanding
was required. The 20mm gun barrels were drilled out and attached to the
wings.
Now the fuselage assembly and wing assembly were ready to be joined. Fit
again was poor with much filling and sanding being required. The rear
decking was added behind the gunner's compartment on top of the fuselage.
Leave off the clear access panel that covers the magnetic compass compartment
until after all painting has taken place. Paint the interior of the
magnetic compass compartment RLM 66. The horizontal tails and end caps
were glued in place next.
The main wheel halves were glued together, the resultant seam sanded, and the
tire area painted RLM 66. After this had dried, the wheel hubs were
painted RLM 70 using a circle template as a mask for painting the hubs.
The completed wheels were trapped between the two halves of each spat. The
fit was fair. Some filling and sanding was required. After assembly
the top 1/3 of the spats were painted Aeromaster RLM 65. This was masked
later and the bottom 2/3 was painted RLM 70. The instructions call for
siren blades to be added to each spat. I did this but had my doubts since
the siren usually was only found on one spat. Besides, this was supposed to be a
torpedo bomber, so the siren would have little or no use if the Stuka was used
in that capacity.
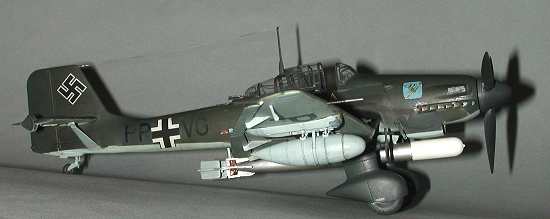
The torpedo was assembled. As mentioned earlier, the resin was not very
good. Assembly went fairly smoothly after everything was identified and
cleaned up.
Next the drop tank holders, dive brakes, and radiators were added under the
wings. The tailplane braces were glued in place at this time also.
Fit of everything but the braces was very good. The braces needed some
careful filling and sanding.
|
PAINT & DECALS |
The torpedo shackle and fins were painted RLM 65 using Poly Scale acrylic.
The torpedo propellers were painted bronze using Floquil lacquer. The
torpedo itself was painted Model Master Steel Metallic. The warhead was
masked off and painted flat white. Three coats of Future were sprayed on
the torpedo in preparation for the decal stripes that were supposed to fit on
the warhead. The decals provided by Hasegawa refused to work no matter
what I did to them! This unfortunately was a precursor of things to come.
I then tried masking and spraying the red stripes. No luck.
Eventually I said to heck with it, gave up, and left the warhead plain ol'
white.
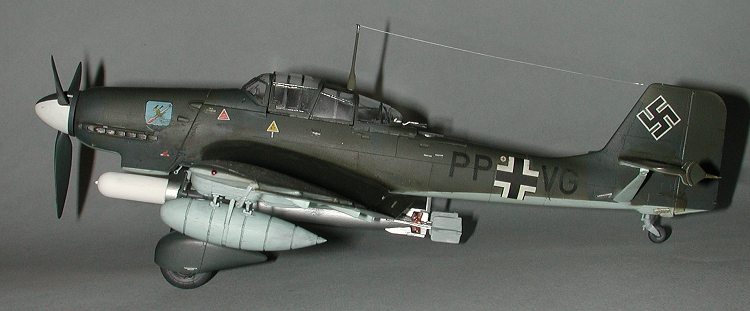
 The bottom of the aircraft was sprayed RLM 65 using Model Masters line of
paints. At the same time the assembled drop tanks were painted the same
color as the underside and set aside to dry. When dry, a hard line between
the bottom and top of the fuselage was masked off using Tamiya tape. Next
RLM 71 by Aeromaster was sprayed on the top surfaces. When dry, the hard
edge for the next color, RLM 70, was masked using Tamiya tape. The pattern
was used from the kit's instruction sheet. When this dried, the paint was
checked and any adjustments made. Next three light coats of Future were
sprayed on the model in preparation for decaling. Only two versions are
given and one of those is speculative at best, so that left the modeler only one
real option. The kit decals turned out to be a disaster, an unmitigated
disaster! They were thick and, despite having a nice smooth surface to
rest on, they silvered anyway. I fail to understand how a company with a
reputation as high as Hasegawa's can skimp when it comes to the decal sheet.
This is not an isolated incident. I've consistently had trouble with
Hasegawa decals in the past. I've heard that dipping them in warm water
before application helps but even this didn't help me here. What makes
matters worse is that this version of the Stuka was basically a
"one-off" version so I couldn't go the aftermarket route.
Thankfully, this model was one donated for review purposes. If I had
forked out $40 for this kit only to find basically unusable decals and poorly
cast resin, I would not have been a happy camper. End of rant.
The bottom of the aircraft was sprayed RLM 65 using Model Masters line of
paints. At the same time the assembled drop tanks were painted the same
color as the underside and set aside to dry. When dry, a hard line between
the bottom and top of the fuselage was masked off using Tamiya tape. Next
RLM 71 by Aeromaster was sprayed on the top surfaces. When dry, the hard
edge for the next color, RLM 70, was masked using Tamiya tape. The pattern
was used from the kit's instruction sheet. When this dried, the paint was
checked and any adjustments made. Next three light coats of Future were
sprayed on the model in preparation for decaling. Only two versions are
given and one of those is speculative at best, so that left the modeler only one
real option. The kit decals turned out to be a disaster, an unmitigated
disaster! They were thick and, despite having a nice smooth surface to
rest on, they silvered anyway. I fail to understand how a company with a
reputation as high as Hasegawa's can skimp when it comes to the decal sheet.
This is not an isolated incident. I've consistently had trouble with
Hasegawa decals in the past. I've heard that dipping them in warm water
before application helps but even this didn't help me here. What makes
matters worse is that this version of the Stuka was basically a
"one-off" version so I couldn't go the aftermarket route.
Thankfully, this model was one donated for review purposes. If I had
forked out $40 for this kit only to find basically unusable decals and poorly
cast resin, I would not have been a happy camper. End of rant.
I washed the decals with Poly S Plastic Prep. Then a sealing coat of
Future was added. Next raw umber artist's oil was used to highlight the
panel lines. The final coat was a 50/50 mixture of Testors Dullcote/Testors
Model Master Metallizer thinner. In order to cover the areas of the
silvered decals, I tried an old trick: I drybrushed the offending areas with RLM
65, 70, or 71 as needed. This never looks quite right but is better than
silvered decals.
|
CONSTRUCTION CONTINUES |
 After the decaling was complete, the drop tanks were added. Each tank is
supposed to have four support braces for a total of eight. This kit only
had six! I did the best I could. The pitot tube was also missing
from the parts trees, so I made a replacement one using two sizes of hypodermic
tubing. Two of the four aileron balances were also missing courtesy of the
missing "V" sprue so this model only has two. The tailwheel was
painted and added to the model next along with the two underfuselage crew steps.
The canopy was masked and painted first RLM 66 then with either RLM 70 or 71
depending on where on the fuselage they happened to sit. Some of the
canopy framing was on the inside. A clear piece of decal paper was painted
RLM 66, cut into strips and applied to the inside framing areas. The
canopy sections fit reasonably well except the very rear one. Remember
that I had glued the rear machine guns to the pedestal? Well now they
proceeded to interfere with the placement of the rear canopy section.
Finally I managed to get in place and hold it in place with non-fogging super
glue.
After the decaling was complete, the drop tanks were added. Each tank is
supposed to have four support braces for a total of eight. This kit only
had six! I did the best I could. The pitot tube was also missing
from the parts trees, so I made a replacement one using two sizes of hypodermic
tubing. Two of the four aileron balances were also missing courtesy of the
missing "V" sprue so this model only has two. The tailwheel was
painted and added to the model next along with the two underfuselage crew steps.
The canopy was masked and painted first RLM 66 then with either RLM 70 or 71
depending on where on the fuselage they happened to sit. Some of the
canopy framing was on the inside. A clear piece of decal paper was painted
RLM 66, cut into strips and applied to the inside framing areas. The
canopy sections fit reasonably well except the very rear one. Remember
that I had glued the rear machine guns to the pedestal? Well now they
proceeded to interfere with the placement of the rear canopy section.
Finally I managed to get in place and hold it in place with non-fogging super
glue.
The radio antenna was glued in place next. For the aerial wire I used very
thin brass rod. This was painted silver with two insulators made from
small drops of white glue painted white. Mercifully, the saga of the Stuka
was now over!
|
CONCLUSIONS |
I guess I had a really bad experience with this model so my judgement here is
suspect. I can't in good conscience recommend plunking down $33 for this
kit. Missing sprues, missing parts, excessively complex building
procedures in some areas, and horrid decals make for bad mojo in any model.
We have come to expect more from Hasegawa.

Review kit courtesy of Marco Polo Importers.
If you would like your product reviewed fairly and quickly by a site that averages over 2,800 visits a day, please contact me or see other details in the Note to Contributors.