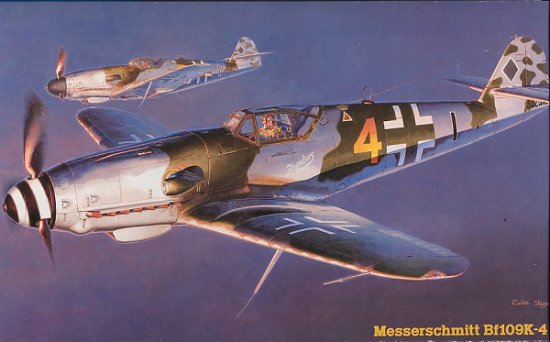
Hasegawa 1/48 Bf-109K-4
|
KIT # |
9063 (JT 63) |
|
PRICE: |
R$ 80.00 |
|
DECALS: |
Two aircraft |
|
REVIEWER: |
|
|
NOTES: |
Aeromaster 48-494 and CMK 4005 used |
|
HISTORY |
Everybody knows the Bf-109´s history very well, so I won’t bother you with this. Nevertheless, the K-4 was the last Bf-109 variant, and boasted 452 mph. I think this aircraft one of the most interesting to model, because many were built using older Bf-109 parts, and painted with some exotic late-war paints and primers. Also, a very large amount of pictures can be found in books like JAPO, because the Germans left the planes hanging on the fields before evacuating. The ones that weren’t destroyed were left unable to fly, and those aircraft pictures are what you should look for references. The plane I chose to depict Lt. Bernhard had been forced to belly-land on Kaufbeuren airfield on April 19, 1945.
|
THE KIT |
The kit consists of 73 gray parts in the usual Hasegawa quality, but again, unpacked, resulting in some unnecessary scratches. It’s really annoying when we pay an expensive price for this kits (specially here in Brazil), and we don’t get the individually bagged sprues like on other kit makers.
 Apart from that, the kit is a beauty.
Some minor scribing, cutting and filling is required to bring the wings to the
K-4 standard, but this is very easy, and a pleasure to do. Also, the rear gear
doors are molded open, so you probably will have to cut them off and fill the
hole, so you can scribe them in closed position, as this is the way most K-4´s
were found on the ground.
Apart from that, the kit is a beauty.
Some minor scribing, cutting and filling is required to bring the wings to the
K-4 standard, but this is very easy, and a pleasure to do. Also, the rear gear
doors are molded open, so you probably will have to cut them off and fill the
hole, so you can scribe them in closed position, as this is the way most K-4´s
were found on the ground.
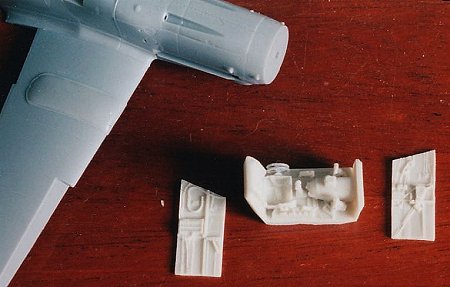
This one I did NOT began with the cockpit, as I glued the fuselage halves, upper wing halves to the fuselage and front cowling before building the cockpit. Gluing the upper wing halves to the fuselage ensures that you will have a perfect seam, not even sanding required if you don’t put too much glue. I reinforced the joint with superglue, as I was going to manipulate the model before gluing the lower wing part. Now, on to the cockpit. I wanted a resin cockpit, as the kit cockpit is very sparse. I chose the CMK 4005 cockpit set for the Bf-109K, as the detail seemed very nice, and is reasonably priced. A friend of mine told me that the most accurate K-4 cockpit is the Technics offering, but after analyzing some period pics, I decided that the CMK was accurate enough for me. Well, but I think I’m not struck with AMS... yet!
 I’m still new to resin, as this was my
first all resin cockpit (actually, this cockpit is part resin part photoetch).
I had only used resin ejection seats before. The major challenge was to remove
the casting blocks from the sidewalls, as they came molded flat on the
blocks. A million years of sanding later, that part was done. The tub didn’t
quite fit the fuselage, so lots of material had to be removed, and lot’s of
fiddling was required to glue the dawn thing.
I’m still new to resin, as this was my
first all resin cockpit (actually, this cockpit is part resin part photoetch).
I had only used resin ejection seats before. The major challenge was to remove
the casting blocks from the sidewalls, as they came molded flat on the
blocks. A million years of sanding later, that part was done. The tub didn’t
quite fit the fuselage, so lots of material had to be removed, and lot’s of
fiddling was required to glue the dawn thing.
One nice touch of this set are the photoetch details. I would prefer the seat belts to be molded in resin together with the tub, but that’s ok. The etched instrument panel is much easier to paint then the resin ones. Just some color detailing on the acetate backing and voilá! They even look like glass after finished!
That done, the other major parts were glued, no surprises. This is one the sweetest kits I’ve ever built! But the winner still is the Tamiya Spitfire.
Some filing was required on the fuselage joint and on the chin. After this, some scribing and on to the paint shop! I must confess, I agree with Lee Kolosna. I HATE scribing! I never get it right on the first attempt, sometimes on the second. Circles? Forget it.
|
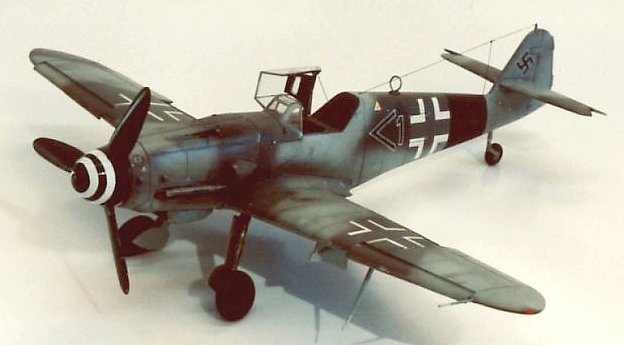
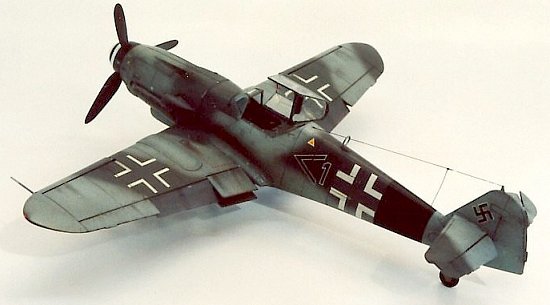
CAMOUFLAGE & MARKINGS |
 I
repainted this kit at least three times, and stripped all the paint once. Why?
Well, I had originally planned to paint a K-4 from the III./JG 53 (Aeromaster,
Last of Breed, 48-494), in RLM 81/82/76. But the RLM 81 (Mr. Color) I have is
not brown at all, and that was what I was looking for. Also, I didn’t have any
RLM 82 on stock. So, I tried to mix both, but the result was a disaster. I
tried to mix again, but I was not happy yet. At this time, I discovered that
the RLM 81 could in fact be RLM 75. Great, as that looked very nice on the
JAPO profile. So, I painted over the RLM 81 with RLM 75 (Gunze Aqueous, with a
touch of red). But I didn’t like it on the model. So I stripped all paint and
decided to paint the unusual scheme of the plane flown by Lt. Ernst-Dieter
Bernhard, still from the same Aeromaster sheet. I have never seen this RLM
75/76/77 scheme, and it looked very good on the model. The RLM 77 was a
primer, used for camouflage when nothing
else was available. For the RLM 77, I
used the Gunze aqueous H307 with 20% white. Camouflage was sprayed free hand
with my Paasche VL. Finally the model was ready for decaling. Aeromaster ones,
as usual very good. Actually, I prefer Eagle Cal decals, as they react
perfectly with Micro Sol, the only thing I can find in here. If anyone out
there knows where I can find Solvaset online, drop me a line! I also applied
the spinner spiral, not without some struggling. I ruined the first spiral
decal, I’m glad that another scheme on the Aeromaster sheet used the same
spiral, so there was another to use. I shot the model with flat clear, and
weathered it with pastels. To seal all, I shot the model with Mr Color Clear
with 30% of flat paste. That result is a very durable and hard semi-gloss
finish. Perfect for me!
I
repainted this kit at least three times, and stripped all the paint once. Why?
Well, I had originally planned to paint a K-4 from the III./JG 53 (Aeromaster,
Last of Breed, 48-494), in RLM 81/82/76. But the RLM 81 (Mr. Color) I have is
not brown at all, and that was what I was looking for. Also, I didn’t have any
RLM 82 on stock. So, I tried to mix both, but the result was a disaster. I
tried to mix again, but I was not happy yet. At this time, I discovered that
the RLM 81 could in fact be RLM 75. Great, as that looked very nice on the
JAPO profile. So, I painted over the RLM 81 with RLM 75 (Gunze Aqueous, with a
touch of red). But I didn’t like it on the model. So I stripped all paint and
decided to paint the unusual scheme of the plane flown by Lt. Ernst-Dieter
Bernhard, still from the same Aeromaster sheet. I have never seen this RLM
75/76/77 scheme, and it looked very good on the model. The RLM 77 was a
primer, used for camouflage when nothing
else was available. For the RLM 77, I
used the Gunze aqueous H307 with 20% white. Camouflage was sprayed free hand
with my Paasche VL. Finally the model was ready for decaling. Aeromaster ones,
as usual very good. Actually, I prefer Eagle Cal decals, as they react
perfectly with Micro Sol, the only thing I can find in here. If anyone out
there knows where I can find Solvaset online, drop me a line! I also applied
the spinner spiral, not without some struggling. I ruined the first spiral
decal, I’m glad that another scheme on the Aeromaster sheet used the same
spiral, so there was another to use. I shot the model with flat clear, and
weathered it with pastels. To seal all, I shot the model with Mr Color Clear
with 30% of flat paste. That result is a very durable and hard semi-gloss
finish. Perfect for me!
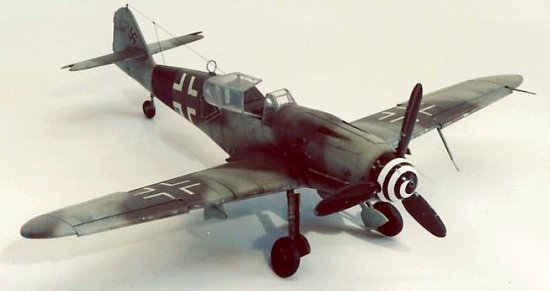
 Finishing touches (and
reconstruction!): On to the final bits. Landing gear (and some wiring with
copper wire), landing gear doors, canopy and pitot were added without
difficulty. Also, I added some paint chipping with metalizer and a 000 brush.
When all was done, my mother managed to drop it on the floor!!
Finishing touches (and
reconstruction!): On to the final bits. Landing gear (and some wiring with
copper wire), landing gear doors, canopy and pitot were added without
difficulty. Also, I added some paint chipping with metalizer and a 000 brush.
When all was done, my mother managed to drop it on the floor!!
AAAAAAAAARRRRRGH!!!!! I got all pieces together and put all to rest a few days. Fortunately, no seams had opened, but I was still very mad, and trying to fix it right then would end in lots of parts going to the spares box. Reconstruction was much harder then I expected, as the broken gear leg was a true nightmare to align. After one hour just dealing with that, I saw that the fixed leg (reinforced with some thick copper wire) was actually a tad longer than the other, and the model was very misaligned. After a few moments of discontent, I decided to try to sand the longer wheel. That worked, but if you look closely to the pictures, you will notice that one tire is flattened, and the other is not! But to date, nobody noticed that until I pointed it, and I’m still happy with the model. Also, when re-gluing the canopy, I managed to spill a lot of superglue right on it! But some sanding and polishing took care of that.
|
CONCLUSIONS |
Despite the problems I had, I still enjoyed a lot the construction, and recommend this kit to all skills! Now my mother stays generally away from my models, after my near epileptic attack when she dropped my 109!
|
REFERENCES |
Messerschmitt Bf-109K, by JAPO
If you would like your product reviewed fairly and quickly, please contact me or see other details in the Note to Contributors.