Tamiya 1/48 FW-190D-9
|
KIT # |
61041 |
|
PRICE: |
R$69.90 |
|
DECALS: |
See Review |
|
REVIEW : |
Rodrigo Santos de Oliveira |
|
NOTES: |
EagleCals #10 and Eduard seat belts used |
|
HISTORY |
The 190´s history has already been pretty well covered, so I won’t bother you with something already known.
|
THE KIT |
Tamiya has provided us with some excellent fitting, flash free parts, with both cockpit and fuselage decently detailed. What more can one ask for in a mainstream kit, you say. Well, accuracy! As most know, Tamiya used as a starting point the 190 D at the Air Force Museum. For some strange reason (I think no one paid much attention to that) this Dora had a D-9 fuselage, but with D-13 wings. Also, the landing gear legs are too short, and the wheels are too small. Not a very good combination! Lastly, the propellers and spinners are out of shape. But these inaccuracies are small enough FOR ME, so I won’t hassle the Trimaster-Dragon-Hasegawa-Italeri (am I forgetting any?) kits.
|
CONSTRUCTION |
 Yes! Yet another 190
review! What can I do? I love those German late-war aircraft! Just for a change,
I began with the cockpit. Noting much to say, except that I used some Eduard
etched seat belts. I love these things and use them all the time. I went on and
closed the fuselage, glued the wings, etc. No real problems. Just one thing, I
think that those 20mm cannon should be separated pieces. I broke them both on
construction! I also dropped the elevators, a fairly simple operation, and
really add realism to the model!
Yes! Yet another 190
review! What can I do? I love those German late-war aircraft! Just for a change,
I began with the cockpit. Noting much to say, except that I used some Eduard
etched seat belts. I love these things and use them all the time. I went on and
closed the fuselage, glued the wings, etc. No real problems. Just one thing, I
think that those 20mm cannon should be separated pieces. I broke them both on
construction! I also dropped the elevators, a fairly simple operation, and
really add realism to the model!
|
PAINT & MARKINGS |
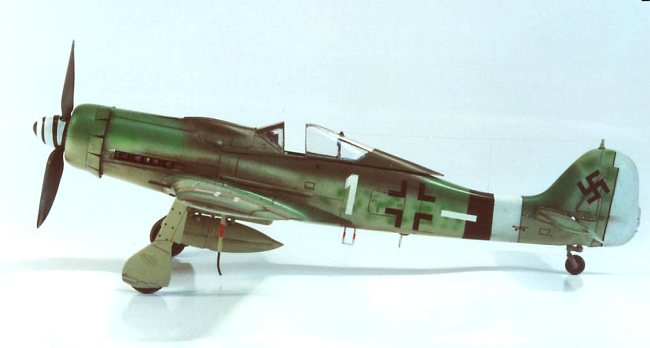
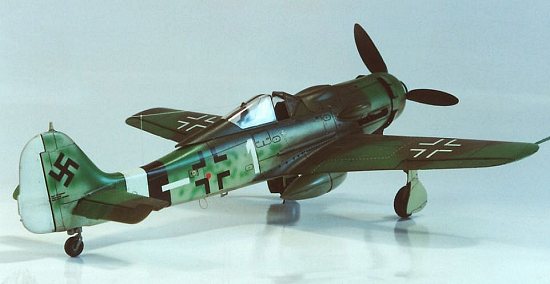
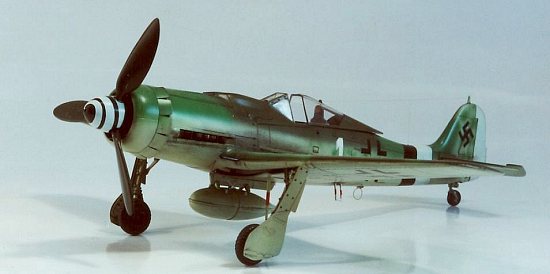
For this kit I decided to use a very nice set of decals from EagleCals, depicting a very late war aircraft, “White 1” from JG 26. The decals demand that this aircraft should have the R4M rocket racks, but as these were a field modification, I decided to ignore them. I used Gunze paints for all the colors, Mr. Color for the RLM 83 and Aqueous for all others. For the “RLM 84”, I used the RAF sky, and the RLM 82 I mixed up from several Aqueous shades. Too bad I didn’t wrote down the mix, as I liked the result! The EagleCals decals went on like a dream, but I managed to screw up 3 (!!!) sets of upper wing crosses. So, I ran out of those. Weathering was done with pastels.
|
CONSTRUCTION CONTINUES |
 Here
is the problem. If you know this aircraft, you have probably noticed that I used
the standard canopy for this plane, but this is incorrect. All because I managed
to step right on the correct late canopy. I
don’t feel like buying a Squadron canopy and fixing this kit. I’ll just try to
do it right the next time.
Here
is the problem. If you know this aircraft, you have probably noticed that I used
the standard canopy for this plane, but this is incorrect. All because I managed
to step right on the correct late canopy. I
don’t feel like buying a Squadron canopy and fixing this kit. I’ll just try to
do it right the next time.
I also lost that little loop antenna, so I made it from copper wire. The brake lines were also made from copper wire. General unpainted stretched sprue (gray) was used for the aerials, as I found this was even less visible then clear plastic. Looks perfect to me!
|
CONCLUSIONS |
This model went on nicely. Some difficulties, But I’m not nit-picking, you know! This was the first model I tried to do mottling (My 8th “serious” model), and I loved the results!! As this model is really easy to build, I recommend it to all skills (even beginners like me!). I also want to thank Othniel, Sidney and Paulo that gave me the decals to this plane.
If you would like your product reviewed fairly and fairly quickly, please contact the editor or see other details in the Note to Contributors.
Back to Reviews Page 2015