
| KIT #: | 04368 |
| PRICE: | £20.00 |
| DECALS: | Three options |
| REVIEWER: | Peter Chiu |
| NOTES: | Supermodel mold |
| HISTORY |
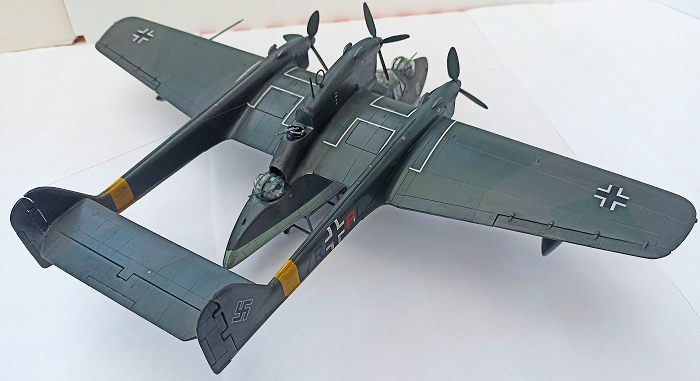
Called the “flying sabot” because it was boat-shaped, the BV 138, despite prolonged development and testing and many technical problems that lasted several years, was the German flying boat that would be built in the greatest numbers.
 By 1934, 3
aircraft companies had been requested by the German Air Ministry to submit
designs for a long-range reconnaissance flying boat that would be capable of
operating on the high seas. HFB (Blohm & Voss) was then awarded the contract and
in the summer of 1936 the HA 138 VI made its maiden flight. The testing of the
V2 revealed that further design modifications to the airframe and landing gear
were needed, so that the BV 138 A-01 did not achieve a satisfactory flying
performance until the summer of 1939.
By 1934, 3
aircraft companies had been requested by the German Air Ministry to submit
designs for a long-range reconnaissance flying boat that would be capable of
operating on the high seas. HFB (Blohm & Voss) was then awarded the contract and
in the summer of 1936 the HA 138 VI made its maiden flight. The testing of the
V2 revealed that further design modifications to the airframe and landing gear
were needed, so that the BV 138 A-01 did not achieve a satisfactory flying
performance until the summer of 1939.
During the Norwegian campaign in April 1940, three aircraft of the nil series were successfully used as transports between Norderney and Narvik. In addition to the production of 25 BV 138-A-1s and 20 BV 138 B-1s, from 1941 onwards, a total of 228 examples of the C-1 range were produced by Blohm & Voss and the Weser Flugzeugbau GmbH.
In July 1940 after only a few hours operation the sea reconnaissance units incurred serious damage to the engines and airframes, however despite many improvements these faults could never be totally eliminated. The trial mine sweeper built in November 1942 produced unsatisfactory results, so the testing was discontinued after only a few flights. As the construction of all seaplanes in Germany had been discontinued, production of the BV 138 ceased in December 1943.
The BV 138 was used for long-range reconnaissance and transport duties until the end of the war. The use of diesel engines and a fuel capacity of up to 4.2 tonnes gave it a maximum flying time of 16.5 hours at a cruising speed of 250 km/h. The defensive armament of MG 151s in hydraulic rotary mounts in the nose and tail plus an MG 131 was above average for a German aircraft. It could also carry three 50 kg bombs.
| THE KIT |
According to Scalemates this is a Revell reboxing of a kit originally tooled by the Italian company Supermodel. It was released in1977 and re-released several times up to the 1990’s before Supermodel ceased trading. Revell released this boxing in 2005.
 The sprues
come boxed in Revells cheap and flimsy side opening packaging. Actually, the box
is a bit too small to hold the sprues, so they have been rather jammed into the
box at an angle. Inspecting the sprues it is very apparent that this is a
tooling from the 1970’s, there are very pronounced raised panel lines all over
the parts. It is especially noticeable on the tail booms and the side walls of
the fuselage.
The sprues
come boxed in Revells cheap and flimsy side opening packaging. Actually, the box
is a bit too small to hold the sprues, so they have been rather jammed into the
box at an angle. Inspecting the sprues it is very apparent that this is a
tooling from the 1970’s, there are very pronounced raised panel lines all over
the parts. It is especially noticeable on the tail booms and the side walls of
the fuselage.
There were pilot figures for the cockpit, though I very rarely put pilots into my builds. and not much detail inside the cockpit. The decals looked in usable condition. The clear parts were clear but a bit on the thick side.
One of the options was to build the MS version which was the experimental minesweeper which had a large circular degaussing boom.
| CONSTRUCTION |
As the kit was going to require a fair bit of filler and sanding, I decided to sand down the raised panel lines and rescribe the panels as best I could. I purchased a set of Hasegawa scribing templates that included all the differing shapes that I was going to need. I then found some illustrations online that provided plan views of the plane along with panel lines. These I downloaded and printed off resizing them, so they were approximately the same size as the kit.
There then followed many hours wet and dry sanding then rescribing the panel lines trying to match the printed diagrams.
 When that
was done, I started the kit. Following the instructions, started with the
cockpit, I decided not to use the pilot figures and used some Tamiya tape as
safety harnesses. The interior was painted using Vallejo Model air, using
Anthracite, black, US dark green and medium grey. There were some decals to
apply to a bank of control panels at the back of the cockpit as well as a set
for the dashboard.
When that
was done, I started the kit. Following the instructions, started with the
cockpit, I decided not to use the pilot figures and used some Tamiya tape as
safety harnesses. The interior was painted using Vallejo Model air, using
Anthracite, black, US dark green and medium grey. There were some decals to
apply to a bank of control panels at the back of the cockpit as well as a set
for the dashboard.
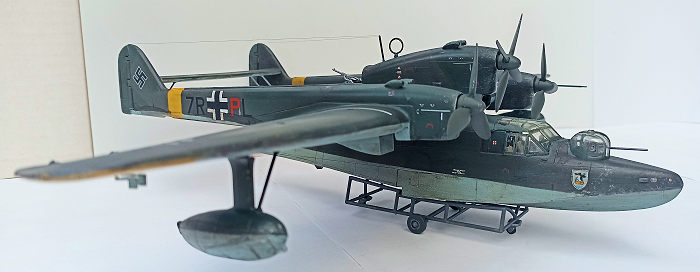
There were 4 porthole type windows either side of the plane, I placed the side of the fuselage against Tamiya tape and using a pencil marked the circular windows and cut them out. Once I had glued the clear parts to the portholes, I applied the circular masks to both sets of windows.
The front an rear turrets were put together, there isn’t much detail but I did mask them off with cut bits of Tamiya tape. The instructions have you insert them into the fuselage at this point, but I thought that would make painting later more difficult. I decided to sand of the small ridge at the bottom of both turrets where they attach to the fuselage. With this I could drop the turrets into their mounts after painting. I did widen the holes for each turret slightly to make this easier.
The wings and tail booms then went together, the fit is so poor where they match up, that Revell instructions specifically tell you to apply putty. Some sanding of the joints got them to fit together and I used some homemade sprue goo to fill in the gaps before applying acrylic putty to finish filling in the gaps.
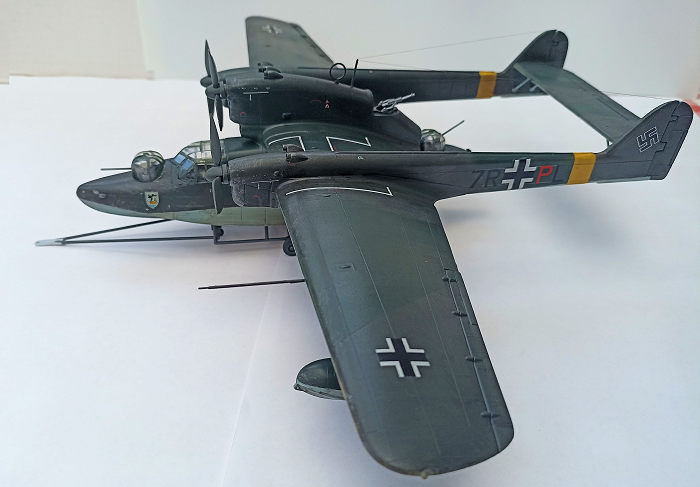
The wings and tail boom assembly was then attached to the fuselage, I had to insert a plastic shim into one side to fill in the gap and use some paint pots to hold the wings at the correct dihedral. Once the glue had set I used Vallejo plastic putty in fill in the gaps.
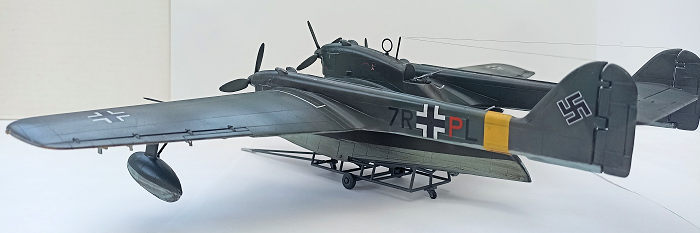
The beaching trolley provided was straight forward to build and was painted with Vallejo Anthracite.
| COLORS & MARKINGS |
Then the kit was primed using Vallejo acrylic primer, sanding and filler was again used before more priming in readiness for painting. I did try pre-shading the panel lines although I have still yet to master this technique.
I was intending to build the version based in Romania, the colours required were RLM 65 for the underside with RLM 04 for the under-wing tips. Then a splinter camouflage of RLM 72 / 73.
 First,
I spray painted the underwing yellow RLM04 and on the tail booms, then
masking that off I sprayed the light blue RLM65 on the underside and lower
fuselage. After more masking, I started with RLM 73, applying Tamiya tape in
the splinter pattern before spray painting RLM 72. It took several attempts
to get the finish I wanted. My first attempts resulted in a very patchy
finish for RLM73 and I had to mask the splinter layout again for RLM72 after
to respraying RLM73 to get a more consistent finish to the paint. Once I was
happy with the painting, I removed the masking tape and was relieved to find
it only required some minor touch up to complete the painting.
First,
I spray painted the underwing yellow RLM04 and on the tail booms, then
masking that off I sprayed the light blue RLM65 on the underside and lower
fuselage. After more masking, I started with RLM 73, applying Tamiya tape in
the splinter pattern before spray painting RLM 72. It took several attempts
to get the finish I wanted. My first attempts resulted in a very patchy
finish for RLM73 and I had to mask the splinter layout again for RLM72 after
to respraying RLM73 to get a more consistent finish to the paint. Once I was
happy with the painting, I removed the masking tape and was relieved to find
it only required some minor touch up to complete the painting.
The underwing floats were masked and painted separately before being attached to the wings.
I sprayed a coat of Alclad II acrylic gloss before applying the decals from the kit. I chose the decals for the plane belonging to unit 3./SAGr. 125 based in Romania. The decals went on without any real problems using Micro Sol / Set. I weathered using a mixture of Vallejo dark panel wash and Ultimate Weathering washes. Finished off with small amount of aluminium paint for chipping and sealed the decals with Vallejo matt varnish.
I finished off by attaching ezline for the radio masts.
| CONCLUSIONS |
I knew in advance how the build of this kit would work out, although fit and detailing are not up to modern standards I was pleased with the finish. Was particularly happy with my first real attempts at rescribing the panel lines. It is a kit very much of the time it was tooled, still, I found the challenge very enjoyable. It’s a shame a newer tooling has not been released but I suppose it is a niche subject. If you do find one still available or have it in your stash I would recommend building it but just be aware of its limitations.
25 April 2024 Copyright
ModelingMadness.com. All rights reserved. No reproduction in part or in whole
without express permission. If you would like your product reviewed fairly and fairly quickly, please
contact
the editor or see other details in the
Note to
Contributors.