| KIT #: | 5925 |
| PRICE: | €10.00 (sale price) |
| DECALS: | Two options |
| REVIEWER: | Ralf Pätzold |
| NOTES: | Kit included photo etch (which wasn't used) |
Half Arrow, Half Anteater: a Dornier 335 “prodel”
or
A quick-and-dirty experiment that turned out better than expected.
| HISTORY |
There’s already a couple of reviews on this site that include some historical background on the Do 335 – allow me to refer you to these. Details relating to the airframes in question can be found in the remainder of this article.
| FINDING THE RIGHT KIT |
This had been on my mind for quite a while – something of a cross between a model and a profile drawing. For lack of a better word, I call it a “prodel”.
The idea seems simple and obvious enough, but research on the net has not yielded an example of someone having done it before. I am sure, however, that after publication of this article, I will be inundated with mails proving me wrong.
While in theory this can be done with practically any kit, it soon becomes obvious that some kits are better suited than others (not a good idea to try this with a 1/72 scale B-36). I figured that for a first-time experiment with the technique, the right kind of kit would be one which
I delved into my pile of unbuilt kits and came back with a near-perfect candidate: Monogram’s venerable 1/48 scale Do 335, in a 1995 ProModeler edition, bought cheap at less than half the price a while ago.
It met condition A. by not only offering the single and double seater in the same box (those were the days...), but by having engine detail on the left hand side of the fuselage. As for condition B., it may be one of a select few planes that have two props and spinners on the centreline that require cutting in half, but apart from that it was only the fact that the lower wing is a single piece that prevented it from being 100% perfect. Expensive it wasn’t, either, and with Tamiya’s offerings out there it is unlikely to turn into an Ebay cash cow anytime soon. As for the dusting bit, there’s only a small loop antenna that I will have to look out for.
The only thing I didn’t like about the kit, and which is pretty obvious in this format, are the overdone flat tires – the Luftwaffe may have run out of most resources required to operate aircraft by the end of the war, but air was probably still available…
| CUTTING THE PARTS |
Actually, the building part of our hobby isn’t exactly my strongest point – I’m only in it for the painting, so to speak! Both my skills and my equipment are somewhat limited, and I wasn’t prepared for a major investment into machinery that would allow me to make perfect cuts for this prototype.
Looking at my toolbox, the best I could come up with was a fretsaw from childhood days. The major stumbling block here were the thick blades that usually come with these things which seemed unfit for the purpose. However, there is a little shop in Berlin that carries all sorts of weird and wonderful fine tools (http://www.fine-tools.com/) where I was able to buy a six-pack of fine blades for a mere 2 Euros.
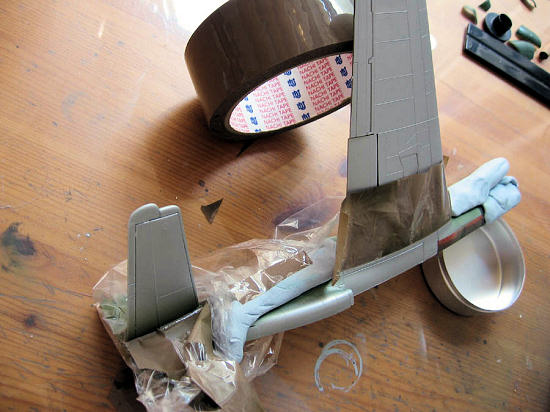
Armed with these, it turned out to be surprisingly easy to make the necessary cuts. After a little trial and error, I came up with the following method: Using thick tape as a guide, I first scored the surface of the parts with a scalpel a couple of times. This produced a groove which then served as a guide during the actual cutting, resulting in relatively straight lines.
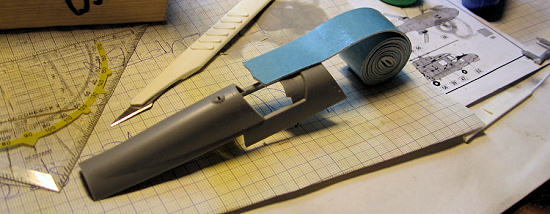
The only parts that gave a little trouble were the long and convex “backs” that allow you to build either the single or two seater variant, but since I needed only one half of each, I made the cuts a little off-centre and sanded the parts straight.
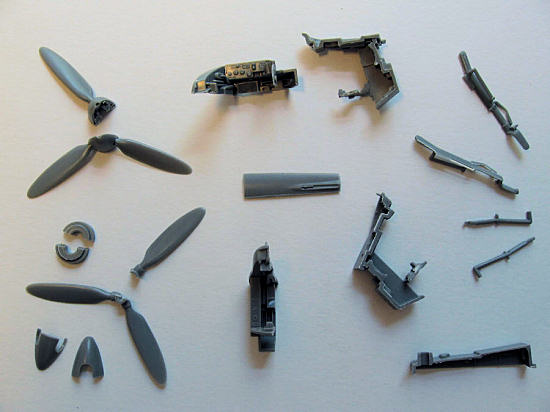
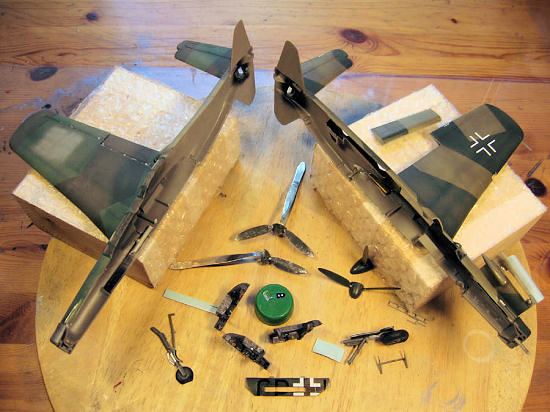
One thing that I hit upon was the fact that for parts that form a sub-assembly, you have a choice of first assembling and then cutting, or vice versa. There is an example in the picture below: one of the spinner/prop assemblies has been glued, then cut; and the other vice versa. In this case, the results were inconclusive: both methods produced results that were OK, if not stellar – this is a choice that probably has to be made after looking carefully at each individual assembly.
What I had feared might end up in a total screw-up actually turned out to be relatively simple and straightforward operation.
| CONSTRUCTION |
Building a model this way turned out to have a few disadvantages, but a large number of advantages as well.
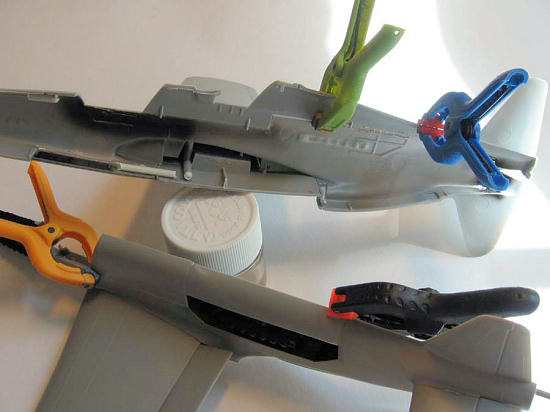
The major disadvantage is the fact that some parts that simply fall into place in a regular build no longer have a firm foothold and their location becomes somewhat vague. This can be usually be remedied easily by gluing in lengths of sprue or sheet styrene for support.
The major advantage is the fact that you can tackle the operation from two sides – inside and out. In the next photos you can see how I was able to use clamps to properly line up the backs and get the cockpit of the left fuselage to fit properly. Stretched sprue softened with lots of glue has been squished through the seams between the back and the remainder of the fuselage from the inside, as later on putty would be on the smaller seams. Spacers have been glued into the wings to make the profile match that on the fuselage (just how can something so quick have such a wing profile?). All of this would have been impossible or considerably more difficult in a conventional build.
Also, you profit from increased parallelism in construction and painting of subassemblies. As a result, this article does not contain the “It was a dark and stormy night” of build reviews, i.e. “Construction started with the cockpit”. In this case, the cockpit was built when painting of the fuselage had already started.
The Monogram Do 335 isn’t exactly the best-fitting kit in the world, but using the aforementioned techniques allowed me to quickly achieve a result that was in line with the non-obsessive level of quality sufficient for this experiment.
| COLORS & MARKINGS |
Painting
Painting wasn’t all that different, really. But the techniques I have developed for making short work of camouflage schemes came in more handy than in a regular build.
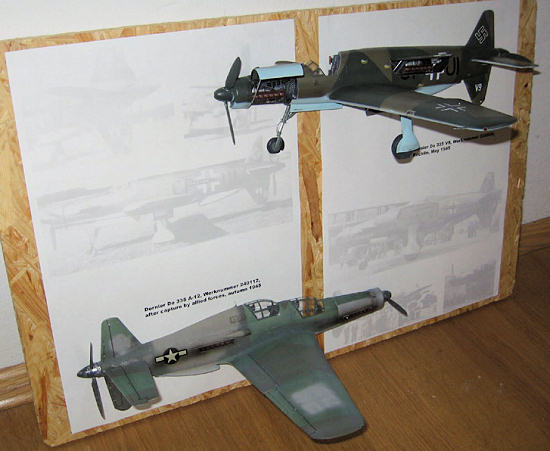
As stated earlier, I wanted the two halves to look different to add visual interest. While the standard paint scheme would have been the usual combination of RLM 81/82/76, an article by Michael Ullmann suggests that early prototypes were built before this scheme became effective, and were still using RLM 70/71/65. A perfect opportunity to show the two side-by side for comparison! I also wanted one of the two to look pristine, the other battered.
“Realism” is something that I consider optional in modelling and usually do not spend too much time worrying about (if I want to obsess about minutiae, I have a day job where I can do that to my heart’s extent). However, the modfile format seemed to call for a modicum of historical accuracy, so I did the unthinkable and went ahead to research the subject.
Which birds to build, then? In reality, less than 50 were assembled, a goodly mixture of prototypes and pre-production batch machines of various variants. To be in line with my low-cost approach, it had to be something that could be done using only the kit-supplied decals or stuff from the spares box.
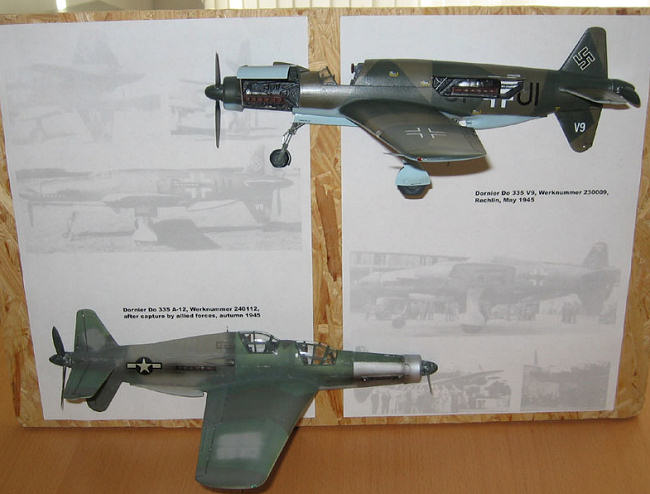
I settled on Werknummer 230009 / V9 / CP+UI (more on this later) for the single seat prototype to be finished in pristine conditions, and decided that its counterpart would be Werknummer 240112, an A-12 double seater which was captured and went through some intensive testing by both UK and US forces, making it the perfect choice for the battered paint scheme.
For painting, I used my usual method which allows me to go through multicolour camo schemes in a breeze. I start by cleaning the surfaces (using dish washing liquid and/or methylated spirit) and spraying a primer layer of either white or aluminium, using an acrylic paint such as Tamiya or the recently released Revell line of acrylics. This I will leave to dry overnight.
I then spray the
first camo colour, using a mix of acrylics (in this case, JPS/Don Color RLM
colours) and 30 to 50 % of the universal miracle ingredient – Future! This has
two main advantages: First of all, I can freehand this translucent mixture on
the very light primer to finely adjust colour saturation and lightness, allowing
me to do in one go what would otherwise require measures such as pre-shading or
post-fading. Secondly, the mixture needs less than an hour to dry and allows me
to go to the next colour quickly. As a side effect, I have a glossy surface that
is usuall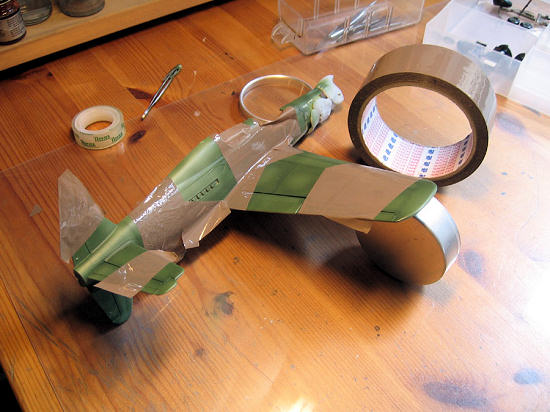 y
OK for decaling and does not require another layer of gloss/Future. There is
also no need for special care in handling these surfaces – provided that your
hands are not covered in solvents, you can touch and hold your models without
special precautions.
y
OK for decaling and does not require another layer of gloss/Future. There is
also no need for special care in handling these surfaces – provided that your
hands are not covered in solvents, you can touch and hold your models without
special precautions.
Here you can see how effective this is: RLM 81 has been sprayed over the Revell acrylics aluminium primer, and left to dry during the lunch break – note the tonal variations. You can see the masking for the upcoming RLM 82 using wide packaging tap: quick, simple and much cheaper than Tamiya tape – provided your paint job can survive it. The packaging tape had been used before: while spraying the RLM 81, I had tried to do some chipping to reveal the underlying aluminium primer, but the paint/Future mix sticks with such tenacity that mere seconds after spraying it on, even rubbing in the tape and yanking it away violently will produce only minute chipping! As you can see, the only place where I was able to produce major chipped areas was on the masking tape on the front engine cover ;-)
The next photo was taken less than an hour later. RLM 82 has been added to complete the upper side camouflage, and the areas to be sprayed RLM 76 have been masked using Blu Tack sausages as I wanted a soft demarcation line.
After spraying RLM 76, I immediately removed the masking and added the overspray covering the markings and national insignia, using a mixture of Tamiya medium grey and olive drab in varying proportions. I freehanded a botched look, simulating washed paint on the fuselage and ghost images of the overpainted insignia on the wings.
In all, I started the camouflage jobs on the two fuselages at 10 o’clock in the morning (having sprayed the primer the day before), and was finished with both sides at around 4 o’clock in the afternoon. This includes spraying (3 colours left, 4 colours right), a quick swipe with a wet paintbrush between layers to clean the surface, all masking required, drying times, construction and paint work on another kit, and a lunch break. Try this with enamels!
As an aside, a “Real men breathe solvents” kind of attitude seems to be prevalent among aircraft modellers in Germany: many seem to be convinced that only enamels or lacquers are to be trusted and acrylics can be made to flake from the model by just staring at them – no idea where this weird misconception originated…
Markings
This was my first experience with the ProModeler “Invisa-Clear” decals, and one I wasn’t quite prepared for!
The set contains markings for one single seater and one double seater. While the latter are supported by my research, the former seem to be entirely spurious – the instructions say they are for “Dornier Do 335A-0, Fourth Prototype”, which is a contradiction in itself, as it could either be one of the prototypes, or an “A-0”, i.e. pre-production, aircraft, but not both at the same time, plus the VG+PK designation is not only invalid for a prototype aircraft (which carried CP+xx designations), but seems to be either non-existent or to belong to a different airframe, not the xxx104 Werknummer that is supposed to go along with it…
After overcoming the thought that research invariably leads to paranoia and is something to be avoided in the future, I hit upon the fact that with a snip of the scissors, I could turn the markings for the double seater (VG+PK) into a set of valid marking for the single seater V9 airframe (VG+PI). A couple more snips would turn two numbers “10” into a single “V9” as used on the lower fin.
As for the right hand side, this has practically no maintenance stencilling whatsoever, and the captured bird had all designations and national insignia painted over. A quick search in the spares box yielded the required “Stars’n’bars” – one dating back to my first life as a modeller a quarter of a century ago, and properly yellowed, too! Since I had already ventured so far down the perilous road of historical accuracy, I decided to also add a swastika to the other side of the model, a first in my current, second modelling career. Another trip to the spares box yielded the desired object – of the same vintage as the “Stars’n’bars”, as at that time, kits in Germany were still shipped with swastika decals. Both decals came off the backing sheet without problems, and I dipped them in Future (what else?) to ensure adhesion – no problems at all!
The lone “Stars’n’bars” was added to the right hand side, and an hour later, a heavy coat of (you guessed it) Future with loads of Tamiya Flat Base was shot over everything except for the aluminium surfaces to give a highly faded look.
On the left hand side, I proceeded to add the modified “Invisa-Clear” decals. When I wetted and applied the first, it nearly gave me a heart attack: a thick wad of milky gravel oozed from under the decals. A quick trip to the instructions revealed that “The milkiness [that] may appear is for better decal adhesion, but will dry clear”. This seems to be true for those decals that I decided to use as is; however, adhesion was minimal so for the rest of them I decided to wash away the smegma and do the Future thing instead. That worked quite well.
I let the decals dry overnight and shot a coat of Future with only a little Flat Base for a pristine look.
| FINAL CONSTRUCTION |
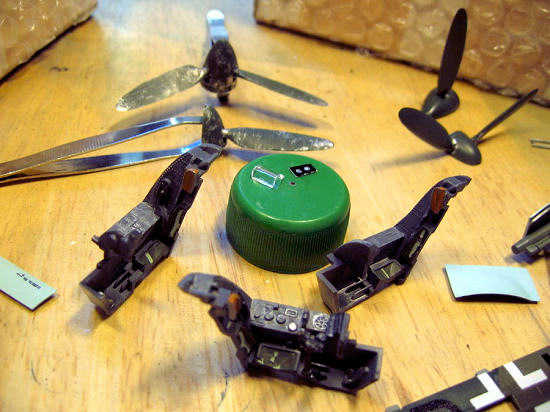
To finish construction, I painted and added the remaining subassemblies and fiddly bits. On the right hand side, there were the canopies, the cockpits, and the prop/spinner assemblies; on the left hand side, this also meant all gear parts, engines and covers, and boarding ladder. All kinds of lights were simulated, mostly using various types of pens.
While parts were drying, I got out my watercolours for a bit of washing (to accentuate the recesses between fuselage/wing and control surfaces) and to freehand the mark behind the aft canopy on the right hand side.
It was now time
to attach the halves to some sort of backing. Since the result looked much
better than expected, I was prepared to give up my low-cost approach at this
point and buy a nice piece of shaped wood, but a quick trip to the nearest DIY
store was unsuccessful, so I just grabbed a piece of wood I had
lying around and attached to that two A4 sheets of paper onto which I had
printed images faded electronically and some information about the airframes. 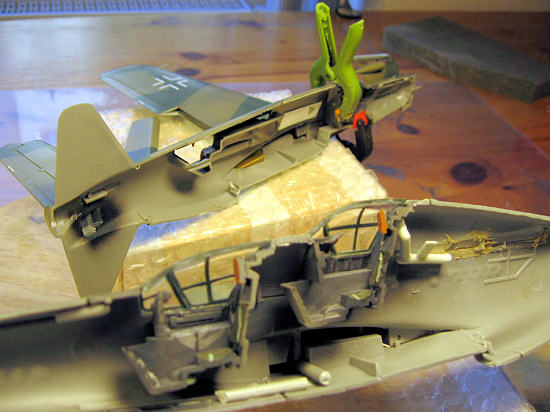
To fix the aircraft halves to the backing, I placed them on the board and, using my finest drill bit in a pin vise, drilled tiny holes through the fuselage in suitable locations (tail fin, engine areas) and down into the boards. I then grabbed a number of the fine pins that are used to attach new shirts to the piece of cardboard that keeps them looking neat in the package. These, though very delicate, have a comparatively big head so there’s no danger that the model slips off the pin. Those that went into the tail fins were shortened a bit so as not to protrude from the back. All pins were inserted into the holes drilled into the fuselage, superglued to same from the back, then superglued into the board. It’s actually a lot less flimsy than it sounds.
I experimented for a while with showing one of the halves from the top, kind of like in a 3-view drawing, but with this bird at least, it didn’t look too interesting, so I stuck with two side views.
Our esteemed editor, who has obviously had similar, if unrealised, ideas in the past, has suggested in the meantime that the halves might even be attached to a mirror, thus giving the impression of a full airframe. Now, that’s a fabulous concept – shows how quickly ideas can develop thanks to the internet!
| CONCLUSIONS |
Well, that went better than expected. Not half bad, so to speak (pun intended).
I fully expected
that armed with only a fretsaw, all I could do is butcher the parts that need
cutting, so I was pretty surprised at the
 outcome.
On the other hand, if I were to do
this again with a bigger or more expensive kit, I would probably rent something
more professional for a day to do the cutting.
outcome.
On the other hand, if I were to do
this again with a bigger or more expensive kit, I would probably rent something
more professional for a day to do the cutting.
What I came away with, apart from the finished prodel, is a lot of experience. Best of all, some of the things I have learned may come in handy even with a conventional build, especially since I am about to tackle my first vac kit – which will probably be aprodel as well as this seems to be a good way to chicken out of some of the complexity.
To sum it up another way:
One outdated Do-335 kit: 10 Euros (estimated swap meet value)
Set of fine blades for fretsaw: 2 Euros
Various materials (paints, glues, wood, etc.): 10 Euros
An Arrow/Anteater model like no other: Priceless!
September 2006
If you would like your product reviewed fairly and fairly quickly, please contact the editor or see other details in the Note to Contributors.