|
KIT # |
48003 |
|
PRICE: |
$24.98 |
|
DECALS: |
One aircraft |
|
REVIEW : |
Sébastien Privat |
|
NOTES: |
Short Run kit |
|
HISTORY |
Heinkel originally entered a competitor for the Bf 109, with the He 112. It had an elliptical wing, rather typical for Heinkel productions, and was found inferior to the Bf 109. A price tag higher than Messerschmitt's bird, and worse handling characteristics were its undoing.
Heinkel engineers didn't lose faith in their ability. In
1937, Siegfried Günther designed a new high-speed fighter, with a potential of
speeds up to 440 mph. It had some striking differences with its earlier stable
brother : a condensation cooling system, which used parts of the wing and
fuselage to cool down its oil and water, a fully retractable landing gear (all
three
wheels could now retract) and a more squared off, inverted gull wing.
 The second prototype reached 394 mph on a 100 km base,
setting a new speed record, and reaching a speed the Bf 109 would reach in 1942.
Obeying the well known theory that states "There's the right way, then
there's the ministry way", the RLM was not convinced of this plane's
potentialities. They ordered Messerschmitt to beat Heinkel's record with a
Bf-109, and so they did with the Bf-109R, of which the only similarity with the
standard Bf-109 was the first part of the name.
The second prototype reached 394 mph on a 100 km base,
setting a new speed record, and reaching a speed the Bf 109 would reach in 1942.
Obeying the well known theory that states "There's the right way, then
there's the ministry way", the RLM was not convinced of this plane's
potentialities. They ordered Messerschmitt to beat Heinkel's record with a
Bf-109, and so they did with the Bf-109R, of which the only similarity with the
standard Bf-109 was the first part of the name.
There is a saying, "The ministry is always right. Reality is sometimes wrong". Heinkel produced 3 He 100 D-0 prototypes, which were sent to Japan for a planned license production. That never materialized. Twelve He 100D-1 were built, of which some were sold to the USSR. The saying about reality and the ministry (or state, or Party) was operational there too, but Yakovlev studied these aircraft, and applied some of his findings to his soon-to-be Yak-1.
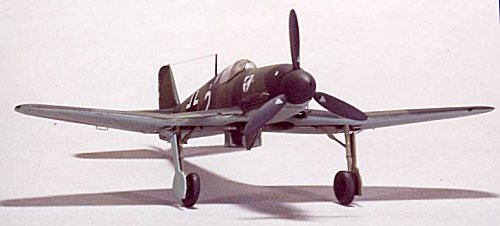
The other He-100D-1s were used as factory defense fighters, and as propaganda fighters, under the spurious designation of "He 113," carrying spurious unit markings. It appears the propaganda worked perfectly, as there are some Allied pilots who incorrectly claimed having encountered the He 113 in late 1940 and 1941.
|
THE KIT |
 This is my first encounter with short run kits, so some of my
comments will seem déjà vu to the more experienced modelers. There are two
sprues of light grey, soft styrene, with heavy attachment points for the parts,
and some flash. There is a clear sprue, with gunsight, closed one-part canopy
and three parts for the open canopy. I found an etched
This is my first encounter with short run kits, so some of my
comments will seem déjà vu to the more experienced modelers. There are two
sprues of light grey, soft styrene, with heavy attachment points for the parts,
and some flash. There is a clear sprue, with gunsight, closed one-part canopy
and three parts for the open canopy. I found an etched
fret with the belts, the instrument panel (with an acetate part for the
instruments), tabs, tab articulation, radio panels, throttle quadrant and the
retractable radiator intakes/exhaust. On my kit, the exhausts were
broken, but no big deal fixing them.
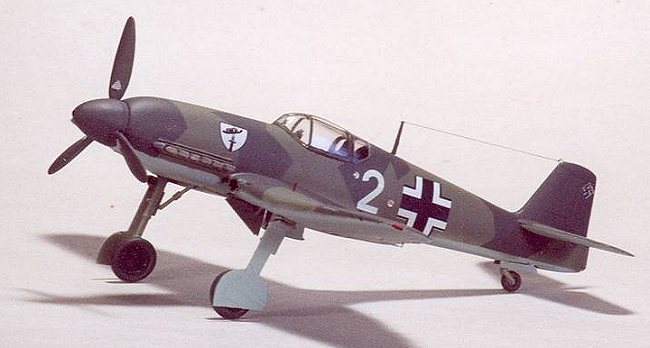
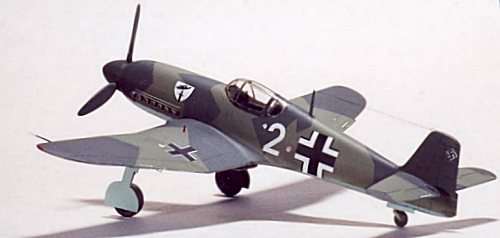
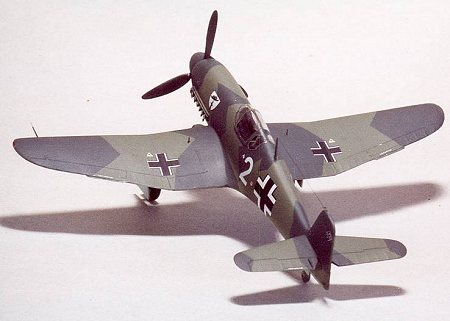
The decal sheet provides markings for 3 fantasy Staffeln, and numbers for the referenced aircraft of the corresponding Staffeln. There's a shield with a hat and a dagger (which I chose), a lightning bolt, and a pipe smoking half moon. The decals are printed by Propagteam; some of the crosses had a very thin white trim on a side.
|
CONSTRUCTION |
As I'm a traditionalist, I began with the cockpit area. The seat (which I sanded down quite a bit), floor, back plate and the fuselage insides were painted RLM02. The instrument panel and radio panels were given a coat of Tire Gray, then drybrushed with white. The perforated etched part that goes around the oxygen bottle was painted silver. I painted the belts with a lightened Faded Olive Drab, and the buckles were painted silver. I cut some resin sprue (a cube 1/5th of an inch wide) for holding the seat in place.
 I had to sand down the cockpit floor to have it fit inside
the fuselage halves. I painted the back of the acetate instrument panel white
and glued it to the back of the etched part, and glued it to one fuselage half.
I glued the cockpit assembly, closed the fuselage halves. And then I had my
first REAL experience with a short run kit: there was a big gap! But I was happy
the gap was there: the canopy fitted thanks to it! (Well, putty and sandpaper,
and patience took care of this.)
I had to sand down the cockpit floor to have it fit inside
the fuselage halves. I painted the back of the acetate instrument panel white
and glued it to the back of the etched part, and glued it to one fuselage half.
I glued the cockpit assembly, closed the fuselage halves. And then I had my
first REAL experience with a short run kit: there was a big gap! But I was happy
the gap was there: the canopy fitted thanks to it! (Well, putty and sandpaper,
and patience took care of this.)
I sanded down the wings to thin the trailing edges, and glued them together, before mating them to the fuselage. And I found the proof I was a rookie: an earlier measurement would have shown I should have sanded down the lower wing for a smooth join to the fuselage! Putty, sandpaper, my Squadron scribing tool and some more patience took care of the problem.
I then masked the canopy, and glued it to the fuselage, with the same song and dance about putty... The rest of the assembly process went smoothly, and the aircraft, minus its undercarriage, and various etched parts, for fear of a handling mishap.
|
PAINT & DECALS |
Painting:
As this was a propaganda aircraft, I assumed it would have a
pristine, factory-fresh look. I primed the entire airframe with RLM02, which
enabled me to track all the imperfections and correct them. To give some depth
to my model, I preshaded it with tire black sprayed on the panel lines. I then
sprayed the undersides RLM65. The light blue demarcation line was masked
using drafting tape, and the upper surface was shot RLM71. Once the paint had
cured, I made the masks for the wings and fuselages (patience again), then shot
RLM70. I let that cure for a couple of days, then I hand painted it with Johnson
Klir. Being French, I have no access to Future, and this is the closest
equivalent. It doesn't spray as well as Future, so my faithful brush was
perfect. And it works fine! The model was ready for decaling.
 Decals:
I choose the shield option, and used the kit decals. They are
very thin, and sometimes seem to have a will of their own, so be careful. I
settled them down with AeroMaster's Aerosol II, then hand painted another coat of
Klir.
Final finish:
I glued the undercarraiges (the doors do need a serious
sanding down), the exhausts (painted Burnt Metal), the various etched bits on
the wings and rudder, the undercarriage indicators (painted red), and the
antenna. As the Pitot probe looked more intended for a Tiger Tank than for a
1/48th fighter, I stretched a Q-Tip (another funny exercise), inserted a thin
copper wire inside, cut everything to size, and superglued it to the leading
edge. The Q-Tip was painted RLM70, and the copper wire was painted silver. I
then coated the whole model with Aeromaster Flat Clear, and unmasked the canopy.
|
CONCLUSIONS |
As noted earlier, this is my first short run experience. I
survived it, the kit survived it too. Sure it's no shake'n'bake, but assembling
this plane, overcoming the problems, had in them the one thing I seek when
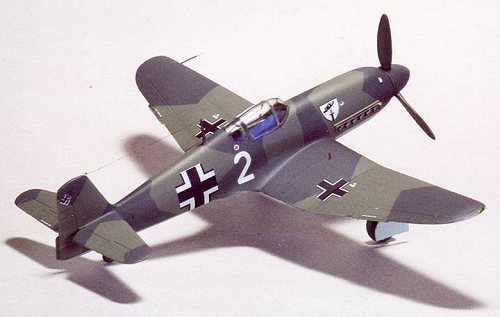
modeling : that was fun! Moreover, this is a very fine looking bird, with its
inverted gull wing and its long legs. If you're interested in "What
If" modeling, you even can paint it with interesting Battle of Britain
markings, or any improbable stuff you'd like, and get a head turner. Go for it!
REFERENCES Reference: William Green: "Warplanes Of the Third
Reich" Copyright ModelingMadness.com. All rights reserved. No reproduction in
part or in whole without express permission. If you would like your product reviewed fairly and fairly quickly, please
contact
the editor or see other details in the Note to
Contributors.