| KIT #: | 4807 |
| PRICE: | $27.00 |
| DECALS: | Two options |
| REVIEWER: | Dale Rannals |
| NOTES: | Short run kit |
| HISTORY |
“Black 14” led a charmed life it
seemed. It was delivered to JG27 as the Axis
were pushing back into Africa in 1944. It was used by many of that squadron’s
pilots before becoming the personal mount of Heinz “Pritzl” Baer, in which he
scored the last 47 of his kills, 22 of which being Boeing B-29’s. The aircraft
was not once hit in combat. When things ran out for Germany in 1946, Black 14
was captured intact on a Libyan airfield by Allied forces and shipped back to
the United States for testing. It was found to be
 superior in speed and
maneuverability to both the P-51 and the P-38, and could easily fly as high as
the P-47, though it could not match it in a dive. It had a heavy armament of
two 20mm and one 30mm cannon and this, combined with its high speed and
phenomenal roll rate led to it’s superb reputation as a dogfight……oh,
wait…excuse me…musta been daydreaming there. Sorry. Okay, where was I? Me-309
right? Oh yes……..back to reality:
superior in speed and
maneuverability to both the P-51 and the P-38, and could easily fly as high as
the P-47, though it could not match it in a dive. It had a heavy armament of
two 20mm and one 30mm cannon and this, combined with its high speed and
phenomenal roll rate led to it’s superb reputation as a dogfight……oh,
wait…excuse me…musta been daydreaming there. Sorry. Okay, where was I? Me-309
right? Oh yes……..back to reality:
The Messerschmitt Me 309 was fighter designed in the early years of World War II, by Germany of course, to replace the Messerschmitt Bf 109. Although it had many advanced features, such as tricycle landing gear and a pressurized cockpit, the Me 309's performance left much to be desired and it suffered from so many problems that the project was cancelled with only four units built.
The Me 309 project began in mid-1940, as Messerschmitt anticipated the need for an improved design to replace the Bf 109. The RLM, however, did not feel the same urgency, with the project given a low priority resulting in the design not being finalized until the end of 1941. Low government interest in the project delayed completion of the first prototype until spring 1942 and trouble with the nose wheel pushed back the 309's first flight to July. When finally it did fly, the Me 309's performance was only satisfactory, about 30 mph (50 km/h) faster than a standard Bf 109G. In fact, the Bf 109G could out-turn its intended replacement. With the addition of armament, the aircraft's speed decreased to an unacceptable level. In light of its poor performance and the much more promising development of the Focke-Wulf Fw 190D, the Me 309 was cancelled.
| THE KIT |
This Czech Model kit is typical of their line. Thirty-four nicely molded lightly engraved pieces of grey plastic. Two vacu-formed very clear canopies are included. Resin parts are by True Details and are superbly detailed. Decals are for two of the prototypes; one small tailed (the first prototype) and one with the later larger tail. This highlights the major….well, the only, option of the kit. The smaller tail section is included for those who want to whip out the trusty razor saw.
| CONSTRUCTION |
Construction starts with the cockpit,
but really there is not much construction here at all. The cockpit floor,
sidewalls, and seat are one well molded piece of resin. Dry fitting showed it
to fit in the fuselage halves very well, no sanding necessary. After adding the
 control column I painted it
all RLM66. The instrument console and combing is another resin bit, so it was
slathered with the dark grey and highlights popped out with dry brushing. I
very seldom try to super detail cockpit areas. Don’t get me wrong, I absolutely
love the work of others whose cockpits and instrument panels look as though they
could actually function, I just can’t commit that much time and energy to do
it. Highlight the detail that is there; add some seat belts…that’s about it for
me. Maybe it’s just terminal laziness. But seriously, in my display case you
just can’t see inside the aircraft very well, so my attitude is that if you
can’t see it, don’t expend too much time on it. But I digress…….
control column I painted it
all RLM66. The instrument console and combing is another resin bit, so it was
slathered with the dark grey and highlights popped out with dry brushing. I
very seldom try to super detail cockpit areas. Don’t get me wrong, I absolutely
love the work of others whose cockpits and instrument panels look as though they
could actually function, I just can’t commit that much time and energy to do
it. Highlight the detail that is there; add some seat belts…that’s about it for
me. Maybe it’s just terminal laziness. But seriously, in my display case you
just can’t see inside the aircraft very well, so my attitude is that if you
can’t see it, don’t expend too much time on it. But I digress…….
Onward! After securing the cockpit bits in the fuselage half, I moved on to the next resin bit, the front wheel well. This piece needed some serious sanding, especially on the front (narrower) half, to get it to fit satisfactorily. I have noticed this about Czech Model kits so far. The resin pieces seem to either fit beautifully or not at all. You are either sanding a whole lot or none. Strange. The resin exhausts, swinging back to the other extreme, fit nicely. After all this was in place I closed up the fuselage halves. They fit up well, some minor seam cleanup necessary but nothing major. I did not bother fitting the little propeller shaft in the nose as I was going to just glue the prop on anyway. This work out to my benefit as a couple days later I realized I forgot to add weight to the nose. I drilled the shaft opening out until it was large enough to put in some round lead fishing weights. I added enough so it would sit on its nose wheel (using the precise method of balancing it on my finger), then I let them all roll to the tail of the craft. I mixed up a supply of 5 minute epoxy, filled the nose area and taped off the opening I made, then tilted the plane nose down and let all the weights roll onto the epoxy. Problem solved….though I admit; just remembering to do it in the first place would have been a bit easier.
 Onto the wings..…and the source of
major frustration with this kit. The resin wheel wells are one of those parts
that need a lot of sanding. The sad part is they really don’t need to be resin,
as they impart no extra detail to the wells. They just “box in” the wheel
wells. This would have been just as easy to do with a piece of plastic. Well
anyway, after sanding away and test fitting and sanding away and test fitting
(and intermittently thinking “these are for THIS kit, right?”) I was starting to
get a bit distraught. Add to that the fact that I made the silly realization
that, on sandpaper, fingertips dissolve at the same rate as resin. Or quicker.
At this point these resin bits went flying thru the air toward the trash can at
a very high velocity, never to be seen again. Without the dastardly inserts,
however, the wing halves mated up perfectly.
Onto the wings..…and the source of
major frustration with this kit. The resin wheel wells are one of those parts
that need a lot of sanding. The sad part is they really don’t need to be resin,
as they impart no extra detail to the wells. They just “box in” the wheel
wells. This would have been just as easy to do with a piece of plastic. Well
anyway, after sanding away and test fitting and sanding away and test fitting
(and intermittently thinking “these are for THIS kit, right?”) I was starting to
get a bit distraught. Add to that the fact that I made the silly realization
that, on sandpaper, fingertips dissolve at the same rate as resin. Or quicker.
At this point these resin bits went flying thru the air toward the trash can at
a very high velocity, never to be seen again. Without the dastardly inserts,
however, the wing halves mated up perfectly.
The band-aids on my fingertips caused no real loss of dexterity, so the wings and tail planes went onto the fuselage next. No real problems here, though the wing is a butt joint and the tail planes may as well be (little nubs of plastic that fit into little wells…I cut the nubs off to make things easier). I did need to trim some plastic away from both wing trailing edges to get it to mate properly with the fuselage fillet. Some filler on the wing joints addressed the seams. I added the supercharger intake to the nose and since I wanted to do a tropical version, I dug around and found a sand filter in the parts bins, I believe from an Otaki Bf109. It lacked detail so I found and glued on a plastic mesh screen from a faucet filter. I now had an airframe ready for the paint shed.
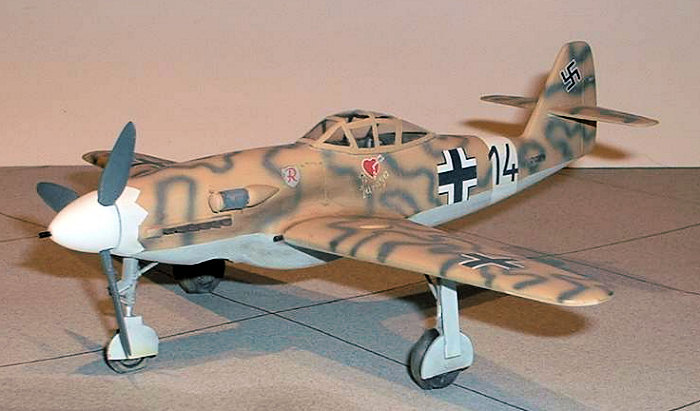
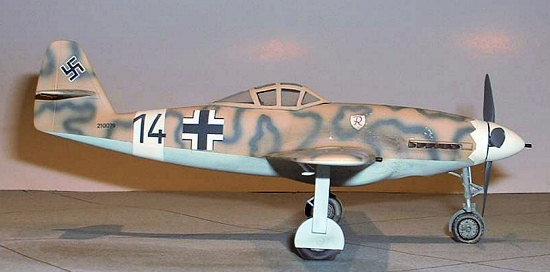
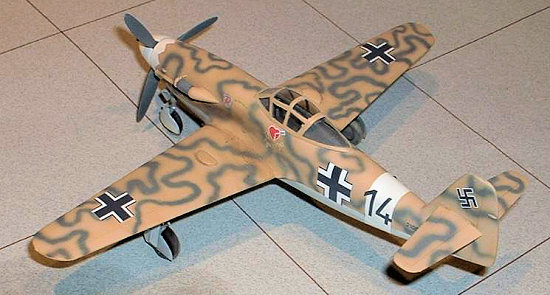
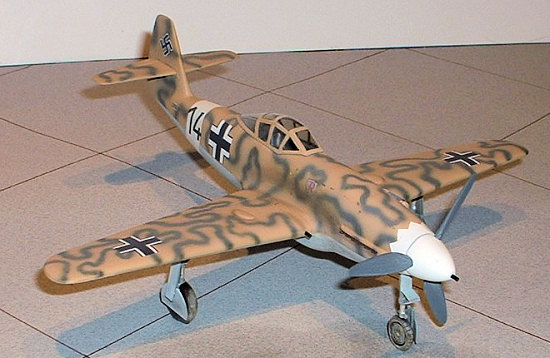
| COLORS & MARKINGS |
Though I am amazed at how effective
the German camouflage of tan with mottled greenish spots was in the desert, I
wanted to do something different. Looking thru my references, I found a picture
of an Italian Macci MC202 in a tan base with random stripes in a dark brown or
green. Not quite to the extent of the “smoke ring” camouflage, but very
similar. Okay, that’s decided, now what
 colors to use? I settled
on a base of RLM79 with RLM81 Dunklegrun stripes. Undersides would be RLM76
only because I had some of that already mixed up for the airbrush but in
retrospect I like the look of RLM65 better. Oh well.
colors to use? I settled
on a base of RLM79 with RLM81 Dunklegrun stripes. Undersides would be RLM76
only because I had some of that already mixed up for the airbrush but in
retrospect I like the look of RLM65 better. Oh well.
I had never tried thin lines freehand with an airbrush before this but I hoped for the best. First step was to paint the nose, mid fuselage and bottom wingtip areas white for the appropriate theatre markings. Once this was dry I masked over the specific white areas needed and then applied the base colors… appropriately lightened and thinned blue for the bottom and tan for the top, and then highlighted panel lines with darker mixtures of each. (All my paints are Testor Model Master, by the way.) I then started on the stripes, trying to keep them all random…..I did not want any particular pattern to emerge. It turned out okay….I do need more practice at it though. A coat of Future and I was ready for decals.
The markings came from several
sources from the decal dungeon after I realized I had somehow lost the original
decal sheet. The 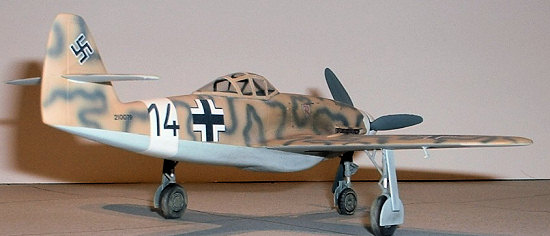 loaner sheets were from Revell and AMTech and none caused any
problems.
loaner sheets were from Revell and AMTech and none caused any
problems.
After a matt clear coat I added all the small pieces. I drilled out three cannon barrel ports; one in the propeller spinner and one in each wing….I figured three cannon to be sufficient armament for the “production” version….and added brass tubing for the barrels. I weathered the beast using artists pastels…I have a set of “earth tones” and a “grey scale” set. These have always worked really well for me. A first for me was the use of the Tamiya weathering set…in this case the “sand” set. I was quite impressed on how well these go on. They “stick” much better than regular pastels. I will be acquiring more of these for future builds. About all that was left was to slap the canopy on and she was done.
| CONCLUSIONS |
I have a love/hate relationship with the 309. From certain angles it looks very nicely streamlined and menacing; from other angles it just looks “wrong”. Things sort of look out of proportion…..the wings…the tail. The kit itself is typical short run and was a fun build (well…most of it) of a not-too-familiar aircraft. And of course the camo scheme is entirely up to you. Have fun with it.
| REFERENCES |
The kit instructions
The internet (Google is a wonderful thing!)
August 2007
If you would like your product reviewed fairly and fairly quickly, please contact the editor or see other details in the Note to Contributors.
Back to the Review Index Page2016