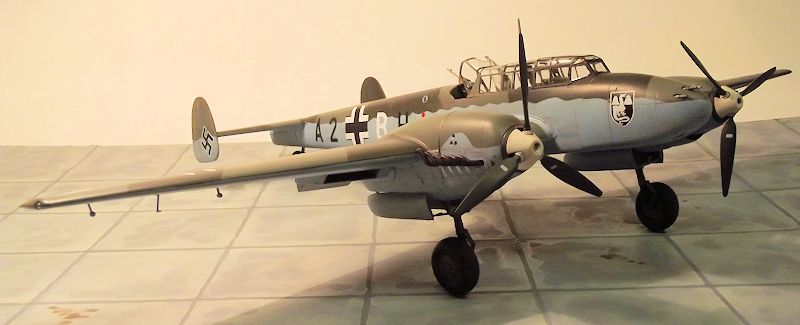
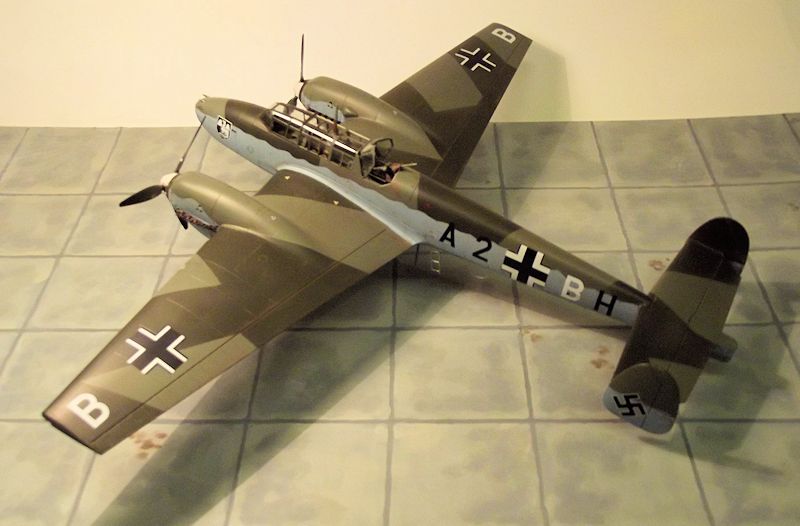
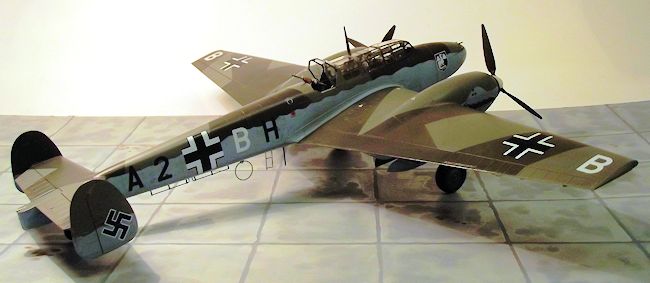
Dragon 1/32 Bf-110D
| KIT #: | 3207 |
| PRICE: | £110-00 |
| DECALS: | Three options |
| REVIEWER: | Frank Reynolds |
| NOTES: |
Aftermarket items: Eduard JX091 canopy masks
(£7-20); Quickboost resin exhausts 32051 (£4-40);
Airscale
generic instrument decals AS32LUFT ( £4-25), |
| HISTORY |
In 1972, the noted aviation historian, Dr. Alfred Price wrote “In the
history of aviation there can be few aircraft that have been maligned
more unjustly than the BF110”. The type had a twofold deficit in the
minds of aviation historians in that it suffered heavy losses in the
Battle of Britain and it served on the losing side in World War Two. Yet
it was a rugged and versatile aircraft that served throughout that war.
The Messerschmitt Bf110 was designed to meet a requirement of the German
Air Ministry in 1934, calling for an aircraft capable, “of the pursuit
of enemy formations operating over the Reich or returning over their own
territory”. It first flew in May 1936 and was designed to utilise the
then-new Daimler Benz DB600 engines. Although never expected to be as
agile as single seat fighters of the period, its level flight speed of
over 310mph was impressive. Progressive flight development and testing
quickly evolved the Bf110B-1 with two DB600A engines of 960HP and the
impressive punch of a six-gun forward armament comprising four 7.9mm
 MG17 machine guns in the nose and two 20mm MG FF cannon in the belly
under the cockpit, capable of being serviced and reloaded by the rear
gunner who was also provided with a flexible 7.9mm MG 17 machine gun for
rear defence.
MG17 machine guns in the nose and two 20mm MG FF cannon in the belly
under the cockpit, capable of being serviced and reloaded by the rear
gunner who was also provided with a flexible 7.9mm MG 17 machine gun for
rear defence.
The availability of a more promising 1,100hp fuel-injected engine, the
DB601, led to the Bf110C, the definitive version to equip the
Luftwaffe’s elite strategic fighter Zerstorer units and 195 of the type
served in a close support role during the invasion of Poland in 1939.
350 of the type were employed during the invasion of France, by then at
the peak of the legend of Germany’s Blitzkrieg tactics.
Late model 110c’s featured underwing racks for a bomb load of up to
1,100lb of bombs a feature continued in
the progressively improved 110D series that also benefited from
improved range, over 700 miles with drop tanks.
Compared with single seat fighters of the period, which were essentially
short range point defence interceptors, the Bf110 was capable of ranging
far and wide, with adequate fuel for a reasonable loiter time and was
ideal for Luftwaffe operations in the Arctic Circle, The Baltic,
Mediterranean, North Africa or the Steppes of Russia.
The 110 was to become a workhorse of the Luftwaffe, employed in an almost bewildering range of variants, heavy fighter, ground attack/tactical bomber, night fighter, reconnaissance. It remained in production until early 1945. As the war turned against Germany the Bf110 might be seen to be antiquated and outclassed, yet in its early years was a powerful, rugged and effective machine with an awesome armament.
| THE KIT |
I approached this kit with some trepidation. It is, by a country mile, the
most expensive kit that I have ever attempted. The scuttlebutt on the web is
contradictory, some say the kit is sublime, others that it is a swine. It is
certainly complex and repays slow, steady work.
 The plastic parts are sensational. Crisp, clean, sharply moulded, with
subtle panel line and rivet detail, there was no flash, no distortion, no
sink marks, it would almost be a shame to cut them from the parts frames or
risk disfiguring them with a cement spill.
The plastic parts are sensational. Crisp, clean, sharply moulded, with
subtle panel line and rivet detail, there was no flash, no distortion, no
sink marks, it would almost be a shame to cut them from the parts frames or
risk disfiguring them with a cement spill.
By comparison, the decal sheet is a disappointment. Some 7in by 3.5in in
size, it only provides the main national markings and code letters for two
aircraft. For a kit of this size and complexity, the absence of airframe
stencils is a major negative and in the context of the premium price,
unacceptable.
The instructions are brief enough, a multi-folded sheet in grey scale and
half tone providing six A4 pages of exploded views, and two of half-tone
camouflage drawings. Again, for a kit of this price and luxurious tooling,
exploded views for just twelve stages of construction are below standard.
Each stage covers all of the parts in a particular area of the airframe,
sometimes unhelpfully. For example stage 4 covers the installation of a
substantial wing spar and belly fairing to be attached to the joined
fuselage halves. Yet that same stage also shows the installation to the
underside of the fuselage of the direction finding loop, belly aerials and
crew access ladder. I defy anyone but the most fastidious of modellers to
install those delicate external parts even before the wings, engines and
tail section have been attached. I find that the best solution is to use a
highlighter pen to mark up those parts that will logically be added at the
end of the build. The instructions are also sloppily edited since some of
the illustrations show under wing tanks that are not applicable to the kit
and none are provided in the box.
| CONSTRUCTION |
 Conscious that the instructions were confusing and contradictory I spent
much time in pre-planning each stage of the build. I began by washing all of
the parts frames in clean water to which a few drops of washing up liquid
were added, then rinsing and left to dry overnight.
Conscious that the instructions were confusing and contradictory I spent
much time in pre-planning each stage of the build. I began by washing all of
the parts frames in clean water to which a few drops of washing up liquid
were added, then rinsing and left to dry overnight.
I had decided that the airframe would be closed up; that is, no exposed
engines or armament compartments. The engines supplied would merely serve to
hold the exhausts and radiators in place, so all of the engine ancillaries
and pipework would be omitted. These parts were removed from the frames and
bagged along with parts marked “not for use” – they were all kept close by
during the build in case I had got it wrong and needed to put them back into
use.
Next, an unscheduled clean up of the parts and not for the usual reasons.
The components are beautifully moulded because they accurately fill the
moulds, and many parts have tiny moulding pips to ensure that the flow of
plastic is complete. Each pip must be cut from the relevant part with a pair
of side cutters. How many I do not know, I lost count at about 100. Any tiny
tags left behind from this process must be carefully trimmed away at the
assembly stage. This is necessary since some of the pips are close to, or
on, the joining surfaces and could prevent the parts from mating properly. A
quick pass with a sanding stick will do, it just requires determination and
patience.
Construction begins with the interior and the base colour chosen was RLM
Grau 02, Tamiya Acrylic XF-22. The long cockpit assembly consists of a full
length floor, with side walls and a rear bulkhead. The instructions suggest
building up the whole cockpit tub and then trapping it between the fuselage
halves. I ignored this and went for the internet consensus that the side
walls are best fixed separately inside the fuselage halves with the floor
and seat assembly attached to one half and the
allowed to dry. The interior is satisfyingly detailed. The pilot’s
cockpit consists of an instrument panel moulded in deep relief with separate
side consoles, throttle box and foot pedals. The bucket seat has separate
side frames and seat belts are added from the kit’s PE fret. The rear
cockpit is delightfully complex with the main spar framework intruding. It
is detailed with the floor mounted MG FF cannon and associated ammunition
drums. The gunner is provided with an amidships forward facing seat to
enable him to tend to the main armament and a rear facing seat for the
flexible machine gun. Again seat belts come from the PE fret. Assorted
“black” boxes within the cockpit were picked out in contrasting dark greys
from the paint locker, while the guns and ammunition drums in Tamiya XF-36
Metallic Grey. The various instruments throughout the cockpit were picked
out with generic decals from an Airscale sheet.
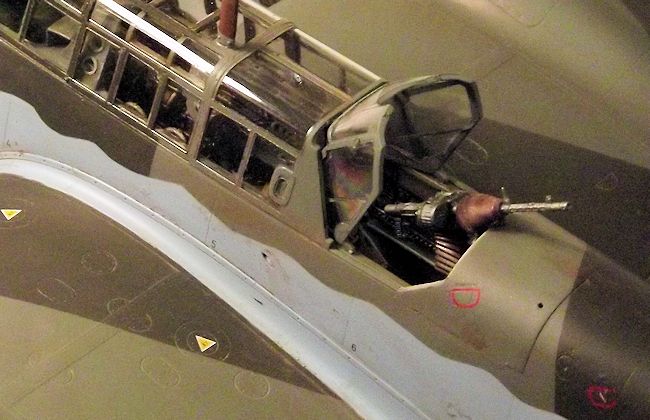 The forward nose consists of two half bulkheads and a horizontal floor for
the quadruple MG 17 machine guns. I cut off the gun barrels, which can be
added later at the external painting stage.
The forward nose consists of two half bulkheads and a horizontal floor for
the quadruple MG 17 machine guns. I cut off the gun barrels, which can be
added later at the external painting stage.
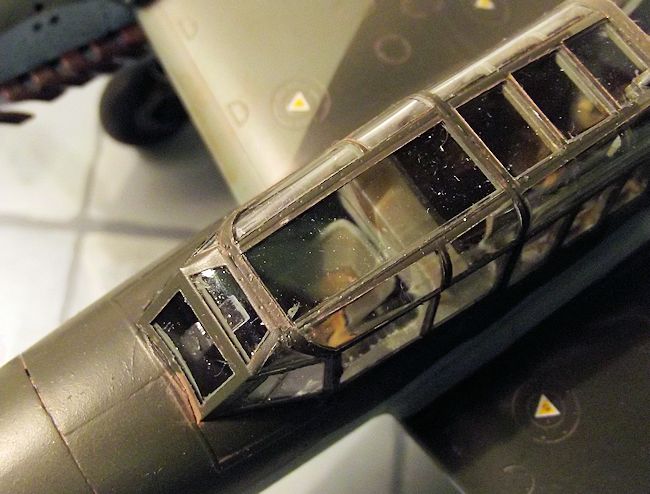
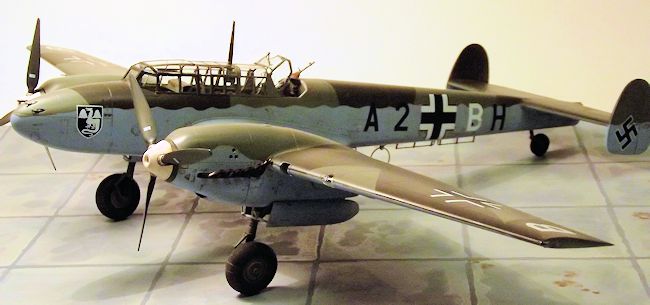
The fuselage halves were joined, needing a minimum of fettling and
adjustment, but I had no real problems with the fit. The canopy can now be
added and it is a work of art. The pilot’s section can be modelled open,
with or without retracted sliding windows to the side glazing. The rear
gunner’s hood has alternative sections allowing it to be closed flush or
cranked open. The substantial rollover cage is separately moulded. The
inside of the canopy was masked off using a vinyl mask set included with the
aftermarket decal sheet from Techmod, and the internal framing painted RLM
Grau 02. There are 54 sections of canopy mask required for the interior of
all the canopy glazing and another 54 for the exterior, so plenty of time
should be allowed for accurate masking and to ensure that the edge of each
mask is burnished down with the point of a cocktail stick to avoid paint
leakage. I chose to fix most of the canopy sections closed, leaving just the
rear gunner’s position open. Do not forget to remove the internal canopy
masks before the glazing is fixed down to the fuselage.
Next are the engines and their nacelles. I simply built up the engine blocks
and their bearers, using just enough parts to support the exhaust and
propellers. The parts for the engine nacelles were carefully identified and,
when removed from the parts frames, carefully labelled with their part
numbers. Most parts are handed, but the instructions are not clear as to
which goes on the left engine and vice-versa. So they were dry assembled at
least twice each, using low tack putty and small pieces of masking tape
until I was satisfied. The nacelles are as comprehensively detailed as the
fuselage structure and consist of a wheel bay roof, engine firewall, upper
and lower cowl fairings and inset upper and lower panels that fit around the
exhaust outlets. There is plenty of scope to go wrong so the panels were
built up carefully, edge to edge, curve to curve, over about a week. When
finished, each nacelle consists of a power egg with an extended platform to
the rear that forms the wheel bay roof, to which an eight-piece main
undercarriage leg is attached. The leg must be added at this stage since the
whole unit is clamped between the upper and lower wing sections. The l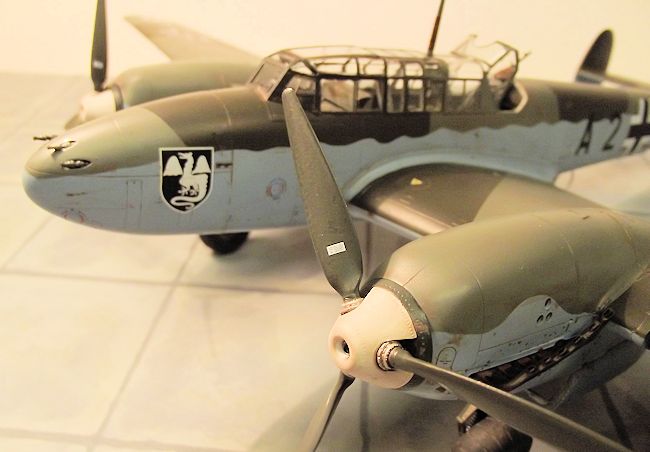 eg
assemblies and nacelle interiors were painted in Grau 02, with a dark colour
wash to accentuate the detail. At this stage the main and tail wheels were
assembled, for installation later in the build. Separate wheel centres are
provided, useful since the tyres can be painted without masking. The tail
wheel is a six part assembly, with separate wheel forks. Tyres were painted
in Tamiya XF-85 Rubber Black.
eg
assemblies and nacelle interiors were painted in Grau 02, with a dark colour
wash to accentuate the detail. At this stage the main and tail wheels were
assembled, for installation later in the build. Separate wheel centres are
provided, useful since the tyres can be painted without masking. The tail
wheel is a six part assembly, with separate wheel forks. Tyres were painted
in Tamiya XF-85 Rubber Black.
The dry assembly technique is then repeated before installation of
the under wing radiator units, which
again are handed and tapered to fit the wing profile. The radiator
components were painted Aluminium Silver, with a thin dark colour wash for
contrast. The upper and lower wings are then joined, trapping the power eggs
in place. I found that these substantial units lined up reasonably well,
with a minimum of fettling. While they were drying, the tail surfaces, nose
cone and rear fuselage cone were installed and also left to set.
The substantial centre section assembly provides both front and rear spars
that lock positively into the wing roots and provide a strong joint for what
is by now becoming a weighty aircraft. The tail section similarly slid into
place along two locating tongues. Tube cement was used for these joints.
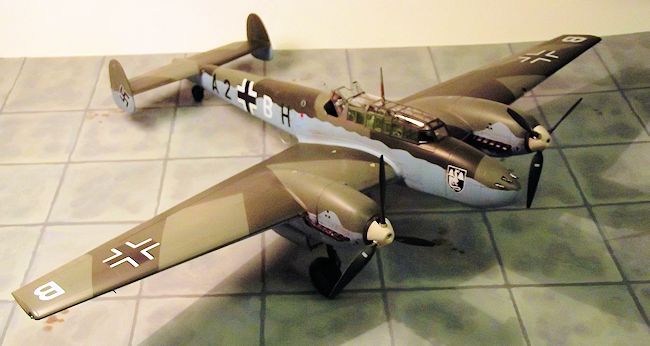
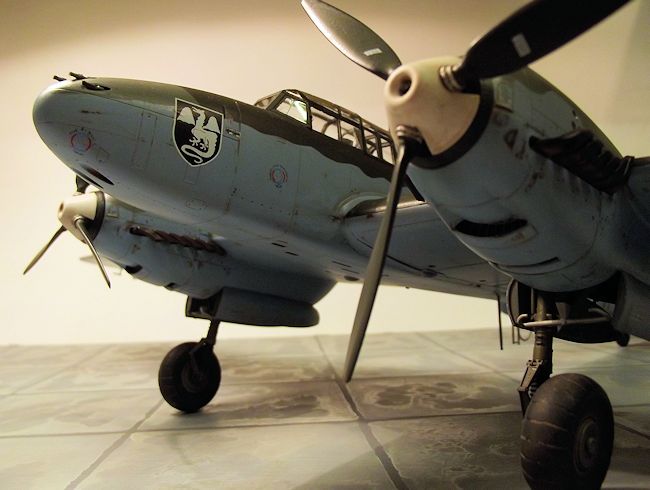
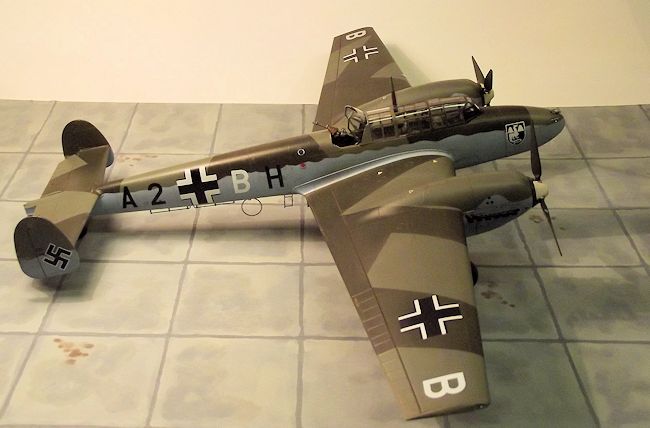
| COLORS & MARKINGS |
The basic airframe was now ready for painting. The cockpit glazing had
already masked externally using an Eduard canopy mask set No JX091,
specifically produced for Dragon’s Bf110D. While I had the vinyl mask set in
the Techmod decals, I prefer the flexibility of the Kabuki-style yellow tape
in an Eduard set compared with the relatively stiff black vinyl from Techmod.
The open rear cockpit, engine and radiator inlets and undercarriage bays
were blocked off with pieces of
tissue
paper stuffed in place, then the airframe was
 washed and primed with grey
auto primer from a rattle can. I was pleased to find that no filler was
required anywhere.
washed and primed with grey
auto primer from a rattle can. I was pleased to find that no filler was
required anywhere.
Lower surfaces were sprayed in Xtracrylic
XA1202 Hellblau RLM 65 in two
thin coats, while the undercarriage doors and small underside detail parts
were sprayed while still on the parts frames.
Now here is a strange thing. At this stage the airframe was transferred to
the Shelf of Doom in my hobby room and stayed there for over a year. And I
have no clear idea why. It may be that the ‘110 came after a run of nine
Bf109s in 1:32 scale and I was beginning to tire of Luftwaffe camouflage.
But there it sat waiting for further inspiration. Then one day it caught my
eye and back on the workbench it went.
The blue undersides and fuselage sides were extensively masked using masses
of Tamiya tape in varying widths, then the upper surfaces received two thin
coats of Grau 02. Further masking of the upper surfaces allowed the final
colour of the splinter patter camouflage to be applied, RLM 71 Dunkelgrun,
using Tamiya XF-61 Dark Green.
The propellers were treated as separate sub assemblies with the blades and
spinner back plates painted RLM 70 Schwarzgrun, ( Tamiya XF-27 Black Green),
the spinners XF-2 Flat White and the hub details picked out in Aluminium
Silver. They would be fitted at the end of the build.
 The masking was steadily stripped away and any small defects in the paint
were touched in. The whole airframe was flicked over with an Ultra Fine
sanding stick to blend in any minor ridges between the colours.
The masking was steadily stripped away and any small defects in the paint
were touched in. The whole airframe was flicked over with an Ultra Fine
sanding stick to blend in any minor ridges between the colours.
The airframe was prepared for the decals with two brushed coats of Future/Klear.
This after market sheet came from Techmod of Poland and the package is good
value. An A4 sheet of well printed matt decals with good colour density and
most importantly, the airframe stencilling. The sheet offers a choice of two
finishes for ‘110Cs from the early war period and the option I chose, a
BF110D from I./ZG 52, France, May 1940. The excellent instructions include
five full colour A4 pages, including one of detailed stencil placements.
Colour call outs are for RLM and Federal Standard numbering. Also included
is the bonus of those vinyl masks for the internal and external cockpit
glazing.
The decals went on easily and settled down well with a little help from
Micro Sol and Micro Set. The whole airframe was sealed with an airbrushed
coat of Xtracrylic Flat Varnish.
| FINAL CONSTRUCTION |
The main wheels and tail wheel assembly were installed. It was now time to
track back and install the small parts highlighted on the instruction sheet,
the belly aerials, mass balances to the control surfaces and to pay some
attention to the exhausts. These items were the only small limitation in
Dragon’s excellent overall mouldings. The very distinctive cranked, handed,
rectangular section exhaust pipes are moulded in solid.
 Fortunately Quickboost have come to the rescue with superbly cast resin replacements
that have hollow ends. They are a direct replacement for the kit parts and
simply tacked in place with a dab of superglue. They were painted Red Brown
XF-64 with a dark over wash from the Citadel range. The propellers were
simply pushed onto the shafts.
Fortunately Quickboost have come to the rescue with superbly cast resin replacements
that have hollow ends. They are a direct replacement for the kit parts and
simply tacked in place with a dab of superglue. They were painted Red Brown
XF-64 with a dark over wash from the Citadel range. The propellers were
simply pushed onto the shafts.
Finally the entire airframe was slathered with a medium Mud Brown wash from
the Promodeller Weathering Wash range. This was left to dry overnight then
carefully rubbed away with a soft cloth and a moistened Q tip. This subtly
highlights Dragon’s superb mouldings and the differing depths and widths of
the recessed panel lines.
One final coat of Xtracrylic flat and it was time to remove the canopy masks. This was a hold your breath moment since I had no idea whether the tack adhesive on the masks might have degraded over the year that it had been in place while on the Shelf of Doom. But there were no problems, so I can confirm that some canopy masks can stay in place for a year and still be removed effectively without leaving any residue behind.
| CONCLUSIONS |
 I was impressed with the quality of the plastic parts, there were no sink
marks, no distortion and the kit required no filler. The surface detail is
subtle and looks great under a coat of paint.
I was impressed with the quality of the plastic parts, there were no sink
marks, no distortion and the kit required no filler. The surface detail is
subtle and looks great under a coat of paint.
This is a premium product that I would rate at 90%. The mouldings are
excellent and in my opinion on par with anything in the market place. The
kit is let down by inadequate decals and weak instructions. I was
unimpressed with the need to spend another £27-00 on aftermarket products.
That said, it is a fine piece when completed and could be further enhanced
by those who have more talent than I do.
It takes a pride of place in my collection.
| REFERENCES |
War Planes of the Second World War,
Fighters Vol.1, By William Green. Macdonald & Co. 1961
Famous Fighters of the Second Wold War, by William Green. Macdonald & Co
1957
May 2014
The kit came from my LHS, Spot on Models and Hobbies, of Swindon, England. All of the aftermarket items from Hannants.
If you would like your product reviewed fairly and fairly quickly, please contact the editor or see other details in the Note to Contributors.