Kopro 1/72 Aero C-3A/B C-103
|
KIT #: |
KOP3158 |
|
PRICE: |
HK$32.50
at UML in Hong Kong (sale item)
|
|
DECALS: |
Four options |
|
REVIEWER: |
Richard F |
|
NOTES: |
Same kit as
Kopro KOP3135 Siebel Si-204 |
 The Aero C-3
was built in Czechoslovakia after World War II. It was a copy of the German
Siebel Si-204D which came into service in about 1943, apparently mainly used as
a trainer and a liaison aircraft. Just over 1200 were made in various
sub-versions. Production wound up in 1945. After the war, the Aero Vodochody
company built a further 179 in three main variants - the C-3A and C-3B were
trainers (the B version for bombing training) and the C-103 designed as a
passenger and transport aircraft. This little plane had yet another life in
France, where up to 350 were built as the NC-701/702 Martinet with three-bladed
props and Renault engines (the 702 had a more conventional nose). The airliner
versions were used by the Czech airline CSA and by Air France.
The Aero C-3
was built in Czechoslovakia after World War II. It was a copy of the German
Siebel Si-204D which came into service in about 1943, apparently mainly used as
a trainer and a liaison aircraft. Just over 1200 were made in various
sub-versions. Production wound up in 1945. After the war, the Aero Vodochody
company built a further 179 in three main variants - the C-3A and C-3B were
trainers (the B version for bombing training) and the C-103 designed as a
passenger and transport aircraft. This little plane had yet another life in
France, where up to 350 were built as the NC-701/702 Martinet with three-bladed
props and Renault engines (the 702 had a more conventional nose). The airliner
versions were used by the Czech airline CSA and by Air France.
There isn't a great deal of information about this little plane. The German
aircraft seems to have the dubious honour of being the last German plane shot
down on the Western front, downed by a P-38 on the evening of 8 May 1945 just a
few hours before the end of the European War - hard luck for those aircrew
having survived that long with the end so close in sight. I read that on
wikipedia - may or may not be true.
 I bought
this because it looked weird and was half price. Full price, which is only $HK65
(E6.50), was nonetheless too much of a stretch for a kit like this of a subject
I'd never even heard of, but who can say no to 50% off? I had a rough idea of
what to expect but I was actually pleasantly surprised. This is a nice little
kit. Of course, it is not remotely close to Tamiya or Hasegawa, and not even as
good as older Airfix kits. But it does have a decent shape, a bit of cockpit
detail, and a nice set of clear parts. In the cockpit there are two seats, a
control panel, control sticks, rudder pedals and a little bit of raised detail.
I bought
this because it looked weird and was half price. Full price, which is only $HK65
(E6.50), was nonetheless too much of a stretch for a kit like this of a subject
I'd never even heard of, but who can say no to 50% off? I had a rough idea of
what to expect but I was actually pleasantly surprised. This is a nice little
kit. Of course, it is not remotely close to Tamiya or Hasegawa, and not even as
good as older Airfix kits. But it does have a decent shape, a bit of cockpit
detail, and a nice set of clear parts. In the cockpit there are two seats, a
control panel, control sticks, rudder pedals and a little bit of raised detail.
It's moulded in grey and the parts need cleaning up, particularly the smaller
parts which do require some effort. The clear parts are quite clear and the
window frames on the main cabin are crisply done.
The kit seems to contain all the parts you need for any of the Aero versions and
also the Siebel versions from the Siebel boxing. There are two little bombs and
a clear turret with a very basic representation of a machine gun. These go with
the C-3B version.
Everything is pretty basic - heavily raised panel lines, some rivets (though
these are okay to my eyes), and basic wheels (but not simplistic - they look
okay).
Getting a great result out of this kit would take a lot of time, effort and
skill. Getting a nice model of the C-3, on the other hand, just takes a little
patience and a lowering of the bar in terms of your expectations.
I started by painting the interior and installing the cabin windows - these fit
very well. There's no detail in the passenger cabin, but unless you really tried
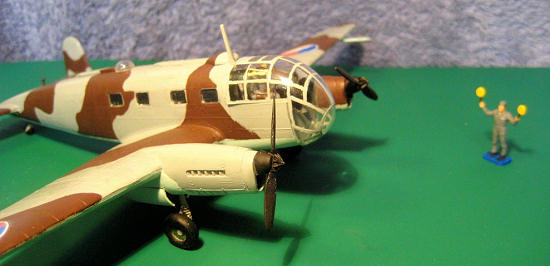
it'd be difficult to see much in there anyway. I painted up the cockpit and
advertised in the spares box for a pair of pilots. These two were laid off from
the aircrew of my Matchbox Dornier flying boat when I decided to do the airmail
version, so they presented as the perfect candidates for this mission. A quick
lick of paint to take off their life jackets and they were hired.
 The good
thing about this model is you can put together the fuselage and install the
cockpit without actually finishing it - the big canopy leaves a huge wide open
space before it is attached. So if you're feeling bogged down by the cockpit you
can install it, build the airframe, and come back later to finish off the front
office.
The good
thing about this model is you can put together the fuselage and install the
cockpit without actually finishing it - the big canopy leaves a huge wide open
space before it is attached. So if you're feeling bogged down by the cockpit you
can install it, build the airframe, and come back later to finish off the front
office.
I built the wings and engine nacelles and attached them to the fuselage along
with the twin tail. Then came a long period of putty and sanding. Needless to
say, the fit on this model was less than perfect, and plenty of careful sanding
is needed to clean up the mismatch without ruining too much of the raised
detail.
With that all done, I moved to the painting described below. Once painted, I
only had to install the control sticks and other cockpit components, plus the
pilots, and seal up the canopy. The canopy doesn't really fit very well. I used
my standard, semi-lazy technique of filling that gap with paint, using a very
fine gap and a tiny bubble of paint, and gently wedging it into the gap until it
fills. I do this because I can't be bothered masking the canopy off. I just
paint the framework freehand instead. Lazy? Yes.
The undercarriage is very simple and went on after a little trimming to the
undercarriage legs to make them fit into their locator holes.
Remember to drill out a hole for your astrodome too, and the turret if you build
that version.
I had hoped to make a C-103 in CSA colours but try as I might, I couldn't find a
picture anywhere.
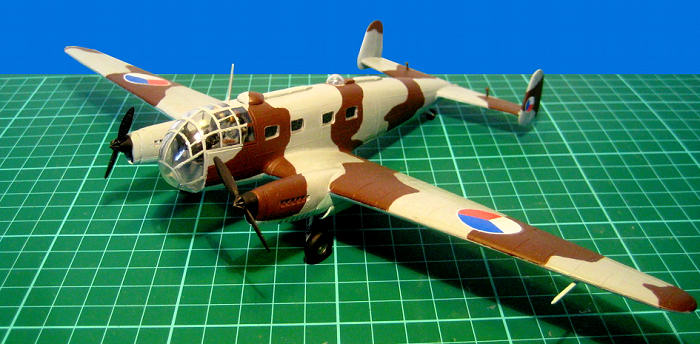
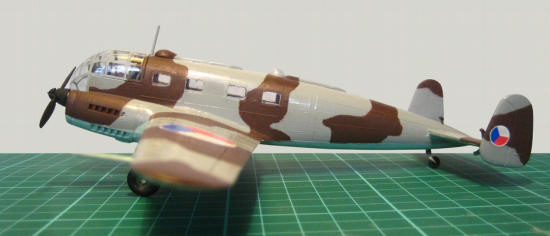
So, I went for the C-3A in brown and light grey camouflage, with the classic
Czech pale blue underside. Other kit alternatives are two Czech C-3 aircraft in
green over blue, and an overall cream Soviet C-103.
 The alert
reader, who perhaps remembers my other reviews, will know that I usually use the
paints that I have handy, rather than seeking out precisely the right colours.
That was my approach here - although I bought a jar of Mr Color 20 "Light Blue"
for the underside, I went with my existing jars of Mr Color 11 "Light Gull Grey"
and Tamiya XF-10 flat brown for the top. The blue and grey are semi-gloss
enamels, while the brown is a matt acrylic.
The alert
reader, who perhaps remembers my other reviews, will know that I usually use the
paints that I have handy, rather than seeking out precisely the right colours.
That was my approach here - although I bought a jar of Mr Color 20 "Light Blue"
for the underside, I went with my existing jars of Mr Color 11 "Light Gull Grey"
and Tamiya XF-10 flat brown for the top. The blue and grey are semi-gloss
enamels, while the brown is a matt acrylic.
Not everyone would agree with this approach of using semi-gloss and matt for the
same scheme, nor on using enamels and acrylics. But the result satisfies me,
especially for a simple build of a fairly basic kit. As I said, I hand painted
the canopy frame lines with a fine brush and a steady hand.
This particular option didn't have any kind of serial numbers or other markings
beyond the roundels. The other Czech variants have more complete markings. The
Czech roundels themselves are nicely done, thin and easily applied. They worked
much better than some other KP decals I used recently, which disintegrated
seconds after hitting the water. Six roundels later, and you're done!
Well, it's a quirky plane, quite stylish in its own way, and if you can find it
at a reasonable price, it's a fun build for the novelty value.
Skilled modellers will be able to really go to town because the basics are
there. Average modellers, like me, can still get a trouble-free build of a plane
that's not well-known and probably rarely seen on display shelves.
Wikipedia
Side profiles:
http://www.czfree-ol.cz/latal/kamuflaze/c-3a.htm
Richard F
October 2009
Copyright ModelingMadness.com If you would like your product reviewed fairly and quickly, please
contact
the editor or see other details in the
Note to
Contributors.
Back to the Main Page
Back to the Review
Index Page 2020