|
KIT: |
Bogu's Resin's 1/72 Fw-190W |
|
KIT # |
815 |
|
PRICE: |
$10.00 |
|
DECALS: |
None |
|
REVIEW: |
Martin Sczepan |
|
NOTES: |
|
Preface
The German version of this review was written as a contribution to the discussion forum on the Revell Germany homepage for April, 1st this year. It was also published on the home page of my modeling club (MSC 'Hans Grade' Berlin - http://www.msc-hansgrade.purespace.de). The English translation was posted in the rec.model.scale news group the same day. Beside the fictional history of a Fw 190 version which never existed it contained a review of a conversion set which was fictional as well. To give the reader of these pages an idea how the model really was built, I added a small construction part at the end of this article.
|
HISTORY |
Even if the history of the Fw 190 seems to be well known, from time to time new facts about this venerable plane are published. So it was a big surprise when last year in the German TV-documentary 'Hilter's Hilfsflugzeuge' footage showing the float plane version Fw 190 W (W stands for 'Wasserflugzeug' - hydroplane) appeared for the first time.
The first attempt to equip fighter planes with floats were made by the
Luftwaffe already in the thirties with the He 51 float plane versions. When the
Luftwaffe searched for a way to protect distant harbors from air raids these
experiments were remembered. So the order to develop float plane versions of
their fighters was given to the Focke Wulf and Messerschmitt companies in late
1944. Messerschmitt solved the problem by equipping the Bf 109 G with a central
float and two auxiliary floats under the wings, while Focke Wulf preferred the
two-float approach. The first test flights with both planes were undertaken in
late January 1945. Since the two floats of the Fw 190 W offered better handling
of the plane under rough weather conditions as well as the possibility to carry
higher loads on the central pylon, this design was chosen by the Luftwaffe. In
fact the tests were so successful, that using the a/c as an attack plane was
considered as well. For this purpose several 'Ruestsaetze' were developed. The
plane could be equipped with underwing rockets. With 'Ruestsatz' R007 it was
possible to carry a 'Personenabwurfbehaelter' (personal dropping container) on
the central pylon that allowed it to drop special agents behind enemy lines.
Since it became clear that the completion of the aircraft carriers 'Graf
Zeppelin' and 'Fuerst Pueckler' would take some more months, the German navy
decided to convert two freighters to auxiliary aircraft carriers. The ships,
named 'Seeschlange' and 'Seegurke', could carry eight Fw 190 W respectively. The
newly formed 'Seekampfgeschwader 3' (SKG 3) was based on these ships. The first
mission started in early April. The 'Seegurke' operated in the Murmansk sea
while the 'Seeschlange' was sent to the gulf of Mexico with the intention to cut
off the fruit deliveries to the US. The first air to air victory with the new
type was achieved when Lt. zur See B. Trunken downed a Mexican 'Kingfisher' on
April 12. In the next weeks the
 planes
operating aboard the 'Seeschlange' were very successful in sinking American
fright ships. As a result the banana supply to the US almost totally broke down.
That's why the Focke Wulf float plane were called 'the scourge of the Caribbean'
by the crews of these ships. Due to the end of the war in Europe, the effect of
this operation (nicknamed 'operation banana split') was very limited. The crew
of the 'Seeschlange' surrendered to the US Navy on May, 10th. Since the US
government feared riots if it became public that a German aircraft carrier could
operate so close to the American mainland, all traces were hidden and the 'Seeschlange'
was sunken east of Miami on May, 16th 1945 with all Fw 190 W on board. The
operations of the 'Seegurke' were not so successful. After a good start with the
sinking of the Russian fish trawler 'Bolshoy durak' the good luck of the ship
failed and it was sunken by a Russian submarine near Kirkenes on April 20, 1945.
The defeat of Germany ended the work on further variations of the type. So the
development Fw 190 W-2 that could be transported by a U-boat (with the intention
to destroy the locks of the Suez-canal) never reached the prototype stage.
planes
operating aboard the 'Seeschlange' were very successful in sinking American
fright ships. As a result the banana supply to the US almost totally broke down.
That's why the Focke Wulf float plane were called 'the scourge of the Caribbean'
by the crews of these ships. Due to the end of the war in Europe, the effect of
this operation (nicknamed 'operation banana split') was very limited. The crew
of the 'Seeschlange' surrendered to the US Navy on May, 10th. Since the US
government feared riots if it became public that a German aircraft carrier could
operate so close to the American mainland, all traces were hidden and the 'Seeschlange'
was sunken east of Miami on May, 16th 1945 with all Fw 190 W on board. The
operations of the 'Seegurke' were not so successful. After a good start with the
sinking of the Russian fish trawler 'Bolshoy durak' the good luck of the ship
failed and it was sunken by a Russian submarine near Kirkenes on April 20, 1945.
The defeat of Germany ended the work on further variations of the type. So the
development Fw 190 W-2 that could be transported by a U-boat (with the intention
to destroy the locks of the Suez-canal) never reached the prototype stage.
|
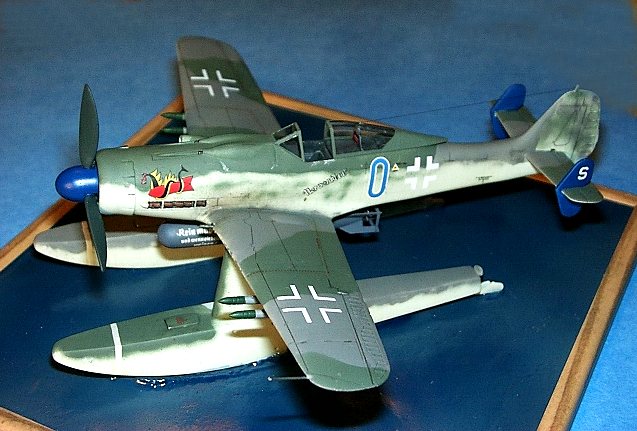
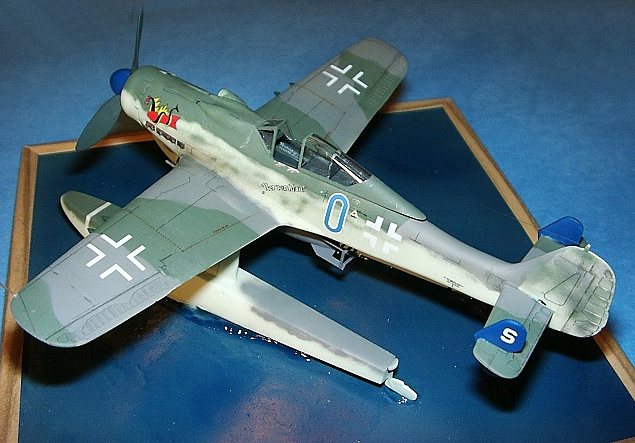
THE KIT |
One year after the publication of the film material of this type the first kit (produced by the Slovakian company 'Bogu's Resins') hits the market. The kit is designed as a conversion to use with the Hasegawa kit and comes with 12 tan resin parts. Beside the floats there are also plugs for the wheel wells, the additional tail stabilizers a set of four rockets and a torpedo. The quality of the parts is very good, with fine recessed panel lines and no visible air bubbles. The fit of the parts is excellent almost no filling and sanding was required. The only problem that I encountered was the exact alignment of the floats but a small drawing supplied with the kit helps to find the right places to drill out the location holes. The dimensions of the floats seem to be correct but the torpedo appears some scale inches to short.
The only major drawback I found, was that this conversion kit contains no decals. But the decal company Errormaster comes to our rescue and has announced the decal sheets 'Banana raiders pt. I-XXVII' (EMD 72-471 to 499).
|
CONCLUSIONS |
For modelers who want to build the airplanes of the Luftwaffe that were of real importance this kit is a must. And if you want to model a version of the Fw 190 that looks different - this is the way to go. Considering the high quality of the parts, the price of 10 US $ is justified but if you also by the decal sheets, this will be a rather expansive project...
Highly recommended
And now the truth...
All my (modeling) friends know me as a specialist for the 'real' Luftwaffe '46 stuff. After building a Me 262 T carrier version two years ago (see review) and a 'Benetton-Lippisch racer' (using the decals of a Benetton-Ford F-1 racer on a Lippisch P.13) last year, I had to surprise my friends on April 1st this year with a new project.
 Since I was working on a
SAAB B-17 by Marivox that time, a nice pair of floats provided with this kit
drew my attention. Inspired by the Spitfire and A6M floatplane versions my
choice fell on the Fw 190 D. So I went to my local hobby shop, bought that
Academy kit and started construction. The kit is quite good (same quality as all
new Academy offerings) with fine engraved panel lines and good detail. The only
weak point is the landing gear which is to simplified. The fit of the major
components is good, only with the front fuselage decking some careful dry
fitting and sanding is needed. Landing gear wells were closed with sheet styrene
and the area was filled and sanded.
Since I was working on a
SAAB B-17 by Marivox that time, a nice pair of floats provided with this kit
drew my attention. Inspired by the Spitfire and A6M floatplane versions my
choice fell on the Fw 190 D. So I went to my local hobby shop, bought that
Academy kit and started construction. The kit is quite good (same quality as all
new Academy offerings) with fine engraved panel lines and good detail. The only
weak point is the landing gear which is to simplified. The fit of the major
components is good, only with the front fuselage decking some careful dry
fitting and sanding is needed. Landing gear wells were closed with sheet styrene
and the area was filled and sanded.
The floats took some more work. The trailing edges of the struts were far too thick and had to thinned down to a reasonable scale. Since I wanted to mount the completed model on a base, I sanded the undersides of the floats. The fit of the completed floats on the model was really good If you consider, that these were designed for a different kit. Only in the front region was some filling with styrene sheet and putty necessary. After mounting the additional stabilizers on the tail (which came also from the Marivox kit and had to thinned down as well), the kit was ready for painting.
|
PAINT & DECALS |
The undersides and floats where airbrushed with a coat of RAF sky, the upper surfaces with RAF dark slate gray and US dark gull gray. Even if these colors are not German, the plane keeps a German appearance (probably since Sky is close to 'RLM 84' and dark gull gray is close to RLM 75). After detail painting (exhaust stacks, gun barrels etc.) the model was given a top coat of clear gloss paint and decals were applied. The decals came from different sources - mostly from the Academy and Marivox sheets. After a light wash with diluted black paint, the model was sprayed with a top coat of Revell flat.
|
CONSTRUCTION CONTINUES |
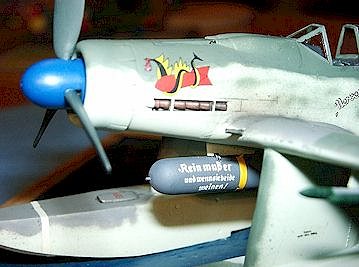 The torpedo was (almost)
scratchbuilt using the body of an Airfix torpedo and sheet styrene, the rockets
came from the spares box with scratchbuilt launch rails/pylons.
The torpedo was (almost)
scratchbuilt using the body of an Airfix torpedo and sheet styrene, the rockets
came from the spares box with scratchbuilt launch rails/pylons.
After mounting the small parts, weapons and canopy ('borrowed' from a Hasegawa kit) the completed model was glued to the base. For this I used clear two component resin glue. This gives strong bond and can easily be hidden by blending with the base with clear blue paint after curing. The base was made from a 3 mm thick sheet of styrene. Water was modeled with water soluble railroad putty. After applying a stabilization coat of diluted white glue, the base was sprayed with several layers of blue, gray and green paints with a final layer of glossy clear blue. After mounting the model to the base the remaining small parts (propeller, antenna wire, pitot tube) were attached and the model was ready for displaying...
Special thanks to Detlef Hoffmann for the digital photography.
If you would like your product reviewed fairly and quickly by a site that has over 1,300 visits a day, please contact me or see other details in the Note to Contributors.