Hasegawa 1/48 Bf-109E "Bulgarian AF"
|
KIT # |
JT 123 |
|
PRICE: |
€ 23.00 |
|
DECALS: |
Ventura set 48-77used |
|
REVIEWER: |
|
|
NOTES: |
Aires Cockpit set used |
|
HISTORY |
I'll restrict my remarks to the use of this type in Romania. Up to the end of the thirties the Royal Romanian air force was equipped mostly with older polish fighters like the PZL P 11. With the upcoming war in Europe and during a phase of internal instability Romania tried to purchase more modern planes like the Hurricane and the PZL P 24. While officially neutral, Romania leaned more and more to the German side and in November 1940 the government signed a treaty with Germany to become officially an ally with the axis. The German interest in Romania had two reasons – Romania was the most important supplier of mineral oil to Germany and it was also an important strategic position for the planned attack on the Soviet Union. During that time German planes were delivered to Romania and some Romanian fighter units were equipped with the Bf 109 E and He 112.
 In total
50 Bf 109 E-3 were delivered – 11 of them new and the remaining 39 were
refurbished Luftwaffe planes. These machines were assigned to the 7th
Fighter Group (Grupul 7 vanatore) which was part of the 1st
Fighter Flotille. As a German ally the Romanian armed forces were involved in
the war against the Soviet union. After some extensive fighting between June and
October 1941 in the Bessarabian and Trans-Dnestra campaigns and the capture of
Odessa a relatively quiet phase followed until August 1942. During these
campaigns the Romanian pilots were quite successful, claiming 322 air and 71
ground victories against the VVS. The most successful pilot was Nicolae Polizu
of the Bf 109 E equipped 7th fighter group with 8 confirmed
victories. The Romanians lost 9 Bf 109’s due to combat and accidents.
In total
50 Bf 109 E-3 were delivered – 11 of them new and the remaining 39 were
refurbished Luftwaffe planes. These machines were assigned to the 7th
Fighter Group (Grupul 7 vanatore) which was part of the 1st
Fighter Flotille. As a German ally the Romanian armed forces were involved in
the war against the Soviet union. After some extensive fighting between June and
October 1941 in the Bessarabian and Trans-Dnestra campaigns and the capture of
Odessa a relatively quiet phase followed until August 1942. During these
campaigns the Romanian pilots were quite successful, claiming 322 air and 71
ground victories against the VVS. The most successful pilot was Nicolae Polizu
of the Bf 109 E equipped 7th fighter group with 8 confirmed
victories. The Romanians lost 9 Bf 109’s due to combat and accidents.
In September 1942 the Stalingrad campaign started. Grupul 7 vanatore was stationed at Karpovka airfield which was shared with Luftwaffe fighter and reconnaissance units. In the first phase of the battle the planes mostly flew escort, reconnaissance and free hunting missions. After the beginning of the Russian winter offensive in late November the focus shifted to ground support and escort of transport aircraft. With the loss of the battle of Stalingrad the Romanian units were forced to retreat and were evacuated to Romania in February 1943. During the Stalingrad campaign 16 Bf 109 were lost, including 12 machines which had to be abandoned at the retreat from Karpovka. During the whole campaign the Romanian units claimed only 39 victories over the VVS mainly due to the reluctance of the Russian pilots to engage axis aircraft.
The Bf 109 E’s were used in active first line service until spring 1943 when the were replaced with Bf 109 G’s and relegated to secondary duties.
|
THE KIT |
Hasegawas Bf 109 E kits came out in the late eighties. After some criticism about shape problems the molds were reworked and the revised kits hit the shelves in the early nineties. As typical for Hasegawa the kit was issued in various versions and even today from time to time a new version of the kit appears.
The kit used for this project was kit JT 123, which contains decals (printed by Aeromaster) for a Romanian Bf 109 E-3 and a Bulgarian Bf 109 E-4. Otherwise it is the same kit as the ‘Galland’-version – down to the instructions and some special parts like the telescope gunsight only used by A. Galland . If you plan to use a Hasegawa kit with aftermarket decals, this one would be a good choice – you get almost all parts for the E-3, E-4 and E-7 versions (various types of canopies, two propeller spinners, fuselage racks for bombs and fuel tanks). The decals are typical Aeromaster products – nicely printed, wonderful to work with but also of somewhat questionable accuracy. The only photo of the Romanian plane I could find (ref. [1], p. 17) showed clearly a yellow cowling (in difference to the painting instructions) and the ‘f’ in the ‘Hai fetito!’ inscription on the cowling had a different shape.
On a trip to Paris some months ago I discovered the Ventura decal set 4877 for a Romanian Bf 109 E. It was a special sale item in the ‘Kit’n Doc’ hobby shop (BTW, the best Hobby shop I found in Paris) for the sensational price of 10 FF (ca. 1.50 US$). The Aires cockpit was something I brought back from a trip to Prague – so this project was truly a result of traveling through Europe: A kit bought in Berlin with decals from Paris and a cockpit set from Prague...
|
CONSTRUCTION |
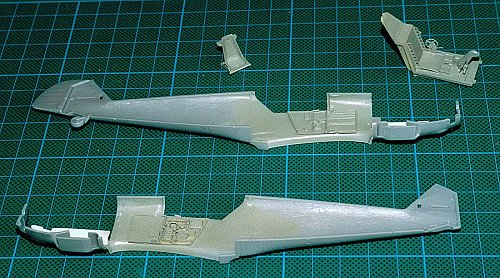 As in most
cases constriction started with the cockpit. Since the Aires set is designed for
the Tamiya kit some surgery on the rear cockpit deck is necessary. I removed
material from the fuselage halves until the Aires cockpit tub fitted nicely.
Also the photoetched instrument panel had to be cut to shape for the obviously
different profile of the Hasegawa fuselage. Removing of the cockpit sidewalls
from the casting blocks proved to be somewhat difficult since the material is
very thin and breaks easily. After mounting the sidewalls to the fuselage
halves, the cockpit section and cockpit parts were airbrushed with RLM 02 (ModelMaster).
The instrument panel was painted flat black and the whole cockpit was drybrushed
and washed. Before gluing the fuselage halves together, the cockpit parts except
the seat and control stick were inserted.
As in most
cases constriction started with the cockpit. Since the Aires set is designed for
the Tamiya kit some surgery on the rear cockpit deck is necessary. I removed
material from the fuselage halves until the Aires cockpit tub fitted nicely.
Also the photoetched instrument panel had to be cut to shape for the obviously
different profile of the Hasegawa fuselage. Removing of the cockpit sidewalls
from the casting blocks proved to be somewhat difficult since the material is
very thin and breaks easily. After mounting the sidewalls to the fuselage
halves, the cockpit section and cockpit parts were airbrushed with RLM 02 (ModelMaster).
The instrument panel was painted flat black and the whole cockpit was drybrushed
and washed. Before gluing the fuselage halves together, the cockpit parts except
the seat and control stick were inserted.
One of the kit regions were Hasegawa really cut corners its the exhaust system. To mold the whole assembly onto the fuselage parts might be sufficient for a 1:72 scale kit but not in this scale... So I decided to replace the exhaust stacks with scratchbuild items. The exhausts were replicated with 1.5*2 mm plastic profiles. Another (minor) problem with the kit is that the characteristic openings in the cowl are nicely reproduced but without any provision to prevent the ‘see through effect’. I used some black painted pieces of plastic card to close off those openings.
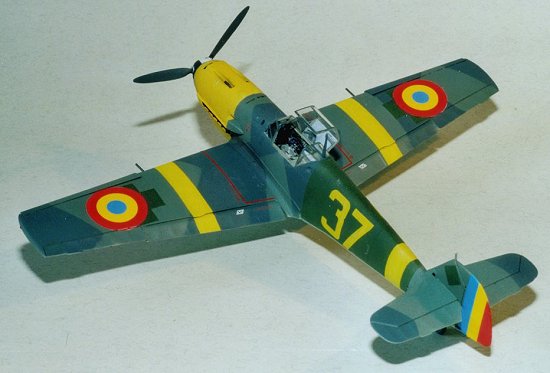
 The next
step was to attach the wings. This time I used the ‘inverted’ method i.e. first
gluing the upper wing parts to the fuselage. This guarantees that there will be
no wing to fuselage gap on the wing upper sides. To get the correct dihedral the
lower wing was fixed to the fuselage/upper wing assembly with duct tape. After
inserting the wing radiator parts the lower wing was glued in place. The only
spot on the model which required some filler is the underside rear wing/fuselage
joint. I solved the problem with Squadron Green putty and careful sanding. The
kit has the option of deployed slats and dropped flaps. The slats should be
mounted in the extended position since on the original 109 the slats were
aerodynamic operated (or Handley Page) slats. So if the speed of the plane falls
below a certain value the slats will deploy automatically. To allow both
positions, the kit wings have a small step near the wing leading edge which I
reduced by gluing narrow strips of styrene sheet to these areas. I wanted to
show the flaps in the dropped position. To ensure a tight fit, the locating pegs
were cut off and after careful dryfitting the flaps were mounted. After
attaching the horizontal stabilizer parts the kit was ready for painting.
The next
step was to attach the wings. This time I used the ‘inverted’ method i.e. first
gluing the upper wing parts to the fuselage. This guarantees that there will be
no wing to fuselage gap on the wing upper sides. To get the correct dihedral the
lower wing was fixed to the fuselage/upper wing assembly with duct tape. After
inserting the wing radiator parts the lower wing was glued in place. The only
spot on the model which required some filler is the underside rear wing/fuselage
joint. I solved the problem with Squadron Green putty and careful sanding. The
kit has the option of deployed slats and dropped flaps. The slats should be
mounted in the extended position since on the original 109 the slats were
aerodynamic operated (or Handley Page) slats. So if the speed of the plane falls
below a certain value the slats will deploy automatically. To allow both
positions, the kit wings have a small step near the wing leading edge which I
reduced by gluing narrow strips of styrene sheet to these areas. I wanted to
show the flaps in the dropped position. To ensure a tight fit, the locating pegs
were cut off and after careful dryfitting the flaps were mounted. After
attaching the horizontal stabilizer parts the kit was ready for painting.
|
PAINT & DECALS |
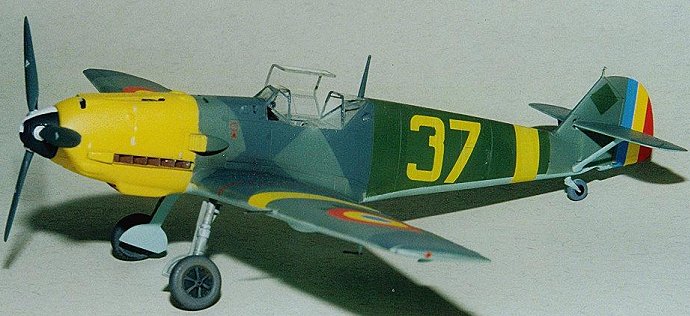
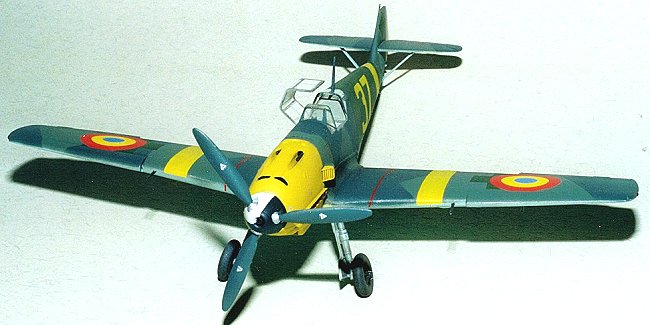
Looking trough my references I found a photo of ‘yellow 37’ in Ref. 1 (page 5). But careful inspection of the photo revealed once more some inconsistencies with the painting instructions. While the instruction sheet says the plane was RLM 71 dark green overall, the b/w photo clearly showed overpainted Balkenreuze on the wings and (with some interpretation) what seems to be an overpainted swastika on the tail. Otherwise the fuselage looks rather solid in color but this is difficult to make out since this area lays in the shadow. The wings and horizontal stabilizers show what seems to be a two tone scheme with little contrast between the colors. This leaves room for some interpretation. As ref. 1 states, most of the Bf 109 E’s delivered to Romania were refurbished Luftwaffe planes. Probably this is one of these planes. Since only the national insignia were overpainted on the wings, these were probably in a (faded?) RLM 70/71 scheme. The fuselage could either be overpainted completely or only in the areas were national insignia and unit markings would be. Or it could even be a new fuselage with refurbished wings. The next open question is what color was used to paint out the national insignia? If this was done in Germany it would be probably RLM 70, but if the markings were overpainted after the plane was delivered to Romania it could be Romanian dark olive green as well. Since the contrast on the b/w photo is rather large I opted for Romanian olive green.
 Before
painting the canopy was masked using Eduard express masks. I started with
airbrushing the engine cowling in yellow. The next step was the application of a
standard 70/71/65 Luftwaffe scheme (using Model Master paints) followed by
“overpainting” the areas were the national insignias would be and of the rear
fuselage with dark olive green (Humbrol). After a final clear coat, the plane
was ready for decaling. Since I already had a bad feeling about the decals, I
started with applying the roundels under the wings and – as I expected the red
color of the decals was highly translucent.... The solution to this was to cut
disks of appropriate size from white decal with a compass cutter (an old Tamiya
Spitfire decal sheet came in handy here). These gave a nice base for the
roundels. Unfortunately the Tamiya decals responded somewhat different to
setting solution – leaving me with a fine white ‘outline’ for the roundels, so
some touchups with a fine brush were necessary. The yellow decals for fuselage
number and wing/fuselage bands went on fine. After a second gloss coat the whole
model was airbrushed with Humbrol matt coat.
Before
painting the canopy was masked using Eduard express masks. I started with
airbrushing the engine cowling in yellow. The next step was the application of a
standard 70/71/65 Luftwaffe scheme (using Model Master paints) followed by
“overpainting” the areas were the national insignias would be and of the rear
fuselage with dark olive green (Humbrol). After a final clear coat, the plane
was ready for decaling. Since I already had a bad feeling about the decals, I
started with applying the roundels under the wings and – as I expected the red
color of the decals was highly translucent.... The solution to this was to cut
disks of appropriate size from white decal with a compass cutter (an old Tamiya
Spitfire decal sheet came in handy here). These gave a nice base for the
roundels. Unfortunately the Tamiya decals responded somewhat different to
setting solution – leaving me with a fine white ‘outline’ for the roundels, so
some touchups with a fine brush were necessary. The yellow decals for fuselage
number and wing/fuselage bands went on fine. After a second gloss coat the whole
model was airbrushed with Humbrol matt coat.
|
CONSTRUCTION CONTINUES |
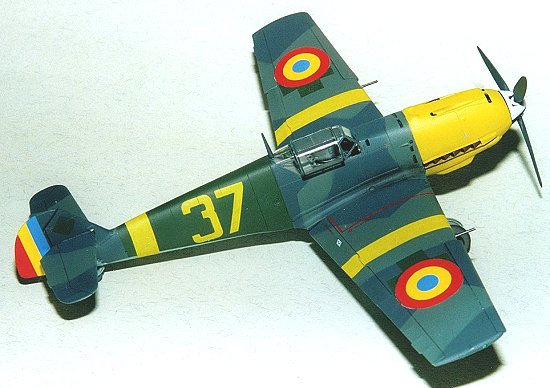
The last step was to mount the remaining small parts, landing gear and exhaust manifolds. Wing machine gun barrels were produced from syringe needles. The canopy hood was added, leaving off the armor plate which was not present at the Romanian machines. Weathering was done rather lightly, only some paint chipping and exhaust stains applied with pigment dusts. An antenna from stretched sprue was added.
|
CONCLUSIONS |
Ten years after its first release Hasegawas Bf 109 E is still a nice kit, relatively easy to build and with good details if you build it right from the box. Hasegawa's multiple boxings make it easy to chose a kit of a wide variety of versions and paint schemes without the need of aftermarket goodies even if the paint schemes are somewhat questionable for some kits.
|
REFERENCES |
[1] ‘Rumanian Air Force – The Prime Decade, 1938-1947’, Denes Bernad, squadron/signal publications 1999, ISBN 0-89747-402-3
[2] ‘Sojusznicy Luftwaffe’ cz. 1, J. Railich, Z. Stojczew, Z. Lalak, Books International, ISBN 83-906942-0-4
If you would like your product reviewed fairly and fairly quickly, please contact the editor or see other details in the Note to Contributors.