Dragon 1/48 FW-190A-8
| KIT: | Verlinden FW-190 Update |
| KIT #: | 5502 |
| PRICE: | $35.00 Cdn |
| DECALS: | Three Aircraft |
| REVIEW: | Ray Snazel |
| NOTES: | Beautiful detail; requires extensive dry fitting and patience for a good fit. |
|
HISTORY |
What could I possibly say about the Wurger that has not already been said? There is an extensive amount of research available on various web sites and books so I won't try to give a history of this remarkable aircraft.
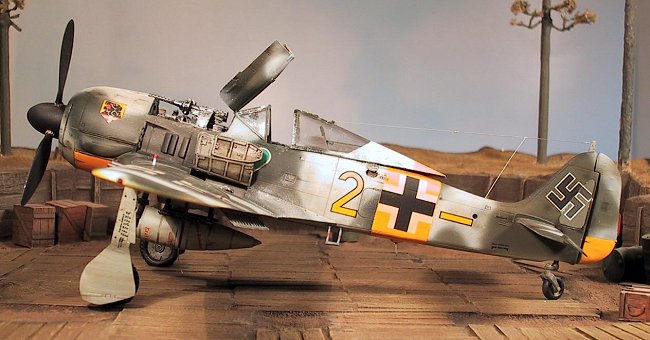
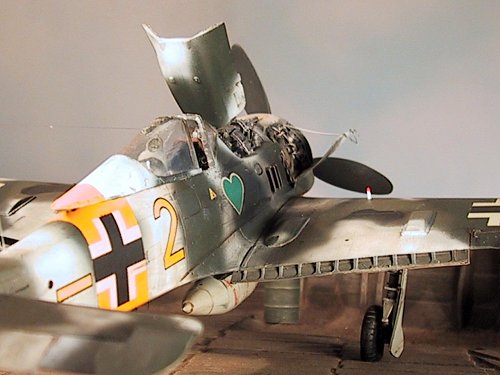
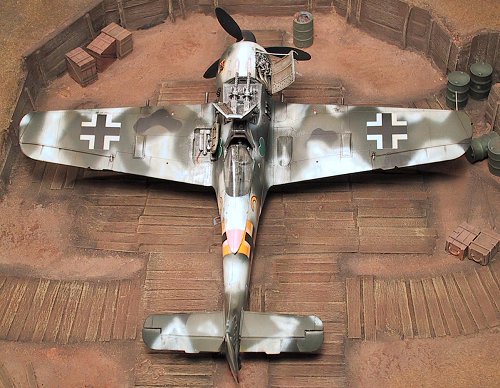
The aircraft I chose to build represents "Yellow 2" flown by Oberfeldwebel Heinrich Sterr of 6/JG54 Greenhearts circa March 1943.
|
THE KIT |
 The kit started out as a Trimaster mold that
Dragon picked up around the early 90’s. Kit # 5502 from dragon is your basic
gray plastic Fw190 nothing really fancy, just a good kit. The original Trimaster
kits had the metal landing gear and a good amount of photo etch which
unfortunately Dragon chose to remove.
The kit started out as a Trimaster mold that
Dragon picked up around the early 90’s. Kit # 5502 from dragon is your basic
gray plastic Fw190 nothing really fancy, just a good kit. The original Trimaster
kits had the metal landing gear and a good amount of photo etch which
unfortunately Dragon chose to remove.
The instructions are clear and concise, the sprues are clean and require only minimal cleanup. The decals are provided for 3 aircraft, which are well documented on the net and in many books. Included in the decal is the option do build Heinz Bar’s personal 190 for those interested.
|
Verlinden Update |
The Verlinden update sells for around the $39-45 dollar mark Canadian. The update I had was purchased 10 years ago and was marked as a companion for the Trimaster kit but it fit just fine into the Dragon kit. I have not looked at the newer versions of this update but I would assume it is the same kit. The update supplies you with engine cowls, one side of the radial engine, upper gun bay, 2 wing root gun bays and
the open tail wheel access panel. Also include is access to the cargo area which I chose not to open on this kit as well as a full cockpit tub with instrument panel. There are various gas caps, oxygen access and latches for the cowls. The kit is basically 50/50 resin and photos etch. The resin was clean but my kit was a bit brittle I assume from the edge so be careful just incase it was the resin. The photo etch was thin and easy to use.
|
CONSTRUCTION |
 The building of this model was very complex
with the addition of the update, a lot of surgery was required and a great deal
of dry fitting. First step was the removal of panel for the front gun bay, be
careful not to hack too much because its difficult to replace at a later date.
The front gun deck once installed attached to the instrument panel which in turn
slides into the cockpit tube. I found this combination frustrating to make work
and in my opinion placed the instrument panel to far forward and thus almost
invisible. To solve this I just installed the instrument panel separate in the
position the kit instructions called for, this allowed the dry fitting to go
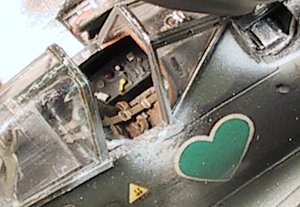
much easier. The cockpit tub and instrument panel were painted RLM66, given a
black wash and dry brushed a light gray for contrast. Tamyia XF56 Metallic gray
was then dry brushed in the high traffic areas to give the bare metal look of
rubbed paint, I find this method works very well for the desired effects.
The building of this model was very complex
with the addition of the update, a lot of surgery was required and a great deal
of dry fitting. First step was the removal of panel for the front gun bay, be
careful not to hack too much because its difficult to replace at a later date.
The front gun deck once installed attached to the instrument panel which in turn
slides into the cockpit tube. I found this combination frustrating to make work
and in my opinion placed the instrument panel to far forward and thus almost
invisible. To solve this I just installed the instrument panel separate in the
position the kit instructions called for, this allowed the dry fitting to go
much easier. The cockpit tub and instrument panel were painted RLM66, given a
black wash and dry brushed a light gray for contrast. Tamyia XF56 Metallic gray
was then dry brushed in the high traffic areas to give the bare metal look of
rubbed paint, I find this method works very well for the desired effects.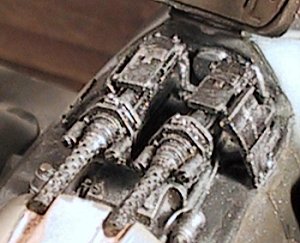
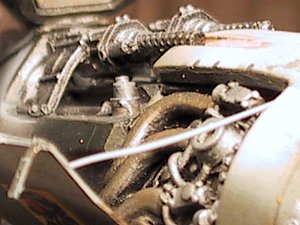
The top gun bay took a great deal of retrofitting to get a good realistic fit. I used scrap plastic to prop the base up and give me a base to fill the gaps that result. Some gap filling glue and putty made short work of this area, be careful not to use to much as there is very small wire molding on the resin that looks good once finished and it would be a shame to cover this with putty.
This area was painted RLM02 and given a few different washed of black and raw umber followed up by increasingly intense dry brushing for effect. The guns were painted gunmetal and dry brushed with metallic gray to get as close to a realistic look as I could achieve. The same painting technique was used on the wing guns with the addition of copper wire to spruce up the maintenance area.
 The open panels were given a raw umber wash
only then dry brushed with light gray. Typically these areas are less greasy
than bottom of the access areas so I tried to make the contrast show this.
The open panels were given a raw umber wash
only then dry brushed with light gray. Typically these areas are less greasy
than bottom of the access areas so I tried to make the contrast show this.
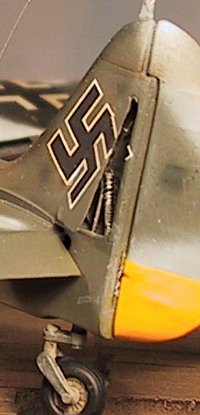
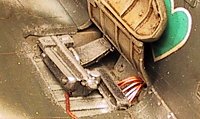
The tail wheel access was very simple to accomplish, Verlinden supplies the panel in the photo etch so you can hack away the tail, insert the photo etch and paint away. Note the separation of the swastika in the picture. I made the tail wheel spring with two grades of wire, the smaller wrapped around the larger.
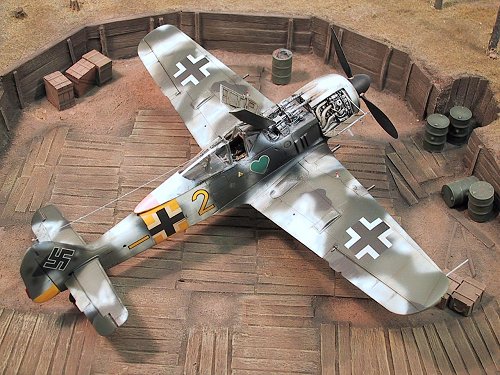
I chose to move the rudder and elevators to show some dynamics, again very simple with a sharp knife. The tail wheel when installed later was also placed to match the rudder, simulating ground crews positioning the aircraft for maintenance.
When attaching the wings to fuselage I found it necessary to spread the fuselage to meet the wings, thus eliminating the need for putty and giving a very nice wing fit. With out using the Verlinden cockpit tube I suspect that this is a unnecessary procedure are the tub seemed to pull the fuselage together thus away from the wing root
 The engine area was also very simple to
build; the only problem is the building of the kits cowls and subsequent removal
of the panel for the engine access. The open cowl panel is two pieces of photo
etch and looks very nice when painted, the cowl latches need a small saw cut on
the upper cowl to simulate the attachment points, be careful with the latches as
they are very small and easy to use, LOL yes there is an extra one on the photo
etch tree. <whew>.
The engine area was also very simple to
build; the only problem is the building of the kits cowls and subsequent removal
of the panel for the engine access. The open cowl panel is two pieces of photo
etch and looks very nice when painted, the cowl latches need a small saw cut on
the upper cowl to simulate the attachment points, be careful with the latches as
they are very small and easy to use, LOL yes there is an extra one on the photo
etch tree. <whew>.
 The gun bay in the wing root was simple; I added the copper wires
for some dynamics and replaced the gun barrels with copper tube for a more
realistic look. The only problem is the gun barrel in the wing root does not
line up with the barrel in the wheel bay which does not line up with the exit
point of the weapon…..argh !!!!! BE CAREFUL with this or sure as heck some silly
judge or fellow modeler will notice it, or worse yet you wont sleep at night
thinking about it, anyway its not to tough a fix if you know its coming. The
antenna is fine stretched spur with white glue insulators.
The gun bay in the wing root was simple; I added the copper wires
for some dynamics and replaced the gun barrels with copper tube for a more
realistic look. The only problem is the gun barrel in the wing root does not
line up with the barrel in the wheel bay which does not line up with the exit
point of the weapon…..argh !!!!! BE CAREFUL with this or sure as heck some silly
judge or fellow modeler will notice it, or worse yet you wont sleep at night
thinking about it, anyway its not to tough a fix if you know its coming. The
antenna is fine stretched spur with white glue insulators.
|
PAINT & DECALS |
 Since returning to modeling I have really wanted to try a winter
scheme on an eastern front FW190 or JU87. After spending around 50 hours on
building this model I decided it was time to give is a shot, hoping for a eye
grabbing model all around. Then I saw this scheme in a book and I was sold.
Since returning to modeling I have really wanted to try a winter
scheme on an eastern front FW190 or JU87. After spending around 50 hours on
building this model I decided it was time to give is a shot, hoping for a eye
grabbing model all around. Then I saw this scheme in a book and I was sold.
"Indicative of the spring thaw period, II Gruppe removed large areas of winter white to reveal the 2 tone green beneath. They sometimes added patches of black to break up the A/C outline. Sterr joined II/JG54 in 1942. He scored 127 kills in the east, most on the FW190 before transfer to IV Gruppe and defense of the Reich duties in late 44. He was downed by a P51 on the 26 Nov 44 while attempting to land at Vorden."
The underside was painted a gray base coat; the panel lines pre-shaded black and painted RLM 76 ghosted over the bottom at a thinned ratio of 2-1.
The upper surfaces started as a light gray base coat with similar pre-shading of the panel lines. Two tone green RLM 71/72 was then applied with patches of flat black. The whole aircraft was then coated with Future to prepare for decals and the whitewash. The decals were applied from various aero master decals to get the authentic numbering and decals of Sterr. I decided the best way to do the whitewash was to simply follow the procedure that the mechanics on the front line would use, take a fully painted A/C and put on the white with a broom. Because of this, not many stencils of data decals were needed, they would typically disappear anyway and the white over the winter months would wipe them out anyway.
 The whitewash was applies first with an airbrush dusting Tamiya
flat white mixed 1-1 with alcohol. Before the paint dried I took a hard small
brush dipped in alcohol and wiped the white areas to get a rough, broom look. By
accident this allowed different shades of the base greens to show through giving
a very weathered effect and thus toning down the white. When I started this
procedure I held my breath but it worked out great in the end. After the white
was finished and dry I went back over with an alcohol dampened Q-Tip and rubbed
areas for further wear.
The whitewash was applies first with an airbrush dusting Tamiya
flat white mixed 1-1 with alcohol. Before the paint dried I took a hard small
brush dipped in alcohol and wiped the white areas to get a rough, broom look. By
accident this allowed different shades of the base greens to show through giving
a very weathered effect and thus toning down the white. When I started this
procedure I held my breath but it worked out great in the end. After the white
was finished and dry I went back over with an alcohol dampened Q-Tip and rubbed
areas for further wear.
Finishing was more Future, a raw umber wash for panel lines, airbrushed exhaust and gun carbon deposit and a final flat coat of Poly S. I final touch of SnJ polishing powder for wear points on the wing root, silver paint for larger chips and we were done.
|
CONCLUSIONS |
This model was a joy to build, the update was a bear but the results justify the many nights in the basement groaning. The paintjob was a challenge but I am thrilled with the results. Just another FW190 but hopefully different enough to get some creative juices flowing.
Happy modeling
Ray
|
REFERENCES |
Osprey Aircraft of the Aces 6, FW 190 Aces of the Russian Front, John Weal
If you would like your product reviewed fairly and quickly, please contact me or see other details in the Note to Contributors.
Back to Reviews Page 2015