Dragon 1/48 Me-262B-1/U-1
|
KIT # |
5519 |
|
PRICE: |
$30.00 |
|
DECALS: |
Two aircraft |
|
REVIEW: |
Ray Snazel |
|
NOTES: |
Beautiful detail; requires extensive dry fitting and patience for a good fit.` |
|
HISTORY |
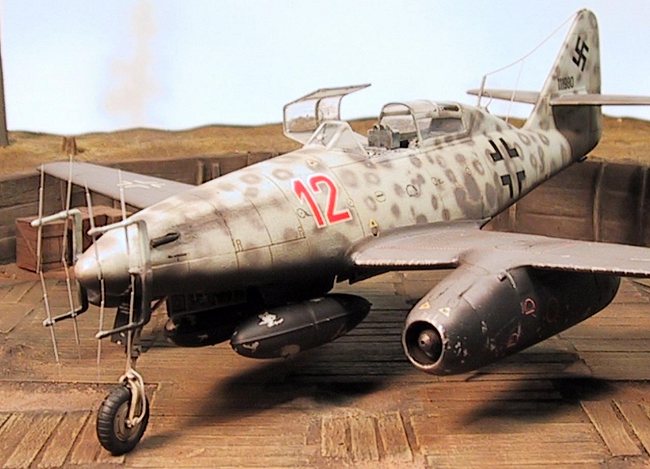
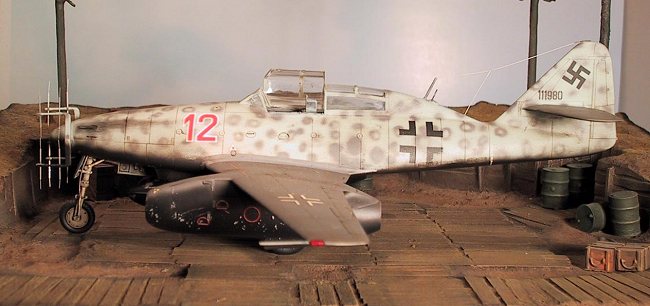
The 262 Nachtjager was a result of the Luftwaffe trying to deal with the mosquito and night raids of bomber command late in the second world war. This particular version was derived from the 2 seat trainers initially built jet conversion of pilots from propeller driven fighters. The first fully operational jet nachtjager was highly successful, in spite of being hampered by lack of fuel, enemy air superiority, and technical disturbances. Flown by Kommando Welter and the 10./NJG 11 in the final months of the war. 'Red 12', wk/nr 111980, survived the war but was subsequently destroyed in a gale at Brize Norton in 1947.
|
THE KIT |
I purchased this kit approximately 8 years ago to add too my collection of
Trimaster 262’s which at the time was just going out of production. Dragon
picked up the molds and removed most of the metal and photo etch making the
kit more in the price range of most modellers. The kit itself is a typical
Dragon kit utilizing the old Trimaster mold. The photo etch in the kit I
find is way too thick, you need a torch <kidding> to cut it and it is very
difficult to clean up. Included are rubber tires which I am not a fan of
but that’s just MHO.
The instructions are clear and concise, the sprues are clean and require
only minimal cleanup. The decals are provided for 2 aircraft, which are
well documented on the net and in many books.
|
CONSTRUCTION |
Cockpit
The cockpit of this kit appears accurate and assembles easily. The entire
cockpit was assembled and then given a bit of updating mostly because I just
can’t seem to leave a kit alone. I have been challenged too make an “out
of the box” model and I always fail. I started by making oxygen hose and
couplers to insert inside the cockpit . I make these by taking copper wire
and wrapping and much smaller size silver wire around the copper wire, cut
too length and paint them up. Other than adding a few extra switches and
some framework to the sidewalls the only other thing I added was to the
canopy railings. If you look at the finished cockpit when the fuselage is
joined the area of the canopy rails is plain and the area behind the rear
seat is just a plain flat area, not realistic IMHO.
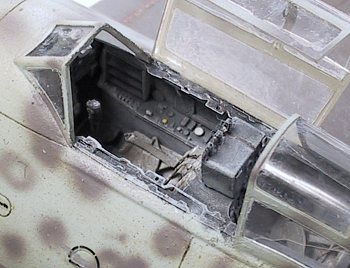
To fix this I rummaged
through my parts box and found some old left over photo etch and built some
rails and an area for the back based on the pictures I could find. I have
to admit I subscribe to the idea that “ if it looks good do it mentality;”
and although probably not 100% accurate, once painted and dry brushed it
really added to the whole cockpit scenery.
Next was the seatbelts supplied by Dragon. If you can
make them look
realistic you are much better than myself. They are too thick and hard to bend. I chose to replace them with some other Tecknics belts I found in
the parts box.
The whole cockpit was painted in RLM66 , given a black acrylic wash and
left to dry overnight. The next day a dry brushing of Light ghost grey and
some strategic blacks, whites and reds and voila the office was finished.
Fuselage and Wings
The main fuselage and horizontal stabilizers went together perfectly, no
problems too speak of, the top and bottom wings attach nicely as well, then
we came too the joining of the wings too fuselage and the engines to wing.
This is awful, just like any other 262 I have built. I received and link
too “How too build and 262 and not go mad” from a frequent reviewer on
Modeling Madness, Grenville Davies, when I had already passed the point of no return,
I strongly recommend you read this before tackling this project. There is
just no way too properly get this or the engines to wing construction too
match without sanding and putty. Take some time here so the putty work is
and minimal as possible to preserve your detail, particularly around the
front nacelles of each engine. The cannon were replaced with copper tubing and pitot tube replaced with
fine copper rod.
Landing Gear
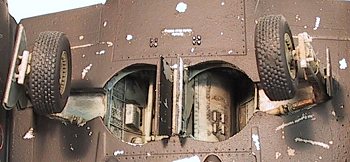 The landing gear cleaned up easily and was assembled, painted in RLM02,
given my usual black wash and dry brushed in decreasing shades until I
reached the effect I was looking for, the gear bay on the kit is very
detailed and this is one place where the thicker photo etch works well and
makes a very nicely detailed bay.
The oleos were covered in bare metal foil and a further raw umber wash given
to simulate oleo leakage around the seals. Then a final touch of silver
wire too simulate brake lines and the gear was put to the side.
The landing gear cleaned up easily and was assembled, painted in RLM02,
given my usual black wash and dry brushed in decreasing shades until I
reached the effect I was looking for, the gear bay on the kit is very
detailed and this is one place where the thicker photo etch works well and
makes a very nicely detailed bay.
The oleos were covered in bare metal foil and a further raw umber wash given
to simulate oleo leakage around the seals. Then a final touch of silver
wire too simulate brake lines and the gear was put to the side.
|
PAINT & DECALS |
My favourite part…
I chose to depict Red 12 mostly because I really wanted too tackle the
night mottling scheme. After many days of prep on the model it was time for
a base / primer coat of a light grey too check for flaws and set up the
model for my experiment. Most aircraft I have come across that have black
surfaces show paint chipping and in wartime this can be extensive. I had
wanted too try a technique I read about in a magazine some time ago and I
decided this was the time. After a base coat I sprayed the whole aircraft
with SNJ Aluminium and let it dry for over a week <business trip> .
Upon my return I sprayed the bottom with night black and left it too dry
about an hour, I used a Poly S acrylic for this hoping it would not bind too
the SNJ too strongly. I then proceeded too use masking tape in a very fast
and random method touching the surface and peeling away some black too
reveal the aluminium beneath. The result as you can see (again sorry for
the pic) is a completely random paint chipping on the bottom surface. I
spent more time on the leading edges and in areas of higher wear (drop
tanks, maint panels etc).
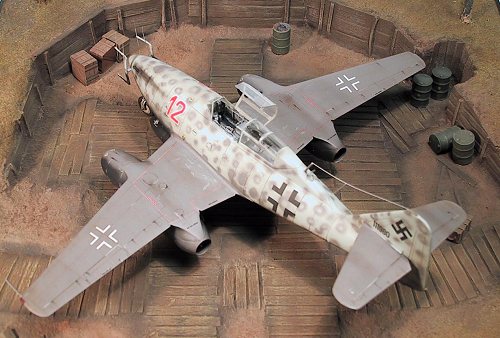 The upper surfaces were painted RLM 76 and then the upper wing painted RLM
75. Next I applied the circular motte too the fuselage and vertical
stabilizer. This was challenging and the trick seemed too be thinning the
paint approx 50/50 with distilled water (Gunze paint BTW). Then canopy was
masked with bare metal foil and painted at the same time. Once dry the foil
is removed revealing a very thin paint line.
The upper surfaces were painted RLM 76 and then the upper wing painted RLM
75. Next I applied the circular motte too the fuselage and vertical
stabilizer. This was challenging and the trick seemed too be thinning the
paint approx 50/50 with distilled water (Gunze paint BTW). Then canopy was
masked with bare metal foil and painted at the same time. Once dry the foil
is removed revealing a very thin paint line.
The whole aircraft once dry was blasted with future floor wax and left too
dry in prep for decaling. All the national insignias I painted by scanning
the decal sheet and printing the insignias on frisket film. After some
tedious sharp knife work the homemade templates were positioned and the
insignias painted. The Red 12 and aircraft id number decals were applied
and another future coat applied too seal the decals. Next I used Poly Flat
coat too prepare the surface for weathering. The entire top surface was
given and oil wash of Raw umber thinned with turpentine and the excess
removed with a soft rag in the direction of the airflow. A fine black ink
pen simulated the smoking rivets common on most aircraft, pastels simulated
the cannon deposits and once again a flat coat to seal it all. The bottom
surface were weathered with various pastels and similarly sealed.
Finally the antennas were made from stretched spur and super glued into
place, then quickly broken off by an errand hand <DOH> and re applied.
|
CONCLUSIONS |
When finished I feel the kit was well worth the time invested, I love the
262’s lines and with the exception of the building problems I would
recommend it too any Luftwaffe fan with moderate building experience.
This is my first kit after a 9-year layoff from building, and my first
review of any kind. I hope that some of my ramblings will help someone with
just one tip too improve their models and thus their enjoyment in a hobby I
have just recently rediscovered. I must say the extensive research material
available on the net from Modeling Madness and other sites is a welcome
addition to our hobby.
|
REFERENCES |
Trimaster/Dragon/DML 262's in 1/48 How to build them and not go Mad. http://www.stormbirds.com
Copyright ModelingMadness.com. All rights reserved. No reproduction in part or in whole without express permission from the editor.
If you would like your product reviewed fairly and fairly quickly, please contact the editor or see other details in the Note to Contributors.
Back to Reviews Page 2016