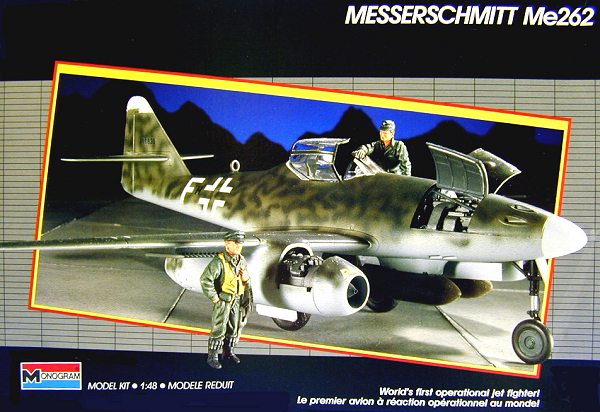
Monogram 1/48 Me-262A-1a
KIT # |
5410 |
|
PRICE: |
$5.00 in 1978! |
|
DECALS: |
5 different aircraft, including JG7 markings of the National Air & Space Museum’s aircraft |
|
REVIEW: |
|
|
NOTES: |
Scratch-built engine features, modified instrument panel and interior; control surfaces (flaps, rudder, elevators, ailerons, leading edge slats) cut out and displayed in various positions. |
|
HISTORY |
Much has been written on this website about the history of the Me-262 - the first jet to see combat (for recent write-ups, see Scott Van Aken's Tamiya kit preview as well as Tom Cleaver's review of the same kit with aftermarket stuff). For this review, then, I’ll just summarize the history of the particular aircraft that I have modeled: The National Air and Space Museum’s (NASM’s) Me-262A-1a.
The NASM aircraft was captured at Lechfeld, Germany, by a special US Army Air Force (AAF) team whose mission was to find and seize advanced German aircraft. This Me-262, along with other captured aircraft, was then loaded aboard a British aircraft carrier at Cherbourg, France, and shipped to the United States.
 Upon its arrival at Newark, New Jersey, a USAAF pilot flew the Me-262 to Freeman
Field, Indiana for testing. The aircraft was then given the tracking number
“FE-111.” During testing, the standard fighter nose was replaced by a
reconnaissance nose from an Me 262A-la/U3. FE-111 was then sent to Park Ridge,
Illinois, where it was stored. Finally, in 1950 the airplane arrived at NASM’s
Silver Hill Facility, and the NASM crew began restoring the jet in 1978.
Upon its arrival at Newark, New Jersey, a USAAF pilot flew the Me-262 to Freeman
Field, Indiana for testing. The aircraft was then given the tracking number
“FE-111.” During testing, the standard fighter nose was replaced by a
reconnaissance nose from an Me 262A-la/U3. FE-111 was then sent to Park Ridge,
Illinois, where it was stored. Finally, in 1950 the airplane arrived at NASM’s
Silver Hill Facility, and the NASM crew began restoring the jet in 1978.
As one might expect, a lot of corrosion had built up on the aircraft over the years, so the Silver Hill restoration crew first had to tackle this problem. The corrosion process was compounded by the fact that Messerschmitt had used composite construction techniques that combined aluminum and steel (dissimilar metals). The solution was to completely disassemble the aircraft, clean every part, and then reassemble all the pieces.
Next, the crew had to restore the fighter nose that had been removed from the aircraft. Some very skilled metal workers at the Silver Hill Facility accomplished this. The restoration took some 6,077 man-hours, and the restored aircraft now wears the colors of the Luftwaffe’s famous JG 7 (Fighter Wing 7). The Japanese magazine Koku-Fan displayed some excellent photos of the newly restored and freshly painted Me-262 in its September 1979 issue, along with a detailed write-up (albeit in Japanese) of the restoration process. According to NASM's website, the Me-262A-1a is currently on display in the museum’s Gallery 106, “Jet Aviation.” (Editor's note: the scheme that it currently wears is completely authentic for this particular aircraft. When the old paint was carefully sanded down, the scheme it carries was found and completely documented so it could be repainted as it at one time was.)
|
THE KIT |
 First introduced
in 1978, Monogram’s Me-262A has stood up well over the past 24 years. During
that period, Monogram has reissued the kit several times (the box art displayed
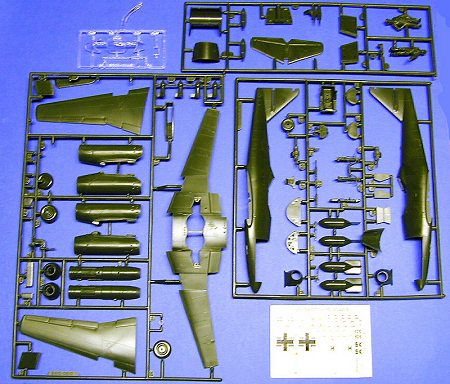
with this article is the 1988 version of the kit, #5453). The model consists of
87 parts molded in dark green styrene on three sprues and 4 clear parts on one
sprue. Decals for the original kit allowed one to model 5 different aircraft:
two Me-262A-1as, including the NASM JG7 aircraft; one Me262A-1b; one
Me262A-2a/U1; and one Me262A-2a. Unlike the current Tamiya kit, the Monogram kit
has the four-gun nose. Additional armament includes two bombs and wing-mounted
rockets. There are also two figures included in the kit: a pilot and a ground
crewman.
First introduced
in 1978, Monogram’s Me-262A has stood up well over the past 24 years. During
that period, Monogram has reissued the kit several times (the box art displayed
with this article is the 1988 version of the kit, #5453). The model consists of
87 parts molded in dark green styrene on three sprues and 4 clear parts on one
sprue. Decals for the original kit allowed one to model 5 different aircraft:
two Me-262A-1as, including the NASM JG7 aircraft; one Me262A-1b; one
Me262A-2a/U1; and one Me262A-2a. Unlike the current Tamiya kit, the Monogram kit
has the four-gun nose. Additional armament includes two bombs and wing-mounted
rockets. There are also two figures included in the kit: a pilot and a ground
crewman.
All molding is very crisp, and the kit has raised panel lines (oh no, the DREADED raised panel line!). Having grown up with these panel lines on numerous kits, this is not an overly troublesome issue for me. Some may choose to rescribe these lines, but I just choose to live with it (besides, on this aircraft, some have pointed out that raised panel lines may be more representative of the real airplane’s construction). The kit includes a 5-piece cockpit with pretty good detail for the times. The nose gun bay includes 6 parts and can be displayed in the open position. A really nice touch is the finely molded brake lines on the wing and nose landing gear. Finally, the kit includes one somewhat sparse engine that can be displayed by leaving off a removable access panel on the finished model.
|
CONSTRUCTION |
 I built this particular model some 20 years ago, but I thought it
would be appropriate to review it now on Modeling Madness due to the
recent release of Tamiya’s Me-262-2a (Kit No. 61082). While an excellent kit, a
drawback for some is the fact that Tamiya did not choose to model the aircraft
with separate leading edge slats, and, since these slats were always
fully-deployed on the prototype when it was on the ground, this creates a
problem for some modelers (although generally not for us “straight out of the
boxers”). When I built this kit, a good friend of mine was ahead of his time in
detailing models, and one of the things I was impressed with was how he cut out
and displayed the control surfaces in various positions. So, with my friend
tutoring me, I decided to try his technique on the Monogram Me-262.
I built this particular model some 20 years ago, but I thought it
would be appropriate to review it now on Modeling Madness due to the
recent release of Tamiya’s Me-262-2a (Kit No. 61082). While an excellent kit, a
drawback for some is the fact that Tamiya did not choose to model the aircraft
with separate leading edge slats, and, since these slats were always
fully-deployed on the prototype when it was on the ground, this creates a
problem for some modelers (although generally not for us “straight out of the
boxers”). When I built this kit, a good friend of mine was ahead of his time in
detailing models, and one of the things I was impressed with was how he cut out
and displayed the control surfaces in various positions. So, with my friend
tutoring me, I decided to try his technique on the Monogram Me-262.
The first hurdle I had to get over was the fact that I needed two
kits to do this correctly. Being essentially a cheapskate, the idea of
purchasing two kits to build one did not readily appeal to me; however, given
the kit’s price at the time ($5), this wasn’t going to send me into financial
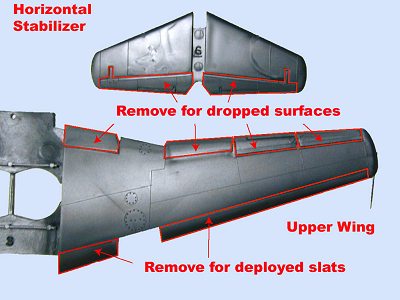
ruin, so I ponied up the money for the extra kit. The first step was to remove
the 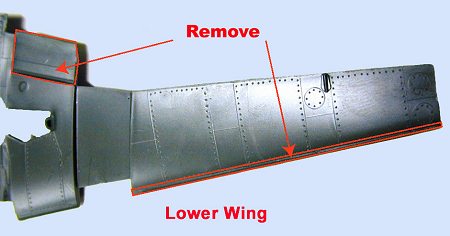 control surfaces from the upper and lower wing parts (Nos. 3, 4 and 5) and
the horizontal stabilizer (No. 6) of one of the kits. (The rudder, No. 7, is
already molded in the kit to be displayed in a left or right position). This was
done with a razor saw and a modeler’s file (the accompanying pictures show the
areas that were removed). I chose to remove the control surfaces in this manner
because scribing the surfaces with an Exacto knife and then removing them was a
whole lot harder than cutting them out of one model first. The file was used to
remove the elevator hinges from the stabilizer once the elevators were cut off,
as this area is too small to access with the razor saw.
control surfaces from the upper and lower wing parts (Nos. 3, 4 and 5) and
the horizontal stabilizer (No. 6) of one of the kits. (The rudder, No. 7, is
already molded in the kit to be displayed in a left or right position). This was
done with a razor saw and a modeler’s file (the accompanying pictures show the
areas that were removed). I chose to remove the control surfaces in this manner
because scribing the surfaces with an Exacto knife and then removing them was a
whole lot harder than cutting them out of one model first. The file was used to
remove the elevator hinges from the stabilizer once the elevators were cut off,
as this area is too small to access with the razor saw.
Once these surfaces were removed from the first kit, I then cut the wing and horizontal stabilizer from around the control surfaces on the other kit (this essentially destroys the wings and stabilizer, but look at all those neat parts you can now add to your parts box!).
The next step was to glue the leading edge slats together. This is a little tricky, but with patience, it’s not too difficult a job. After drying, I smoothed the seam between the two parts with sandpaper. The good news about the flaps and ailerons is that Monogram molded all of them on the two top wing sections, so there is no need to glue two halves together here.
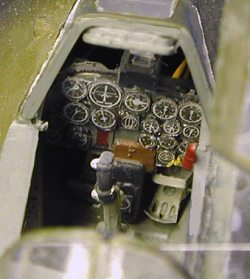
Breathing a little sigh of relief at having destroyed only one kit, I next concentrated on the cockpit. Although the kit’s cockpit is adequate, there was an aftermarket set available at the time for this kit, so I opted to use this set to provide the instrument panel. I also used a set of photo-etched rudder pedals and seatbelt buckles from a set (I think all of these were made by Waldron at the time). The cockpit was sprayed with Pactra Dark Gray and the instrument panel was painted with Pactra flat black. I then picked out various instrument panel details using a brush and flat white, red and yellow paints. I constructed the seatbelts out of paper, attached the photo-etched buckles, and painted them an off-white color. Once these were glued in the cockpit tub, I moved onto the next subassembly: the engine.
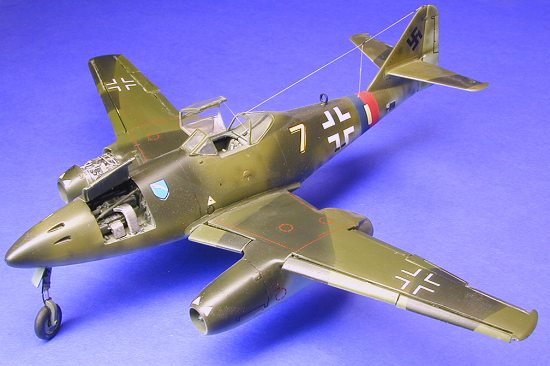
 I decided to display my model with the right engine cover off, so
I wanted a little more detail in the exposed engine. I accomplished this by
adding various engine plumbing with very small electronics solder (available at
Radio Shack or other electronics supply stores) to the assembled engine. It’s
very pliable, can be easily bent, and is readily attachable to plastic using
superglue. I also added a few small boxes and shapes to the engine to indicate
various components of the jet engine. I was not trying to be very accurate:
rather, I was attempting to imply a typical jet engine, if you get my drift
(others may want to use a detailed reference source on the Me-262’s Jumo engines
to do this detailing). Once this detailing was done, I glued the completed
engine into the engine nacelles. As I recall, there were some fit issues
associated with the nacelles, so careful fitting would be in order here for
anyone tackling this kit.
I decided to display my model with the right engine cover off, so
I wanted a little more detail in the exposed engine. I accomplished this by
adding various engine plumbing with very small electronics solder (available at
Radio Shack or other electronics supply stores) to the assembled engine. It’s
very pliable, can be easily bent, and is readily attachable to plastic using
superglue. I also added a few small boxes and shapes to the engine to indicate
various components of the jet engine. I was not trying to be very accurate:
rather, I was attempting to imply a typical jet engine, if you get my drift
(others may want to use a detailed reference source on the Me-262’s Jumo engines
to do this detailing). Once this detailing was done, I glued the completed
engine into the engine nacelles. As I recall, there were some fit issues
associated with the nacelles, so careful fitting would be in order here for
anyone tackling this kit.
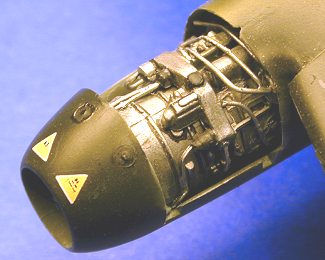
I then assembled the gun bay, sprayed it overall with Pactra Dark
Gray, then brush 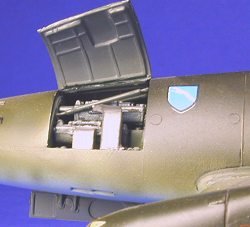 painted various details associated with the guns. This was then
set aside. Prior to attaching the cannon nose cover, I placed some lead weights
in the nose and secured these with white glue so that the model would sit
properly on its tricycle landing gear.
painted various details associated with the guns. This was then
set aside. Prior to attaching the cannon nose cover, I placed some lead weights
in the nose and secured these with white glue so that the model would sit
properly on its tricycle landing gear.
I painted the cockpit sides dark gray and then glued the fuselage halves together. A little filler was required for the seams, and after applying this I wet-sanded the seams. Next, I glued in the completed cockpit tub from the bottom of the fuselage, and also dropped in the nose gear bay. After this was added, I glued in the gun bay. I scribed the gun bay cover with an Exacto knife and snapped it in half so I could model the open gun bay.
I next assembled the three-piece wing, and then attached the engine nacelles to the wing. Again, filler was required for the seam between the nacelles and the wings. Once assembled, the wing was mated to the fuselage, and the horizontal stabilizer and rudder were glued to the tail. At this point, I was ready to paint most of the model.
|
PAINT |
When I first built this kit, there were not nearly as many choices of paints and colors available to the plastic modeler. Pactra had a nice line of military flats (including a range of WWII Luftwaffe colors) on the market, and at the time, that was the best choice for me. Accordingly, I read the Monogram instructions, and opted for the Pactra Luftwaffe colors of Green (Grun), Black Green (schwarzgrun) and Olive Drab (olivgrun). When I first painted the model, I realized that one of the green’s I had chosen was not as bright a green as the picture I had at the time of the recently restored NASM Me-262, but I recall debating about that and sticking with Monogram’s recommendation instead (fool that I was).
 Suffice it to say, the NASM Me-262 clearly sports a green that is
brighter than the one I used, so modeler’s need to be aware of this. I am not
sure what the Luftwaffe equivalent is, but if you view the aircraft on NASM’s
website you will see what I mean. (Recalling my decision process, at the time
the only reference I had was the Koku-Fan article, and for some reason I
remember thinking that the colors in the pictures were just too bright. Now that
we have the Web, I can see that their photographer captured the colors exactly
as they are on the NASM aircraft. What a toad I was! Koku-Fan
photographers NEVER screwed up the color composition of their photos, and I knew
that. Whatever possessed me to decide this way I will never know!!).
Suffice it to say, the NASM Me-262 clearly sports a green that is
brighter than the one I used, so modeler’s need to be aware of this. I am not
sure what the Luftwaffe equivalent is, but if you view the aircraft on NASM’s
website you will see what I mean. (Recalling my decision process, at the time
the only reference I had was the Koku-Fan article, and for some reason I
remember thinking that the colors in the pictures were just too bright. Now that
we have the Web, I can see that their photographer captured the colors exactly
as they are on the NASM aircraft. What a toad I was! Koku-Fan
photographers NEVER screwed up the color composition of their photos, and I knew
that. Whatever possessed me to decide this way I will never know!!).
Having made my choices for the main camouflage colors, I first sprayed the wheel wells with Pactra’s dark gray. I then stuffed these with Kleenex and sprayed the entire model with Pactra’s Luftwaffe Light Blue (Hellblau). To accommodate the painting of the camouflage pattern, I glued all of the control surfaces back onto the model using white glue. I masked off the canopy using Scotch Tape and then glued it and the windscreen onto the model with white glue. I also attached the gun bay and engine covers.
With the control surfaces, cockpit glass and covers temporarily
in place, I sprayed the top surfaces of the wings, tail, horizontal stabilizer
and fuselage with Pactra Luftwaffe Green. I then cut out masking tape patterns
to replicate the splinter pattern so common to Luftwaffe aircraft, masked the
wings and stabilizer, and sprayed the unmasked areas with Pactra
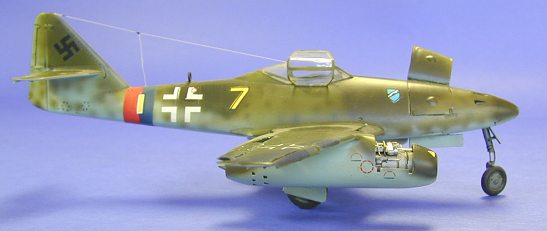 Luftwaffe Black
Green. I then proceeded to apply the Black Green and Olive Green mottling on the
fuselage’s upper surfaces and the tail.
Luftwaffe Black
Green. I then proceeded to apply the Black Green and Olive Green mottling on the
fuselage’s upper surfaces and the tail.
Once it was dry, I covered the entire model with a coat of Testors Glosscote in preparation for applying the kit decals. These were applied using the Micro Sol Micro Set system. Once the decals dried, I washed the model in warm soapy water, let it dry, and then covered the model with Testors Dullcote.
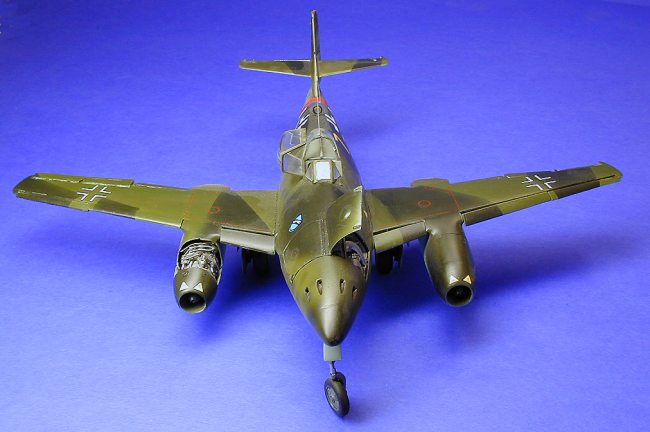
At this point, it was time to start attaching all of the peripheral parts. I first detached the control surfaces, cleaned up the white glue residue with alcohol, and then reattached these surfaces in various positions. Next, I removed the center section of the canopy, as I wanted to display this in the open position. The completed landing gear assemblies were glued on the aircraft, and the previously painted gear doors were glued in the open position. As an added feature, I cut the nose gear in half and superglued it back together with the wheel turned. To strengthen the gear, I drilled holes in the two pieces using a pin vise, then superglued a cut-to-fit straight pin into the two pieces. The final touch was a stretched sprue antenna attached with white glue and accented with white glue insulators.
|
CONCLUSIONS |
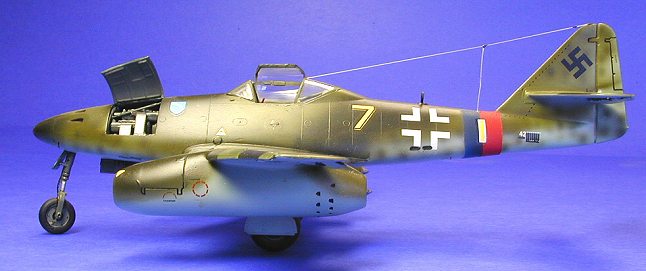
It is remarkable to me how well this kit still stacks up to the competition after all these years. For my money, it looks as much like the prototype as the DML and Tamiya kits. For those that are willing to do a little work, it is not too difficult to pose the model with positionable control surfaces without using an aftermarket kit (although I am presupposing that one has two Monogram kits that one is willing to part with!!). I was extremely impressed with Monogram’s Me-262 when it first came out in 1978, and after revisiting it again some 24 years later, I’m even more impressed with the job the Monogram folks did on this kit. It is truly a classic, and if you can find one, I highly recommend you purchase it.
August 2002
|
REFERENCES |
1. “Messerschmitt Me 262A-1a Schwalbe,” National Air and Space Museum Website, 2002.
2. C.D.B. Bryan, The National Air and Space Museum, 1984.
3. “Messerchmitt Me262,” Koku-Fan, September 1979.
Copyright Modeling Madness.com