Special Hobby 1/72 Ju-388J
|
KIT # |
72022 |
|
PRICE: |
$26.98 |
|
DECALS: |
One aircraft |
|
REVIEW : |
|
|
NOTES: |
Kit vacuform with white metal |
|
HISTORY |
The last hurrah, the end of a long lineage of capable aircraft
was the Ju-388. Envisioned as the next step in the evolution of the Ju-88 line,
the 388 started off as a much-modified Ju-188. In fact, the Ju-188T was very
similar to the final 388 version. Many such grand plans were penned on paper for
the ultimate 88, ground attack, night-fighter, reconnaissance and bomber were
but a few jobs in store. The night-fighter version or the Ju-388J flew with
Jumo-213 engines, as the proposed BMW engines were not yet available. The V-1
included all the refinements of the final production models minus the more
powerful engines, which were later attached and the airframe renamed V-2. With a
crew of 3 or 4 in a cramped pressurized cockpit, it's only defense was a remote
controlled tail barrette and it's high speed. Too little too late was it's fate,
a similar ending to one of the Reich's' wonder machines.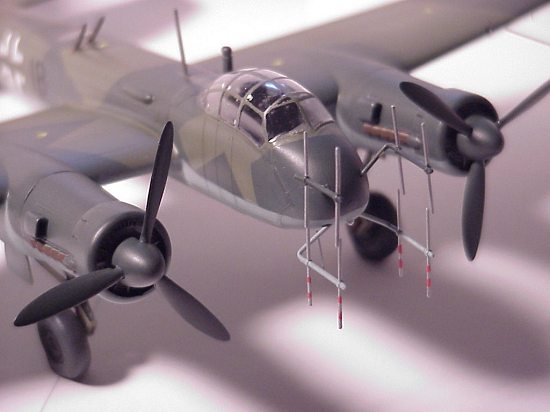
|
THE KIT |
Special Hobby's Ju-388-J kit is the second such installment following their earlier Ju-388 K/L kits. Many of the J parts were to be found in the earlier kit, but it lacked the canopy, which was particular only to this aircraft. Unless you had an older Airmodel vacuform canopy stashed a way you just had to bid your time and wait for this kit, as I did. Now, having assembled the Kora resin kit of the same aircraft in the same scale I find the Special Hobby version to be of vastly similar and simpler construction. Some welcomed photo-etched parts are in this new kit, as well as a super resin interior, but many smaller details have been over-looked. I suspect the low-pressure molding has a lot to do with it. Two nice clear vacuformed canopies are included should ones' knife slip, and a beautifully printed decal sheet for one aircraft is also in the box with split swastikas. Editors Note: Take a look at the Ju-388K/L preview as the plastic and most of the resin is identical.
|
CONSTRUCTION |
Let's get started with the interior, all the resin pieces need to carefully be sawed from their pour blocks and sanded. The fuselage halves should be inspected and cleared of any molding pegs in the vicinity of where the resin parts are to be placed. This will insure that once they are in place, will not give the impression of a 3-foot thick cockpit sidewall. As it turns out, the seats once placed in the finished cockpit bump and rub each other, this sure was a cramped confining cockpit! After all is in place, the two fuselage halves mate together quite well with little filler needed.
 Be prepared for a let down. The wings are a major
disappointment. In particular the engine nacelles, they happen to be the wrong
shape, at least according to all the drawings I've seen on the subject. Case in
point when the resin wheel wells are applied. They don't fit particularly well
because the forward firewall should be a round shape; the plastic in the kit is
more oval. I suspect the resin pieces were originally designed for a Ju-88 kit
of a different manufacturer. It really matters little as nothing can be seen
once the whole assembly is finished.
Be prepared for a let down. The wings are a major
disappointment. In particular the engine nacelles, they happen to be the wrong
shape, at least according to all the drawings I've seen on the subject. Case in
point when the resin wheel wells are applied. They don't fit particularly well
because the forward firewall should be a round shape; the plastic in the kit is
more oval. I suspect the resin pieces were originally designed for a Ju-88 kit
of a different manufacturer. It really matters little as nothing can be seen
once the whole assembly is finished.
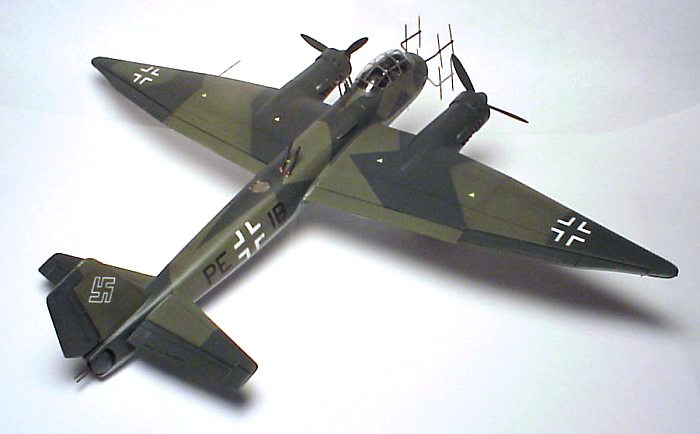
Deviation time. Yes Ladies and Gentleman, here is where we depart from our normal tour and enter the world of, 'put another set of wings on the kit' time. The donor wings come from the long-winded Italeri Ju-188 kit, sans engraved panel lines, complete with the Jumo-213 engines. I wanted to depart from the regular kit to make the V-1 version of the Ju-388-J, as everyone will be building the V-2 version as supplied in the kit. The wings where a perfect fit, and the Italeri landing gear was used along with True Details Ju-88 wheels. I found the depth of the engraving used to represent the ailerons and flaps was much better on the old Italeri kit than on the newer kit. The empennage are butt joined to the rear of the fuselage and look convincing. A formidable gun pack is suspended beneath the forward fuselage, it's a shame that resin gun barrels are not supplied, the original parts are less than adequate. More pieces could have been done in resin than what were done; then again some of the resin bits supplied could have best been left out!
Everything else was done according to the kit instructions, little else in the way of problems occurred.
As the antler radar array was photo-etched, some tubing was used to replace the 2 dimensional antenna with something a bit more believable. Some plastic bits from the older Ertl Ju-88 nightfighter came in handy.

|
PAINT & DECALS |
Paint a Ju-388-J anything you like as long as its 71/70/65. A sharp demarcation line between upper and lower colors is also called for. Paint used was a combination of ModelMaster and Xtra-color. A coating of Future clear and the transfers were applied, another coat of clear to seal them and check for silvering. Once everything looked good, a final application of Xtra-clor flat was used overall.
Speaking of painting is it just me or does any of you out their dislike masking the canopy as much as I do? Especially a canopy like a Ju-188, or He-111, or even the Ju-338! Gosh dang it Eduard, let's get cracking on a mask for this kit too, save masks for Me-109s and Fw-190s for the wimps in the crowd. These are some serious masking jobs. I always love spending several days masking these beasts, too. Ed
|
CONCLUSIONS |
Overall results are as follows, 8 out of 10 for satisfaction, 7 for quality of original kit, and 8 for difficulty of masking. Hey, don't laugh. Many a kit sits on the shelf because the canopy is a bear to work with. I managed to make my mask work well enough to take these photos, and wish to extend a special thanks to Special Hobby for another fun build.

Copyright ModelingMadness.com. All rights reserved. No reproduction in part or in whole without express permission from the editor.
If you would like your product reviewed fairly and fairly quickly, pleasecontact the editor or see other details in the Note to Contributors.