|
KIT: |
ARBA 1/48 Heinkel Wespe |
|
KIT # |
? |
|
PRICE: |
@$50.00 |
|
DECALS: |
see review |
|
REVIEWER: |
|
|
NOTES: |
Resin kit |
|
HISTORY |
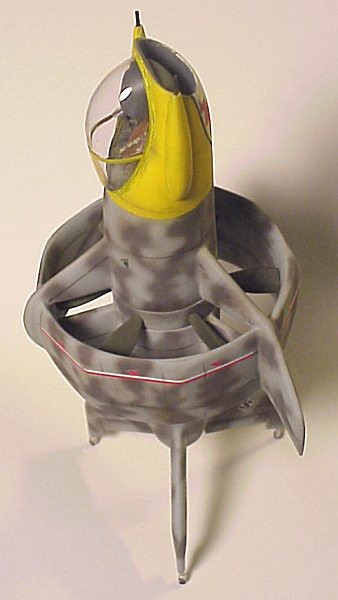
The Heinkel designers were busy near the end of the Second World War churning out possibilities to help turn the tide of the conflict to their advantage. One such design was a point defense fighter with the ability to take off vertically strike it’s intended airborne target, and then return to earth landing in a vertical posture, a daunting task, even today. This particular design utilized some unknown turbojet engine coupled to a 6 bladed drive ring within a ducted fan structure. It was unlikely this aircraft would have ever made it to the prototype stage as too many other projects promised more hope.
|
THE KIT |
This was a sight unseen purchase that arrived from Hannants, very quickly I might add, the package resplendent with green US Customs tape. Let me tell you about the kit, since Customs has already had their look at it.
Same box as every other ARBA kit, whether the massive BV-155 or the smallest conversion, complete with a color picture of the completed model. Our task is to try to get the parts in the box to look something like that photo. Step one; look at the one page instruction sheet, read the short history and the even shorter construction description. Step two, look at the small number of pieces that it takes to make this kit and wonder why you paid that much for this kit. “It’ll only take a weekend” I said to myself, with the normally quality minded folks at ARBA making this kit; “it should be a no-brainer to assemble”. Yeah, right.
|
CONSTRUCTION |
 For the most part, the
above statement is correct, ARBA has had a great deal of experience making these
one-off designs of rare aircraft, and have done a good deal of success. It was a
bit disappointing to see some quality issues with this new kit. Mold shift is
evident on most of the parts; at least I thought it was mold shifting. What was
a problem assembling the lower fuselage to the middle section was actually not a
problem at all. The two pieces are ’keyed’ to fit together so the fins line up
properly. I in turn sanded them down and realized my error, having to insert a
thin disk of plastic to compensate. Not a big boo boo, but considering the mold
lines and misalignment scars on the other parts, I wasn’t taking any chances.
For the most part, the
above statement is correct, ARBA has had a great deal of experience making these
one-off designs of rare aircraft, and have done a good deal of success. It was a
bit disappointing to see some quality issues with this new kit. Mold shift is
evident on most of the parts; at least I thought it was mold shifting. What was
a problem assembling the lower fuselage to the middle section was actually not a
problem at all. The two pieces are ’keyed’ to fit together so the fins line up
properly. I in turn sanded them down and realized my error, having to insert a
thin disk of plastic to compensate. Not a big boo boo, but considering the mold
lines and misalignment scars on the other parts, I wasn’t taking any chances.
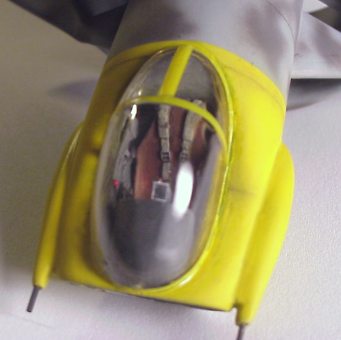
Alrightee, the upper part
of the craft is very nicely done, the interior is molded as part of this
casting, and it is spectacular. One thing missing are rudder pedals, which do
not have a place in this interior, none what so ever. Hope no one notices
through the crystal clear vacuform canopy, of which two are supplied. The ducted
wing is in three parts, they fit quite well together, some Bondo is need at some
areas. Once the wing is dry, just try and fit in around the extensions on the
forward body, go ahead, I dare you. Some careful sanding will be needed here to
make it fit. Another problem surfaces when aligning the wing
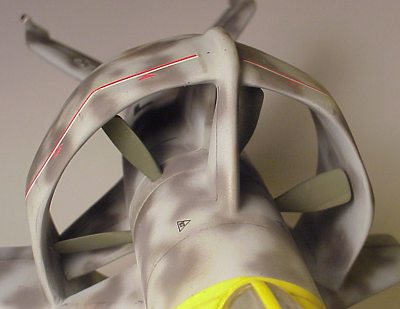 to the ‘ring
holders’, the original plan is that they are positioned at 110 degrees to each
other when viewed from above, the fact is they are slightly off, making a clean
miss of on one of the holders. A bit of ‘fudging’ is needed and sanding to try
to make it look right. The lower portion of the fuselage connects fairly well
once it too has been sanded to slide into the wing.
to the ‘ring
holders’, the original plan is that they are positioned at 110 degrees to each
other when viewed from above, the fact is they are slightly off, making a clean
miss of on one of the holders. A bit of ‘fudging’ is needed and sanding to try
to make it look right. The lower portion of the fuselage connects fairly well
once it too has been sanded to slide into the wing.
Between the upper and lower structure is the ring which holds the propeller blade, this part looks like an old style tinker toy wood part with the holes. The ring has a casting block gate on it, which makes for some careful sanding to keep the disk round. Well, it would require care, if the ring was round to begin with, mine looked a little ‘not so round’, hoping that once the propellers are applied would not be as noticeable. The propellers are in white metal, and the holes in the thrust ring need to be deeper so the whole assembly fits into the ring. Takes a few minutes with a proper size drill, not a big deal really.
So far the score looks
like this, ARBA kit 7, Bondo 3, but we enter the
 second half. After an
application of primer to catch mistakes, there are a few other things that need
help. Namely pin holes, only on the lower half of the kit; the upper part and
wing have been spared the putty knife. Also a few fins have a really nasty mold
line and look almost short shot. Some of the engraving seems a little shallow,
some look well defined, almost as though two or three separate people were
involved in making the masters, these lines are not up to ARBA’s usual
standards.
second half. After an
application of primer to catch mistakes, there are a few other things that need
help. Namely pin holes, only on the lower half of the kit; the upper part and
wing have been spared the putty knife. Also a few fins have a really nasty mold
line and look almost short shot. Some of the engraving seems a little shallow,
some look well defined, almost as though two or three separate people were
involved in making the masters, these lines are not up to ARBA’s usual
standards.
In order to make sure the inner surface of the ducted wing gets its’ fair share of paint, I opted to leave it of until the whole thing was painted. This means the wing must slide onto the body with a minimal of fuss, and leave no seams or gaps, and that is the hard part. Carefully sand the mating surfaces so the wing and body slide on without squeaking some filler was used to build up a curved surface for the wing to rest on. It worked pretty well, only some Micro-crystal clear was used to fix the two parts to each other, friction helped with the rest.
|
PAINT & DECALS |
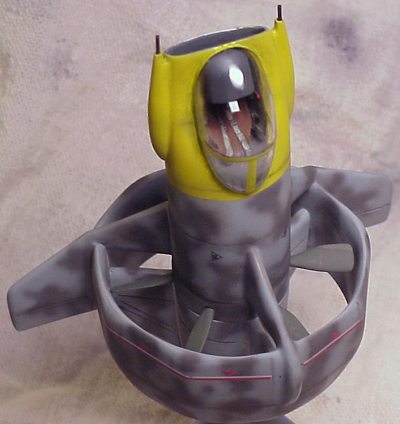
When the wing was
removed, a decorative camouflage scheme was applied, a basic RLM 76 overall with
a dash of RLM 75 in a streaked mottle pattern to represent trees as it stands
waiting to pounce on 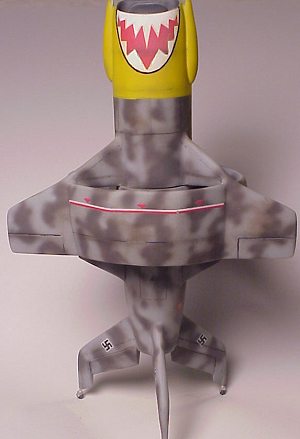 unsuspecting bomber formations. The over effect looks good,
but something is missing. Not to have anyone say I’m a boring modeler, A yellow
nose was painted on to jazz it up a bit, but still the kit lacked something. Out
came the trusty ALPS printer and with the help of Corel Draw, a Sharks mouth now
is embellished on the yellow. Since the kit had so-so engraving, I used a heavy
chalk panel line shading effect, perhaps a bit over the top for many people.
Given the chance, the kit will get striped down and repainted some day.
unsuspecting bomber formations. The over effect looks good,
but something is missing. Not to have anyone say I’m a boring modeler, A yellow
nose was painted on to jazz it up a bit, but still the kit lacked something. Out
came the trusty ALPS printer and with the help of Corel Draw, a Sharks mouth now
is embellished on the yellow. Since the kit had so-so engraving, I used a heavy
chalk panel line shading effect, perhaps a bit over the top for many people.
Given the chance, the kit will get striped down and repainted some day.
|
CONSTRUCTION CONTINUES |
Next comes the task of gluing on the six white metal fan blades, of course I mean TASK. For one reason or another, ARBA thought the blades would insert easily into the shallow holes on the fuselage ring. So drill them deeper silly. I did and they still needed to be trimmed at the base of the blades. So there, we trimmed the blades and they clear the inner surfaces of the ducted wing, almost. I suspect the Ducted wing is not truly round on the inside, because a blade or two are awfully close to the surface. Oh well, live and learn.
Last things to go on are
the canopy and gear wheels. The vacuformed canopy is nice and thick, but very
clear. Too many companies give you super thin canopies that buckle under normal
preparation, not so with this kit. It was a pleasure to sand
 and shape this one
to fit the cockpit opening; care must be used, as the cutting marks are not well
defined. Also, the plastic used tends to fracture when cut with a scissors, best
warm it up in warm water before cutting or use a sharp number 11 blade.
and shape this one
to fit the cockpit opening; care must be used, as the cutting marks are not well
defined. Also, the plastic used tends to fracture when cut with a scissors, best
warm it up in warm water before cutting or use a sharp number 11 blade.
The score is now ARBA 9, Bondo 4, and Swearing 2.
|
CONCLUSIONS |
I’m finally to the point where the kit is almost together, it looks rather good, but will not be taken too seriously by true Luftwaffe-ophites. This thing, as designed, would have failed to make it off the ground, only had 10 minutes of fuel, and the pilot most certainly needs to bail out in order to survive to fly another mission. But, it is a sweet looking model despite some minor drawbacks, which is why this kit rates a 5 in ease of assembly.
So better have a few tuff builds before tackling this one. Thanks to me for buying this kit and ARBA for making Luft-46 fans get that warm fuzzy feeling again.
If you would like your product reviewed fairly and quickly by a site that has well over 150,000 visitors a month, please contact me or see other details in the Note to Contributors.
Back to the Reviews Index Page