
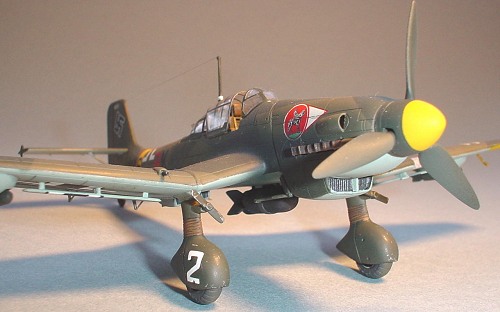
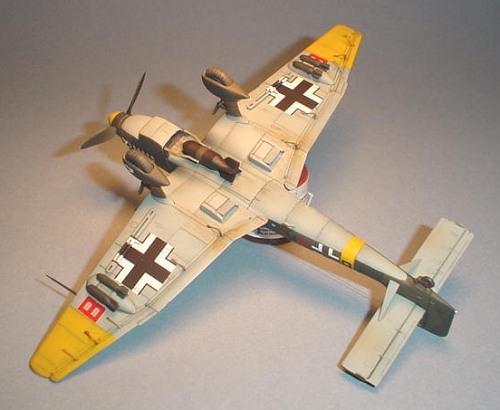
Fujimi 1/72 Ju-87D-1/3 Stuka
| KIT #: | 25014 |
| PRICE: | $12.98 MSRP |
| DECALS: | See Review |
| REVIEWER: | Joe Youngerman |
| NOTES: | Great kit at a new low price. |
| HISTORY |
The Ju 87 Stuka
is certainly one of the most well known combat aircraft of World War Two.
From its sturdy purposeful stance to its terrifying dive siren the Stuka
stands out for most of us as an awesome attack weapon of the period. The
Stuka is reported to have sunk more shipping than any other aircraft in the
history of warfare, not to mention the destruction of
 thousands of armored
and other vehicles on land. Despite these achievements, the Stuka was not
without its faults and vulnerabilities. It was slow even in its final forms
and was never confused with a fighter plane where maneuverability was
concerned. It needed fighter escort to survive in areas where enemies were
expected, especially against the western allies.
thousands of armored
and other vehicles on land. Despite these achievements, the Stuka was not
without its faults and vulnerabilities. It was slow even in its final forms
and was never confused with a fighter plane where maneuverability was
concerned. It needed fighter escort to survive in areas where enemies were
expected, especially against the western allies.
The Stuka, like many German aircraft of WW2 was forced to soldier on log past the point it should have been replaced with a more modern weapon. Flown in the Spanish Civil War to the end of the Second World War, it must have greatly surpassed its designer’s expectations. The Ju 87D-3 was the most widely produced variant, with the D-1 modeled here being a major improvement over the previous B/R models. The D was first flown in early 1941 and was in action in all fronts not long after. A new propeller and more powerful engine combination gave the Ju 87D much greater load carrying capability and the airframe itself was cleaned up to improve aerodynamic efficiency.
| THE KIT |
 The Fujimi Ju 87 kits have been
around for some time now and were initially very expensive if you could
even find them. I managed to get at least one copy of all the variants over
the years…something I could do today much cheaper thanks to the new lower
prices on these kits!
The Fujimi Ju 87 kits have been
around for some time now and were initially very expensive if you could
even find them. I managed to get at least one copy of all the variants over
the years…something I could do today much cheaper thanks to the new lower
prices on these kits!
This particular release can be built as a D-1 or a D-3 depending on your preferences. The D-5 has a longer wing and is kitted separately. All the kits are well packaged and molded in glossy light gray styrene. The canopy can only be displayed in the closed position, unlike the newer Italeri kits, and interior detail is minimal at best. The surface detail is very well done though and even out-of-the-box these kits will look great built up. It had been years since I built a Stuka and really wanted to dress this one up a bit. I gathered some goodies in the form of a Falcon vac canopy, Moskit replacement exhausts, and a basic Eduard photo etch set for the interior.
| CONSTRUCTION |
 The Moskit exhausts were well worth the
investment as they fit perfectly and really add a lot to the look of the
kit. I installed them first as I began the assembly process. The nose
halves were then joined and the small splitter that separates the oil
cooler and air intake in the nose intake was made from a small piece of
strip plastic. I also scratch built the backside of the oil cooler using
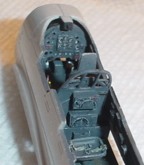
Aero Detail’s Ju 87 book as a guide. Using that same book, I scratch built
a new interior from plastic strips of various sizes and used the Eduard
photo-etch pieces for the instrument panel, circuit breaker panel, and the
rear cockpit radio faces. The radios are well modeled in the Italeri kit
but are completely absent from the Fujimi releases and must be fabricated
from plastic…not a big deal really as there are fairly simple. I chose to
use the rear seat provided though you may want to replace it with a more
accurate “netting” example.
The Moskit exhausts were well worth the
investment as they fit perfectly and really add a lot to the look of the
kit. I installed them first as I began the assembly process. The nose
halves were then joined and the small splitter that separates the oil
cooler and air intake in the nose intake was made from a small piece of
strip plastic. I also scratch built the backside of the oil cooler using
Aero Detail’s Ju 87 book as a guide. Using that same book, I scratch built
a new interior from plastic strips of various sizes and used the Eduard
photo-etch pieces for the instrument panel, circuit breaker panel, and the
rear cockpit radio faces. The radios are well modeled in the Italeri kit
but are completely absent from the Fujimi releases and must be fabricated
from plastic…not a big deal really as there are fairly simple. I chose to
use the rear seat provided though you may want to replace it with a more
accurate “netting” example.
Overall the fit of the kit is excellent
and there were no problems getting the fuselage halves together or joining
them to the wing. One aspect of the wing that most Stuka kits don’t
represent well is the actuators for the flaps and ailerons. These are very
prominent on the actual aircraft but are just molded on the wing in most
Stuka kits I’ve seen. I just couldn’t let that go so
 I carefully removed
the offending blobs and drilled out holes for the actuator rods. Only after
painting did I attach scratch built rods and actuator arms made from
stretched sprue and strip plastic. The effect is dramatic and well worth
the effort in my opinion. The D-1 that I was modeling had the dive sirens
mounted but Fujimi does not provide them! A bit of a problem except I just
happen to have an Italeri Ju 87B/R kit that I won’t need them for so the
raiding began! The Italeri parts fit very well onto the stubs that Fujimi
does provide saving me time and trouble trying to scratch build these
items.
I carefully removed
the offending blobs and drilled out holes for the actuator rods. Only after
painting did I attach scratch built rods and actuator arms made from
stretched sprue and strip plastic. The effect is dramatic and well worth
the effort in my opinion. The D-1 that I was modeling had the dive sirens
mounted but Fujimi does not provide them! A bit of a problem except I just
happen to have an Italeri Ju 87B/R kit that I won’t need them for so the
raiding began! The Italeri parts fit very well onto the stubs that Fujimi
does provide saving me time and trouble trying to scratch build these
items.
Another small issue that needed to be
addressed was the wing mounted landing light. These days most kits
thankfully include at least a cutout with a clear plastic lens for this
feature. The Fujimi kit went cheap here and while the light is scribed into
the port wing there is no clear part for a realistic looking light. One
could just paint it silver but a fix here is not a big problem. I cut out
the light area with my trusty saw and boxed in the space with sheet
plastic. A small light bulb was crafted from a thin slice of some spare
clear plastic sprue and the backside of this painted with
 Testor’s chrome
silver. The tiny bulb was then glued into the space with white glue. The
light cover was made from thin clear plastic sheet shaped to the airfoil
using an appropriately sized paint brush as a “mold” to bend it around. It
was carefully cut to fit snugly inside of the light cutout and installed
using Formula 560 Canopy Glue…the best white glue I have found for my
modeling needs, where clear parts are concerned. The result looks much
better than silver paint and only took about an hour to accomplish.
Testor’s chrome
silver. The tiny bulb was then glued into the space with white glue. The
light cover was made from thin clear plastic sheet shaped to the airfoil
using an appropriately sized paint brush as a “mold” to bend it around. It
was carefully cut to fit snugly inside of the light cutout and installed
using Formula 560 Canopy Glue…the best white glue I have found for my
modeling needs, where clear parts are concerned. The result looks much
better than silver paint and only took about an hour to accomplish.
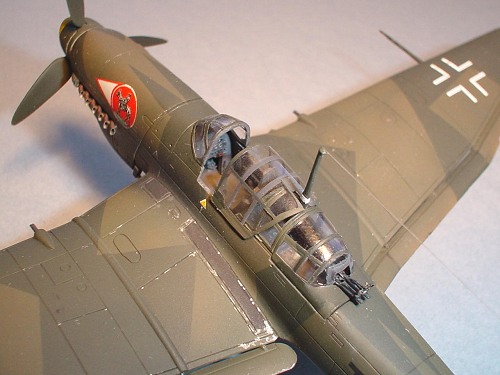
The landing gear is beautifully molded and fits very well onto the wing. The tail planes were added and again the fit was excellent. I did replace the wing guns with drilled out plastic rod and sanded off the inaccurate details on the wing mounted bombs before painting and attaching them. The canopy was cut and the vac replacement used only for the main sliding section. The forward and rear glazing was armored and the vac parts just look too thin to me. The dive brakes are too thick and so I sanded them to about ½ their original thickness for a more realistic look. Finally, I added the wing tip lights that were sanded off during construction with scratch replacements and installed the little cross-hair sights on the rear guns from the photo-etch set. The radio wire was made from a section of fine stainless steel wire from the Sea Bird Company.
| COLORS & MARKINGS |
 I used Gunze RLM 70 and Pollyscale RLM
71 over Humbrol RLM 65. The yellow theater markings were Aeromaster RLM 02
and Aeromaster RLM 66 was tapped for the interior. The model was pre-shaded
with Pollyscale flat black before the rest of the painting commenced. The
exhaust stains were achieved using a very diluted 80/20 mix of Pollyscale
black and rust. Other weathering was accomplished with pastels and washes.
Some of the canopy bracing is internal and should be RLM 66. I did this by
very carefully using strips of tape to mask the interior canopy framing and
then sprayed the RLM 66. It worked well though it took a little while to
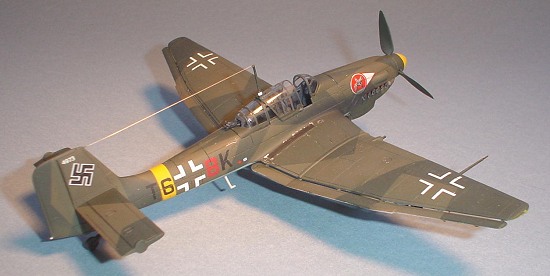
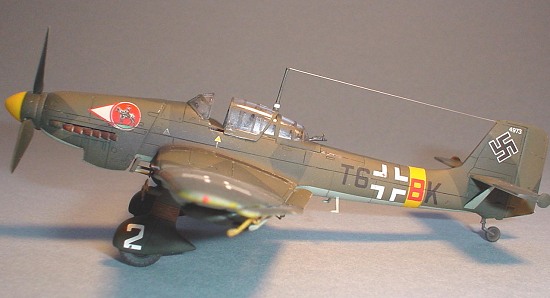
make sure no disaster would occur. The finished aircraft represents a D-1
flying with II/St.G2 “Immelmann” group while operating in the Russian front
during the summer of 1943. The kit decals for the tail number, wheel spat
number and nose art were the only ones used as they were a bit brittle. The
rest are various decals from my decal box and for a change I actually had
all the codes I needed for the wings and fuselage! Future was applied
before decaling and Testor’s flat used afterwards to complete the project.
I used Gunze RLM 70 and Pollyscale RLM
71 over Humbrol RLM 65. The yellow theater markings were Aeromaster RLM 02
and Aeromaster RLM 66 was tapped for the interior. The model was pre-shaded
with Pollyscale flat black before the rest of the painting commenced. The
exhaust stains were achieved using a very diluted 80/20 mix of Pollyscale
black and rust. Other weathering was accomplished with pastels and washes.
Some of the canopy bracing is internal and should be RLM 66. I did this by
very carefully using strips of tape to mask the interior canopy framing and
then sprayed the RLM 66. It worked well though it took a little while to
make sure no disaster would occur. The finished aircraft represents a D-1
flying with II/St.G2 “Immelmann” group while operating in the Russian front
during the summer of 1943. The kit decals for the tail number, wheel spat
number and nose art were the only ones used as they were a bit brittle. The
rest are various decals from my decal box and for a change I actually had
all the codes I needed for the wings and fuselage! Future was applied
before decaling and Testor’s flat used afterwards to complete the project.
| CONCLUSIONS |
The Fujimi kits have been around for some time but still hold up very well being more correct in shape and size than the Academy kits. The Fujimi kit can, with a little work, be built into very nicely detailed model of this much feared and admired weapon from World War Two. I would highly recommend Fujimi’s kits to anyone thinking of a Stuka build in this scale!
February 2005
| REFERENCES |
Aero Detail 11, Junkers Ju 87D/G Stuka. Dai Nippon Kiaga Co. Ltd. 1994
St.G 2 “Immelmann”. Marek J. Murawski. Kagero Publishing, 2003
Ju 87 Stuka in Action. Brian Filley. Squadron Signal Publications, 1986
Copyright ModelingMadness.com. All rights reserved. No reproduction in part or in whole without express permission from the editor.
If you would like your product reviewed fairly and fairly quickly, please contact the editor or see other details in the Note to Contributors.
Back to the Review Index Page2015