Heller 1/43 Mercedes C9
|
KIT #: |
80107 |
|
PRICE: |
AUD $10.95 in the 1990s
|
|
DECALS: |
One option: Le Mans 1989 |
|
REVIEWER: |
Graham
Mison |
|
NOTES: |
|

The
partnership between Swiss Sports car constructor Peter Sauber and Mercedes-Benz
began in the early 1980s. This developed to a point in 1988 when the German
manufacturer took Sauber on as the official factory team for the World Sports
Car Championship using the Sauber C9. This resulted in a second place in the
Championship but a dismal result at Le Mans. Next year, with the cars painted
German Silver, the C9s won 7 of the 8 Championship races and finished with
almost double the points of their nearest rival.
 The
Sauber (Mercedes-Benz) C9 won the twice around the clock French classic in 1989
with the winning car (#63) driven by Jochen Mass, Manuel Reuter and Stanley
Dickens. They covered 390 laps and had a 5 lap margin over a second C9 (#61)
driven by Mauro Baldi, Kenny Acheson and Gianfranco Brancatelli. Third was the
Porsche 962C (#9) of Bob Wollek and Hans-Joachim Stuck.
The
car was powered by a Mercedes-Benz M119 turbocharged 5ltr V8 with aluminium
heads using a 5 speed gearbox putting out around 720 HP. The body was
constructed from carbon fibre and aramide with a length of 4.8mtrs and a height
of 1mtr. These cars were often referred to as just Mercedes C9s or ‘Silver
Arrows’, the first competition cars with that tag applied to them since the mid
1950s. The Le Mans winner exits in the Mercedes museum and the ’89 WSCC winner
was recently sold to Australian Bob Sherrard who is running it in the 2008 Group
C historic series. He and Wayne Park drove the car to victory on May 18 at Spa
Francorchamps in the 90-minute enduro.
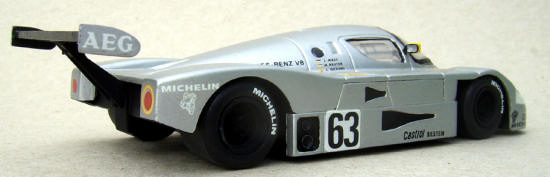
Heller’s
small-scale kit of the C.9 was released in the early ‘90s. The lid and tray
style box has an eye-catching painting of the ‘Silver Arrow’ Le Mans winner. I
believe the artwork in this series was amongst the best to ever grace a Heller
box top. The contents consists of 14 styrene parts molded in white, 3 clear
parts, 2 metal axles, 4 vinyl tyres, a small decal sheet for car #63 and a
double sided instruction sheet with a 2 stage assembly diagram and a painting
and decaling guide on the reverse. The decaling guide is conveniently in 1/43.
As far as flaws go there are a few ejector pin marks on what will be the inside
of the chassis and the clear headlight covers in my kit were rough along the
glueing surface.
 Construction
begins with the single piece chassis. To this is added the one-piece cockpit
tub, this is simplified down to an integrally molded drivers seat with some
panelling detail beside it and a second headrest. The driver’s seat has belts
and buckles molded on. The instructions call for the axles, wheels and tyres to
be added at this stage but I left them off and gave an overall coat of Flat
Black. I gave the cockpit some dry brushing with Aluminium. The belts were
painted Dark Blue with the buckles picked out in Silver.
Construction
begins with the single piece chassis. To this is added the one-piece cockpit
tub, this is simplified down to an integrally molded drivers seat with some
panelling detail beside it and a second headrest. The driver’s seat has belts
and buckles molded on. The instructions call for the axles, wheels and tyres to
be added at this stage but I left them off and gave an overall coat of Flat
Black. I gave the cockpit some dry brushing with Aluminium. The belts were
painted Dark Blue with the buckles picked out in Silver.
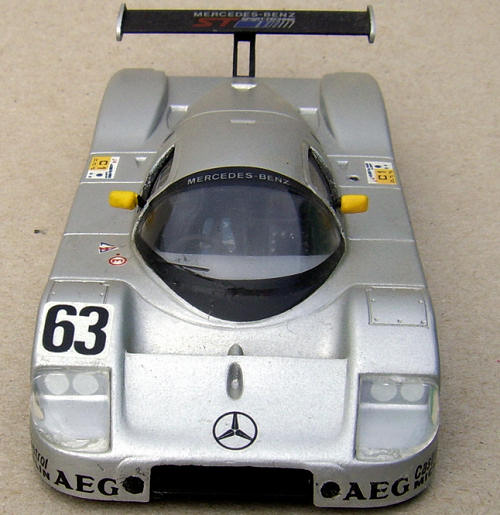
The
second stage deals with the exterior. The body is in 3 parts. I joined the sides
to the main section and sprayed this assembly Testors German Silver. When dry
the NACA ducts and exhaust pipes were painted Flat Black.
I
then cleaned up the rear wing and its support bracket and gave this a spray of
Flat Black, at the same time giving a coat to the wheels. Next were added the 2
external mirrors, these were painted Black, Yellow and Silver. The body and wing
were given a coat of Gloss and when dry the majority of decals were applied,
these went on the smooth surface very well. After this had dried I mixed a small
amount of Flat with Gloss and applied this, this gives a better look to silver
in small scale than a Gloss finish in my opinion.
The
single piece windscreen / side windows was next and once this was installed I
applied the decal for the surround. Strangely this did not want to lay down in
one corner so I applied some Decal Set. This pulled it down but I noticed later
that the Decal Set had an effect on the paint in that area.
The
wheels were now inserted into their tyres and these were pushed onto the axles
and the Michelin decals added.
All
that remained now was to attach the steering wheel, rear wing to the chassis and
the headlight covers. The last items were molded with rough edges and needed
some cleaning up, this was only partly successful and still look a little on the
rough side. A little bit of weathering in the form of stone chips was applied.
These
kits by Heller are recommended to all ages and are a very quick build, this one
was spread over a 3 day weekend.
 www.groupcracing.com
- Images and info on the Historic Group C series.
www.groupcracing.com
- Images and info on the Historic Group C series.
www.racingsportscars.com/photo/Le_Mans-1989-06-11-photo.html
Images from Le Mans 1989.
Graham
Mison
July 2008
Copyright ModelingMadness.com
If you would like your product reviewed fairly and fairly quickly, please
contact
the editor
or see other details in the
Note to
Contributors.
Back to the Main Page
Back to the Review
Index Page 2019