| KIT: | Tamiya 1/24 Ferrari Modena 360 Spyder. |
| KIT #: | 24238 |
| PRICE: | £19.95 GBP |
| DECALS: | One option |
| REVIEWER: | Patrick Barratt |
| NOTES: | Sex on wheels |
| HISTORY |
Phew! Where do you start with “History” and “Ferrari”?
I will narrow it down to this particular model and keep it brief if only because this is a model review and not a history lesson…. What I should have said was that if I am going to look up the history…..then so can you to J.
 The Modena
started life as a 3.5ltr V8 coupe and very soon a spider (convertible) model
followed. It has a double wishbone suspension system all round and a 6-speed
gearbox with F1 paddle change option behind the steering wheel (not a very good
system in my opinion). The bottom line for most of us is that it might as well
be the Batmobile because this kit will be the closest any of us get to owning
one.
The Modena
started life as a 3.5ltr V8 coupe and very soon a spider (convertible) model
followed. It has a double wishbone suspension system all round and a 6-speed
gearbox with F1 paddle change option behind the steering wheel (not a very good
system in my opinion). The bottom line for most of us is that it might as well
be the Batmobile because this kit will be the closest any of us get to owning
one.
| THE KIT |
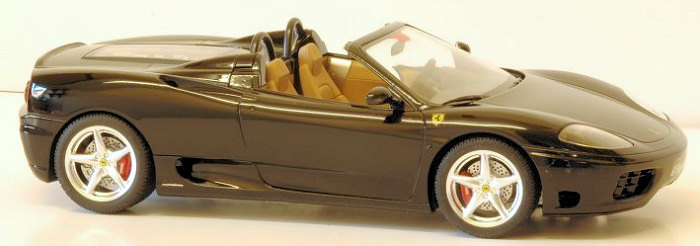
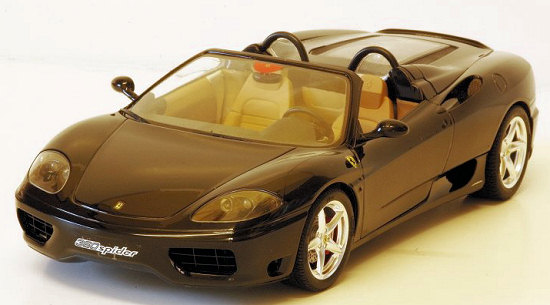
The kit is made up of 6 spru’s, 2 black, 2 silver, 1 chrome, and 1 clear. Approximately150 parts. Also included are 4 extremely realistic rubber tyres, 4 chrome plated wheels, a small selection of metal decals, normal decals and self adhesive masking shapes to mask the clear parts, Detail is good and moulding seem true with no distortion. The body shell is one piece with no opening panels apart from the glass tailgate over the engine. The kit can be assembled with the roof up or down. All parts are just what you would expect from Tamiya and the kit is indorsed by Ferrari themselves!! Say no more J
| CONSTRUCTION |
 The instruction sheet
consists of a brief history of the car and 18 comprehensive construction stages.
For those who have built this type of car kit before the procedure is as you
might expect with 4 main sub assemblies, 1/ Chassis. 2/ Engine 3/
Interior/seating tub. 4/ body.
The instruction sheet
consists of a brief history of the car and 18 comprehensive construction stages.
For those who have built this type of car kit before the procedure is as you
might expect with 4 main sub assemblies, 1/ Chassis. 2/ Engine 3/
Interior/seating tub. 4/ body.
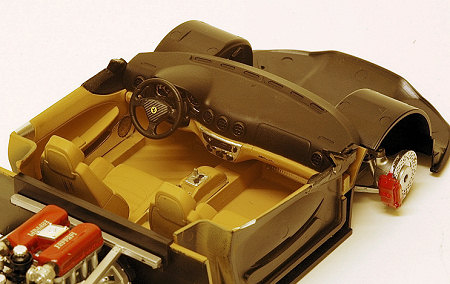
Starting with the interior/tub, this is made up of the main tub itself with a moulded in centre consol. To this you add a pair of inner door skins, a pair of seats and a dashboard. This being a convertible, everything you do at this stage will be on show so take your time. Everything that is supplied here is good but the interior lacks seat belts so you will have to do something about that. I used BMF on the aluminium sections on the door interiors and to pick out the detail on the radio section of the dash and the centre consol as well as a small amount of CF decaling on the steering wheel. Those with more experience than me will probably go to town on the detailing at this point but I must hold my hands up right here and confess this is the first model car I have completed (although the second I have started) so this is very much a review from a novice point of view. A bit of research into getting a realistic leather/vinyl and carpet finish would be useful.
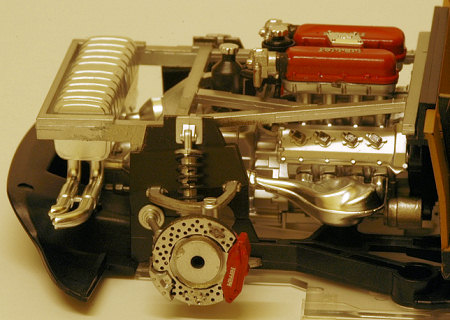 The engine is
a very nicely detailed V8 with lots of shiny bits so it’s very easy to make
this look impressive. It will be on show through the glass-topped hood so once
again time spent here is time well spent as they say (someone must have said
that at some time J). Assembly is straightforward and should present no
problems.
The engine is
a very nicely detailed V8 with lots of shiny bits so it’s very easy to make
this look impressive. It will be on show through the glass-topped hood so once
again time spent here is time well spent as they say (someone must have said
that at some time J). Assembly is straightforward and should present no
problems.
The next stage is fitting the tub and engine to the chassis and adding the suspension. Again this is straightforward thanks to Tamiya’s usual superb fit of parts. The chassis has a clear section under the engine that can be painted or left as is. There is an advantage in leaving it clear as it lets light in underneath that helps illuminate the engine, visible through the top of the hood
Once all these parts are to you liking you can set about the body. It goes without saying that the first thing to do here is spray it and its associated parts, these are called out in the instructions as “body colour” so you cant go to far wrong. A small sheet of nylon mesh is supplied to use as a grill/mesh over some of the inlets in the body shell. I gather a new company called “Lion Roar” makes an etched brass kit as well for this task. The fully assembled body with its screen and inner wheel arches etc is then fitted to the chassis and the wheels attached (via rubber sleeves so they can be removed to show the suspension and brakes).
| COLORS & MARKINGS |
 Painting cars
is an art in its self it seems. People are fanatical about preparation, gloss
coats, lacquers and depth of shine! In some cases even measuring the reflection
with a ruler. The fact is that although real cars are very shinny with there
multiple lacquer coats, the paint finish is often orange peeled and doesn’t
stand the sort of close inspection that car modellers subject their models too .
That said, if you can get a superb finish….well what’s wrong with that. I used
Tamiya spray cans, Gloss Black and clear lacquer. I did use an airbrush to spray
the interior Tamiya light sand and a can of car touch up matt black that gives
quite a rough surface to simulate the textured vinyl dashboard.
Painting cars
is an art in its self it seems. People are fanatical about preparation, gloss
coats, lacquers and depth of shine! In some cases even measuring the reflection
with a ruler. The fact is that although real cars are very shinny with there
multiple lacquer coats, the paint finish is often orange peeled and doesn’t
stand the sort of close inspection that car modellers subject their models too .
That said, if you can get a superb finish….well what’s wrong with that. I used
Tamiya spray cans, Gloss Black and clear lacquer. I did use an airbrush to spray
the interior Tamiya light sand and a can of car touch up matt black that gives
quite a rough surface to simulate the textured vinyl dashboard.
360 spiders came in 4 colours, Red (of course) Silver, Black and Blue so purists, take your pick, the rest of you can chose anything you want although I should steer clear of Pink and the like for fear of a law suit from Ferrari!
Once again precise colours mixes are called out in the instructions.
| CONCLUSIONS |
This was an
extremely enjoyable kit to make. As I have said, I have only ever started 2 car
kits and the first (A Tamiya Ferrari FXX) ended in complete frustration and
disaster simply because it was beyond my limited skills, a case of trying to run
before I could walk. This 360 spider on the other hand with its non-opening
doors and trunk and in particular, its one-piece body shell was a much better
introduction to the genre and I was able to pick up a lot of tips for the fu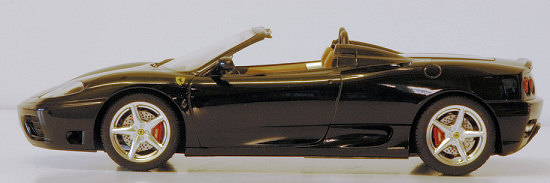 ture.
The main difference here for military equipment builders like myself is the need
to spray all parts before fitting so careful consideration must be given to
where you are going to place the glue so that it doesn’t melt the paint and seep
through and become visible on the finished part. Also bear in mind that where as
you are probably used to trying to get that weathered finish with chips and oil
stains, here you are looking for that new car “showroom” finish and even the
slightest remnant of glue on a finger can spoil hours of work on a body shell.
It really is a whole new discipline for us camouflage types!
ture.
The main difference here for military equipment builders like myself is the need
to spray all parts before fitting so careful consideration must be given to
where you are going to place the glue so that it doesn’t melt the paint and seep
through and become visible on the finished part. Also bear in mind that where as
you are probably used to trying to get that weathered finish with chips and oil
stains, here you are looking for that new car “showroom” finish and even the
slightest remnant of glue on a finger can spoil hours of work on a body shell.
It really is a whole new discipline for us camouflage types!
If after all that you still feel you would like to turn you hand to a Car kit, well this Ferrari worked for me. Its reasonably simple to build, it’s a great looking car, it’s a convertible so all the work on the interior is visible and it doesn’t involve acres of decals. Oh and of course it’s a Tamiya so no need to worry about fit/filler.
| REFERENCES |
The only references I used were the supplied instruction and a WIP thread from another site!!!! (But don’t tell Scott)
August 2007
If you would like your product reviewed fairly and quickly by a site that has near 400,000 visitors a month, please contact me or see other details in the Note to Contributors.