Revell 1/25 Reynard 98 Champ Cars
| KIT #: | 2327/8 |
| PRICE: | Currently OOP |
| DECALS: | One option |
| REVIEWER: | Ben Brown |
| NOTES: |
| HISTORY |
Since 1909 American open wheel auto championship racing has been sanctioned by several different bodies. From 1909 to 1955, it was run by the American Automobile Association, a much more stodgy version of which Americans now call when their car breaks down on the side of the road. In 1956, the United States Auto Club (USAC), run by Indy 500 speedway owner Tony Hulman took over following public outrage over a crash at the 1955 24 Hours of Le Mans which killed driver Pierre Levegh and 80 spectators. USAC continued as sanctioning body until 1979, when most of the car owners split away from USAC because of what they saw as inept handling of the racing series.
 They
started their own series known as the Championship Auto Racing Teams (CART),
modeled as an American version of Bernie Ecclestone’s Formula One Constructors
Association. Things went well until the mid-1990s, when a dispute between CART
owners and Indianapolis Motor Speedway owner Tony George erupted. George wanted
CART to showcase American racing and because of CART’s move toward more road
racing and the fact that several non-American drivers were winning races, George
formed his own race series, the Indy Racing League (IRL). IRL was hailed (or
derided, depending on who you ask) as an open-wheeled NASCAR, as all races were
run on speedways, on U.S. soil, with mostly American drivers. Since George
owned Indy, he basically shut out CART teams by limiting the number of CART
teams allowed to run and by using a very different set of rules for the cars
themselves, which required the CART teams to build new cars just for that race.
CART remained the dominant series for a while, but teams and drivers eventually
started migrating to the IRL. Both series continue to run, but with Americans’
limited interest in open wheel racing, the two series dilute the viewing
audience. IRL’s current move to include road races, “Danicamania” over IRL
driver Danica Patrick, and continued financial troubles leave CART, now called
Champ Car World Series, with a bleak future.
They
started their own series known as the Championship Auto Racing Teams (CART),
modeled as an American version of Bernie Ecclestone’s Formula One Constructors
Association. Things went well until the mid-1990s, when a dispute between CART
owners and Indianapolis Motor Speedway owner Tony George erupted. George wanted
CART to showcase American racing and because of CART’s move toward more road
racing and the fact that several non-American drivers were winning races, George
formed his own race series, the Indy Racing League (IRL). IRL was hailed (or
derided, depending on who you ask) as an open-wheeled NASCAR, as all races were
run on speedways, on U.S. soil, with mostly American drivers. Since George
owned Indy, he basically shut out CART teams by limiting the number of CART
teams allowed to run and by using a very different set of rules for the cars
themselves, which required the CART teams to build new cars just for that race.
CART remained the dominant series for a while, but teams and drivers eventually
started migrating to the IRL. Both series continue to run, but with Americans’
limited interest in open wheel racing, the two series dilute the viewing
audience. IRL’s current move to include road races, “Danicamania” over IRL
driver Danica Patrick, and continued financial troubles leave CART, now called
Champ Car World Series, with a bleak future.
Reynards were
the dominant Champ car chassis during the late 1990s. These British-built cars
were easily adaptable to several different turbocharged 2.65L V-8 engines,
including Ford, Toyota, and Honda. These engines are over-engineered, so they
can be rebuilt multiple times over a season, compared to Formula 1, where
engines lasted one race, and a team often went through 200 engines and $18
million per season. Built on a carbon fibre chassis, CART cars had a minimum
dry weight of 1550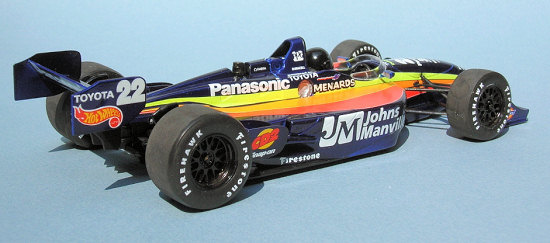 lbs. The cars used six-speed sequential gear boxes, and cost
about $430,000 each in 1998. Though they look similar, it is hard to compare
Champ, IRL, and Formula 1 cars. All are built to different sets of rules, with
different weights, horsepower and engine sizes.
lbs. The cars used six-speed sequential gear boxes, and cost
about $430,000 each in 1998. Though they look similar, it is hard to compare
Champ, IRL, and Formula 1 cars. All are built to different sets of rules, with
different weights, horsepower and engine sizes.
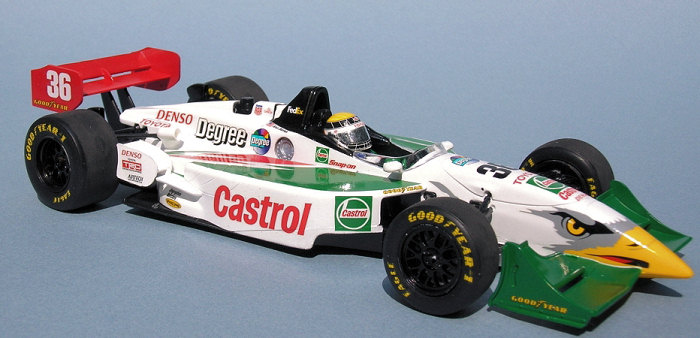
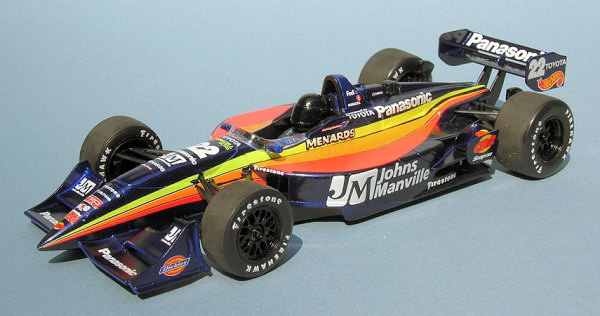
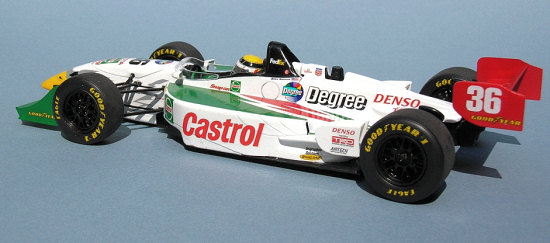
Reynards won the both the CART FedEx Championship Series and the Indy 500. One of the distinctive characteristics of the cars were the gull-winged front wings on the road course set-up, and the smaller downward-turned wing for speedways. In 1998 the company supplied 41 cars for fourteen teams.
Alex Barron won the 1997 American Toyota Atlantic series championship before moving into Dan Gurney’s All American Racing team the following year. After two years, he moved over to Roger Penske’s team to replace Gonzalo Rodriguez, who was killed in a crash at Laguna Seca. Barron was the Indy 500 Rookie of the Year in 2002, and continued to race for Eddie Cheever’s Red Bull Racing until 2006, when he stepped back to the ChampCar Atlantic series. He has been signed to drive part time in the Indycar series for 2007, including the Indy 500.
Robby Gordon is the son of off road racing legend “Baja Bob” Gordon. Robby won five consecutive off road championships between 1986 and 1990, plus a sixth in 1996. In 1990, he started road racing, winning races in both the Trans-Am and IMSA Camel GT series. He began racing in the CART Indycar series in 1992 and fielded his own team in 1999, 2000, and 2002 with little success. Gordon began driving in NASCAR races in 1991, and is currently driving a “Car Of Tomorrow” with Ford Fusion stickers on it in that series.
| THE KIT |
Since
American open-wheel racing isn’t as popular as Formula 1, there haven’t been
many recent kits of this type of cars available, outside of some expensive resin
ones. Revell released this kit in several different forms in the late 1990s,
with variations to the decals, wheels and side pods. The kits were molded in
white plastic, with a clear piece for the windscreen and the driver’s helmet
 visor. Some versions had BBS wheels, while others had OZ wheels. There were
also both speedway and road course wings. These are “curbside” kits, with very
little engine detail, which is fine, since not much can be seen under the engine
cover. I can’t comment on the accuracy, since I don’t know a lot about these
cars, but they look like the Reynards in photos I found online. Since each race
course dictated different aerodynamic changes and the cars varied from race to
race, so these are sort of generic representations of the car. Decals were
provided for Miller Lite, Chip Gannassi Target, Motorola, Gurney Eagle, Shell,
Panasonic, and Visteon teams. The glossy decals were printed by Cartograph, and
the artwork is simply outstanding. Unfortunately, they don’t respond to any
setting solution known to man. It takes multiple applications of full-strength
Solvaset just to get them to lay down.
visor. Some versions had BBS wheels, while others had OZ wheels. There were
also both speedway and road course wings. These are “curbside” kits, with very
little engine detail, which is fine, since not much can be seen under the engine
cover. I can’t comment on the accuracy, since I don’t know a lot about these
cars, but they look like the Reynards in photos I found online. Since each race
course dictated different aerodynamic changes and the cars varied from race to
race, so these are sort of generic representations of the car. Decals were
provided for Miller Lite, Chip Gannassi Target, Motorola, Gurney Eagle, Shell,
Panasonic, and Visteon teams. The glossy decals were printed by Cartograph, and
the artwork is simply outstanding. Unfortunately, they don’t respond to any
setting solution known to man. It takes multiple applications of full-strength
Solvaset just to get them to lay down.
There is a little aftermarket support for them, with several different decal sheets from Speedline, Indycals, and possibly some others, as well as a photo-etched wing detail set from Detail Master.
| CONSTRUCTION |
Since I
spent a couple of my impressionable childhood years living in Indianapolis, I’ve
always been partial to winged, open wheel cars. Every year around the start of
race season, I get the urge to build an Indy car, but I usually never get around
to doing it due to a lack of time. I normally build military airplanes, so I’m
most comfortable with flat paints that can often hide some of the multitude of
flaws that show up in my models. Cars, on the other hand, seem to involve
near-perfect finishes, and horror of horrors, vinyl tires. Fortunately, I’ve
lately been enjoying building airliners, with their glossy white finishes and
large, colorful 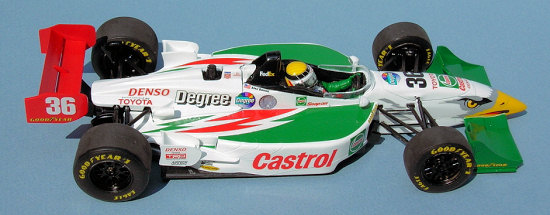 decals, and this helped push me over the edge and into the world
of car modeling. This year, I vowed to screw up my courage and actually build a
race car. I couldn’t decide on the cool eagle’s head on the Castrol Gurney
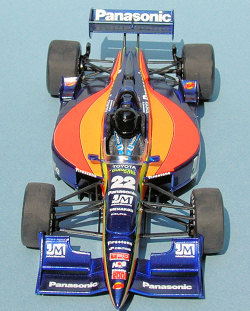
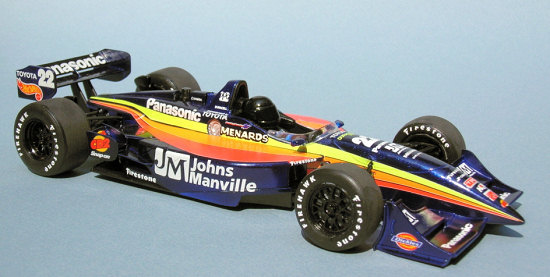
Eagle or the bright fluorescent colors on the Panasonic car, so I figured, “Why
not build both?”
decals, and this helped push me over the edge and into the world
of car modeling. This year, I vowed to screw up my courage and actually build a
race car. I couldn’t decide on the cool eagle’s head on the Castrol Gurney
Eagle or the bright fluorescent colors on the Panasonic car, so I figured, “Why
not build both?”
After reading several build articles about these kits, I learned that the engineering of this model makes it hard to paint. I began by cutting the engine covers away from the forward parts of the bodies. This would enable me to paint most of the model without having to mask the engine and rear suspension. The other builders recommended removing the lower part of the front suspension, to make it easier to fill the joint where the upper and lower halves of the body meet. I just left mine, since these were just fun builds and front suspension more-or-less hides the joint. I painted the insides of the models black, then joined the top and bottom halves of the body. I didn’t glue the aft parts of the bodies together, because they needed to flex a little when I squeezed the cockpits in place later. I also left off the tops of the side pods until later, since you can’t install the rear suspension with them in place. They fit surprisingly well, so I just did a little test-fitting and sanding before I set them aside for later. The nose piece with the wings needed a little filler on the underside. There are some large gaps inside the radiator intakes, which I filled with sheet styrene, then touched up these areas with more black paint. I left the air scoop off of the right side of the Panasonic car, since it doesn’t appear to have been fitted in any photos. Neither car had the fin on the engine cover, so I removed it and sanded the resulting scar smooth. The fuel filler could be installed on the left or right side of the car, depending on the track. Revell provides a plug for the unused side, which I installed so I could paint it along with the body. The filler can be left off until later, if you use the assembly order I used. I found out later that the plug interfered with the seat when I tried to install it after the car was painted. I ended up popping the joint on the left side of the nose on the Castrol car. I’ll sand the plug down on my next model.
 Next, I built
up the rear suspension and engine assemblies. The exhaust pipe has a couple of
large ejector pin marks in them, which I filled with Mr. Surfacer. I painted
the engine assemblies black and the exhausts gunmetal, but didn’t do any other
detailing since they can’t be seen on the finished models.
Next, I built
up the rear suspension and engine assemblies. The exhaust pipe has a couple of
large ejector pin marks in them, which I filled with Mr. Surfacer. I painted
the engine assemblies black and the exhausts gunmetal, but didn’t do any other
detailing since they can’t be seen on the finished models.
The two-piece cockpit tubs were painted black, with silver gearshift handles. The pedals are provided separately, but there is really no need to bother installing them, unless you want to say, “Yep, they’re in there.” Speedline didn’t provide decals for a 1/24 Robby Gordon, and the cockpit is a little too sparse to go driverless, so I decided to have The Stig, the mystery driver from BBC’s Top Gear TV show, stand in for Robby. I painted the driver’s uniform Floquil Weathered Black, which is a very dark grey, then dry brushed some highlights with a little dark grey. I probably should have used “White Stig” to brighten up the Panasonic car’s cockpit, but I prefer the looks of the Vader-like “Black Stig” from the show’s first two seasons. The Stig’s black uniform almost disappeared into the black cockpit, but the kit seat belt decals added a little color. The kit helmets’ clear visors are very thick and don’t fit at all, so rather than wrestle with making and fitting new visors and cleaning up the seams on the helmets, I ordered a couple of resin helmets from Detail Master. I painted The Stig’s helmet Tamiya gloss black, and Alex Barron’s gloss white lacquer. I used lacquer paint on Barron’s helmet because of a previous disaster involving a combination of Tamiya acrylic paint, impossibly stiff decals, and large quantities of Solvaset. Before tackling the decals, I covered the visor with some Bare Metal Foil to give it a mirrored finish. I’m still not sure I like the results. Then it was time for the decals. I actually resorted to removing each one from the paper, then holding it in a puddle of Solvaset for a minute before applying it to the helmet. And I still had to fight them into place! They finally fit surprisingly well, considering the resin helmet was shaped differently than the kit helmet. Alex’s uniform had black legs, a red patch around the waist, white upper torso, and green arms. Rather than mask all of this, especially since not much would be seen in the cockpit, I first painted the driver white, then the lower half black without bothering to mask anything. I then cut a strip of red decal film and applied it to the driver between the black and white. Now I had a nice, sharp break between the colors. The arms were painted off of the body, then glued in place.
| COLORS & MARKINGS |
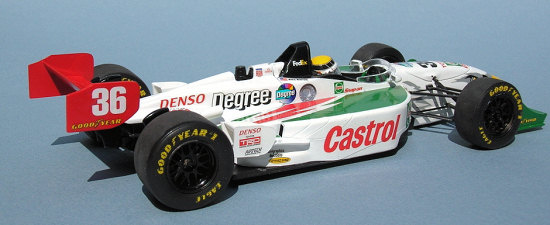
I primed the body of the Castrol car with Tamiya’s white primer, followed by Tamiya gloss white, all from rattle cans. The Panasonic car was primed with Tamiya’s grey primer, then painted with several coats of Tamiya’s TS-51 Racing Blue. I’m not sure exactly what shade of blue the original car was, but this looked pretty close to photos I found on the internet. For the Castrol car’s wings, I used Castrol Green and Red paint from Model Car World. They sell an excellent line of airbrush-ready lacquer paints that have been premixed to correct team colors for a huge number of NASCAR and other race series teams. After letting the paint dry for a few days, I masked the bodies and painted the undersides semi-gloss black.
 At this point,
I didn’t see any advantage to leaving everything in subassemblies, so I
assembled the cars. This helped in the application of the Speedline decals,
because they went over both the side pods and the engine cover, and I didn’t
want any breaks in the decals. The cockpit tubs fit into the body, then were
trapped by a part that fits under the roll bar. The engine/rear suspension
mounts into slots in the belly pan, then the engine cover rests on top and
butt-joins with the forward part of the body. You have to thread the aft ends
of the side pods through the rear suspension, then they fit up against the body
with hardly a gap anywhere. The Castrol car had a visible black line where the
pod halves met, but I found that a Bic White-Out pen was perfect for
flowing white-out into the groove. This stuff is perfect for repairing mis-scribed
panel lines on airplane kits, too. It wasn’t necessary to glue the rear wings
on at this point, but I did anyway. They made the cars look like the cars were
up on jacks in the shop, awaiting a mechanic. I guess it was the car equivalent
of flying a partially-completed airplane kit around the room.
At this point,
I didn’t see any advantage to leaving everything in subassemblies, so I
assembled the cars. This helped in the application of the Speedline decals,
because they went over both the side pods and the engine cover, and I didn’t
want any breaks in the decals. The cockpit tubs fit into the body, then were
trapped by a part that fits under the roll bar. The engine/rear suspension
mounts into slots in the belly pan, then the engine cover rests on top and
butt-joins with the forward part of the body. You have to thread the aft ends
of the side pods through the rear suspension, then they fit up against the body
with hardly a gap anywhere. The Castrol car had a visible black line where the
pod halves met, but I found that a Bic White-Out pen was perfect for
flowing white-out into the groove. This stuff is perfect for repairing mis-scribed
panel lines on airplane kits, too. It wasn’t necessary to glue the rear wings
on at this point, but I did anyway. They made the cars look like the cars were
up on jacks in the shop, awaiting a mechanic. I guess it was the car equivalent
of flying a partially-completed airplane kit around the room.
Speedline
includes markings for the car Robby Gordon drove in the 1999 Long Beach race and
several oval-track races. The decals were stiff, didn’t like to conform to
curves, and they reacted unexpectedly to setting solutions. Sometimes they
wrinkled up after an application of Micro Set, while other parts were almost
immune to Solvaset. I had to use a little artistic license with the decals for
the end plates on the rear wing. The 22 should be in the upper aft corner of
the plate, with the Hot Wheels logo forward of this and the Toyota logo on the
bottom. Unfortunately, the Hot Wheels logo is about twice as large as it should
be, so it would 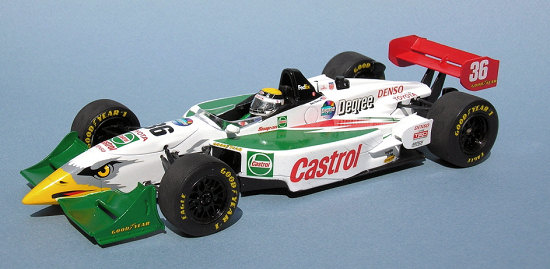 only fit on the bottom of the plate, and the numbers would have
been cut off by the cutout in the plate if I put them where they belonged. If I
had built the speedway version, I would have been able to get the numbers in the
right spots, but the Toyota and Hot Wheels decals would still have been wrong.
The other decals were more-or-less trouble-free, but when dry, they tended to
crack and flake off the model easily.
only fit on the bottom of the plate, and the numbers would have
been cut off by the cutout in the plate if I put them where they belonged. If I
had built the speedway version, I would have been able to get the numbers in the
right spots, but the Toyota and Hot Wheels decals would still have been wrong.
The other decals were more-or-less trouble-free, but when dry, they tended to
crack and flake off the model easily.
The kit decals I used on the Castrol car gave me mixed feelings, ranging from total hatred while I was applying them to amazement once they had dried. They would not conform to the slightest curve without multiple applications of Solvaset, but they did eventually lay down. When the decals had dried, the carrier film was invisible and the glossy ink made a clear coat almost unnecessary. I was especially surprised the yellow beak on the eagle decal conformed with the car’s nose. It did have a little ridge down the center of the nose, which I cut off and covered with a strip of yellow decal cut from the beak of the oval track version’s eagle. The decal was so thick, my patch is still visible if you look close enough. I got a little silvering in spots, but I was able to score through the decals with a knife and apply more Solvaset. After the decals were dry, I masked the cockpits and sprayed a coat of Future to seal the decals and give the models a good shine.
| FINAL CONSTRUCTION |
I added the brakes and their cooling ducts to the cars’ suspensions, then the steering rods and upper control arms to the front. I painted the mirrors on the windscreens , then glued them in place on the cars.
 The tires were
shiny and had a seam running along the centerline, so I sanded them down until
the seam was gone and the tires looked like they had a few miles on them. The
logos on the sidewalls were decals. I applied the Castrol car’s logos directly
to the vinyl, then melted them on with multiple applications of Solvaset. This
seems to have etched the vinyl slightly, dulling the finish, but I still hit
them with a coat of clear flat acrylic to further dull them. Speedline only
provides logos for one side of the tires on the Panasonic car, and they
silvered, wouldn’t conform to the tires and flaked off at the slightest touch.
Fortunately, the kit decals had a set of Firestone logos, which worked great
after a half-dozen applications of Solvaset. The wheels plug right into the
tires without any fuss, although the opening on one side of each tire is larger
than the other. If the wheels give you any trouble, it’s probably because
you’re trying to force them through the wrong side of the tire. Go ahead, ask
me how I know! The rear wheels just press onto a metal axle, which runs through
a hole in the transmission.
The tires were
shiny and had a seam running along the centerline, so I sanded them down until
the seam was gone and the tires looked like they had a few miles on them. The
logos on the sidewalls were decals. I applied the Castrol car’s logos directly
to the vinyl, then melted them on with multiple applications of Solvaset. This
seems to have etched the vinyl slightly, dulling the finish, but I still hit
them with a coat of clear flat acrylic to further dull them. Speedline only
provides logos for one side of the tires on the Panasonic car, and they
silvered, wouldn’t conform to the tires and flaked off at the slightest touch.
Fortunately, the kit decals had a set of Firestone logos, which worked great
after a half-dozen applications of Solvaset. The wheels plug right into the
tires without any fuss, although the opening on one side of each tire is larger
than the other. If the wheels give you any trouble, it’s probably because
you’re trying to force them through the wrong side of the tire. Go ahead, ask
me how I know! The rear wheels just press onto a metal axle, which runs through
a hole in the transmission.
| CONCLUSIONS |
These Reynard kits are good-looking curbside kits. Not as detailed as Tamiya’s Formula 1 cars, but still fun builds. If you use the kit decals, be sure to have a gallon or two of Solvaset on hand. The Speedline decals look great, and even the white decals cover the dark blue paint perfectly. Unfortunately, their accuracy errors, brittleness and tendency to flake off the model reduces them to merely “Average” in quality.
It’s a shame Champ Car World Series’ and IRL’s childish feuding have kept open-wheeled racing from really catching on in the USA like NASCAR has. Hopefully, some day somebody with NASCAR’s marketing skills will be able to bring the two series back together and generate enough public interest that there will be a single strong race series, featuring ovals and road courses, and we’ll see new kits of American open wheel race cars.
| REFERENCES |
http://en.wikipedia.org/wiki/CART
http://en.wikipedia.org/wiki/The_Stig
September 2007
Copyright ModelingMadness.com
If you would like your product reviewed fairly and fairly quickly, please contact the editor or see other details in the Note to Contributors.