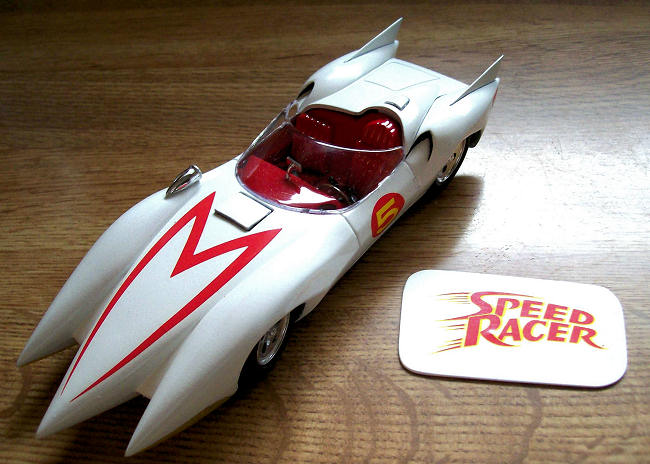
Polar Lights 1/24 Mach 5
| KIT #: | 804 |
| PRICE: | CAD$18.00 |
| DECALS: | One option |
| REVIEWER: | Pablo Calcaterra and son |
| NOTES: |
| HISTORY |
I was a Speed Racer fan since I was a kid (Meteoro, in Spanish) and as such, always wanted to have a good model of his famous Mach 5. Finally, with the movie (not very good to capture the spirit of the original cartoon) Polar Lights issued this kit. I built some of the parts of the kit with my son for him to start to get into the hobby.
| THE KIT |
It has more than 70 pieces, some of them already chromed (mirrors, wheels) and several options can be displayed: saws, jumping jacks, messenger bird, hood with engine (behind the cockpit!!!??) and a complex mechanism to move the front wheels thru the steering wheel. Of course, decals options are for only one example! There are two kits, one easier to build (snap and with stickers) and this one, that requires glue and has waterslide decals.
| CONSTRUCTION |
 After doing
some research in Internet about this kit, I read that there are several
accuracies. I managed to confirm that these facts are right, using the short
parts of episodes you can watch in YouTube.
After doing
some research in Internet about this kit, I read that there are several
accuracies. I managed to confirm that these facts are right, using the short
parts of episodes you can watch in YouTube.
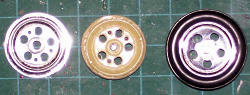
One extra disappointment is that
one of the wheels hal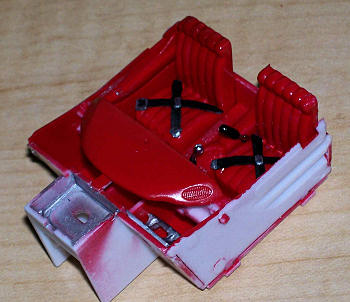 ves
was missing so I was forced to copy one in resin, and then paint in chrome
silver.
ves
was missing so I was forced to copy one in resin, and then paint in chrome
silver.
We then built together the cockpit,
seats, and I painted everything in red, with some details in black or silver. I
must say that the kit has lots of them, including the lap seat belts.
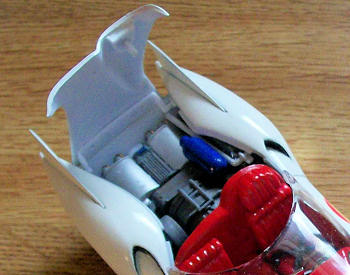
With this part ready, we put
together the engine, tanks and exhausts. Now, if the original Mach 5 had had
this arrangement, then Speed’s little brother and chimpanzee would have had a
very “warm” trip in the trunk…as there is no floor for it. This part of the kit
does not make sense at all. The engine should be under the hood, and the
interior of the trunk is missing completely. But anyways, for my
 son to have
some fun and for him to build something easy, we put together the engine and
everything behind the cockpit, having previously painted them (gray for the
engine with some red/brown dust drybrushed, blue for the oxygen tank, silver for
the 2 exhausts)
son to have
some fun and for him to build something easy, we put together the engine and
everything behind the cockpit, having previously painted them (gray for the
engine with some red/brown dust drybrushed, blue for the oxygen tank, silver for
the 2 exhausts)
The tail fins are curved but they
should be straight, so I corrected this error. Talking about another error, the
wheels should have 6 holes instead of the 5 that the ones in the kit have. This
is really hard to correct so I decided to leave them as they are.
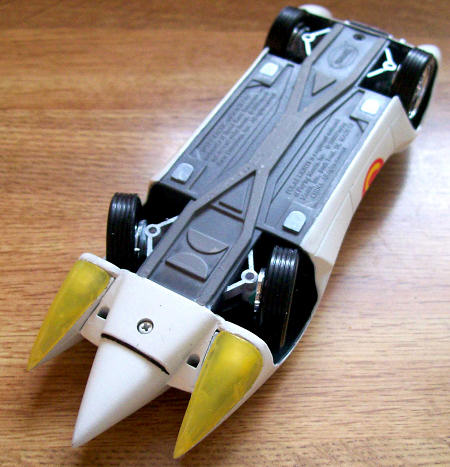
Top and bottom of the car were
glued together and a coat of light gray was airbrushed to find errors and parts
to be sanded.
My son wanted to place the car sitting on the jacks and with the saws on, but it would not have looked very nice. So I took the base of the jacks and glued them in place. I left the holes for the arms of the saws untouched.
| COLORS & MARKINGS |
 I had to
give the car 5 light coats of White Gloss Acryl paint, until I was able to cover
the light gray (dark gray was given to the underside, with some struts
highlighted in a different shade). I masked the chromed parts (lights, wheels)
with the Vallejo masking solution…an awful product that it’s very thin and very
hard to remove as it breaks very easily. Removing it is a nightmare. Once ready
and satisfied with the finish, we applied the decals. The “5” on the doors are
too small. The “M” is just perfect.
I had to
give the car 5 light coats of White Gloss Acryl paint, until I was able to cover
the light gray (dark gray was given to the underside, with some struts
highlighted in a different shade). I masked the chromed parts (lights, wheels)
with the Vallejo masking solution…an awful product that it’s very thin and very
hard to remove as it breaks very easily. Removing it is a nightmare. Once ready
and satisfied with the finish, we applied the decals. The “5” on the doors are
too small. The “M” is just perfect.
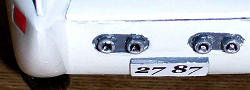
The license plate is missing so,
following directions I found in another website, I made it with my printer and
glued it with white glue
 to a little
piece of plastic. Then I protected the ink with a light coat of Future applied
with the airbrush.
to a little
piece of plastic. Then I protected the ink with a light coat of Future applied
with the airbrush.
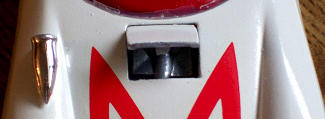
The oval grids on both sides on top
of the dashboard were painted in black and then drybrushed in red.
The air intakes beside the cockpit
and under the nose were painted in black with a brush.
 The
messenger bird, painted in chrome silver, was glued in it’s compartment before
the windshield.
The
messenger bird, painted in chrome silver, was glued in it’s compartment before
the windshield.
Wheels were added; light bulbs were
glued in place. The glass that covers them (glass) are clear so I painted them
with a mix of Future and yellow Acryl paint, using the airbrush.
 And finally,
the windshield was glued in place.
And finally,
the windshield was glued in place.
| CONCLUSIONS |
I am happy with the way it looks, but not too much. Those minor errors like the size of the “5”, and the overall proportions (the kit is too long and narrow, compared to what can be seen in one of the opening scenes on the presentation of the show. And Polar Light claims that they had consulted and got the correct dimensions from the Japanese team…there must be a mistake somewhere). Finally I have my Mach 5, the first and last car that I will ever builtd Nothing can be compared to building planes!
| REFERENCES |
YouTube
April 2009
Copyright ModelingMadness.com
If you would like your product reviewed fairly and quickly, please contact the editor or see other details in the Note to Contributors.