Tamiya 1/24 Xanavi Nimo GT-R (R 34) Special Edition
| KIT #: | 24271 |
| PRICE: | AUD$ 59.95 |
| DECALS: | Two options |
| REVIEWER: | Grenville Davies |
| NOTES: | Special edition kit has photo etch parts and carbon fibre decals. |
| HISTORY |
The Nissan Skyline GT-R is an iconic Japanese sports coupé in the Nissan Skyline range. Dubbed "Godzilla" by Wheels magazine in Australia when released in 1989, it was rated by many motoring magazines, including the well-respected Wheels, as providing performance and handling equal or superior to that of European icons like the Porsche 911 and the Ferrari Testarossa, at a considerably lower price.
After canceling the Skyline GT-R marque in 1973, Nissan revived the GT-R again in 1989. At the time Nissan was competing in “Group A” racing, with the 1988 Nissan Skyline GTS-R (a 2000 cc turbocharged RWD car). Nismo, Nissan's motorsport division, wanted to retire the GTS-R, in favour of a more competitive vehicle. The R32 chassis had just been designed, and was chosen as a base to build a more competitive “Group A” race car.
Nismo originally designed the new R32 “Group A” Skyline to have a 2350 cc straight 6, turbocharged engine, and produce 600 horsepower using a RWD drive train until 1994. Under “Group A” regulations, a turbocharged engine must multiply its engine displacement by 1.7, putting the new Skyline in the 4000 cc class requiring the use of 10 inch wide tyres. Knowing this, Nismo made the decision to make the car all wheel drive. They developed a special motorsport-oriented AWD system for this purpose called the ATTESA E-TS Pro. Although this assisted with traction, it made the car 100 kg heavier, heavier compared to other cars in the 4000 cc class. Nismo then made the decision to increase the displacement to 2600 cc, and put the car in the 4500 cc class, where the car's weight was near-equal to other competing cars. The 4500 cc class also allowed for 11 inch wide tyres.
The R33 was developed in 1995 as a successor to the venerable R32 model that Japan had come to know so well. The engine in the R33 used the same turbochargers, and the same specification of transmission, although the syncros were made stronger. By using a wider collar in the R32's oil pump drive failures under higher horsepower applications were corrected. The R33 engine also introduced a mechanical advance on the intake camshaft improving torque slightly. The base model R33 GT-R weighed 1750 kg.
The R33 GT-R was launched in January 1995 with the base model GT-R and the V-spec model. The V-spec model weighed 10 kg heavier, and had sportier suspension resulting in lower ground clearance. The V-spec also featured the newer Attesa-ETS Pro all wheel drive system, which included an Active Limited Slip differential and four wheel independent channel ABS braking system.
A special edition R33 was released on November 3 1997. The car was called the 400R, (R for Racing). Developed with Nismo, it featured an overbored RB26DETT engine, the RBX-GT2, with polished ports, an upgraded exhaust, composite parts, and a freer flowing turbo and intercooler system. The car developed a staggering 450 horsepower, and gave the car a top speed of over 200 mph.
 The R34 Skyline GT-R and GT-R V-spec models were released in January 1999. The
R34 GT-R was also made shorter (from front to rear), and the front wheels were
moved closer to the front. The valve covers were also painted glossy red, rather
than dull black.
The R34 Skyline GT-R and GT-R V-spec models were released in January 1999. The
R34 GT-R was also made shorter (from front to rear), and the front wheels were
moved closer to the front. The valve covers were also painted glossy red, rather
than dull black.
A new feature on the R34 GT-R was a 5.8" LCD multifunction display on the center of the dashboard, which showed seven different live readings of engine and vehicle statistics such as turbocharger pressure, oil and water temperature, among others. The GT-R V-spec model added two extra features to the display, the first being a measurement of lateral g-forces, and the second being a lap timer, to time laps on a track event.
Like its predecessor, the new R34 GT-R V-spec models came equipped with the Attesa-ETS Pro system, while standard GT-R models come with the non-Pro system. The V-spec model also had firmer suspension, and lower ground clearance. The V-spec model also included a plastic front air diffuser (covering the underside of the engine), and also a rear carbon fibre air diffuser, designed to keep air flowing smoothly under the car.
At the time of the R34's release, like the R32 and R33, Nissan released an R34 N1 model. The new R34 N1 was also given the new R34 N1 engine. Only 45 R34 N1 models were produced from the factory, 12 of which were used by Nismo for Super Taikyu racing. The rest were sold to various customers, mostly racing teams, and tuning garages.
In August 2000, Nissan released a newer V-Spec II GT-R model. The V-Spec II had increased stiffness in the suspension (even stiffer than the original V-spec) and also came equipped with a carbon fibre bonnet, which was lighter than the aluminium from which all other GT-R bonnets were made. The seats were also made with black cloth, rather than the grey cloth used on other R34 GT-R models. From this point, the standard trim level GT-R also received the new black seats.
In February 2002 Nissan released a final production model of the R34 GT-R called the Nür. It was sold in 2 different models: the Skyline GT-R V-spec II Nür and the Skyline GT-R M-spec Nür. The Nür was named after the famous German Nürburgring racetrack, where the Skyline was developed. The Nür model featured an improved RB26DETT based on the N1 racing engine, used by Nismo in motorsports. The V-spec II Nür was based on the regular V-spec II model, and the M-spec Nür was based on the regular M-spec model. Other than the addition of the Nür engine, the Nür models also a speedometer reading up to 300 km/h.
Nismo originally designed the concept of the Z-tune in 2002 when Nissan was close to finishing the R34 Skyline production. The first Z-tune was built in 2003, using a used 2002 Skyline GT-R V-Spec II. It was built with a concept RB26DETT 'Z1' engine. The cylinder diameter was bored out, and the crankshaft was designed with a longer stroke. The engine was now a 2.8L, and produced about 600 hp.
Nismo was then given the approval from Nissan to build 20 Z-tune models. For the 20 production models, the 2.8L engine was revised to allow it to reach 9000 rpm. The turbochargers were supplied by IHI (Ishikawajima-Harima Heavy Industries Co., Ltd) in Japan. The engine was advertised as making as much as 600 hp. This second revision of the Z-tune engine was called the 'Z2'. The bodywork was designed with the same functional components used in Nismo's GT500 racing cars, such as engine bay vents on the hood and fenders, as well as wider fenders for wider wheels. The Z-tune was also improved with an aggressive suspension setup, and a specially designed Brembo brake setup.
 The entire car was essentially handmade, with the car being completely stripped
and re-built from the chassis up. Engineers reinforced and stiffened the chassis
in key areas, completely redesigned the suspension, drive train, engine, gearbox
and other components so as to work at maximum efficiency and reliability as is
expected of a road-going vehicle. Only 20 units exist worldwide and it is often
regarded as the most expensive (prices for some have been known to exceed
AU$500,000) street legal GT-R ever built.
The entire car was essentially handmade, with the car being completely stripped
and re-built from the chassis up. Engineers reinforced and stiffened the chassis
in key areas, completely redesigned the suspension, drive train, engine, gearbox
and other components so as to work at maximum efficiency and reliability as is
expected of a road-going vehicle. Only 20 units exist worldwide and it is often
regarded as the most expensive (prices for some have been known to exceed
AU$500,000) street legal GT-R ever built.
During the early nineties with the establishment of the Japan GT Championship (JGTC) the Nissan Skyline GT-R performed consistently. During the 2002 season the car performed below expectations and did not win a single race throughout the year. In the off season the Nismo team worked on the cars and following extensive changes to the external appearance that included a raised front fender and a narrow, more compact rear body was ready for the 2003 season. In compliance with regulations the underpan was flat and resulted in greater uplift at the front of the car. To counteract the problem a rear spoiler was designed, plus the addition of air outlets behind the front wheels.
In addition to these body changes the 3 litre, twin turbo V6 VQ30DETT, introduced midway through the 2002 season was continually upgraded. Race output of this engine was estimated at around 480 ps or approximately 473 hp (353 kW). With the use of this engine plus lightening of the vehicle through the use of a smaller driver’s cabin and pipe framing resulted in a better weight distribution. This led to a faster cornering and better braking car.
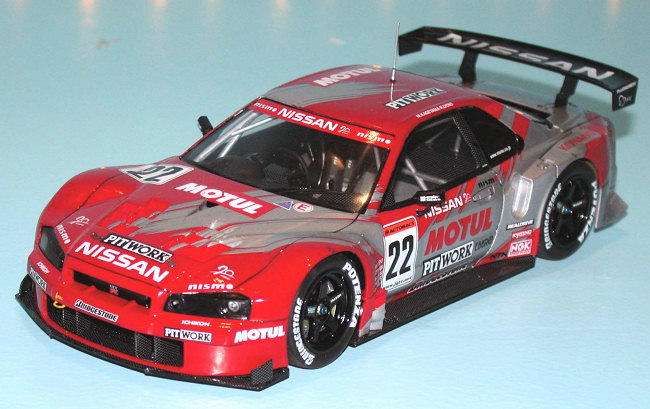
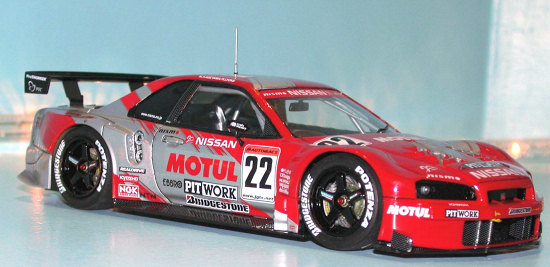
In 2003 Team Nismo presented two cars with drivers S. Motoyama and M. Krumm in the No. 23 Xanavi Nismo, and M. Kageyama and R. Lyons in the No. 22 Motul Pitwork. The Xanavi Nismo car performed consistently throughout the 2003 season and notched up 2nd in Rounds 1and 5, with 3rd in Rounds 3 and 8. The Motul Pitwork scored an impressive win in Round 2 plus a 2nd in Round 4. The Xanavi Nismo car won the last race of the season coming from behind, taking out the Driver’s Championship, following excellent strategy combined with speedy pit stops. This also resulted in team Nismo taking out the Team Championship.
The R34 Skyline GT-R took an indefinite break from the JGTC, at the end of the season.
| THE KIT |
The kit comes in a very sturdy Tamiya style box with cover art of the Number 23 Xanavi Nismo car resplendent in the red and silver livery. There are six sprues, all bagged, and in clear, black, silver and white plastic, plus clear red and orange for the tail lights; the body is in white plastic and a bag containing the wheels and poly caps is supplied. The main decal sheet allows a choice between the Number 23 Xanavi Nismo car and the Number 22 Motul Pitwork car, the object of this review. In addition to the main decal sheet there is a smaller sheet that contains the carbon fibre decal for the seat, seatbelts and instrumentation, plus internal decals. There is a small metal transfer sheet and a sheet of masks to be used on the clear glass parts. Lastly to round out the special edition there is a separate sheet for the carbon fibre decals used throughout the interior and exterior of the car, which are quite well presented but need careful cutting out, and a photo etch sheet for the discs, grilles, bonnet and boot pins (hood and trunk for my American readers!) and the towing points front and rear of the car.
A comprehensive set of instructions are included showing eighteen phases of construction and the decal application. Painting is called out through various stages of the build and colours are in Mr Tamiya’s preferred brand – Tamiya of course!
| CONSTRUCTION |
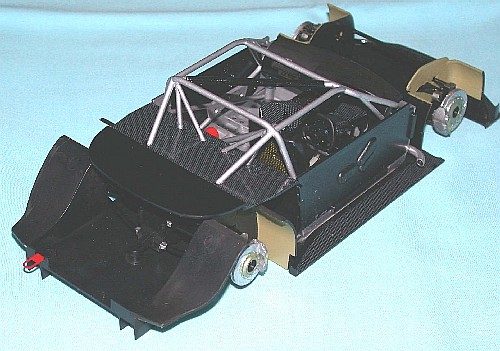
Interior Cabin Tub
With most car models I generally like to start with the interior as this is where most detail tends to be, at least with the kits sans engines. This kit is what is politely termed a ‘curb-side’ model meaning no engine and pretty basic suspension; this is really basic in this kit!
I started by
painting the body and various other bits and pieces as it was easier than trying
to get everything together and then paint. I actually didn’t follow the
recommended path for the build (this will not come as a surprise for most) and
started by putting the roll cage together and then painting it with Tamiya
AS-12, Bare-Metal Silver. The cage was completely built, including the two
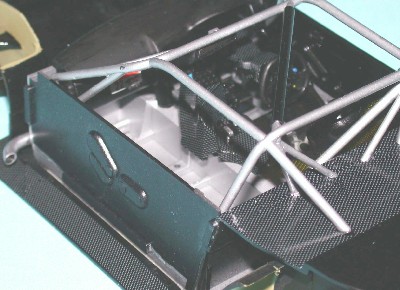 rear stays and temporarily fitted to the interior tub until dry- the
instructions call for the two rear stays to be glued to the rear deck before
fitting the remainder of the cage, but it is easier if done beforehand. The roll
cage also requires being painted Semi-gloss Black to simulate the rubber
padding added for safety reasons.
rear stays and temporarily fitted to the interior tub until dry- the
instructions call for the two rear stays to be glued to the rear deck before
fitting the remainder of the cage, but it is easier if done beforehand. The roll
cage also requires being painted Semi-gloss Black to simulate the rubber
padding added for safety reasons.
I also painted the cabin tub with the same colour Bare-Metal Silver and Tamiya Semi-gloss Black (TS-28), in preparation for the carbon fibre decals. The seat was in flat black and the back painted with semi-gloss black. Once dry the carbon fibre decal for the rear of the seat was applied as were the seatbelts. The interior required some parts to be painted, which was done as per the instructions. The fire extinguisher was painted red and the straps picked out in enamel Model Master Chrome Silver, a decal added for completion.
The instrument panel and forward bulkhead were painted flat black and semi-gloss black enamel (Model Master) and the steering column was covered in a carbon fibre decal after painting. The steering wheel is different for each of the cars and as I chose Number 22 (Motul Pitwork) there are two buttons that required painting enamel Tamiya X-14 Sky Blue and X-8 Lemon Yellow.
The centre console, containing the gear lever and hand brake was painted X-18, Semi-gloss Black and once dry a complex series of carbon fibre decals were cut from the sheet and attached. Once dry these decals were coated with Gloss Clear.
The two exhaust outlets were attached to the front of the tub, after being painted X-11 Chrome Silver. The interior mirror and the registration plate were added and the inside door trim added to the cabin tub, which was then put to one side.
Under Panel
The under panel
(lower body) is presented as a two piece affair with the front part having the
front steering mechanism and the gearbox, complete with lower wishbone
suspension, the rear forms the gearbox cover and acts as a pathway for air,
keeping the car close to the track during racing. The front part also requires
the internal wheel wells to be added and painted XF-60, Dark
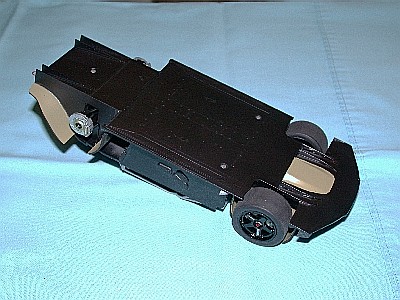 Yellow. As
this is a fairly difficult thing to do after painting (as per the instruction
sheet) I decided to glue the two front wheel wells together, clean up the joints
and then paint the upper parts, after painting the lower areas with X-18,
Semi-gloss Black. This was completed before the front wheel assembly was
attached.
Yellow. As
this is a fairly difficult thing to do after painting (as per the instruction
sheet) I decided to glue the two front wheel wells together, clean up the joints
and then paint the upper parts, after painting the lower areas with X-18,
Semi-gloss Black. This was completed before the front wheel assembly was
attached.
As with the interior there are a number of carbon fibre decals that must be carefully cut away from the decal sheet and applied to the sides and front fender, after painting these areas in semi-gloss black. Again the carbon decals were given a coat of clear gloss. The underside of both parts of the under panel were painted using Model Master Aircraft Interior to give a contrast to the predominantly black colours used. The engine sump was painted XF-60, Dark yellow.
The gearbox was glued and the upper wishbones, drive shafts and braces were painted in semi-gloss black with the connecting points X-11, Chrome Silver. The inside of the wheel wells on the rear under pan were painted in XF-60, Dark Yellow and once completed it was attached to the front ready for the interior cabin tub. The area to be covered by the interior cabin was also painted with AS-12, Bare-Metal Silver. Care needs to be taken when attaching the rear pan as the rear suspension is delicate.
Wheels, Brakes and Tyres
These parts were
worked on as various bits and pieces were drying and setting. Each of the rotors
was painted X-11, Chrome Silver with the photo etched parts attached to
the inside of each part. The reason for this is that the detail on these parts
is great as presented, although the inside shows no detail whatsoever. On a real
disc rotor the grooves would be present on both outer and
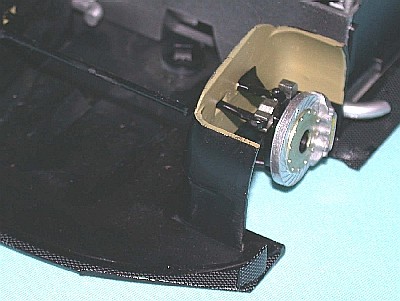 inner sides. I took
the photo etch part and ensured that the slope of the grooves matched that of
the outer side and attached them with superglue. The middle of the rotors was
painted with X-31, Titanium Gold and the rivets picked out using X-11,
Chrome Silver.
inner sides. I took
the photo etch part and ensured that the slope of the grooves matched that of
the outer side and attached them with superglue. The middle of the rotors was
painted with X-31, Titanium Gold and the rivets picked out using X-11,
Chrome Silver.
The callipers were painted with XF-56, Metallic Grey and when dry were treated to a decal. The disc was then attached to their support hub with a poly cap sandwiched between the two parts. Both the front and rear support hubs were painted with X-18 Semi-gloss Black and the lower attachment points painted with X-32, Titanium Silver.
The wheels were painted with TS-14, Gloss Black and when dry had two decals attached. A wheel lock was attached to each wheel, painted in X-31, Titanium Gold and then painted with X-23, Clear Blue for the left hand side and X-27, Clear Red for the right hand side – you’d think that the car fraternity would at least follow the aircraft convention of blue for starboard and red for port!
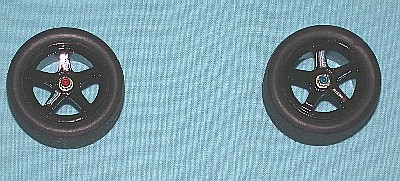 The wheels are
racing slicks and were treated with a good sanding to remove the mould line and
resulted in a fair approximation of track-like wear. There are two decals
attached to the outside of each wheel, the placement being determined by the car
number. These decals are typical of those included by Tamiya and require cutting
to approximate shape and then wetting the wheel prior to removing the protective
backing and sticking in place. The paper is then moistened with a wet finger and
allowed to become translucent before moving off the decal gently. One try is
usually enough to do the trick – just make sure the decal is aligned to the edge
of the rim otherwise it looks weird. A spare is provided to cater for those of
us with thick clumsy fingers (yes, I used the spare!).
The wheels are
racing slicks and were treated with a good sanding to remove the mould line and
resulted in a fair approximation of track-like wear. There are two decals
attached to the outside of each wheel, the placement being determined by the car
number. These decals are typical of those included by Tamiya and require cutting
to approximate shape and then wetting the wheel prior to removing the protective
backing and sticking in place. The paper is then moistened with a wet finger and
allowed to become translucent before moving off the decal gently. One try is
usually enough to do the trick – just make sure the decal is aligned to the edge
of the rim otherwise it looks weird. A spare is provided to cater for those of
us with thick clumsy fingers (yes, I used the spare!).
At this stage the twin front carbon fibre fins were attached to the front fender and the rear towing point, (photo etch part), attached. These are different colours for each car and for Number 22 it was painted X-7, Red.
Once completed the entire assembly was attached to the underpan to await the upper body.
Front Grille
 This part is a
work of art and required a degree of caution, with carbon fibre decals and photo
etch screens plus head light assemblies. The whole assembly is painted using
TS-29, Semi-gloss Black enamel and put aside to dry before attaching
anything else.
This part is a
work of art and required a degree of caution, with carbon fibre decals and photo
etch screens plus head light assemblies. The whole assembly is painted using
TS-29, Semi-gloss Black enamel and put aside to dry before attaching
anything else.
The next step was to cut out the numerous carbon fibre decals and attach them. I had some difficulty here and it is fortunate that there is enough of the decal sheet to make up for clumsy modellers. I certainly needed it as I tried to be smart and use decal setting solution to help conform around curved surfaces. The decal is so thin that it warped and, in some cases fell apart. In the end I use warm water and carefully positioned the decal prior to patting dry with clean tissue. It worked and once completely dry, usually overnight, the area was painted with clear gloss.
The three mesh photo etch parts were pre-painted using semi-gloss black and then attached with superglue.
The headlights were covered with a decal and then attached to the grille by simply pressing into pace – no glue was required. The final touch was the metal decal GTR symbol that included a decal over the surface.
Clear Parts
As with the
latest Tamiya kits a set of pre-cut masks are provided to allow for
detailed painting of the inside of the various windows. The front, rear and side
windows all get the mask treatment all being sprayed with X-18 Semi-gloss
Black enamel. Once 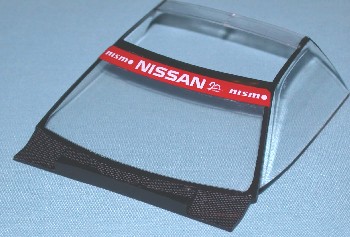 the
paint has been applied the masks should be removed carefully to avoid tearing
the black paint. As a precaution against “bleeding” under the masks I generally
apply some clear gloss paint along the edge of the mask.
the
paint has been applied the masks should be removed carefully to avoid tearing
the black paint. As a precaution against “bleeding” under the masks I generally
apply some clear gloss paint along the edge of the mask.
With the side and rear windows it was also necessary to apply some smoke tint. This was done using Gunze Sangyo spray; I find it is of a finer consistency than the Tamiya equivalent.
The front and rear windows were also treated to carbon fibre decals, the rear window being covered with one decal and the front with no fewer than five decals, some being recut from the excess sheet due to over-zealous handling.
These parts were attached after the body was painted.
| COLORS & MARKINGS |
Painting
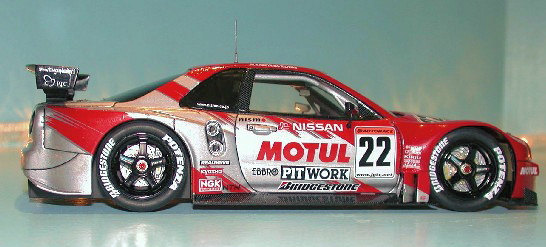
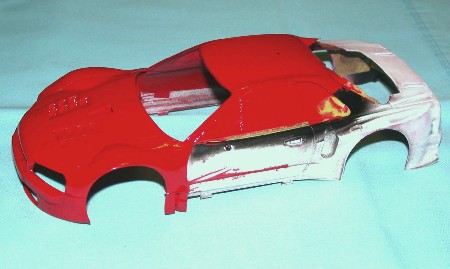
As intimated at the start of this review the real painting of the model took place throughout the build and during times when various parts were setting after being glued. This was especially true of the body as it required two colours, TS-8, Italian Red and TS-17 Gloss Aluminium.
Firstly the body was sanded with 1200 micro-cloths and water to remove the edge off the shiny plastic and parts to be added to the body. It was allowed to dry overnight. This process helps the enamel paint to bond. The bonnet vents were sanded to fit and then a small amount of filler used to blend into the bonnet and, once dry was given a light sanding. The fuel filler located on the right hand side of the body was not added at this time, nor was the blank on the left hand side of the car. These were painted separately and the fuel filler painted to replicate car number 22 (yes they are different!). Both were glued prior to the mind-numbing body decal session.
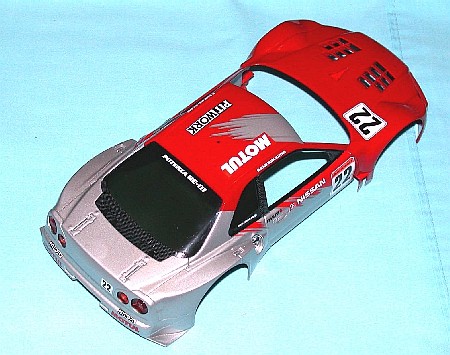
 The body was
masked off to spray the TS-8 by checking references for the “C” pillar
and the side vents on the front fenders where these would be split into two
colours. The areas around the side windows were also masked as were the interior
areas of the car where overspray would penetrate. The window areas were sprayed
with TS-29 Semi-gloss Black prior to the body. The colour is laid down
with an initial “mist” making sure that the “high” points are covered. After
about fifteen minutes the second coat is applied, which is also fairly light –
the thing to note here is that it is easier to apply many light coats rather
than have to wait until the coat dries to remove runs! The final coats can be a
little heavier, but again be careful with the painting and allow time between
each coat. Patience will pay off in the long run, just make sure that you cover
the model between coats and avoid dusty environments. Once the red had dried the
area was masked again and the TS-17 Gloss Aluminium was sprayed.
The body was
masked off to spray the TS-8 by checking references for the “C” pillar
and the side vents on the front fenders where these would be split into two
colours. The areas around the side windows were also masked as were the interior
areas of the car where overspray would penetrate. The window areas were sprayed
with TS-29 Semi-gloss Black prior to the body. The colour is laid down
with an initial “mist” making sure that the “high” points are covered. After
about fifteen minutes the second coat is applied, which is also fairly light –
the thing to note here is that it is easier to apply many light coats rather
than have to wait until the coat dries to remove runs! The final coats can be a
little heavier, but again be careful with the painting and allow time between
each coat. Patience will pay off in the long run, just make sure that you cover
the model between coats and avoid dusty environments. Once the red had dried the
area was masked again and the TS-17 Gloss Aluminium was sprayed.
Once the colours had dried and the masking tape removed it was time to add the windows, rear lights, front grille in preparation for the abovementioned mind-numbing decal session. The final step in painting the body was to apply a light paste and gently rub the paintwork to remove any blemishes and generate a very high sheen for the decals.
Decals
 I know this is
one area where some people see it as a nice, gentle state of mind exercise, that
rarely causes angst, or in my case ‘blue’ air above the work bench. Allow me to
state that this build caused my hair to turn white and my eyes to roll back in
my head. I commenced speaking in tongues, but I digress – aaargh!
I know this is
one area where some people see it as a nice, gentle state of mind exercise, that
rarely causes angst, or in my case ‘blue’ air above the work bench. Allow me to
state that this build caused my hair to turn white and my eyes to roll back in
my head. I commenced speaking in tongues, but I digress – aaargh!
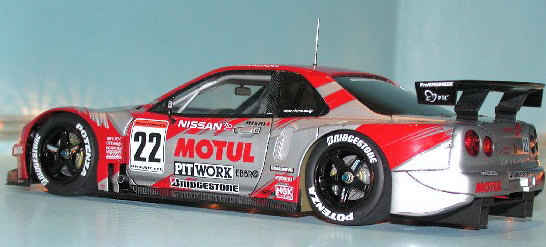
There was very little problem with the decaling, aside from a few minor curling and mangling bits – nothing out of the ordinary. The problem came when everything had been attached; areas not covered by the striking silver/red and dark grey pattern were painted and allowed to dry, following a good clean with water to remove any decal setting solution. I then decided to spray the whole model with Tamiya Clear Gloss spray and let it dry overnight. When I came to check my wonderful progress I was met with the striking red/silver and dark grey decals showing signs of crazing, at least the silver portion. Nothing could be done but a do-over! I am currently awaiting new decals to allow me to build the second car, number 23, as I cannibalised my second kit to complete this one!
I learn proper good I do (sic) and decided to use Johnson’s Future on my second attempt. This was also a near disaster but quick thinking on my part averted my loss of sanity and the result is the final model. Next kit will not be getting any clear protective layer - just in case!
| FINAL CONSTRUCTION |
Once the body had been completed I added the windows, rear spoiler, side mirrors, windscreen wiper and aerial. The final touch was the addition of the bonnet and boot pins. The body was then attached to the lower body by carefully slotting the locator pins on each side. For display the body can be carefully removed by gently pushing against these points.
| CONCLUSIONS |
 I really like
building cars, almost as much as I do aircraft and bikes. This one was a
challenge with the complex decals and the amount of carbon fibre decals used in
the build. I would suggest that the decals really do not need setting solution,
although one or two areas may benefit from this as they fit around complex
shapes. Generally the decals are thin and go on very well. If you don’t tend to
try and out-think the smarty pants that designed them you will manage without
too much hassle.
I really like
building cars, almost as much as I do aircraft and bikes. This one was a
challenge with the complex decals and the amount of carbon fibre decals used in
the build. I would suggest that the decals really do not need setting solution,
although one or two areas may benefit from this as they fit around complex
shapes. Generally the decals are thin and go on very well. If you don’t tend to
try and out-think the smarty pants that designed them you will manage without
too much hassle.
This has been a great build and more so as it is a return to M2 for me in more than a few years of absence. I thoroughly recommend any semi-skilled modeller to have a go at the kit (this is more to do with the decaling side of things as the kit build is easy) and, as mentioned above, I have the Number 23 to build, to which I am looking forward.
| REFERENCES |
Mostly done by searching the web – preferred engine is Google, of course! The historical information has been unabashedly copied and slightly mangled for presentation in this article. Others know this car infinitely better than me, other than an occasional sight of the backside of a road-going version disappearing in the distance! They are a very fast bit of gear – almost as fast as my wonderful BMW K1200RS!
June 2007
Copyright ModelingMadness.com
If you would like your product reviewed fairly and fairly quickly, please contact the editor or see other details in the Note to Contributors.